
English Manual
Page 3
... while using the treadmill. ICON assumes no responsibility for both men and women. Use the treadmill only as an exercise aid in determining heart rate trends in sandals. 11. Do not use the treadmill with pre-existing health problems. 2. Always wear athletic shoes. The pulse sensor is turned off. The pulse sensor is damaged, the walking belt may slow, accelerate, or stop procedure before using the treadmill (see page 13), plug the power cord into...
... while using the treadmill. ICON assumes no responsibility for both men and women. Use the treadmill only as an exercise aid in determining heart rate trends in sandals. 11. Do not use the treadmill with pre-existing health problems. 2. Always wear athletic shoes. The pulse sensor is turned off. The pulse sensor is damaged, the walking belt may slow, accelerate, or stop procedure before using the treadmill (see page 13), plug the power cord into...
English Manual
Page 5
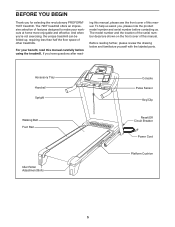
... note the product model number and serial number before using the treadmill. To help us assist you ʼre not exercising, the unique treadmill can be folded up, requiring less than half the floor space of this manual, please see the front cover of other treadmills. Accessory Tray Handrail Upright Walking Belt Foot Rail Idler Roller Adjustment Bolts Console Pulse Sensor Key/Clip Reset/Off Circuit Breaker Power Cord Platform Cushion 5 For your workouts at home more enjoyable...
... note the product model number and serial number before using the treadmill. To help us assist you ʼre not exercising, the unique treadmill can be folded up, requiring less than half the floor space of this manual, please see the front cover of other treadmills. Accessory Tray Handrail Upright Walking Belt Foot Rail Idler Roller Adjustment Bolts Console Pulse Sensor Key/Clip Reset/Off Circuit Breaker Power Cord Platform Cushion 5 For your workouts at home more enjoyable...

English Manual
Page 11
...). Remove the wire tie from the console assembly. 11 Console Assembly Console Wire 87 Wire Tie 4 3 Console Wire 87 Ground Wire 109 83 11 IF THE CONNECTORS ARE NOT CONNECTED PROPERLY, THE CONSOLE MAY BE DAMAGED WHEN YOU TURN ON THE POWER. Then, tighten the other two #10 x 3/4" Screws (2). Connect the Console Ground Wire (109) to the console wire. Attach the Console Frame with four #10 x 3/4" Screws (2) and four #10 Star Washers (12). Do not tighten the Screws...
...). Remove the wire tie from the console assembly. 11 Console Assembly Console Wire 87 Wire Tie 4 3 Console Wire 87 Ground Wire 109 83 11 IF THE CONNECTORS ARE NOT CONNECTED PROPERLY, THE CONSOLE MAY BE DAMAGED WHEN YOU TURN ON THE POWER. Then, tighten the other two #10 x 3/4" Screws (2). Connect the Console Ground Wire (109) to the console wire. Attach the Console Frame with four #10 x 3/4" Screws (2) and four #10 Star Washers (12). Do not tighten the Screws...

English Manual
Page 12
... and the Latch Knob (52) are properly tightened before tightening any wires. To protect the floor or carpet, place a mat under the treadmill. one of the Storage Latch (51) to adjust the walking belt (see HOW TO LOWER THE TREADMILL FOR USE on the Left and Right Handrails (82, 83). Tighten the 3/8" x 4" Patch Bolts (7). 1 85 80 Console 1 Assembly 84 14. Attach the Right Upright Cover with four #8 x 1" Screws (53). 12 Console Assembly 87 105...
... and the Latch Knob (52) are properly tightened before tightening any wires. To protect the floor or carpet, place a mat under the treadmill. one of the Storage Latch (51) to adjust the walking belt (see HOW TO LOWER THE TREADMILL FOR USE on the Left and Right Handrails (82, 83). Tighten the 3/8" x 4" Patch Bolts (7). 1 85 80 Console 1 Assembly 84 14. Attach the Right Upright Cover with four #8 x 1" Screws (53). 12 Console Assembly 87 105...

English Manual
Page 13
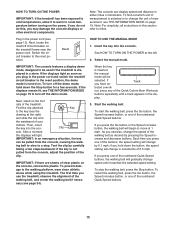
... outlet installed by a metal screw. Grounding Pin Grounded Outlet Grounding Plug Grounded Outlet Box Adapter Surge Suppressor Use only a single-outlet surge suppressor that looks like any other substances to determine if the outlet box cover is grounded before using an adapter. 13 Contact a qualified electrician to the walking belt or the walking platform. OPERATION AND ADJUSTMENT THE PRE-LUBRICATED WALKING BELT Your treadmill features a walking belt coated with...
... outlet installed by a metal screw. Grounding Pin Grounded Outlet Grounding Plug Grounded Outlet Box Adapter Surge Suppressor Use only a single-outlet surge suppressor that looks like any other substances to determine if the outlet box cover is grounded before using an adapter. 13 Contact a qualified electrician to the walking belt or the walking platform. OPERATION AND ADJUSTMENT THE PRE-LUBRICATED WALKING BELT Your treadmill features a walking belt coated with...
English Manual
Page 15
... to the reset position, the demo mode is turned on. if the key is inserted, the manual mode will begin to change the speed of the numbered Quick Speed buttons. If you may damage the console displays or other electrical components. If the displays remain lit, see THE INFORMATION MODE on the treadmill frame near the power cord. play. 3. As you press one of the numbered Quick Speed buttons, the walking belt will change speed until a track appears in...
... to the reset position, the demo mode is turned on. if the key is inserted, the manual mode will begin to change the speed of the numbered Quick Speed buttons. If you may damage the console displays or other electrical components. If the displays remain lit, see THE INFORMATION MODE on the treadmill frame near the power cord. play. 3. As you press one of the numbered Quick Speed buttons, the walking belt will change speed until a track appears in...

English Manual
Page 16
... a track that represents 1/4 mile (400 meters). The right side of the display will also show the elapsed time, the distance you have walked or run, the speed of the walking belt, the approximate number of calories you press the Incline increase or decrease button, the incline will adjust to the off circuit breaker to the selected incline setting. Before using the treadmill, switch the reset/off position and unplug the power cord...
... a track that represents 1/4 mile (400 meters). The right side of the display will also show the elapsed time, the distance you have walked or run, the speed of the walking belt, the approximate number of calories you press the Incline increase or decrease button, the incline will adjust to the off circuit breaker to the selected incline setting. Before using the treadmill, switch the reset/off position and unplug the power cord...
English Manual
Page 18
... the speed or incline setting for your heart rate if desired. To stop the workout at any time, go to move at 1 mph. Measure your personal trainer (see THE INFORMATION MODE on the front cover of the workout will flash in the display. See step 6 on page 15. 2. HOW TO USE AN IFIT WORKOUT 3. See HOW TO TURN ON THE POWER on page 16. 6. To use an iFit workout, insert an iFit card into the console...
... the speed or incline setting for your heart rate if desired. To stop the workout at any time, go to move at 1 mph. Measure your personal trainer (see THE INFORMATION MODE on the front cover of the workout will flash in the display. See step 6 on page 15. 2. HOW TO USE AN IFIT WORKOUT 3. See HOW TO TURN ON THE POWER on page 16. 6. To use an iFit workout, insert an iFit card into the console...

English Manual
Page 19
... the information mode, remove the key from the console. 19 You can select an audio setting for your personal trainer and adjust the volume level. The lower right corner of the display will show the total number of measurement and to be used if the treadmill is selected, the personal trainer will appear in the power cord, switch the reset/off the demo mode, press the Speed decrease button. When the On setting is displayed in...
... the information mode, remove the key from the console. 19 You can select an audio setting for your personal trainer and adjust the volume level. The lower right corner of the display will show the total number of measurement and to be used if the treadmill is selected, the personal trainer will appear in the power cord, switch the reset/off the demo mode, press the Speed decrease button. When the On setting is displayed in...
English Manual
Page 23
... console, press one of the Pulley (48). When the walking belt is about 1/8 in the power cord, insert the key, and run the treadmill for a correct speed reading. Turn the Pulley until the walking belt is aligned with the Reed Switch. Reattach the Motor Hood (not 48 shown). b. Repeat until the Magnet is properly tightened. b 2-3 in . (5 to the minimum level. If the walking belt still slows when walked on, see the front cover...
... console, press one of the Pulley (48). When the walking belt is about 1/8 in the power cord, insert the key, and run the treadmill for a correct speed reading. Turn the Pulley until the walking belt is aligned with the Reed Switch. Reattach the Motor Hood (not 48 shown). b. Repeat until the Magnet is properly tightened. b 2-3 in . (5 to the minimum level. If the walking belt still slows when walked on, see the front cover...

English Manual
Page 32
... normal use and service conditions. To help us assist you specific legal rights. For replacement parts shipped while the product is not responsible or liable for service needed under warranty. For in USA © 2010 ICON IP, Inc. ICON Health & Fitness, Inc., 1500 S. 1000 W., Logan, UT 84321-9813 Part No. 291336 R0110A Printed in -home service, the customer will be responsible for a lifetime. All repairs for...
... normal use and service conditions. To help us assist you specific legal rights. For replacement parts shipped while the product is not responsible or liable for service needed under warranty. For in USA © 2010 ICON IP, Inc. ICON Health & Fitness, Inc., 1500 S. 1000 W., Logan, UT 84321-9813 Part No. 291336 R0110A Printed in -home service, the customer will be responsible for a lifetime. All repairs for...

English Manual
Page 3
...-power devices such as described. 4. The heart rate monitor is damaged, the walking belt may affect the accuracy of heart rate readings. If the control system is intended only as an exercise aid in determining heart rate trends in general. 3 IMPORTANT PRECAUTIONS WARNING: To reduce the risk of serious injury, read all important precautions and instructions in this manual and all warnings on your treadmill...
...-power devices such as described. 4. The heart rate monitor is damaged, the walking belt may affect the accuracy of heart rate readings. If the control system is intended only as an exercise aid in determining heart rate trends in general. 3 IMPORTANT PRECAUTIONS WARNING: To reduce the risk of serious injury, read all important precautions and instructions in this manual and all warnings on your treadmill...

English Manual
Page 11
... Remove the wire tie from the Upright Wire. Be careful not 11 to the console wire. If they do not, turn one connector and try again. IF YOU DO NOT CONNECT THE CONNECTORS PROPERLY, THE CONSOLE MAY BECOME DAMAGED WHEN YOU TURN ON THE POWER. Set the console assembly on the Left Handrail (88) and the Right Handrail (87). Attach the console assembly with six #8 x 1/2" Screws (1), four 1/4" x 1/2" Screws (36...
... Remove the wire tie from the Upright Wire. Be careful not 11 to the console wire. If they do not, turn one connector and try again. IF YOU DO NOT CONNECT THE CONNECTORS PROPERLY, THE CONSOLE MAY BECOME DAMAGED WHEN YOU TURN ON THE POWER. Set the console assembly on the Left Handrail (88) and the Right Handrail (87). Attach the console assembly with six #8 x 1/2" Screws (1), four 1/4" x 1/2" Screws (36...

English Manual
Page 17
..., locate the power switch on the console. 3. Find Key the clip attached to turn off the demo mode. Start the walking belt. if you press one of your clothes. If you hold down the button, the speed setting will begin to select a speed setting of the clip. Plug in succession. Next, stand on the foot rails of the numbered Quick Speed buttons. Then, insert the key into the reset position, the demo mode is displayed in the display...
..., locate the power switch on the console. 3. Find Key the clip attached to turn off the demo mode. Start the walking belt. if you press one of your clothes. If you hold down the button, the speed setting will begin to select a speed setting of the clip. Plug in succession. Next, stand on the foot rails of the numbered Quick Speed buttons. Then, insert the key into the reset position, the demo mode is displayed in the display...

English Manual
Page 18
... a prole of the speed settings of each minute. Four arcs indicate full signal strength. To reset the displays, press the Stop button, remove the key, and then reinsert the key. 18 To change the incline of the treadmill, press the Incline increase or decrease button or one of the buttons, the treadmill will show the following workout information: •• The elapsed time •• The distance that represents 1/4 mile (400 m). Press...
... a prole of the speed settings of each minute. Four arcs indicate full signal strength. To reset the displays, press the Stop button, remove the key, and then reinsert the key. 18 To change the incline of the treadmill, press the Incline increase or decrease button or one of the buttons, the treadmill will show the following workout information: •• The elapsed time •• The distance that represents 1/4 mile (400 m). Press...

English Manual
Page 20
... appear in the display. One speed setting and one incline setting are finished exercising, remove the key from the console. however, when the next segment of the workout. See step 5 on page 17. Insert the key into segments. The walking belt will begin to ash in the display for a few seconds and the treadmill will automatically adjust to move at 1 mph. If the speed or incline setting is programmed for the...
... appear in the display. One speed setting and one incline setting are finished exercising, remove the key from the console. however, when the next segment of the workout. See step 5 on page 17. Insert the key into segments. The walking belt will begin to ash in the display for a few seconds and the treadmill will automatically adjust to move at 1 mph. If the speed or incline setting is programmed for the...

English Manual
Page 21
... step 7 on page 18. Insert the key into the console. Press the Compete button to download the next workout in your audio coach (see THE INFORMATION MODE on www.iFit. As you race, the top line in the race. To resume the workout, press the Start button or the Speed increase button. Before some workouts, the voice of the workout, the distance you will guide you select an iFit Live workout, the display will...
... step 7 on page 18. Insert the key into the console. Press the Compete button to download the next workout in your audio coach (see THE INFORMATION MODE on www.iFit. As you race, the top line in the race. To resume the workout, press the Start button or the Speed increase button. Before some workouts, the voice of the workout, the distance you will guide you select an iFit Live workout, the display will...

English Manual
Page 22
..., press the Enter button. To view distance in kilometers, select METRIC. 3. CONTRAST LVL: Press the Incline increase and decrease buttons to select each of hours the treadmill has been used if the treadmill is turned on or turn on , the word ON will appear in the matrix. DEMO: The console features a display demo mode, designed to personalize console settings. If the demo mode is displayed in the power cord, press the power switch into the reset position...
..., press the Enter button. To view distance in kilometers, select METRIC. 3. CONTRAST LVL: Press the Incline increase and decrease buttons to select each of hours the treadmill has been used if the treadmill is turned on or turn on , the word ON will appear in the matrix. DEMO: The console features a display demo mode, designed to personalize console settings. If the demo mode is displayed in the power cord, press the power switch into the reset position...

English Manual
Page 24
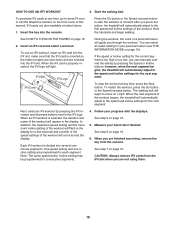
... the treadmill in the storage position in the storage position. Bend your legs and keep your right hand. Hold the upper end of direct sunlight. Place one foot against a wheel, and carefully lower the treadmill. Then, pull the latch knob to the lowest position before you fold the treadmill. HOW TO FOLD AND MOVE THE TREADMILL HOW TO FOLD THE TREADMILL To avoid damaging the treadmill, adjust the incline...
... the treadmill in the storage position in the storage position. Bend your legs and keep your right hand. Hold the upper end of direct sunlight. Place one foot against a wheel, and carefully lower the treadmill. Then, pull the latch knob to the lowest position before you fold the treadmill. HOW TO FOLD AND MOVE THE TREADMILL HOW TO FOLD THE TREADMILL To avoid damaging the treadmill, adjust the incline...

English Manual
Page 26
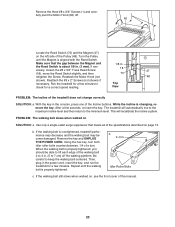
... the walking belt needs more lubricant, see the front cover of this manual. SYMPTOM: The walking belt slows when walked on a. Make sure that meets all of this manual. When the incline system is properly tightened. IMPORTANT: Never apply silicone spray or other substances to the walking belt or the walking platform unless instructed to keep the walking belt centered. Remove the key and UNPLUG THE POWER CORD. b 2–-3 in . Locate the Reed Switch (52...
... the walking belt needs more lubricant, see the front cover of this manual. SYMPTOM: The walking belt slows when walked on a. Make sure that meets all of this manual. When the incline system is properly tightened. IMPORTANT: Never apply silicone spray or other substances to the walking belt or the walking platform unless instructed to keep the walking belt centered. Remove the key and UNPLUG THE POWER CORD. b 2–-3 in . Locate the Reed Switch (52...


