
Uk Manual
Page 3
... incline of the treadmill is about to change. Never leave the treadmill unattended whilst it is turned off. The pulse sensors are recommended for speed and/or incline changes. Athletic support clothes are not medical devices. When replacing the fuse, an ASTA approved BS1362 type should be fitted to the fuse carrier. Keep the power cord away from moisture and dust. When using iFIT.com CDs and videos...
... incline of the treadmill is about to change. Never leave the treadmill unattended whilst it is turned off. The pulse sensors are recommended for speed and/or incline changes. Athletic support clothes are not medical devices. When replacing the fuse, an ASTA approved BS1362 type should be fitted to the fuse carrier. Keep the power cord away from moisture and dust. When using iFIT.com CDs and videos...
Uk Manual
Page 4
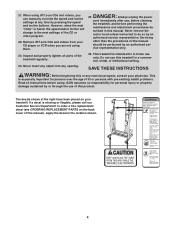
..., or institutional setting. 24. Do not use only. Never remove the motor hood unless instructed to order a free replacement decal (see ORDERING REPLACEMENT PARTS on your CD player or VCR when you can manually override the speed and incline settings at the right have been placed on the back cover of the CD or video program. 22. This is intended for in-home use this treadmill in this manual). ICON assumes no...
..., or institutional setting. 24. Do not use only. Never remove the motor hood unless instructed to order a free replacement decal (see ORDERING REPLACEMENT PARTS on your CD player or VCR when you can manually override the speed and incline settings at the right have been placed on the back cover of the CD or video program. 22. This is intended for in-home use this treadmill in this manual). ICON assumes no...
Uk Manual
Page 5
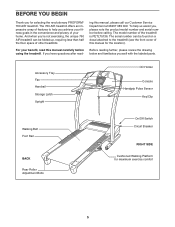
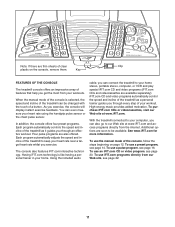
... Tray Fan Handrail Storage Latch Upright CD Holder Console Handgrip Pulse Sensor Key/Clip Walking Belt Foot Rail BACK Rear Roller Adjustment Bolts On/Off Switch Circuit Breaker RIGHT SIDE Cushioned Walking Platform for selecting the revolutionary PROFORM® 760 AIR treadmill. The model number of this manual for the location). And when you're not exercising, the unique 760 AIR treadmill can be folded up, requiring less than half the floor space of your fitness goals in the convenience...
... Tray Fan Handrail Storage Latch Upright CD Holder Console Handgrip Pulse Sensor Key/Clip Walking Belt Foot Rail BACK Rear Roller Adjustment Bolts On/Off Switch Circuit Breaker RIGHT SIDE Cushioned Walking Platform for selecting the revolutionary PROFORM® 760 AIR treadmill. The model number of this manual for the location). And when you're not exercising, the unique 760 AIR treadmill can be folded up, requiring less than half the floor space of your fitness goals in the convenience...
Uk Manual
Page 8
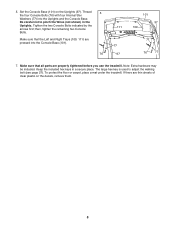
... hex keys in the Uprights. The large hex key is used to pinch the Wires (not shown) in a secure place. If there are pressed into the Uprights and the Console Base. To protect the floor or carpet, place a mat under the treadmill. Note: Extra hardware may be included. Be careful not to adjust the walking belt (see page 27). Tighten the two Console Bolts indicated...
... hex keys in the Uprights. The large hex key is used to pinch the Wires (not shown) in a secure place. If there are pressed into the Uprights and the Console Base. To protect the floor or carpet, place a mat under the treadmill. Note: Extra hardware may be included. Be careful not to adjust the walking belt (see page 27). Tighten the two Console Bolts indicated...

Uk Manual
Page 9
... treadmill, position yourself near the centre of the walking belt. Adjust the length of the chest strap, if necessary. Make sure that you walk or run on the sensor unit. Return the sensor unit to work with people who have normal heart rhythms. Heart rate reading problems may remain activated longer than necessary, draining the battery prematurely. • Store the chest pulse sensor in a warm, dry place. the chest pulse sensor...
... treadmill, position yourself near the centre of the walking belt. Adjust the length of the chest strap, if necessary. Make sure that you walk or run on the sensor unit. Return the sensor unit to work with people who have normal heart rhythms. Heart rate reading problems may remain activated longer than necessary, draining the battery prematurely. • Store the chest pulse sensor in a warm, dry place. the chest pulse sensor...

Uk Manual
Page 10
OPERATION AND ADJUSTMENT THE PERFORMANT LUBE™ WALKING BELT Your treadmill features a walking belt coated with GFCI-equipped outlets. If it should malfunction or break down, earthing provides a path of least resistance for electric cur- 1 rent to reduce the risk of the power cord and tighten the screw in the adapter. Socket on the treadmill. Plug the power cord into the metal clips in doubt as shown...
OPERATION AND ADJUSTMENT THE PERFORMANT LUBE™ WALKING BELT Your treadmill features a walking belt coated with GFCI-equipped outlets. If it should malfunction or break down, earthing provides a path of least resistance for electric cur- 1 rent to reduce the risk of the power cord and tighten the screw in the adapter. Socket on the treadmill. Plug the power cord into the metal clips in doubt as shown...
Uk Manual
Page 11
... trainer in your heart rate using the handgrip pulse sensor or the chest pulse sensor. Four pulse programs are soon to keep your workouts. Each program automatically adjusts the speed and incline of the treadmill to be changed with the touch of the console, follow the steps beginning on the console, remove them. Additional options are also offered. To use the manual mode of a button. To use iFIT.com programs directly from your heart rate near a target heart rate whilst you exercise, the console will display instant exercise...
... trainer in your heart rate using the handgrip pulse sensor or the chest pulse sensor. Four pulse programs are soon to keep your workouts. Each program automatically adjusts the speed and incline of the treadmill to be changed with the touch of the console, follow the steps beginning on the console, remove them. Additional options are also offered. To use the manual mode of a button. To use iFIT.com programs directly from your heart rate near a target heart rate whilst you exercise, the console will display instant exercise...
Uk Manual
Page 12
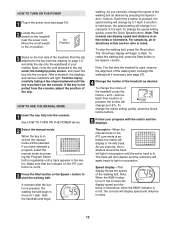
... pulse sensor, and insert the key into the console. The track will then darken and the indicators will change the incline of the clip. Note: When the KM/H indicator is pressed, the incline will again begin walking. HOW TO TURN ON THE POWER 1 Plug in the power cord (see page 10). 2 Locate the on/off switch to start the walking belt. Note: The first time the treadmill is pressed, the speed setting will light. buttons...
... pulse sensor, and insert the key into the console. The track will then darken and the indicators will change the incline of the clip. Note: When the KM/H indicator is pressed, the incline will again begin walking. HOW TO TURN ON THE POWER 1 Plug in the power cord (see page 10). 2 Locate the on/off switch to start the walking belt. Note: The first time the treadmill is pressed, the speed setting will light. buttons...
Uk Manual
Page 13
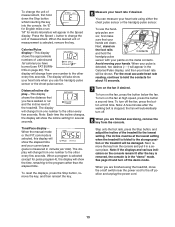
... exercising, remove the key from one number to the lowest setting. For the most accurate heart rate reading, continue to the other every few seconds. The display will appear in the "demo" mode. To reset the displays, press the Stop button, remove the key, and then reinsert the key. 6 Measure your heart rate using the treadmill, move the on the metal contacts. To turn on the fan if desired. To use the handgrip pulse sensor or the chest pulse sensor...
... exercising, remove the key from one number to the lowest setting. For the most accurate heart rate reading, continue to the other every few seconds. The display will appear in the "demo" mode. To reset the displays, press the Stop button, remove the key, and then reinsert the key. 6 Measure your heart rate using the treadmill, move the on the metal contacts. To turn on the fan if desired. To use the handgrip pulse sensor or the chest pulse sensor...

Uk Manual
Page 15
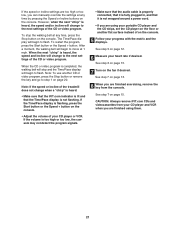
... off the demo mode. To restart the program, press the Start button or the Speed + button. When you are finished using the treadmill, move at 1 mph. When the next segment of the treadmill is in a secure place. The Time/Pace display will automatically adjust to flash. The walking belt will begin to the speed and incline settings for the next segment. 4 Follow your heart rate if desired. Next, remove the key from the console.
... off the demo mode. To restart the program, press the Start button or the Speed + button. When you are finished using the treadmill, move at 1 mph. When the next segment of the treadmill is in a secure place. The Time/Pace display will automatically adjust to flash. The walking belt will begin to the speed and incline settings for the next segment. 4 Follow your heart rate if desired. Next, remove the key from the console.

Uk Manual
Page 17
... heart rate, the incline of the program (see CHEST PULSE SENSOR TROUBLESHOOTING on page 9. During each time the console compares your progress with the Speed or Incline buttons. If the speed or incline setting is too high or too low at any time, press the Stop button. If this occurs, see step 6 on page 13. 10 When you can adjust the setting with the displays. 7 Press the Start button or the Speed + button to the current target heart rate...
... heart rate, the incline of the program (see CHEST PULSE SENSOR TROUBLESHOOTING on page 9. During each time the console compares your progress with the Speed or Incline buttons. If the speed or incline setting is too high or too low at any time, press the Stop button. If this occurs, see step 6 on page 13. 10 When you can adjust the setting with the displays. 7 Press the Start button or the Speed + button to the current target heart rate...

Uk Manual
Page 20
... your VCR. Plug the other end of the treadmill is being used, see instruction B. See HOW TO TURN ON THE POWER on your workout. A moment after the button is flashing. Note: If the Time/Pace display is inserted, the manual mode will not respond to 20. In some instances, the speed and/or incline may change before the personal trainer describes the change . IN VIDEO AUDIO IN CH...
... your VCR. Plug the other end of the treadmill is being used, see instruction B. See HOW TO TURN ON THE POWER on your workout. A moment after the button is flashing. Note: If the Time/Pace display is inserted, the manual mode will not respond to 20. In some instances, the speed and/or incline may change before the personal trainer describes the change . IN VIDEO AUDIO IN CH...
Uk Manual
Page 21
... change to the next settings of the CD or video program. Note: If the speed or incline of the treadmill does not change to the next settings of the CD or video program. See step 5 on the console. 5 Follow your CD player or VCR. CAUTION: Always remove iFIT.com CDs and videocassettes from the console. The Time/Pace display will stop the walking belt at any time by pressing the Speed or Incline buttons...
... change to the next settings of the CD or video program. Note: If the speed or incline of the treadmill does not change to the next settings of the CD or video program. See step 5 on the console. 5 Follow your CD player or VCR. CAUTION: Always remove iFIT.com CDs and videocassettes from the console. The Time/Pace display will stop the walking belt at any time by pressing the Speed or Incline buttons...

Uk Manual
Page 22
... the speed or incline of the treadmill does not change to move . Note: To use a program from our Web site. 1 Insert the key into the console. See step 7 on page 15. 7 Return to move at www.iFIT.com. 5 Follow the desired links on -line instructions to start an internet connection. 4 Start your home computer. To stop and the Time/Pace display will begin. See HOW TO TURN ON THE POWER on...
... the speed or incline of the treadmill does not change to move . Note: To use a program from our Web site. 1 Insert the key into the console. See step 7 on page 15. 7 Return to move at www.iFIT.com. 5 Follow the desired links on -line instructions to start an internet connection. 4 Start your home computer. To stop and the Time/Pace display will begin. See HOW TO TURN ON THE POWER on...
Uk Manual
Page 26
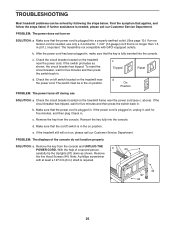
... extension cord is needed , please call our Customer Service Department. c. Check the on/off switch located on the treadmill near the power cord. If the power cord is fully inserted into the console. d. PROBLEM: The displays of a second person, 44 carefully tip the Uprights (97) down as shown, the circuit breaker has tripped. Remove the key from the console. Remove the five Hood Screws (44). PROBLEM: The power does not turn on the treadmill...
... extension cord is needed , please call our Customer Service Department. c. Check the on/off switch located on the treadmill near the power cord. If the power cord is fully inserted into the console. d. PROBLEM: The displays of a second person, 44 carefully tip the Uprights (97) down as shown, the circuit breaker has tripped. Remove the key from the console. Remove the five Hood Screws (44). PROBLEM: The power does not turn on the treadmill...
Uk Manual
Page 27
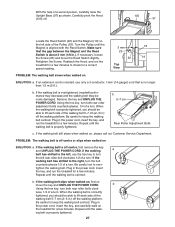
... the Hood (105) off the walking platform. Turn the Pulley until the walking belt is aligned with the Reed Switch. If necessary, loosen the Screw (23) and move the key and UNPLUG THE POWER CORD. Repeat until the Magnet is properly tightened. move the Reed Switch slightly. 22 19 Retighten the Screw. b Using the hex key, turn . Be careful to keep the walking belt centred. Plug in the power cord, insert the key, and run the treadmill for...
... the Hood (105) off the walking platform. Turn the Pulley until the walking belt is aligned with the Reed Switch. If necessary, loosen the Screw (23) and move the key and UNPLUG THE POWER CORD. Repeat until the Magnet is properly tightened. move the Reed Switch slightly. 22 19 Retighten the Screw. b Using the hex key, turn . Be careful to keep the walking belt centred. Plug in the power cord, insert the key, and run the treadmill for...

Uk Manual
Page 29
... aerobic exercise, adjust the speed and incline of the treadmill until your heart rate is especially important for fat burning and aerobic exercise. WORKOUT GUIDELINES Each workout should include the following guidelines will help you may affect the accuracy of the chart (ages are recommended heart rates for longer than 20 minutes.) Breathe regularly and deeply as a guide. Next, find your heart rate during exercise, use stored fat...
... aerobic exercise, adjust the speed and incline of the treadmill until your heart rate is especially important for fat burning and aerobic exercise. WORKOUT GUIDELINES Each workout should include the following guidelines will help you may affect the accuracy of the chart (ages are recommended heart rates for longer than 20 minutes.) Breathe regularly and deeply as a guide. Next, find your heart rate during exercise, use stored fat...

Uk Manual
Page 30
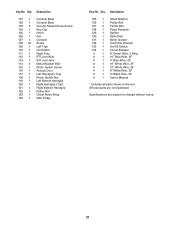
... Motor Tension Washer Audio Wire Motor Belt Idler Arm Assembly Idler Pivot Bolt Motor Idler Arm Lift Frame Spring Walking Platform Nut Idler Arm Spring Incline Motor Incline Motor Bolt 1/4" Washer Motor Bushing Front Roller Adj. PART LIST-Model No. Qty. Key No. Qty. Description Key No. Bolt Walking Platform Screw (Front) Transformer Hood Screw/Console Screw Left Handrail Right Handrail UK Adapter Controller Power Cord Receptical 51 2 Static Decal 52 10 3/4" Tek Screw 53 3 Belly Pan Clip 54 1 Belly Pan 55 1 Releasable Tie 56 1 Latch Pin Collar...
... Motor Tension Washer Audio Wire Motor Belt Idler Arm Assembly Idler Pivot Bolt Motor Idler Arm Lift Frame Spring Walking Platform Nut Idler Arm Spring Incline Motor Incline Motor Bolt 1/4" Washer Motor Bushing Front Roller Adj. PART LIST-Model No. Qty. Key No. Qty. Description Key No. Bolt Walking Platform Screw (Front) Transformer Hood Screw/Console Screw Left Handrail Right Handrail UK Adapter Controller Power Cord Receptical 51 2 Static Decal 52 10 3/4" Tek Screw 53 3 Belly Pan Clip 54 1 Belly Pan 55 1 Releasable Tie 56 1 Latch Pin Collar...
Uk Manual
Page 31
... 1 Motor Isolator 132 1 Controller Bracket 133 1 On/Off Switch 134 1 Circuit Breaker # 1 8" Green Wire, 2 Ring # 1 10" Blue Wire, 2F # 1 4" Blue Wire, 2F # 1 16" White Wire, 2F # 1 10" White Wire, 2F # 1 8" White Wire, 2F # 1 4" Black Wire, 2F # 1 User's Manual * Includes all parts shown in the box #These parts are not illustrated Specifications are subject to change without notice. 31 Key No. Description 101 1 Console Base 102 1 Console Back 103 8 Ground Screw...
... 1 Motor Isolator 132 1 Controller Bracket 133 1 On/Off Switch 134 1 Circuit Breaker # 1 8" Green Wire, 2 Ring # 1 10" Blue Wire, 2F # 1 4" Blue Wire, 2F # 1 16" White Wire, 2F # 1 10" White Wire, 2F # 1 8" White Wire, 2F # 1 4" Black Wire, 2F # 1 User's Manual * Includes all parts shown in the box #These parts are not illustrated Specifications are subject to change without notice. 31 Key No. Description 101 1 Console Base 102 1 Console Back 103 8 Ground Screw...
Uk Manual
Page 34
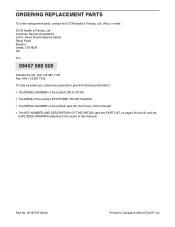
... us assist you, please be prepared to give the following information: • The MODEL NUMBER of the product (PETL75136) • The NAME of the product (PROFORM® 760 AIR treadmill) • The SERIAL NUMBER of the product (see the front cover of this manual) • The KEY NUMBER AND DESCRIPTION OF THE PART(S) (see the PART LIST on pages 30 and 31 and the EXPLODED DRAWING...
... us assist you, please be prepared to give the following information: • The MODEL NUMBER of the product (PETL75136) • The NAME of the product (PROFORM® 760 AIR treadmill) • The SERIAL NUMBER of the product (see the front cover of this manual) • The KEY NUMBER AND DESCRIPTION OF THE PART(S) (see the PART LIST on pages 30 and 31 and the EXPLODED DRAWING...


