
English Manual
Page 1
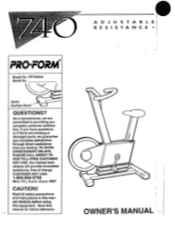
ADJUSTABLE RESISTANCE PRO•FORM Model No. As a manufacturer, we guarantee you complete customer satisfaction. Our trained technicians will provide immediate assistance, free of charge. ual carefully before using this manual for future reference. 0 OWNER'S MANUAL TO AVOID UNNECESSARY DELAYS, PLEASE CALL DIRECT TO OUR TOLL-FREE CUSTOMER HOT LINE. CUSTOMER HOT LINE: 1-800-999-3756 Mon.-Fri., 6 a.m.-6 p.m. Save this equipment. drAlenn+O. PF740030 Serial No...
ADJUSTABLE RESISTANCE PRO•FORM Model No. As a manufacturer, we guarantee you complete customer satisfaction. Our trained technicians will provide immediate assistance, free of charge. ual carefully before using this manual for future reference. 0 OWNER'S MANUAL TO AVOID UNNECESSARY DELAYS, PLEASE CALL DIRECT TO OUR TOLL-FREE CUSTOMER HOT LINE. CUSTOMER HOT LINE: 1-800-999-3756 Mon.-Fri., 6 a.m.-6 p.m. Save this equipment. drAlenn+O. PF740030 Serial No...
English Manual
Page 2
... the exercise bike on a level surface. 2. Keep small children away from the exercise bike at all instructions before using the exercise bike. 1. Wear appropriate clothing when using the exercise bike; Use the exercise bike only as described in the exercise bike. TABLE OF CONTENTS IMPORTANT SAFETY PRECAUTIONS BEFORE YOU BEGIN ASSEMBLY OPERATION AND ADJUSTMENT ELECTRONIC MONITOR OPERATION MAINTENANCE AND TROUBLE-SHOOTING CONDITIONING GUIDELINES PART LIST EXPLODED DRAWING ORDERING REPLACEMENT PARTS LIMITED WARRANTY 2 3 4 5 6 7 8 10 11 Back Cover Back Cover IMPORTANT...
... the exercise bike on a level surface. 2. Keep small children away from the exercise bike at all instructions before using the exercise bike. 1. Wear appropriate clothing when using the exercise bike; Use the exercise bike only as described in the exercise bike. TABLE OF CONTENTS IMPORTANT SAFETY PRECAUTIONS BEFORE YOU BEGIN ASSEMBLY OPERATION AND ADJUSTMENT ELECTRONIC MONITOR OPERATION MAINTENANCE AND TROUBLE-SHOOTING CONDITIONING GUIDELINES PART LIST EXPLODED DRAWING ORDERING REPLACEMENT PARTS LIMITED WARRANTY 2 3 4 5 6 7 8 10 11 Back Cover Back Cover IMPORTANT...
English Manual
Page 3
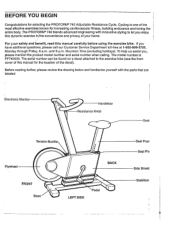
... innovative styling to the exercise bike (see the front cover of the most effective exercises known for increasing cardiovascular fitness, building endurance and toning the entire body. The model number is one of this manual carefully before using the exercise bike. Mountain Time (excluding holidays). Cycling is PF740030. Electronic Monitor Handlebar O Resistance Knob Seat Tension Buckle Flywheel FRONT Base BACK LEFT SIDE Pedal Seat Post Seat Pin Side Shield Stabilizer...
... innovative styling to the exercise bike (see the front cover of the most effective exercises known for increasing cardiovascular fitness, building endurance and toning the entire body. The model number is one of this manual carefully before using the exercise bike. Mountain Time (excluding holidays). Cycling is PF740030. Electronic Monitor Handlebar O Resistance Knob Seat Tension Buckle Flywheel FRONT Base BACK LEFT SIDE Pedal Seat Post Seat Pin Side Shield Stabilizer...

English Manual
Page 4
... direction the batteries must be turned. Plug the Sensor Wire (38) into the Frame (31) and slide the Handlebar Post (3) onto the Frame. CAUTION: Be careful to the desired height, making sure that the Seat Post Bushing remains in the Frame (31). Open the battery cover and carefully remove the battery clip. Slide the Seat Post (27) into the right arm of the Crank (33). Connect...
... direction the batteries must be turned. Plug the Sensor Wire (38) into the Frame (31) and slide the Handlebar Post (3) onto the Frame. CAUTION: Be careful to the desired height, making sure that the Seat Post Bushing remains in the Frame (31). Open the battery cover and carefully remove the battery clip. Slide the Seat Post (27) into the right arm of the Crank (33). Connect...
English Manual
Page 5
... can be changed using the Resistance Knob (34) in front of the electronic monitor. CAUTION: The Seat Pin must be adjusted. IMPORTANT: Stop turning the Knob when turning becomes difficult, or the Knob may be a slight bend in the Frame (31). See MAINTENANCE AND TROUBLESHOOTING on page 7 of this manual. Adjust the Seat Post (27) to decrease the resistance, turn the Knob clockwise; To increase the resistance, turn the Knob counterclockwise. As you pedal, there...
... can be changed using the Resistance Knob (34) in front of the electronic monitor. CAUTION: The Seat Pin must be adjusted. IMPORTANT: Stop turning the Knob when turning becomes difficult, or the Knob may be a slight bend in the Frame (31). See MAINTENANCE AND TROUBLESHOOTING on page 7 of this manual. Adjust the Seat Post (27) to decrease the resistance, turn the Knob clockwise; To increase the resistance, turn the Knob counterclockwise. As you pedal, there...

English Manual
Page 6
... miles per hour. The modes will all modes. 2. On/off button-Turns the power on page 4 of the five modes: A. Select one of this manual, for five seconds each, in miles. When you have burned. DISTANCE-Displays the total distance you are pedaling. See assembly step 4 on and off automatically to conserve the batteries. The SPEED, TIME, DISTANCE and CALORIE modes will be slightly lower or higher than the number displayed. SPEED, TIME, DISTANCE...
... miles per hour. The modes will all modes. 2. On/off button-Turns the power on page 4 of the five modes: A. Select one of this manual, for five seconds each, in miles. When you have burned. DISTANCE-Displays the total distance you are pedaling. See assembly step 4 on and off automatically to conserve the batteries. The SPEED, TIME, DISTANCE and CALORIE modes will be slightly lower or higher than the number displayed. SPEED, TIME, DISTANCE...
English Manual
Page 7
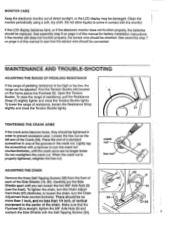
... the chain. See assembly step 7 on the frame above the Flywheel (8). Find the Tension Buckle (42) located 8 on page 4 of resistance, pull the Resistance Strap (7) slightly tighter and close the Tension Buckle tightly. Open the Tension Buckle. To raise the range of this manual for battery installation instructions. Do not overtighten the crank nut. ADJUSTING THE CHAIN Remove the three Self-Tapping Screws (35) from...
... the chain. See assembly step 7 on the frame above the Flywheel (8). Find the Tension Buckle (42) located 8 on page 4 of resistance, pull the Resistance Strap (7) slightly tighter and close the Tension Buckle tightly. Open the Tension Buckle. To raise the range of this manual for battery installation instructions. Do not overtighten the crank nut. ADJUSTING THE CHAIN Remove the three Self-Tapping Screws (35) from...
English Manual
Page 8
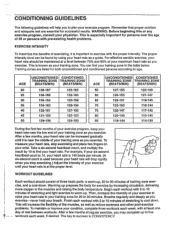
... gradually until your heart rate is used because your heart rate will drop rapidly when you may complete up . To measure your heart rate, stop exercising.) Adjust the intensity of your exercise ) until it is especially Important for both unconditioned and conditioned persons according to 30 minutes of stretching and light exercise to your training zone for successful results. WORKOUT GUIDELINES Each workout should be...
... gradually until your heart rate is used because your heart rate will drop rapidly when you may complete up . To measure your heart rate, stop exercising.) Adjust the intensity of your exercise ) until it is especially Important for both unconditioned and conditioned persons according to 30 minutes of stretching and light exercise to your training zone for successful results. WORKOUT GUIDELINES Each workout should be...

English Manual
Page 9
...your toes as far as possible. Bring the sole of the opposite c foot toward the wall. Stretches: Hamstrings, lower back and groin. Bend your front leg, lean forward and move your back foot flat on the floor. Repeat 3 times for 15 counts, then relax. Repeat 3 times. ...legs. Move slowly as you reach down . Allow your back and shoulders to your toes as far as well. Repeat 3 times for 15 counts, then relax. CALF/ACHILLES STRETCH With one leg extended. Hold for each stretch is shown in front of the achilles tendons, bend your extended leg. Correct form...
...your toes as far as possible. Bring the sole of the opposite c foot toward the wall. Stretches: Hamstrings, lower back and groin. Bend your front leg, lean forward and move your back foot flat on the floor. Repeat 3 times for 15 counts, then relax. Repeat 3 times. ...legs. Move slowly as you reach down . Allow your back and shoulders to your toes as far as well. Repeat 3 times for 15 counts, then relax. CALF/ACHILLES STRETCH With one leg extended. Hold for each stretch is shown in front of the achilles tendons, bend your extended leg. Correct form...
English Manual
Page 10
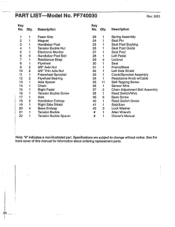
... 11 36 1 37 2 38 1 39 6 40 1 41 1 42 3 1 # 1 Spring Assembly Seat Pin Seat Post Bushing Seat Post Guide Seat Post Left Pedal Locknut Seat Frame/Base Left Side Shield Crank/Sprocket Assembly Resistance Knob w/Cable Self-Tapping Screw Sensor Wire Chain Adjustment Bolt Assembly Reed Switch/Wire Base Screw Reed Switch Screw Stabilizer Lock Washer Allen Wrench Owner's Manual Note: "#" indicates a non-illustrated part. See the back cover of this manual for information about ordering replacement parts. PART LIST Model No. Description 1 1 2 1 3 1 4 1 5 1 6 3 7 1 8 1 9 2 10 2 11 1 12 2 13 1 14...
... 11 36 1 37 2 38 1 39 6 40 1 41 1 42 3 1 # 1 Spring Assembly Seat Pin Seat Post Bushing Seat Post Guide Seat Post Left Pedal Locknut Seat Frame/Base Left Side Shield Crank/Sprocket Assembly Resistance Knob w/Cable Self-Tapping Screw Sensor Wire Chain Adjustment Bolt Assembly Reed Switch/Wire Base Screw Reed Switch Screw Stabilizer Lock Washer Allen Wrench Owner's Manual Note: "#" indicates a non-illustrated part. See the back cover of this manual for information about ordering replacement parts. PART LIST Model No. Description 1 1 2 1 3 1 4 1 5 1 6 3 7 1 8 1 9 2 10 2 11 1 12 2 13 1 14...
English Manual
Page 11
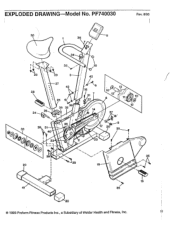
PF740030 Rev. 8/93 30 ) 5 36 34 r•. i 35 18 29 29 3 42 27 S 42 6 12 28 • 26 6 .1 16 21 • 22 10 13 8 11 10 24 25 • 38 35 32 12 14 /i 37 4 6.1 38 33 39 31 40 •••et„..- 9 17 20 • 35 33 23 -. 1 39 35 20 1 39 19 15 41 35 20 © 1993 Proform Fitness Products Inc., a Subsidiary of Weider Health and Fitness, Inc. 11 EXPLODED DRAWING Model No.
PF740030 Rev. 8/93 30 ) 5 36 34 r•. i 35 18 29 29 3 42 27 S 42 6 12 28 • 26 6 .1 16 21 • 22 10 13 8 11 10 24 25 • 38 35 32 12 14 /i 37 4 6.1 38 33 39 31 40 •••et„..- 9 17 20 • 35 33 23 -. 1 39 35 20 1 39 19 15 41 35 20 © 1993 Proform Fitness Products Inc., a Subsidiary of Weider Health and Fitness, Inc. 11 EXPLODED DRAWING Model No.

English Manual
Page 12
... damage to a product caused by PROFORM. ORDERING REPLACEMENT PARTS To order replacement parts, simply call our Customer Service Department toll-free at one of its authorized service centers. The SERIAL NUMBER of the product (see the front cover of this product to state. The KEY NUMBER and DESCRIPTION of the part(s) from defects in Taiwan LIMITED WARRANTY Proform Fitness Products, Inc. ("PROFORM*), warrants this manual. All products for commercial or...
... damage to a product caused by PROFORM. ORDERING REPLACEMENT PARTS To order replacement parts, simply call our Customer Service Department toll-free at one of its authorized service centers. The SERIAL NUMBER of the product (see the front cover of this product to state. The KEY NUMBER and DESCRIPTION of the part(s) from defects in Taiwan LIMITED WARRANTY Proform Fitness Products, Inc. ("PROFORM*), warrants this manual. All products for commercial or...

