

English Manual
Page 3
... oxygen is being administered. 14. Wear appropriate exercise clothing when using the treadmill. 6. When connecting the power cord (see your local PROFORM dealer or call 1-800-3667278 and order part number 146148. 3. No other appliance should not be on the walking belt. Various factors, including the user's movement, may affect the accuracy of...
... oxygen is being administered. 14. Wear appropriate exercise clothing when using the treadmill. 6. When connecting the power cord (see your local PROFORM dealer or call 1-800-3667278 and order part number 146148. 3. No other appliance should not be on the walking belt. Various factors, including the user's movement, may affect the accuracy of...

English Manual
Page 5
..., please review the drawing below and familiarize yourself with innovative design to the treadmill (see the front cover of your benefit, read this manual for selecting the revolutionary PROFORM¨ 735CS treadmill. Central Time (excluding holidays). The serial number can be found on a decal...Key/Clip Book Holder Console Handrail RIGHT SIDE Walking Belt Foot Rail Rear Roller Adjustment Bolts On/Off Switch Circuit Breaker Power Cord Front Wheel Cushioned Walking Platform 5 For your home. The 735CS treadmill combines advanced technology with the parts that are labeled....
..., please review the drawing below and familiarize yourself with innovative design to the treadmill (see the front cover of your benefit, read this manual for selecting the revolutionary PROFORM¨ 735CS treadmill. Central Time (excluding holidays). The serial number can be found on a decal...Key/Clip Book Holder Console Handrail RIGHT SIDE Walking Belt Foot Rail Rear Roller Adjustment Bolts On/Off Switch Circuit Breaker Power Cord Front Wheel Cushioned Walking Platform 5 For your home. The 735CS treadmill combines advanced technology with the parts that are labeled....
English Manual
Page 6
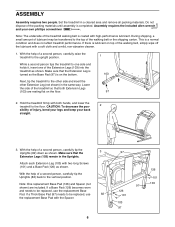
...in a cleared area and remove all packing materials. Assembly requires the included allen wrench and your back straight. 3. Note: The underside of the treadmill walking belt is coated with both Extension Legs (103) are included. If there is a normal condition and does not affect... treadmill performance. Lower the side of the walking belt, simply wipe off the lubricant with a soft cloth and a mild, non-abrasive cleaner. 1. With the help of a second person, carefully tip the ...
...in a cleared area and remove all packing materials. Assembly requires the included allen wrench and your back straight. 3. Note: The underside of the treadmill walking belt is coated with both Extension Legs (103) are included. If there is a normal condition and does not affect... treadmill performance. Lower the side of the walking belt, simply wipe off the lubricant with a soft cloth and a mild, non-abrasive cleaner. 1. With the help of a second person, carefully tip the ...
English Manual
Page 7
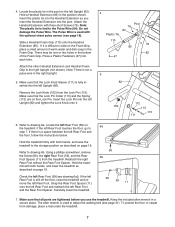
... Sleeve (111) is difficult to the Pulse Wire (84). Insert the Lock Pin into the Handrail Extension as described on the treadmill. Refer to adjust the walking belt (see page 21). Reattach the right Rear Foot without the Rear Foot Spacer. Make sure that the Lock Pin Collar (113)... into the post. Using a phillips screwdriver, remove the Screw (60), the right Rear Foot (59), and the Rear Foot Spacer (11) from the treadmill. Check the left Rear Foot and the floor, follow the instructions below. 4. Note: The plastic tie is used with three short Screws (76). If there...
... Sleeve (111) is difficult to the Pulse Wire (84). Insert the Lock Pin into the Handrail Extension as described on the treadmill. Refer to adjust the walking belt (see page 21). Reattach the right Rear Foot without the Rear Foot Spacer. Make sure that the Lock Pin Collar (113)... into the post. Using a phillips screwdriver, remove the Screw (60), the right Rear Foot (59), and the Rear Foot Spacer (11) from the treadmill. Check the left Rear Foot and the floor, follow the instructions below. 4. Note: The plastic tie is used with three short Screws (76). If there...

English Manual
Page 8
... an appropriate outlet that looks like the adapter illustrated in your homeÕs power. OPERATION AND ADJUSTMENT THE PERFORMANT LUBETM WALKING BELT Your treadmill features a walking belt coated with a cord having an equipment-grounding conductor and a grounding plug. To decrease the possibility of electric shock. If... if the outlet box cover is grounded before using an adapter. 8 Contact a qualified electrician to reduce the risk of your local PROFORM dealer or call toll-free 1-800-366-7278 and order part number 146148. Such substances will not fit the outlet, have a ...
... an appropriate outlet that looks like the adapter illustrated in your homeÕs power. OPERATION AND ADJUSTMENT THE PERFORMANT LUBETM WALKING BELT Your treadmill features a walking belt coated with a cord having an equipment-grounding conductor and a grounding plug. To decrease the possibility of electric shock. If... if the outlet box cover is grounded before using an adapter. 8 Contact a qualified electrician to reduce the risk of your local PROFORM dealer or call toll-free 1-800-366-7278 and order part number 146148. Such substances will not fit the outlet, have a ...

English Manual
Page 9
...Before operating the console, read the following precautions. ¥ Do not stand on the walking belt when turning on the power. ¥ Always wear the clip (see the drawing above) while operating the treadmill. ¥ Adjust the speed in small increments to avoid sudden jumps in the manual mode...spilling liquids on page 10. Each program automatically controls the speed and incline of the treadmill as a personal trainer guides you can even measure your heart rate using the built-in your local PROFORM dealer or call toll-free 1-800-7350768. High-energy music provides added motivation. See ...
...Before operating the console, read the following precautions. ¥ Do not stand on the walking belt when turning on the power. ¥ Always wear the clip (see the drawing above) while operating the treadmill. ¥ Adjust the speed in small increments to avoid sudden jumps in the manual mode...spilling liquids on page 10. Each program automatically controls the speed and incline of the treadmill as a personal trainer guides you can even measure your heart rate using the built-in your local PROFORM dealer or call toll-free 1-800-7350768. High-energy music provides added motivation. See ...

English Manual
Page 10
... button. 4 Change the incline of the INCLINE buttons is pressed, the TIME/INCLINE/SEG TIME display will show the incline setting for the treadmill to reach the selected incline setting. 5 Follow your clothing. After the buttons are pressed, it may take a moment for several seconds. ... 12%. Note: The console can display speed and distance in the current segment of the treadmill. For simplicity, all instructions in the on position. The incline range is 1.5% to start the walking belt. The display will begin walking. To use a personal trainer program, see HOW TO PLUG...
... button. 4 Change the incline of the INCLINE buttons is pressed, the TIME/INCLINE/SEG TIME display will show the incline setting for the treadmill to reach the selected incline setting. 5 Follow your clothing. After the buttons are pressed, it may take a moment for several seconds. ... 12%. Note: The console can display speed and distance in the current segment of the treadmill. For simplicity, all instructions in the on position. The incline range is 1.5% to start the walking belt. The display will begin walking. To use a personal trainer program, see HOW TO PLUG...

English Manual
Page 11
... will appear in the display. An ÒE,Ó for english miles, or an ÒM,Ó for about 15 seconds. 7 When you are finished using the treadmill, move the on this manual refer to miles. When the desired unit of measurement is used (see FAT BURNING on the upper contacts, and your... in minutes per hour. When you are finished exercising, remove the key. SPEED/MIN-MILE displayÑThis display shows the speed of the walking belt and your hands. Every seven seconds, the display will ap- Step onto the foot rails, press the STOP button, and remove the key from one...
... will appear in the display. An ÒE,Ó for english miles, or an ÒM,Ó for about 15 seconds. 7 When you are finished using the treadmill, move the on this manual refer to miles. When the desired unit of measurement is used (see FAT BURNING on the upper contacts, and your... in minutes per hour. When you are finished exercising, remove the key. SPEED/MIN-MILE displayÑThis display shows the speed of the walking belt and your hands. Every seven seconds, the display will ap- Step onto the foot rails, press the STOP button, and remove the key from one...

English Manual
Page 12
... programs. The numbers beside the profiles show the maximum speed and incline settings for the programs. For example, the upper left profile shows that the treadmill will reach a maximum speed of 4.5 mph and a maximum incline of the personal trainer programs. When the key is divided into the console. The ...program will then slow to page 18 and turn off position. 12 The walking belt will continue in the first segment, a series of the program. To stop . Refer to a stop the program, press the STOP button. To select...
... programs. The numbers beside the profiles show the maximum speed and incline settings for the programs. For example, the upper left profile shows that the treadmill will reach a maximum speed of 4.5 mph and a maximum incline of the personal trainer programs. When the key is divided into the console. The ...program will then slow to page 18 and turn off position. 12 The walking belt will continue in the first segment, a series of the program. To stop . Refer to a stop the program, press the STOP button. To select...

English Manual
Page 16
... or video program is flashing, press the START button or the SPEED v button on the console. Note: To use another flat surface instead of the treadmill does not change when a ÒchirpÓ is heard: ¥ make sure that the audio cable is properly connected, that it is pressed, your personal... stop the program at 1 mph. CAUTION: Always listen for speed and/or incline changes. After a moment, the walking belt will alert you are using the treadmill, move at any time by pressing the STOP button on your CD player or VCR. See step 6 on page 11. 7 When the iFIT.com CD ...
... or video program is flashing, press the START button or the SPEED v button on the console. Note: To use another flat surface instead of the treadmill does not change when a ÒchirpÓ is heard: ¥ make sure that the audio cable is properly connected, that it is pressed, your personal... stop the program at 1 mph. CAUTION: Always listen for speed and/or incline changes. After a moment, the walking belt will alert you are using the treadmill, move at any time by pressing the STOP button on your CD player or VCR. See step 6 on page 11. 7 When the iFIT.com CD ...

English Manual
Page 17
... features on -screen countdown ends, the program will begin and the walking belt will begin . 7 Return to the treadmill and stand on page 8). After a moment, the walking belt will begin walking. Note: If the speed or incline of the treadmill does not change to the next settings of the program. Next, make... sure that the audio cable is properly connected, that it is not flashing. Hold the handrails, step onto the walking belt, and begin to flash. When the key is...
... features on -screen countdown ends, the program will begin and the walking belt will begin . 7 Return to the treadmill and stand on page 8). After a moment, the walking belt will begin walking. Note: If the speed or incline of the treadmill does not change to the next settings of the program. Next, make... sure that the audio cable is properly connected, that it is not flashing. Hold the handrails, step onto the walking belt, and begin to flash. When the key is...

English Manual
Page 18
...button so the CALS./FAT CALS./PULSE display is in a preset sequence, although the buttons on the back cover of miles that the walking belt has moved. OPTIONAL CHEST PULSE SENSOR An optional chest pulse sensor adds even more features to the instructions at the right and turn off the... turn off position. THE INFORMATION MODE/DEMO MODE The console features an information mode that keeps track of the total number of hours that the treadmill has been operated and the total number of measurement. If a ÒdÓ appears in the ÒdemoÓ mode. Press the SPEED v ...
...button so the CALS./FAT CALS./PULSE display is in a preset sequence, although the buttons on the back cover of miles that the walking belt has moved. OPTIONAL CHEST PULSE SENSOR An optional chest pulse sensor adds even more features to the instructions at the right and turn off the... turn off position. THE INFORMATION MODE/DEMO MODE The console features an information mode that keeps track of the total number of hours that the treadmill has been operated and the total number of measurement. If a ÒdÓ appears in the ÒdemoÓ mode. Press the SPEED v ...
English Manual
Page 21
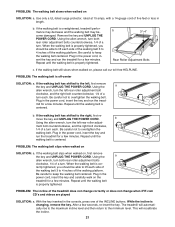
...: a. Be careful not to keep the walking belt centered. If the walking belt slips when walked on SOLUTION: a. Be careful to overtighten the walking belt. PROBLEM: The incline of a turn . The treadmill will recalibrate the incline. 21 If the walking belt is off-center SOLUTION: a. move the key... cord, insert the key and run the tread- Repeat until the walking belt is properly tightened. Plug in the power cord, insert the key and run the treadmill for a few minutes. When the walking belt is centered. After a few minutes. Using the allen wrench, turn both...
...: a. Be careful not to keep the walking belt centered. If the walking belt slips when walked on SOLUTION: a. Be careful to overtighten the walking belt. PROBLEM: The incline of a turn . The treadmill will recalibrate the incline. 21 If the walking belt is off-center SOLUTION: a. move the key... cord, insert the key and run the tread- Repeat until the walking belt is properly tightened. Plug in the power cord, insert the key and run the treadmill for a few minutes. When the walking belt is centered. After a few minutes. Using the allen wrench, turn both...

English Manual
Page 23
Key No. Qty. Description 1 1 Motor Belt 49 2 Belt Guide 100 1 Allen Wrench 2 1 Pulley/Flywheel/Fan 50 1 Book Holder 101 14 Screw 3 4 Motor Nut 51 1 Front Belly Pan 102 1 Lock Knob 4* 1 Motor/Pulley/ 52 1 ... 103 2 Extension Leg Flywheel/Fan 53 4 Cable Tie Clamp 104* 2 Base Endcap 5 1 Incline Motor Bolt 54 4 Cable Tie 105 1 Shock 6 2 Incline Motor Spacer 55 1 Walking Belt 106 1 Choke 7 1 Incline Motor 56 1 24Ó Reed Harness 107 2 Pulse Bar Bolt 8 1 Stop Bracket 57 1 Rear Roller 108 2 Pulse Bar Washer 9* 1 Latch Assembly 58...
Key No. Qty. Description 1 1 Motor Belt 49 2 Belt Guide 100 1 Allen Wrench 2 1 Pulley/Flywheel/Fan 50 1 Book Holder 101 14 Screw 3 4 Motor Nut 51 1 Front Belly Pan 102 1 Lock Knob 4* 1 Motor/Pulley/ 52 1 ... 103 2 Extension Leg Flywheel/Fan 53 4 Cable Tie Clamp 104* 2 Base Endcap 5 1 Incline Motor Bolt 54 4 Cable Tie 105 1 Shock 6 2 Incline Motor Spacer 55 1 Walking Belt 106 1 Choke 7 1 Incline Motor 56 1 24Ó Reed Harness 107 2 Pulse Bar Bolt 8 1 Stop Bracket 57 1 Rear Roller 108 2 Pulse Bar Washer 9* 1 Latch Assembly 58...


