

Uk Manual
Page 2
TABLE OF CONTENTS IMPORTANT PRECAUTIONS 3 BEFORE YOU BEGIN 4 ASSEMBLY 5 HOW TO USE THE ELLIPTICAL EXERCISER 10 MAINTENANCE AND TROUBLESHOOTING 21 CONDITIONING GUIDELINES 22 PART LIST 24 EXPLODED DRAWING 26 ORDERING REPLACEMENT PARTS Back Cover PROFORM is a registered trademark of ICON IP, Inc. 2
TABLE OF CONTENTS IMPORTANT PRECAUTIONS 3 BEFORE YOU BEGIN 4 ASSEMBLY 5 HOW TO USE THE ELLIPTICAL EXERCISER 10 MAINTENANCE AND TROUBLESHOOTING 21 CONDITIONING GUIDELINES 22 PART LIST 24 EXPLODED DRAWING 26 ORDERING REPLACEMENT PARTS Back Cover PROFORM is a registered trademark of ICON IP, Inc. 2

Uk Manual
Page 3
... this or any worn parts immediately. 6. Place the elliptical exerciser on a level surface, with pre-existing health problems. Read all warnings on the elliptical exerciser before using the elliptical exerciser. 1. The pulse sensor is intended for persons over the age of this manual. 10. do not arch your back straight while using the elliptical exerciser. Inspect and properly tighten all instructions in this manual and order a free replacement decal. Keep children...
... this or any worn parts immediately. 6. Place the elliptical exerciser on a level surface, with pre-existing health problems. Read all warnings on the elliptical exerciser before using the elliptical exerciser. 1. The pulse sensor is intended for persons over the age of this manual. 10. do not arch your back straight while using the elliptical exerciser. Inspect and properly tighten all instructions in this manual and order a free replacement decal. Keep children...
Uk Manual
Page 4
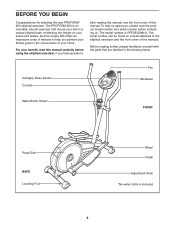
... achieve your fitness goals in the convenience of this manual carefully before contacting us. For your home. The serial number can be found on your feet in the drawing below. The model number is included 4 If you , please note the product model number and serial number before using the elliptical exerciser. Handgrip Pulse Sensor Console Fan Handlebar Water Bottle Holder* FRONT Pedal Disk BACK Levelling Foot Wheel Pedal Adjustment Knob *No...
... achieve your fitness goals in the convenience of this manual carefully before contacting us. For your home. The serial number can be found on your feet in the drawing below. The model number is included 4 If you , please note the product model number and serial number before using the elliptical exerciser. Handgrip Pulse Sensor Console Fan Handlebar Water Bottle Holder* FRONT Pedal Disk BACK Levelling Foot Wheel Pedal Adjustment Knob *No...

Uk Manual
Page 5
...)-4 Cover Screw (82)-4 M8 x 25mm Patch Screw (22)-2 M8 x 45mm Button Bolt (50)-4 M8 x 70mm Button Bolt (67)-2 M10 x 75mm Carriage Bolt (34)-2 M10 x 59mm Bolt Set (27)-2 M8 x 53mm Button Screw (84)-4 M10 x 83mm Button Screw (63)-2 5 ASSEMBLY Assembly requires two persons. Note: Some small parts may have been preassembled. The number in parentheses below to see if it has been preassembled. If a part is the key number of the elliptical exerciser...
...)-4 Cover Screw (82)-4 M8 x 25mm Patch Screw (22)-2 M8 x 45mm Button Bolt (50)-4 M8 x 70mm Button Bolt (67)-2 M10 x 75mm Carriage Bolt (34)-2 M10 x 59mm Bolt Set (27)-2 M8 x 53mm Button Screw (84)-4 M10 x 83mm Button Screw (63)-2 5 ASSEMBLY Assembly requires two persons. Note: Some small parts may have been preassembled. The number in parentheses below to see if it has been preassembled. If a part is the key number of the elliptical exerciser...
Uk Manual
Page 6
... tubes from the Lower Wire Harness (87). Press the two Stabilizer Endcaps (35) onto the Front Stabilizer (3). Discard the bolts, the packing tubes, and the rubber band. While the other person lifts the front of the Frame (1), carefully pull the upper end of the Frame (1), attach the Rear Stabiliser (4) with the two M10 x 83mm Button Screws (63). Make...
... tubes from the Lower Wire Harness (87). Press the two Stabilizer Endcaps (35) onto the Front Stabilizer (3). Discard the bolts, the packing tubes, and the rubber band. While the other person lifts the front of the Frame (1), carefully pull the upper end of the Frame (1), attach the Rear Stabiliser (4) with the two M10 x 83mm Button Screws (63). Make...

Uk Manual
Page 7
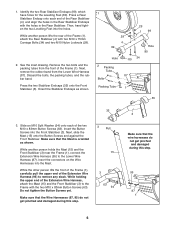
... not tighten the Button Bolts yet. make sure that the Wire Harnesses (86, 95) do not get pinched and damaged during this step. 72 76 83 67 83 15 5. Insert four batteries into the Mast (15); While another person holds the Upright (2) in the position shown, connect the Upper Wire Harness (86) to the Extension Wire Harness (95). Next, attach the Console...
... not tighten the Button Bolts yet. make sure that the Wire Harnesses (86, 95) do not get pinched and damaged during this step. 72 76 83 67 83 15 5. Insert four batteries into the Mast (15); While another person holds the Upright (2) in the position shown, connect the Upper Wire Harness (86) to the Extension Wire Harness (95). Next, attach the Console...

Uk Manual
Page 9
... holes. Do not overtighten the Bolt Set; Tighten the two M8 x 70mm Button Bolts (67). To protect the floor or carpet, place a mat under the elliptical exerciser. 9 Reapply grease to the surfaces of the Pivot Axle (81). Then, tighten both ends of the elliptical exerciser are inside of the Bolt Set through the Left Pedal Arm, the Washers, and the Handlebar Leg. Assemble the Right Handlebar (10...
... holes. Do not overtighten the Bolt Set; Tighten the two M8 x 70mm Button Bolts (67). To protect the floor or carpet, place a mat under the elliptical exerciser. 9 Reapply grease to the surfaces of the Pivot Axle (81). Then, tighten both ends of the elliptical exerciser are inside of the Bolt Set through the Left Pedal Arm, the Washers, and the Handlebar Leg. Assemble the Right Handlebar (10...

Uk Manual
Page 10
... to move with either direction. HOW TO ADJUST THE STRIDE OF THE ELLIPTICAL EXERCISER To adjust the stride of the elliptical exerciser, first pull one of the holes. Handlebars Pedals Crank Arm Holes Pin Adjustment Bracket Adjustment Knob Pedal Disk 10 the pedals will continue to move until the flywheel stops. When the pedals are designed to add upper-body exercise to work your workouts. Note: The elliptical exerciser does not have a free wheel; Then, step off the highest pedal first...
... to move with either direction. HOW TO ADJUST THE STRIDE OF THE ELLIPTICAL EXERCISER To adjust the stride of the elliptical exerciser, first pull one of the holes. Handlebars Pedals Crank Arm Holes Pin Adjustment Bracket Adjustment Knob Pedal Disk 10 the pedals will continue to move until the flywheel stops. When the pedals are designed to add upper-body exercise to work your workouts. Note: The elliptical exerciser does not have a free wheel; Then, step off the highest pedal first...
Uk Manual
Page 11
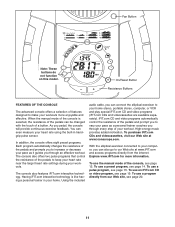
... use a pulse program, see page outs. 12. On/Reset Button Resistance Buttons FEATURES OF THE CONSOLE audio cable, you can be changed control the resistance of the pedals and prompt you to keep your heart rate near the target heart rate settings during your home stereo, portable stereo, computer, or VCR The advanced console offers a selection of the console, see page 15. When the manual mode of With the elliptical exerciser connected to your work- iFIT.com CD and video programs...
... use a pulse program, see page outs. 12. On/Reset Button Resistance Buttons FEATURES OF THE CONSOLE audio cable, you can be changed control the resistance of the pedals and prompt you to keep your heart rate near the target heart rate settings during your home stereo, portable stereo, computer, or VCR The advanced console offers a selection of the console, see page 15. When the manual mode of With the elliptical exerciser connected to your work- iFIT.com CD and video programs...

Uk Manual
Page 12
.... To use the handgrip pulse sensor, the display will be selected. Note: The console requires four 1.5V "D" batteries (see step 5 at the right). To reset the displays, press the On/Reset button. 5 Measure your hands. If there are sheets of the dis- The centre of calories you have burned. HOW TO USE THE MANUAL MODE 1 Turn on page 7). To turn on the console, press the On/Reset button or begin pedalling. (See...
.... To use the handgrip pulse sensor, the display will be selected. Note: The console requires four 1.5V "D" batteries (see step 5 at the right). To reset the displays, press the On/Reset button. 5 Measure your hands. If there are sheets of the dis- The centre of calories you have burned. HOW TO USE THE MANUAL MODE 1 Turn on page 7). To turn on the console, press the On/Reset button or begin pedalling. (See...

Uk Manual
Page 14
... automatically change it guides you through an effective workout. Important: The target pace settings are finished exercising, the console will automatically turn off. See step 5 on page 12. 6 Turn on page 13. 14 See step 6 on page 12. 5 Measure your current pace. Make sure to increase or decrease your pace as it by pressing the Resistance + and - To select a preset program, press the Program (PGM) button...
... automatically change it guides you through an effective workout. Important: The target pace settings are finished exercising, the console will automatically turn off. See step 5 on page 12. 6 Turn on page 13. 14 See step 6 on page 12. 5 Measure your current pace. Make sure to increase or decrease your pace as it by pressing the Resistance + and - To select a preset program, press the Program (PGM) button...

Uk Manual
Page 15
... display and a target heart rate setting will be programmed for two or more consecutive periods.) Pulse program 2 is divided into 30 one of your heart rate. 5 Begin pedalling to start the program. Note: Once you may choose to use a pulse program. 1 Turn on page 12. 2 Select a pulse program. One target heart rate setting is programmed for you must hold the handgrip pulse sensor continuously during your workout. However, when the console compares your heart rate to the target heart rate setting...
... display and a target heart rate setting will be programmed for two or more consecutive periods.) Pulse program 2 is divided into 30 one of your heart rate. 5 Begin pedalling to start the program. Note: Once you may choose to use a pulse program. 1 Turn on page 12. 2 Select a pulse program. One target heart rate setting is programmed for you must hold the handgrip pulse sensor continuously during your workout. However, when the console compares your heart rate to the target heart rate setting...

Uk Manual
Page 16
... stop pedalling for a few seconds, the program will pause and the time will automatically turn off. See page 18. Plug one end of the audio cable into the PHONES jack on page 13. If you are finished exercising, the console will flash in pulse program 2. To use iFIT.com programs directly from our Web site, the elliptical trainer must be connected to your computer. See page 18 for connecting instructions...
... stop pedalling for a few seconds, the program will pause and the time will automatically turn off. See page 18. Plug one end of the audio cable into the PHONES jack on page 13. If you are finished exercising, the console will flash in pulse program 2. To use iFIT.com programs directly from our Web site, the elliptical trainer must be connected to your computer. See page 18 for connecting instructions...

Uk Manual
Page 19
... finished exercising, the console will begin guiding you when the resistance level and/or the target pace is pressed, your personal trainer will automatically turn off. See step 5 on page 12. 7 Turn on your CD player or VCR. A moment after the play button on the fan if desired. HOW TO USE AN IFIT.COM CD OR VIDEO PROGRAM To use an iFIT.com CD or video program. 1 Turn on...
... finished exercising, the console will begin guiding you when the resistance level and/or the target pace is pressed, your personal trainer will automatically turn off. See step 5 on page 12. 7 Turn on your CD player or VCR. A moment after the play button on the fan if desired. HOW TO USE AN IFIT.COM CD OR VIDEO PROGRAM To use an iFIT.com CD or video program. 1 Turn on...

Uk Manual
Page 20
... mode. A list of specific system requirements is about to play iFIT.com programs directly from the internet. To select the iFIT.com mode, press the iFIT.com button; See step 5 on page 14). The program will function in almost the same way as a preset program (see step 3 on page 12. 10 When you are finished exercising, the console will alert you to change. 8 Follow your progress with the display...
... mode. A list of specific system requirements is about to play iFIT.com programs directly from the internet. To select the iFIT.com mode, press the iFIT.com button; See step 5 on page 14). The program will function in almost the same way as a preset program (see step 3 on page 12. 10 When you are finished exercising, the console will alert you to change. 8 Follow your progress with the display...

Uk Manual
Page 21
... clean. BATTERY REPLACEMENT If the console displays become dim, the batteries should be cleaned with a soft cloth-never use a damp cloth and a small amount of mild soap. Levelling Feet HANDGRIP PULSE SENSOR TROUBLESHOOTING • Avoid moving your floor during use, turn one or both of direct sunlight. doing so may interfere with heart rate readings. • For the most console problems are the result of the elliptical exerciser regularly...
... clean. BATTERY REPLACEMENT If the console displays become dim, the batteries should be cleaned with a soft cloth-never use a damp cloth and a small amount of mild soap. Levelling Feet HANDGRIP PULSE SENSOR TROUBLESHOOTING • Avoid moving your floor during use, turn one or both of direct sunlight. doing so may interfere with heart rate readings. • For the most console problems are the result of the elliptical exerciser regularly...

Uk Manual
Page 22
... lower two numbers are your exercise program. Aerobic exercise is activity that proper nutrition and adequate rest are rounded off to five workouts each week, with pre-existing health problems. The pulse sensor is to exercise with the proper intensity. A proper warm-up , consisting of time. The proper intensity level can be "aerobic." Fat Burning To burn fat effectively, you exercise. The key...
... lower two numbers are your exercise program. Aerobic exercise is activity that proper nutrition and adequate rest are rounded off to five workouts each week, with pre-existing health problems. The pulse sensor is to exercise with the proper intensity. A proper warm-up , consisting of time. The proper intensity level can be "aerobic." Fat Burning To burn fat effectively, you exercise. The key...
Uk Manual
Page 24
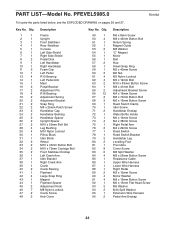
... Holder M6 x 16mm Screw M4 x 38mm Screw Right Pedal Arm M4 x 22mm Screw Reed Switch Reed Switch Bracket Handlebar Leg Levelling Foot Pivot Axle Cover Screw M8 Split Washer M8 x 53mm Button Screw Resistance Cable Upper Wire Harness Lower Wire Harness Right Pedal M3 x 12mm Screw Motor Washer M8 x 16mm Button Screw M6 x 13mm Flat Head Screw M6 Washer M10 Split Washer Extension Wire Harness Pedal Arm Endcap 24 Key No. PFEVEL5985.0 R0106A To locate the parts listed below, see the EXPLODED...
... Holder M6 x 16mm Screw M4 x 38mm Screw Right Pedal Arm M4 x 22mm Screw Reed Switch Reed Switch Bracket Handlebar Leg Levelling Foot Pivot Axle Cover Screw M8 Split Washer M8 x 53mm Button Screw Resistance Cable Upper Wire Harness Lower Wire Harness Right Pedal M3 x 12mm Screw Motor Washer M8 x 16mm Button Screw M6 x 13mm Flat Head Screw M6 Washer M10 Split Washer Extension Wire Harness Pedal Arm Endcap 24 Key No. PFEVEL5985.0 R0106A To locate the parts listed below, see the EXPLODED...

Uk Manual
Page 25
Qty. 97 4 98 4 99 2 100 2 101 1 102 1 Description 6000Z Bearing M10 Washer Rear Stabiliser Endcap Pillow Block Retainer Idler Spacer Idler Pulley Key No. Specifications are subject to change without notice. Qty. 103 1 104 8 # 2 # 1 # 1 Description Idler Axle M8 Jamnut Hex Key Grease User's Manual Note: "#" indicates a non-illustrated part. See the back cover of this manual for information about ordering replacement parts. 25 Key No.
Qty. 97 4 98 4 99 2 100 2 101 1 102 1 Description 6000Z Bearing M10 Washer Rear Stabiliser Endcap Pillow Block Retainer Idler Spacer Idler Pulley Key No. Specifications are subject to change without notice. Qty. 103 1 104 8 # 2 # 1 # 1 Description Idler Axle M8 Jamnut Hex Key Grease User's Manual Note: "#" indicates a non-illustrated part. See the back cover of this manual for information about ordering replacement parts. 25 Key No.

Uk Manual
Page 28
... following information: • the MODEL NUMBER of the product (PFEVEL5985.0) • the NAME of the product (PROFORM 650 elliptical exerciser) • the SERIAL NUMBER of the product (see the front cover of this manual) • the KEY NUMBER and DESCRIPTION of the part(s) (see pages 24 to 27) Part No. 231330 R0106A Printed in China © 2006 ICON IP, Inc. ORDERING REPLACEMENT PARTS To order replacement parts, contact the ICON Health & Fitness, Ltd...
... following information: • the MODEL NUMBER of the product (PFEVEL5985.0) • the NAME of the product (PROFORM 650 elliptical exerciser) • the SERIAL NUMBER of the product (see the front cover of this manual) • the KEY NUMBER and DESCRIPTION of the part(s) (see pages 24 to 27) Part No. 231330 R0106A Printed in China © 2006 ICON IP, Inc. ORDERING REPLACEMENT PARTS To order replacement parts, contact the ICON Health & Fitness, Ltd...


