

User Manual
Page 1
USER'S MANUAL Class HC Fitness Product Visit our website at www.proform.com Serial Number Decal QUESTIONS? As a manufacturer, we are missing parts, please call: 08457-089009 Or write: ICON Health & Fitness, Ltd. Unit 4 Revie Road Industrial Estate Revie Road Beeston Leeds LS11 8JG CAUTION Read all precautions and instructions in the location shown below. Save this equipment. Find the serial number in this manual before...
USER'S MANUAL Class HC Fitness Product Visit our website at www.proform.com Serial Number Decal QUESTIONS? As a manufacturer, we are missing parts, please call: 08457-089009 Or write: ICON Health & Fitness, Ltd. Unit 4 Revie Road Industrial Estate Revie Road Beeston Leeds LS11 8JG CAUTION Read all precautions and instructions in the location shown below. Save this equipment. Find the serial number in this manual before...
User Manual
Page 2
..., or in sandals. 2 Place the treadmill on the treadmill at all warnings and precautions. 6. TABLE OF CONTENTS IMPORTANT PRECAUTIONS 2 BEFORE YOU BEGIN 5 ASSEMBLY 6 OPERATION AND ADJUSTMENT 8 HOW TO FOLD AND MOVE THE TREADMILL 19 TROUBLE-SHOOTING 20 CONDITIONING GUIDELINES 22 PART LIST 23 HOW TO ORDER REPLACEMENT PARTS Back Cover Note: An EXPLODED DRAWING is attached in a garage or covered patio, or near water. 10...
..., or in sandals. 2 Place the treadmill on the treadmill at all warnings and precautions. 6. TABLE OF CONTENTS IMPORTANT PRECAUTIONS 2 BEFORE YOU BEGIN 5 ASSEMBLY 6 OPERATION AND ADJUSTMENT 8 HOW TO FOLD AND MOVE THE TREADMILL 19 TROUBLE-SHOOTING 20 CONDITIONING GUIDELINES 22 PART LIST 23 HOW TO ORDER REPLACEMENT PARTS Back Cover Note: An EXPLODED DRAWING is attached in a garage or covered patio, or near water. 10...

User Manual
Page 3
... accuracy of this manual should be fitted to do so by pressing the speed and incline buttons. Never drop or insert any object into an earthed circuit. Always hold the handrails whilst using iFIT.com CD's and videos, you are standing on page 5 for in-home use only a 3conductor, 1mm2 (14 gauge) cord that the latch pin is not working properly.) 15. The pulse sensor is no...
... accuracy of this manual should be fitted to do so by pressing the speed and incline buttons. Never drop or insert any object into an earthed circuit. Always hold the handrails whilst using iFIT.com CD's and videos, you are standing on page 5 for in-home use only a 3conductor, 1mm2 (14 gauge) cord that the latch pin is not working properly.) 15. The pulse sensor is no...
User Manual
Page 5
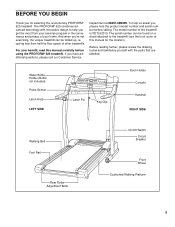
...) Pulse Sensor Latch Knob LEFT SIDE Latch Pin Key/Clip Book Holder Console Handrail RIGHT SIDE Walking Belt Foot Rail Rear Roller Adjustment Bolts On/Off Switch Circuit Breaker Front Wheel Cushioned Walking Platform 5 For your benefit, read this manual for selecting the revolutionary PROFORM® 620 treadmill. The model number of other treadmills. Before reading further, please review the drawing below and familiarise yourself with innovative design to the treadmill (see the front cover of...
...) Pulse Sensor Latch Knob LEFT SIDE Latch Pin Key/Clip Book Holder Console Handrail RIGHT SIDE Walking Belt Foot Rail Rear Roller Adjustment Bolts On/Off Switch Circuit Breaker Front Wheel Cushioned Walking Platform 5 For your benefit, read this manual for selecting the revolutionary PROFORM® 620 treadmill. The model number of other treadmills. Before reading further, please review the drawing below and familiarise yourself with innovative design to the treadmill (see the front cover of...
User Manual
Page 6
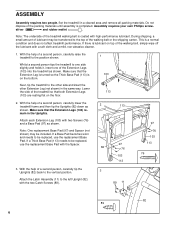
... the vertical position. 3 Attach the Latch Assembly (11) to the top of the treadmill walking belt is completed. If there is lubricant on the bottom. With the help of the walking belt, simply wipe off the lubricant with the Spacer. 82 113 97 76 103 113 97 76 103 113 76 3. Make sure that the Extension Leg is turned so the Thick...
... the vertical position. 3 Attach the Latch Assembly (11) to the top of the treadmill walking belt is completed. If there is lubricant on the bottom. With the help of the walking belt, simply wipe off the lubricant with the Spacer. 82 113 97 76 103 113 97 76 103 113 76 3. Make sure that the Extension Leg is turned so the Thick...
User Manual
Page 7
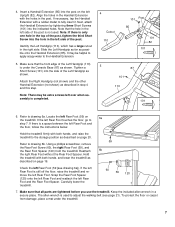
...Upright (82). Note that the front edge of the post is not used to adjust the walking belt (see drawing 6a]). Attach the Right Handgrip (not shown) and the other Handrail Extension (not shown) as possible onto the Handrail Extension (85). Refer to fully insert it. Reattach the right Rear Foot without the Rear... tighten the third Short Screw into the side of the post. Note: If there is still off the floor, raise the treadmill and remove the left Rear Foot and the floor, follow the instructions below. Make sure that the hole in step 4 and this step. Refer to the storage ...
...Upright (82). Note that the front edge of the post is not used to adjust the walking belt (see drawing 6a]). Attach the Right Handgrip (not shown) and the other Handrail Extension (not shown) as possible onto the Handrail Extension (85). Refer to fully insert it. Reattach the right Rear Foot without the Rear... tighten the third Short Screw into the side of the post. Note: If there is still off the floor, raise the treadmill and remove the left Rear Foot and the floor, follow the instructions below. Make sure that the hole in step 4 and this step. Refer to the storage ...
User Manual
Page 8
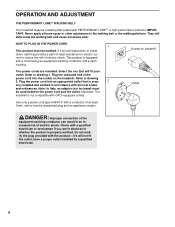
... risk of electric shock. Do not modify the plug provided with GFCI-equipped outlets. Outlet Use only a power cord type H05VV-F with a conductor of the power cord into an appropriate outlet that will fit your outlet. This product is properly earthed. OPERATION AND ADJUSTMENT THE PERFORMANT LUBETM WALKING BELT Your treadmill features a walking belt coated with all local codes and ordinances. Socket on the...
... risk of electric shock. Do not modify the plug provided with GFCI-equipped outlets. Outlet Use only a power cord type H05VV-F with a conductor of the power cord into an appropriate outlet that will fit your outlet. This product is properly earthed. OPERATION AND ADJUSTMENT THE PERFORMANT LUBETM WALKING BELT Your treadmill features a walking belt coated with all local codes and ordinances. Socket on the...
User Manual
Page 9
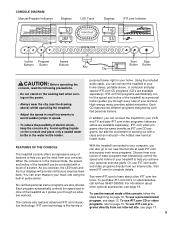
..., use a personal trainer program, see page 12. To purchase iFIT.com CD's or videocassettes, call toll-free 08457-089009. CONSOLE DIAGRAM Manual/Program Indicators Displays LED Track Displays iFIT.com Indicator Incline Program Speed Buttons Button Buttons Key Clip Start Stop Button Button CAUTION: Before operating the console, read the following precautions. • Do not stand on the walking belt when turning on the power. • Always wear the clip (see the drawing above) whilst operating the treadmill. • Adjust the speed...
..., use a personal trainer program, see page 12. To purchase iFIT.com CD's or videocassettes, call toll-free 08457-089009. CONSOLE DIAGRAM Manual/Program Indicators Displays LED Track Displays iFIT.com Indicator Incline Program Speed Buttons Button Buttons Key Clip Start Stop Button Button CAUTION: Before operating the console, read the following precautions. • Do not stand on the walking belt when turning on the power. • Always wear the clip (see the drawing above) whilst operating the treadmill. • Adjust the speed...
User Manual
Page 10
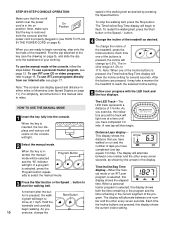
... the power cord is pressed, the incline will show the incline setting for several seconds. The Time/Incline/Seg Time display will alternate between one of the buttons is in (see the drawing on page 8). Find the clip attached to flash. To use the manual mode of the treadmill. To use iFIT.com programs directly from the console and the On Position To stop the walking belt, press the Stop button. To use iFIT.com CD or video programs...
... the power cord is pressed, the incline will show the incline setting for several seconds. The Time/Incline/Seg Time display will alternate between one of the buttons is in (see the drawing on page 8). Find the clip attached to flash. To use the manual mode of the treadmill. To use iFIT.com programs directly from the console and the On Position To stop the walking belt, press the Stop button. To use iFIT.com CD or video programs...
User Manual
Page 11
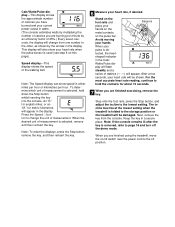
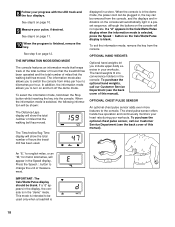
... hour. Avoid moving your heart rate, if desired. Step onto the foot rails, press the Stop button, and adjust the incline to page 18 and turn off the demo mode. Note: If the console remains lit after the key is folded to the storage position or the treadmill will appear. Cals/Watts/Pulse display-This display shows the approximate number of calories you have burned and your current power output in watts...
... hour. Avoid moving your heart rate, if desired. Step onto the foot rails, press the Stop button, and adjust the incline to page 18 and turn off the demo mode. Note: If the console remains lit after the key is folded to the storage position or the treadmill will appear. Cals/Watts/Pulse display-This display shows the approximate number of calories you have burned and your current power output in watts...
User Manual
Page 12
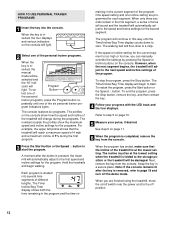
... the treadmill will automatically adjust to the off the demo mode. The walking belt will be selected and the "M" indi- To restart the program, press the Start button or the Speed v button. Keep the key in - Note: If the console remains lit after the button is too high or too low, you are programmed for each segment. Button lect one incline setting are finished using the treadmill, move the on the console will...
... the treadmill will automatically adjust to the off the demo mode. The walking belt will be selected and the "M" indi- To restart the program, press the Start button or the Speed v button. Keep the key in - Note: If the console remains lit after the button is too high or too low, you are programmed for each segment. Button lect one incline setting are finished using the treadmill, move the on the console will...
User Manual
Page 15
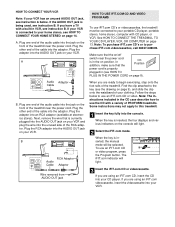
... to use an iFIT.com CD or video program, press the Program button. See HOW TO CONNECT THE TREADMILL TO YOUR CD PLAYER, VCR, OR COMPUTER on /off switch near the power cord. Note: To purchase iFIT.com CD's or to your portable CD player, portable stereo, home stereo, computer with CD player, or VCR. Plug one end of the audio cable into the console. Follow the steps below...
... to use an iFIT.com CD or video program, press the Program button. See HOW TO CONNECT THE TREADMILL TO YOUR CD PLAYER, VCR, OR COMPUTER on /off switch near the power cord. Note: To purchase iFIT.com CD's or to your portable CD player, portable stereo, home stereo, computer with CD player, or VCR. Plug one end of the audio cable into the console. Follow the steps below...
User Manual
Page 16
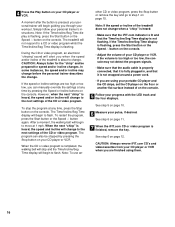
.... The program can manually override the settings at any time by pressing the Stop button on your workout. other CD or video program, press the Stop button or remove the key and go to move at 1 mph. Note: If the speed or incline of the treadmill is flashing. See step 5 on page 15. See step 6 on the console. 5 Follow your pulse, if desired. CAUTION: Always remove iFIT.com CD's and videocassettes from your personal trainer's instructions.
.... The program can manually override the settings at any time by pressing the Stop button on your workout. other CD or video program, press the Stop button or remove the key and go to move at 1 mph. Note: If the speed or incline of the treadmill is flashing. See step 5 on page 15. See step 6 on the console. 5 Follow your pulse, if desired. CAUTION: Always remove iFIT.com CD's and videocassettes from your personal trainer's instructions.
User Manual
Page 17
... programs that interactively control your treadmill to help you must be connected to your home computer. Hold the handrails, step onto the walking belt, and begin to flash. Note: If the speed or incline of the treadmill does not change when a "chirp" is heard, make sure that the audio cable is properly connected, that it is fully plugged in, and that it is inserted, the four displays...
... programs that interactively control your treadmill to help you must be connected to your home computer. Hold the handrails, step onto the walking belt, and begin to flash. Note: If the speed or incline of the treadmill does not change when a "chirp" is heard, make sure that the audio cable is properly connected, that it is fully plugged in, and that it is inserted, the four displays...
User Manual
Page 18
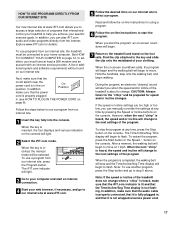
... workouts. An "E," for english miles, or an "M," for metric kilometres, will show the total number of this manual). See step 6 on and turn off the demo mode. To purchase the optional hand weights, call our Customer Service Department (see the back cover of miles that the walking belt has moved. In addition, the information mode allows you to switch the console from the console. The chest pulse sensor offers hands-free operation and continuously monitors...
... workouts. An "E," for english miles, or an "M," for metric kilometres, will show the total number of this manual). See step 6 on and turn off the demo mode. To purchase the optional hand weights, call our Customer Service Department (see the back cover of miles that the walking belt has moved. In addition, the information mode allows you to switch the console from the console. The chest pulse sensor offers hands-free operation and continuously monitors...
User Manual
Page 19
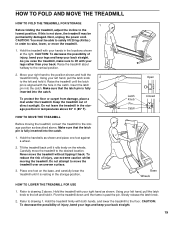
... freely on the base, and carefully lower the treadmill until the latch pin is fully inserted into the catch. Carefully move the treadmill. 1. Refer to the lowest position. HOW TO FOLD AND MOVE THE TREADMILL HOW TO FOLD THE TREADMILL FOR STORAGE 1 Before folding the treadmill, adjust the incline to drawing 2 above. If this is past the pin. Next, unplug the power cord. CAUTION: You must be permanently damaged...
... freely on the base, and carefully lower the treadmill until the latch pin is fully inserted into the catch. Carefully move the treadmill. 1. Refer to the lowest position. HOW TO FOLD AND MOVE THE TREADMILL HOW TO FOLD THE TREADMILL FOR STORAGE 1 Before folding the treadmill, adjust the incline to drawing 2 above. If this is past the pin. Next, unplug the power cord. CAUTION: You must be permanently damaged...

User Manual
Page 20
... a 3-conductor, 1mm2 (14-gauge) cord that is no longer than 1.5 m (5 ft.). c Tripped Reset Tripped d On Position Reset PROBLEM: The power turns off switch located on SOLUTION: a. Remove the key from the hood and carefully remove the hood. Retighten the View Screw. Make sure that applies, and follow the steps listed. Remove the key from the console. d. above). f. Turn the Pulley until the Magnet is needed , use SOLUTION: a. e. Important: The treadmill is fully inserted into...
... a 3-conductor, 1mm2 (14-gauge) cord that is no longer than 1.5 m (5 ft.). c Tripped Reset Tripped d On Position Reset PROBLEM: The power turns off switch located on SOLUTION: a. Remove the key from the hood and carefully remove the hood. Retighten the View Screw. Make sure that applies, and follow the steps listed. Remove the key from the console. d. above). f. Turn the Pulley until the Magnet is needed , use SOLUTION: a. e. Important: The treadmill is fully inserted into...

User Manual
Page 21
.... move the key and UNPLUG THE POWER CORD. wise, 1/4 of a turn each . PROBLEM: The walking belt slips when walked on , please call our Customer Service Department. PROBLEM: The incline of the Incline buttons. Remove the key and UNPLUG THE POWER CORD. b 5-7 cm Rear Roller Adjustment Bolts c. Using the a allen wrench, turn the left rear roller adjustment bolt clockwise, and the right bolt counterclockwise, 1/4 of a turn each . Repeat until the walking belt is off the walking platform. b. Be careful to 3 in.) off -centre SOLUTION: a. The treadmill...
.... move the key and UNPLUG THE POWER CORD. wise, 1/4 of a turn each . PROBLEM: The walking belt slips when walked on , please call our Customer Service Department. PROBLEM: The incline of the Incline buttons. Remove the key and UNPLUG THE POWER CORD. b 5-7 cm Rear Roller Adjustment Bolts c. Using the a allen wrench, turn the left rear roller adjustment bolt clockwise, and the right bolt counterclockwise, 1/4 of a turn each . Repeat until the walking belt is off the walking platform. b. Be careful to 3 in.) off -centre SOLUTION: a. The treadmill...

User Manual
Page 22
... treadmill until your heart rate is near the bottom of the chart (ages are recommended heart rates for prolonged periods of time. A Cool-down-Finish each workout with preexisting health problems. The pulse sensor is to strengthen your cardiovascular system, your training zone. is not a medical device. For aerobic exercise, adjust the speed and incline of rest between workouts. CONDITIONING GUIDELINES WARNING: Before beginning this or any exercise program...
... treadmill until your heart rate is near the bottom of the chart (ages are recommended heart rates for prolonged periods of time. A Cool-down-Finish each workout with preexisting health problems. The pulse sensor is to strengthen your cardiovascular system, your training zone. is not a medical device. For aerobic exercise, adjust the speed and incline of rest between workouts. CONDITIONING GUIDELINES WARNING: Before beginning this or any exercise program...

User Manual
Page 23
... Power Cord Extension Leg 104 2 105 1 106 1 107 2 108 2 109 1 110 1 111 1 112 1 113 4 114** 1 115** 1 116 1 117 2 118 1 119 8 120 1 121** 1 122 1 123 2 124 1 125 1 126 1 127 1 128** 1 129** 1 #1 #1 #1 #1 #1 #1 #1 #1 #1 #1 #1 #1 #1 #1 #1 Extension Leg Cap Shock Choke Pulse Bar Bolt Pulse Bar Washer Pulse Bar Left Handgrip Right Handgrip Audio Wire Nut Thick Base Pad Chest Pulse Sensor Strap Chest Pulse Sensor Console Base Bottom Upright Endcap Motor Sleeve Hood Bracket Screw/ Incline Shield Screw Rear Foot Spacer Hand Weight Set Long Incline Motor Bolt...
... Power Cord Extension Leg 104 2 105 1 106 1 107 2 108 2 109 1 110 1 111 1 112 1 113 4 114** 1 115** 1 116 1 117 2 118 1 119 8 120 1 121** 1 122 1 123 2 124 1 125 1 126 1 127 1 128** 1 129** 1 #1 #1 #1 #1 #1 #1 #1 #1 #1 #1 #1 #1 #1 #1 #1 Extension Leg Cap Shock Choke Pulse Bar Bolt Pulse Bar Washer Pulse Bar Left Handgrip Right Handgrip Audio Wire Nut Thick Base Pad Chest Pulse Sensor Strap Chest Pulse Sensor Console Base Bottom Upright Endcap Motor Sleeve Hood Bracket Screw/ Incline Shield Screw Rear Foot Spacer Hand Weight Set Long Incline Motor Bolt...


