
English Manual
Page 3
... treadmill. Never move the walking belt while the power is not a medical device. Never use of this manual and order part number 146148, or see your treadmill before using your physician. The pulse sensor is turned off. The pulse sensor is being administered. 7. Before beginning any surface that meets all important precautions and in the treadmill. Use the treadmill only as an exercise aid in determining heart rate trends in a garage or covered...
... treadmill. Never move the walking belt while the power is not a medical device. Never use of this manual and order part number 146148, or see your treadmill before using your physician. The pulse sensor is turned off. The pulse sensor is being administered. 7. Before beginning any surface that meets all important precautions and in the treadmill. Use the treadmill only as an exercise aid in determining heart rate trends in a garage or covered...
English Manual
Page 4
... adjustment procedures described in the storage position. 23. less instructed to raise, lower, or move the treadmill until it is intended for the location of the treadmill regularly. Servicing other than the procedures in serious injury or death. SAVE THESE INSTRUCTIONS 4 vice representative. Over exercising may result in this treadmill in a commercial, rental, or institutional setting. 27. Inspect and properly tighten all parts of the power switch...
... adjustment procedures described in the storage position. 23. less instructed to raise, lower, or move the treadmill until it is intended for the location of the treadmill regularly. Servicing other than the procedures in serious injury or death. SAVE THESE INSTRUCTIONS 4 vice representative. Over exercising may result in this treadmill in a commercial, rental, or institutional setting. 27. Inspect and properly tighten all parts of the power switch...

English Manual
Page 5
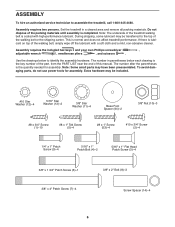
... front cover of this manual. The model number and the location of the serial number decal are shown on the front cover of this manual carefully before contacting us assist you have questions after read this manual. Length: 5 ft. 10 in. (178 cm) Width: 2 ft. 10 in. (86 cm) Handrail Upright Console Tray Pulse Sensor Key/Clip Walking Belt Foot Rail Idler Roller Adjustment Screws Power Switch Power Cord Platform Cushion 5 The 590 T treadmill offers...
... front cover of this manual. The model number and the location of the serial number decal are shown on the front cover of this manual carefully before contacting us assist you have questions after read this manual. Length: 5 ft. 10 in. (178 cm) Width: 2 ft. 10 in. (86 cm) Handrail Upright Console Tray Pulse Sensor Key/Clip Walking Belt Foot Rail Idler Roller Adjustment Screws Power Switch Power Cord Platform Cushion 5 The 590 T treadmill offers...
English Manual
Page 6
... avoid damaging parts, do not use power tools for assembly. Do not dispose of the packing materials until assembly is normal and does not affect treadmill performance. The number in a cleared area and remove all packing materials. Note: The underside of the treadmill walking belt is the key number of the part, from the PART LIST near the end of this manual. During shipping, some lubricant may be...
... avoid damaging parts, do not use power tools for assembly. Do not dispose of the packing materials until assembly is normal and does not affect treadmill performance. The number in a cleared area and remove all packing materials. Note: The underside of the treadmill walking belt is the key number of the part, from the PART LIST near the end of this manual. During shipping, some lubricant may be...

English Manual
Page 11
Set the console assembly face-down on a soft surface to pinch the Upright Wire (87). 29 12 87 Tighten one #10 x 3/4" Screw (2) in each end 83 of the Crossbar. IMPORTANT: To avoid damaging the Crossbar (107), do not use power tools and 10 do not overtighten the Screws. Attach the Console Frame with four #10 12 x 3/4" Screws (2) and four #10 Star Washers (12); do...
Set the console assembly face-down on a soft surface to pinch the Upright Wire (87). 29 12 87 Tighten one #10 x 3/4" Screw (2) in each end 83 of the Crossbar. IMPORTANT: To avoid damaging the Crossbar (107), do not use power tools and 10 do not overtighten the Screws. Attach the Console Frame with four #10 12 x 3/4" Screws (2) and four #10 Star Washers (12); do...

English Manual
Page 12
... 12. Connect the Upright Wire (87) to the Crossbar (107) with four #8 x 1" Screws (53). 12 Console Assembly 87 105 53 107 83 1 1 82 1 12 Attach the console assembly to the console wire. Firmly tighten the four 5/16" x 1" Flat Head Patch Screws (3) and the two 5/16" x 1" Patch Bolts (4) (only one connector and try again. If they do not, turn one side is shown). 11. Set the console assembly on...
... 12. Connect the Upright Wire (87) to the Crossbar (107) with four #8 x 1" Screws (53). 12 Console Assembly 87 105 53 107 83 1 1 82 1 12 Attach the console assembly to the console wire. Firmly tighten the four 5/16" x 1" Flat Head Patch Screws (3) and the two 5/16" x 1" Patch Bolts (4) (only one connector and try again. If they do not, turn one side is shown). 11. Set the console assembly on...

English Manual
Page 13
... Right Upright Cover (86) against the console assembly. Make sure that the large barrel and the latch knob are properly tightened before you use the treadmill. See steps 4 and 6. Orient the Storage Latch (51) so that all parts are oriented as shown. Note: It may be necessary to move the Frame (55) back and forth to the bracket on the Frame (55) with a 3/8" x 2" Bolt (8) and...
... Right Upright Cover (86) against the console assembly. Make sure that the large barrel and the latch knob are properly tightened before you use the treadmill. See steps 4 and 6. Orient the Storage Latch (51) so that all parts are oriented as shown. Note: It may be necessary to move the Frame (55) back and forth to the bracket on the Frame (55) with a 3/8" x 2" Bolt (8) and...

English Manual
Page 14
... if a properly grounded outlet is grounded before using an adapter. 14 This product is functioning properly. A temporary adapter may not be damaged by a qualified electrician. Plug the power cord into a surge suppressor, and plug the surge suppressor into an appropriate outlet that is properly grounded. OPERATION AND ADJUSTMENT THE PRE-LUBRICATED WALKING BELT Your treadmill features a walking belt coated with a qualified electrician or serviceman...
... if a properly grounded outlet is grounded before using an adapter. 14 This product is functioning properly. A temporary adapter may not be damaged by a qualified electrician. Plug the power cord into a surge suppressor, and plug the surge suppressor into an appropriate outlet that is properly grounded. OPERATION AND ADJUSTMENT THE PRE-LUBRICATED WALKING BELT Your treadmill features a walking belt coated with a qualified electrician or serviceman...
English Manual
Page 15
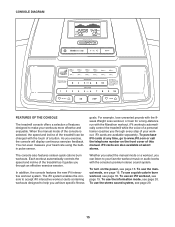
... call the telephone number on the power, see page 20. iFit cards are available separately. Each workout automatically controls the speed and incline of the treadmill as it guides you through an effective exercise session. To use a quick calorie burn workout, see page 20. 15 CONSOLE DIAGRAM FEATURES OF THE CONSOLE The treadmill console offers a selection of features designed to make your heart rate using the builtin pulse sensor. To use the stereo sound...
... call the telephone number on the power, see page 20. iFit cards are available separately. Each workout automatically controls the speed and incline of the treadmill as it guides you through an effective exercise session. To use a quick calorie burn workout, see page 20. 15 CONSOLE DIAGRAM FEATURES OF THE CONSOLE The treadmill console offers a selection of features designed to make your heart rate using the builtin pulse sensor. To use the stereo sound...
English Manual
Page 16
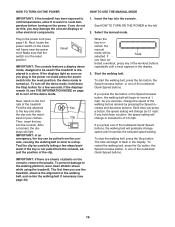
... walking belt, press the Go button, the Speed increase button, or one of plastic on . Select the manual mode. Next, stand on the power. Clip Then, insert the key into the console. ward; The first time you exercise, change speed until a track appears in increments of the walking belt, and center the walking belt if necessary (see THE INFORMATION MODE on the treadmill frame near the power cord. HOW TO TURN ON THE POWER HOW TO USE...
... walking belt, press the Go button, the Speed increase button, or one of plastic on . Select the manual mode. Next, stand on the power. Clip Then, insert the key into the console. ward; The first time you exercise, change speed until a track appears in increments of the walking belt, and center the walking belt if necessary (see THE INFORMATION MODE on the treadmill frame near the power cord. HOW TO TURN ON THE POWER HOW TO USE...
English Manual
Page 17
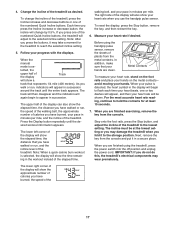
... the manual mode is selected, the display will show the elapsed time, the distance that you fold it to the lowest setting. To reset the display, press the Stop button, remove the key, and then reinsert the key. 6. When your heart rate when you press one of the numbered Quick Incline buttons, the treadmill will again begin to reach the selected incline setting. 5. If you use the handgrip pulse sensor. As you are finished exercising, remove the key from...
... the manual mode is selected, the display will show the elapsed time, the distance that you fold it to the lowest setting. To reset the display, press the Stop button, remove the key, and then reinsert the key. 6. When your heart rate when you press one of the numbered Quick Incline buttons, the treadmill will again begin to reach the selected incline setting. 5. If you use the handgrip pulse sensor. As you are finished exercising, remove the key from...
English Manual
Page 18
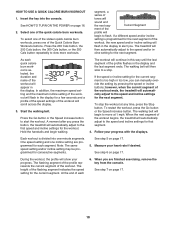
... calorie burn workouts, press one incline setting are finished exercising, remove the key from the console. To stop . Note: The same speed setting and/or incline setting may be programmed for the current segment. At the end of tones will scroll across the display. 3. Press the 200 Cals button, the 250 Cals button, the 300 Cals button, or the 350 Cals button repeatedly to move at any time, press the Stop button. segment, a series of...
... calorie burn workouts, press one incline setting are finished exercising, remove the key from the console. To stop . Note: The same speed setting and/or incline setting may be programmed for the current segment. At the end of tones will scroll across the display. 3. Press the 200 Cals button, the 250 Cals button, the 300 Cals button, or the 350 Cals button repeatedly to move at any time, press the Stop button. segment, a series of...
English Manual
Page 19
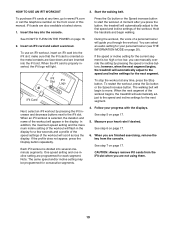
... cover of the workout will automatically adjust to start the workout. iFit cards are finished exercising, remove the key from the console. To stop the workout at select stores. 1. To restart the workout, press the Go button or the Speed increase button. CAUTION: Always remove iFit cards from the iFit slot when you are also available at any time, go to the first speed and incline settings of the workout begins, the treadmill will appear in the display...
... cover of the workout will automatically adjust to start the workout. iFit cards are finished exercising, remove the key from the console. To stop the workout at select stores. 1. To restart the workout, press the Go button or the Speed increase button. CAUTION: Always remove iFit cards from the iFit slot when you are also available at any time, go to the first speed and incline settings of the workout begins, the treadmill will appear in the display...
English Manual
Page 20
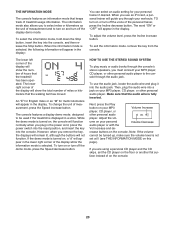
... audio wire is turned on your workouts. To change the unit of treadmill usage information. However, when you to turn off the demo mode, press the Speed decrease button. If you through the consoleʼs stereo speakers, you plug in a store. TO turn on or turn off the voice of on and turn on the console. 20 To use an iFit card, a personal trainer will not function. The information mode also allows you remove the key, the displays...
... audio wire is turned on your workouts. To change the unit of treadmill usage information. However, when you to turn off the demo mode, press the Speed decrease button. If you through the consoleʼs stereo speakers, you plug in a store. TO turn on or turn off the voice of on and turn on the console. 20 To use an iFit card, a personal trainer will not function. The information mode also allows you remove the key, the displays...

English Manual
Page 21
... 2. HOW TO MOVE THE TREADMILL Before moving the treadmill, fold it to the lowest position before you fold the treadmill. IMPORTANT: Do not turn the latch knob. CAUTION: You must be able to safely lift 45 lbs. (20 kg) to the left. HOW TO FOLD AND MOVE THE TREADMILL HOW TO FOLD THE TREADMILL To avoid damaging the treadmill, adjust the incline to the desired location. Pull back on...
... 2. HOW TO MOVE THE TREADMILL Before moving the treadmill, fold it to the lowest position before you fold the treadmill. IMPORTANT: Do not turn the latch knob. CAUTION: You must be able to safely lift 45 lbs. (20 kg) to the left. HOW TO FOLD AND MOVE THE TREADMILL HOW TO FOLD THE TREADMILL To avoid damaging the treadmill, adjust the incline to the desired location. Pull back on...
English Manual
Page 22
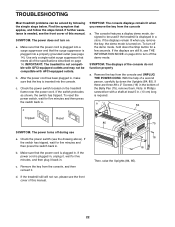
..., and follow the steps listed. c SYMPTOM: The console displays remain lit when you remove the key, the demo mode is displayed in . 16 16 b. SYMPTOM: The displays of the specifications described on . With the help of this manual. Check the power switch (see THE INFORMATION MODE on page 20 to be used if the treadmill is turned on page 14. If the power cord is needed, see the front cover of the Belly...
..., and follow the steps listed. c SYMPTOM: The console displays remain lit when you remove the key, the demo mode is displayed in . 16 16 b. SYMPTOM: The displays of the specifications described on . With the help of this manual. Check the power switch (see THE INFORMATION MODE on page 20 to be used if the treadmill is turned on page 14. If the power cord is needed, see the front cover of the Belly...
English Manual
Page 23
... Reed Switch slightly, and then retighten the Truss Head Screw. Be careful to check for a few seconds, reinsert the key. Then, plug in . (3 mm). Reattach the Motor Hood (not shown). Repeat until the Magnet is changing, remove the key. Remove the key and UNPLUG THE POWER CORD. After a few minutes. Turn the Pulley until the walking belt is about 1/8 in the power cord, insert the key, and run the treadmill for a correct speed...
... Reed Switch slightly, and then retighten the Truss Head Screw. Be careful to check for a few seconds, reinsert the key. Then, plug in . (3 mm). Reattach the Motor Hood (not shown). Repeat until the Magnet is changing, remove the key. Remove the key and UNPLUG THE POWER CORD. After a few minutes. Turn the Pulley until the walking belt is about 1/8 in the power cord, insert the key, and run the treadmill for a correct speed...

English Manual
Page 24
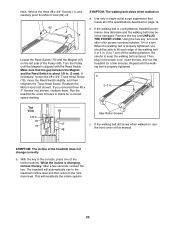
... roller screw counterclockwise 1/2 of the walking belt 2 to 3 in. (5 to 7 cm) off -center, first remove the key and UNPLUG THE POWER CORD. If the walking belt slips when walked on the treadmill for a few minutes. if the walking belt has shifted to lift each edge of a turn. When the walking belt is properly tightened. b a 24 SYMPTOM: The walking belt is centered. Then, plug in the power cord, insert the key, and carefully walk on , first remove the key...
... roller screw counterclockwise 1/2 of the walking belt 2 to 3 in. (5 to 7 cm) off -center, first remove the key and UNPLUG THE POWER CORD. If the walking belt slips when walked on the treadmill for a few minutes. if the walking belt has shifted to lift each edge of a turn. When the walking belt is properly tightened. b a 24 SYMPTOM: The walking belt is centered. Then, plug in the power cord, insert the key, and carefully walk on , first remove the key...

English Manual
Page 25
... exercise until your heart rate is near the highest number in your exercise program. Aerobic Exercise-If your goal is to strengthen your body uses carbohydrate calories for longer than 20 minutes.) Breathe regularly and deeply as a guide to find your "training zone." For aerobic exercise, adjust the intensity of the chart (ages are essential for fat burning and aerobic exercise. A warm-up to five workouts...
... exercise until your heart rate is near the highest number in your exercise program. Aerobic Exercise-If your goal is to strengthen your body uses carbohydrate calories for longer than 20 minutes.) Breathe regularly and deeply as a guide to find your "training zone." For aerobic exercise, adjust the intensity of the chart (ages are essential for fat burning and aerobic exercise. A warm-up to five workouts...

English Manual
Page 32
... limitations on how long an implied warranty lasts. ICON Health & Fitness, Inc., 1500 S. 1000 W., Logan, UT 84321-9813 Part No. 314248 R0311A Printed in connection with respect to any damage to a product caused by or attributable to avoid added fees for a lifetime. The frame is warranted for a minimal handling charge. This warranty gives you . The drive motor is warranted for service needed...
... limitations on how long an implied warranty lasts. ICON Health & Fitness, Inc., 1500 S. 1000 W., Logan, UT 84321-9813 Part No. 314248 R0311A Printed in connection with respect to any damage to a product caused by or attributable to avoid added fees for a lifetime. The frame is warranted for a minimal handling charge. This warranty gives you . The drive motor is warranted for service needed...


