

English Manual
Page 2
TABLE OF CONTENTS IMPORTANT PRECAUTIONS 3 BEFORE YOU BEGIN 4 PART IDENTIFICATION CHART 5 ASSEMBLY 6 HOW TO USE THE ELLIPTICAL TRAINER 9 MAINTENANCE 11 CONDITIONING GUIDELINES 12 PART LIST 14 EXPLODED DRAWING 15 HOW TO ORDER REPLACEMENT PARTS Back Cover FULL 90 DAY WARRANTY Back Cover 2
TABLE OF CONTENTS IMPORTANT PRECAUTIONS 3 BEFORE YOU BEGIN 4 PART IDENTIFICATION CHART 5 ASSEMBLY 6 HOW TO USE THE ELLIPTICAL TRAINER 9 MAINTENANCE 11 CONDITIONING GUIDELINES 12 PART LIST 14 EXPLODED DRAWING 15 HOW TO ORDER REPLACEMENT PARTS Back Cover FULL 90 DAY WARRANTY Back Cover 2
English Manual
Page 3
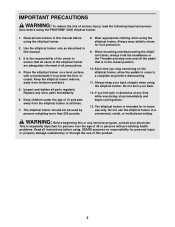
...all instructions in a commercial, rental, or institutional setting. If you stop exercising on a level surface, with pre-existing health problems. Read all parts regularly. This is the responsibility of serious injury, read the following important precau- Inspect and tighten all instructions before using the elliptical trainer. Place.... 11. It is especially important for in-home use the elliptical trainer in this product. 3 Wear appropriate clothing when using the PROFORM® 545E elliptical trainer. 1. SEARS assumes no responsibility for foot protection. 9.
...all instructions in a commercial, rental, or institutional setting. If you stop exercising on a level surface, with pre-existing health problems. Read all parts regularly. This is the responsibility of serious injury, read the following important precau- Inspect and tighten all instructions before using the elliptical trainer. Place.... 11. It is especially important for in-home use the elliptical trainer in this product. 3 Wear appropriate clothing when using the PROFORM® 545E elliptical trainer. 1. SEARS assumes no responsibility for foot protection. 9.
English Manual
Page 4
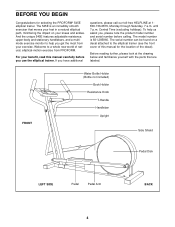
...the product model number and serial number before you use the elliptical trainer. For your benefit, read this manual for selecting the PROFORM® 545E elliptical trainer. FRONT Water Bottle Holder (Bottle not included) Book Holder Resistance Knob T-Handle Handlebar Upright Side Shield Pedal Disk LEFT ... for the location of the decal). If you get the most from PROFORM. To help you have additional questions, please call our toll-free HELPLINE at the drawing below and familiarize yourself with the parts that moves your feet in a natural elliptical path, minimizing the impact...
...the product model number and serial number before you use the elliptical trainer. For your benefit, read this manual for selecting the PROFORM® 545E elliptical trainer. FRONT Water Bottle Holder (Bottle not included) Book Holder Resistance Knob T-Handle Handlebar Upright Side Shield Pedal Disk LEFT ... for the location of the decal). If you get the most from PROFORM. To help you have additional questions, please call our toll-free HELPLINE at the drawing below and familiarize yourself with the parts that moves your feet in a natural elliptical path, minimizing the impact...
English Manual
Page 5
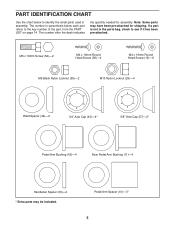
...Bushing (11)-4 Handlebar Spacer (39)-2 * Extra parts may have been pre-attached for assembly. The number in parenthesis below to identify the small parts used in the parts bag, check to the key number of the part, from the PART LIST on page 14. Note: Some parts may be included. Pedal Arm Spacer (41...)-3* 5 PART IDENTIFICATION CHART Use the chart below each part refers to see if it has been ...
...Bushing (11)-4 Handlebar Spacer (39)-2 * Extra parts may have been pre-attached for assembly. The number in parenthesis below to identify the small parts used in the parts bag, check to the key number of the part, from the PART LIST on page 14. Note: Some parts may be included. Pedal Arm Spacer (41...)-3* 5 PART IDENTIFICATION CHART Use the chart below each part refers to see if it has been ...
English Manual
Page 6
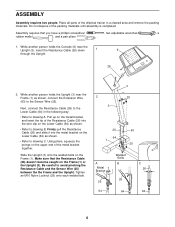
...) and slide it into the wire clip on the metal bracket, and insert the tip of the packing materials until assembly is completed. Place all parts of the metal bracket together. Next, connect the Resistance Cable (26) to the Lower Cable (64) in a cleared area and remove the packing materials...
...) and slide it into the wire clip on the metal bracket, and insert the tip of the packing materials until assembly is completed. Place all parts of the metal bracket together. Next, connect the Resistance Cable (26) to the Lower Cable (64) in a cleared area and remove the packing materials...
English Manual
Page 7
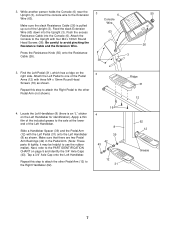
... 43 12 31 Ridge 31 12 62 12 Grease 7 Repeat this step to attach the Right Pedal to the other Pedal Arm (12) to the PART IDENTIFICATION CHART on the 3 right side. Console Make sure the slack Resistance Cable (26) is an "L" sticker on the Left Handlebar for identification). ...Left Handlebar. Tap a 3/4" Axle Cap onto the Left Handlebar. Make sure that there are two Pedal Arm Bushings (42) in the Pedal Arm. (Note: These parts fit tightly; Feed the slack Extension Wire (63) down into the Console (6). Find the Left Pedal (31), which has a ridge on page 5 and identify ...
... 43 12 31 Ridge 31 12 62 12 Grease 7 Repeat this step to attach the Right Pedal to the other Pedal Arm (12) to the PART IDENTIFICATION CHART on the 3 right side. Console Make sure the slack Resistance Cable (26) is an "L" sticker on the Left Handlebar for identification). ...Left Handlebar. Tap a 3/4" Axle Cap onto the Left Handlebar. Make sure that there are two Pedal Arm Bushings (42) in the Pedal Arm. (Note: These parts fit tightly; Feed the slack Extension Wire (63) down into the Console (6). Find the Left Pedal (31), which has a ridge on page 5 and identify ...
English Manual
Page 8
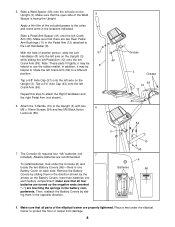
... under the elliptical trainer to the axles and crank arms in the Pedal Arm (12) attached to use the rubber mallet. Note: These parts fit tightly; In addition, it may be helpful to the Left Handlebar (8). Attach the T-Handle (10) to attach the Right Handlebar and... all four batteries are turned so the negative ends (marked "-") are two Rear Pedal Arm Bushings (11) in the locations indicated. Make sure that all parts of the included grease to protect the floor or carpet from damage. 8 The Console (6) requires four "AA" batteries (not 7 included). 5. Slide a...
... under the elliptical trainer to the axles and crank arms in the Pedal Arm (12) attached to use the rubber mallet. Note: These parts fit tightly; In addition, it may be helpful to the Left Handlebar (8). Attach the T-Handle (10) to attach the Right Handlebar and... all four batteries are turned so the negative ends (marked "-") are two Rear Pedal Arm Bushings (11) in the locations indicated. Make sure that all parts of the included grease to protect the floor or carpet from damage. 8 The Console (6) requires four "AA" batteries (not 7 included). 5. Slide a...
English Manual
Page 11
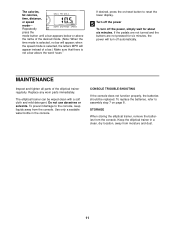
...-SHOOTING If the console does not function properly, the batteries should be wiped clean with a soft cloth and mild detergent. Replace any worn parts immediately. STORAGE When storing the elliptical trainer, remove the batteries from the console. The calories, fat calories, time, distance, or speed mode... off automatically. Use only a sealable water bottle in a clean, dry location, away from moisture and dust. 11 MAINTENANCE Inspect and tighten all parts of the desired mode. (Note: When the time mode is not a bar above the word "scan." Repeatedly press the mode button until a...
...-SHOOTING If the console does not function properly, the batteries should be wiped clean with a soft cloth and mild detergent. Replace any worn parts immediately. STORAGE When storing the elliptical trainer, remove the batteries from the console. The calories, fat calories, time, distance, or speed mode... off automatically. Use only a sealable water bottle in a clean, dry location, away from moisture and dust. 11 MAINTENANCE Inspect and tighten all parts of the desired mode. (Note: When the time mode is not a bar above the word "scan." Repeatedly press the mode button until a...

English Manual
Page 12
...is the recommended heart rate for fat burning, maximum fat burning, and cardiovascular (aerobic) exercise. the middle number is make exercise a regular and enjoyable part of rest between workouts. Remember, the key to success is the heart rate for aerobic exercise. Take a six-second heartbeat count, and multiply the ... zone for longer than 20 minutes.) A cool-down, with at least one day of your everyday life. 12 CONDITIONING GUIDELINES The following three parts: To find the proper heart rate for you, first find your age at the bottom of the chart (ages are rounded off to the ...
...is the recommended heart rate for fat burning, maximum fat burning, and cardiovascular (aerobic) exercise. the middle number is make exercise a regular and enjoyable part of rest between workouts. Remember, the key to success is the heart rate for aerobic exercise. Take a six-second heartbeat count, and multiply the ... zone for longer than 20 minutes.) A cool-down, with at least one day of your everyday life. 12 CONDITIONING GUIDELINES The following three parts: To find the proper heart rate for you, first find your age at the bottom of the chart (ages are rounded off to the ...
English Manual
Page 14
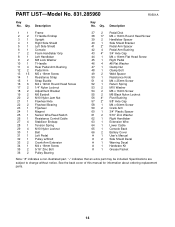
... No. 831.285960 R0501A Key No. Description Key No. "*" indicates that an extra part may be included. See the back cover of this manual for information about ordering replacement parts. 14 Description 1 1 Frame 2 2 T-Handle Endcap 3 1 Upright 4 1 Right Side Shield 5 1 Left Side Shield 6 1 Console 7 2 Foam Handlebar Grip 8 1 ... Back 66 2 Battery Cover # 1 User's Manual # 2 Side Shield Decal # 1 Warning Decal # 1 Hardware Kit # 1 Grease Packet Note: "#" indicates a non-illustrated part. Qty. Specifications are subject to change without notice. Qty.
... No. 831.285960 R0501A Key No. Description Key No. "*" indicates that an extra part may be included. See the back cover of this manual for information about ordering replacement parts. 14 Description 1 1 Frame 2 2 T-Handle Endcap 3 1 Upright 4 1 Right Side Shield 5 1 Left Side Shield 6 1 Console 7 2 Foam Handlebar Grip 8 1 ... Back 66 2 Battery Cover # 1 User's Manual # 2 Side Shield Decal # 1 Warning Decal # 1 Hardware Kit # 1 Grease Packet Note: "#" indicates a non-illustrated part. Qty. Specifications are subject to change without notice. Qty.
English Manual
Page 16
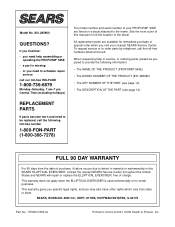
...OF THE PRODUCT (PROFORM® 545E) • The MODEL NUMBER OF THE PRODUCT (831.285960) • The KEY NUMBER OF THE PART (see page 14) • The DESCRIPTION OF THE PART (see page 14). REPLACEMENT PARTS If parts become worn and need help or service, or ordering parts, please be prepared ...8226; you may also have other rights which vary from the date of charge. When requesting help assembling or operating the PROFORM® 545E • a part is used commercially or for immediate purchase or special order when you find the location of your nearest SEARS Service Center. ...
...OF THE PRODUCT (PROFORM® 545E) • The MODEL NUMBER OF THE PRODUCT (831.285960) • The KEY NUMBER OF THE PART (see page 14) • The DESCRIPTION OF THE PART (see page 14). REPLACEMENT PARTS If parts become worn and need help or service, or ordering parts, please be prepared ...8226; you may also have other rights which vary from the date of charge. When requesting help assembling or operating the PROFORM® 545E • a part is used commercially or for immediate purchase or special order when you find the location of your nearest SEARS Service Center. ...


