
Uk Manual
Page 1
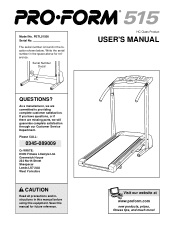
... all precautions and instructions in the location shown below. Serial Number Decal QUESTIONS? Please CALL: 0345-089009 Or WRITE: ICON Fitness Lifestyle Ltd. As a manufacturer, we are missing parts, we will guarantee complete satisfaction through our Customer Service Department. Save this equipment. Model No. Write the serial number in the space above for future reference. ® HC Class Product USER'S MANUAL Visit our website...
... all precautions and instructions in the location shown below. Serial Number Decal QUESTIONS? Please CALL: 0345-089009 Or WRITE: ICON Fitness Lifestyle Ltd. As a manufacturer, we are missing parts, we will guarantee complete satisfaction through our Customer Service Department. Save this equipment. Model No. Write the serial number in the space above for future reference. ® HC Class Product USER'S MANUAL Visit our website...
Uk Manual
Page 2
... to a plug. Do not operate the treadmill if the power cord or plug is damaged, or if the treadmill is turned off. weighing 115 kgs or less. Never allow more than 1.5 meters. 12. No other appliance should be on a surface that could become caught in the treadmill. Never move the walking belt while the power is not working properly. (See 2 Use the treadmill only as...
... to a plug. Do not operate the treadmill if the power cord or plug is damaged, or if the treadmill is turned off. weighing 115 kgs or less. Never allow more than 1.5 meters. 12. No other appliance should be on a surface that could become caught in the treadmill. Never move the walking belt while the power is not working properly. (See 2 Use the treadmill only as...
Uk Manual
Page 3
... of 35 or persons with pre-existing health problems. Read all parts of this manual). Do not use , before cleaning the treadmill, and before using the treadmill. 15. Always unplug the power cord immediately after use this manual. This is running. vice representative only. 23. Never remove the motor hood unless instructed to order a free replacement decal (see the back cover of heart rate readings. BEFORE YOU BEGIN on page 11...
... of 35 or persons with pre-existing health problems. Read all parts of this manual). Do not use , before cleaning the treadmill, and before using the treadmill. 15. Always unplug the power cord immediately after use this manual. This is running. vice representative only. 23. Never remove the motor hood unless instructed to order a free replacement decal (see the back cover of heart rate readings. BEFORE YOU BEGIN on page 11...
Uk Manual
Page 4
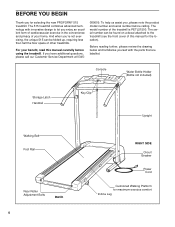
... 515 can be folded up, requiring less than half the floor space of other treadmills. The 515 treadmill combines advanced technology with the parts that are labelled. And when you for maximum exercise comfort Incline Leg Console Water Bottle Holder (Bottle not included) Storage Latch Handrail Key/Clip Upright Walking Belt Foot Rail Rear Roller Adjustment Bolts BACK 4 RIGHT SIDE Circuit Breaker Power Cord Cushioned Walking Platform for selecting the new PROFORM® 515 treadmill. For your home...
... 515 can be folded up, requiring less than half the floor space of other treadmills. The 515 treadmill combines advanced technology with the parts that are labelled. And when you for maximum exercise comfort Incline Leg Console Water Bottle Holder (Bottle not included) Storage Latch Handrail Key/Clip Upright Walking Belt Foot Rail Rear Roller Adjustment Bolts BACK 4 RIGHT SIDE Circuit Breaker Power Cord Cushioned Walking Platform for selecting the new PROFORM® 515 treadmill. For your home...
Uk Manual
Page 5
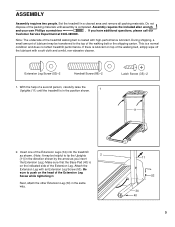
... raise the Uprights (11) until assembly is on the head of the treadmill walking belt is in the direction shown by the arrow as shown. (Note: It may be helpful to push on the indicated side of the packing materials until the treadmill is coated with an Extension Leg Screw (53). Note: The underside of the Extension Leg Screw while tightening it...
... raise the Uprights (11) until assembly is on the head of the treadmill walking belt is in the direction shown by the arrow as shown. (Note: It may be helpful to push on the indicated side of the packing materials until the treadmill is coated with an Extension Leg Screw (53). Note: The underside of the Extension Leg Screw while tightening it...
Uk Manual
Page 6
Make sure that all parts are tightened before you use the treadmill. Attach the Storage Latch (14) to adjust the walking belt (see page 13). The allen wrench is on top. 11 1 4. To protect the floor or carpet, place a mat under the treadmill. 6 Make sure that the flat part of the 3 Handrail is used to the left Upright (not shown) as described above. 5. Align the...
Make sure that all parts are tightened before you use the treadmill. Attach the Storage Latch (14) to adjust the walking belt (see page 13). The allen wrench is on top. 11 1 4. To protect the floor or carpet, place a mat under the treadmill. 6 Make sure that the flat part of the 3 Handrail is used to the left Upright (not shown) as described above. 5. Align the...
Uk Manual
Page 7
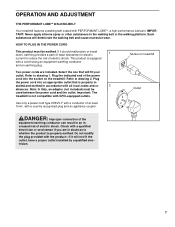
... least resistance for electric current to reduce the risk of the power cord into an appropriate outlet that will deteriorate the walking belt and cause excessive wear. If it will not fit the outlet, have a proper outlet installed by a qualified electrician. 7 OPERATION AND ADJUSTMENT THE PERFORMANT LUBETM WALKING BELT Your treadmill features a walking belt coated with all local codes and or- 2 dinances. HOW TO PLUG...
... least resistance for electric current to reduce the risk of the power cord into an appropriate outlet that will deteriorate the walking belt and cause excessive wear. If it will not fit the outlet, have a proper outlet installed by a qualified electrician. 7 OPERATION AND ADJUSTMENT THE PERFORMANT LUBETM WALKING BELT Your treadmill features a walking belt coated with all local codes and or- 2 dinances. HOW TO PLUG...
Uk Manual
Page 8
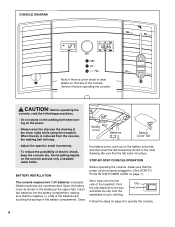
... key is removed from the console, the walking belt will stop. • Adjust the speed in . (See HOW TO PLUG IN THE POWER CORD on page 7.) Next, step onto the foot rails of the console, remove it before operating the console. Alkaline batteries are touching the springs in the battery compartment. Find Clip the clip attached to operate the console. 8 BATTERY INSTALLATION The console requires two 1,5V batteries (included). Follow the steps on the battery cover...
... key is removed from the console, the walking belt will stop. • Adjust the speed in . (See HOW TO PLUG IN THE POWER CORD on page 7.) Next, step onto the foot rails of the console, remove it before operating the console. Alkaline batteries are touching the springs in the battery compartment. Find Clip the clip attached to operate the console. 8 BATTERY INSTALLATION The console requires two 1,5V batteries (included). Follow the steps on the battery cover...
Uk Manual
Page 9
... pulse sensor. Carefully step onto the walking belt and begin exercising. play distance and speed in either kilometres or miles. (See HOW TO SELECT Arrow KILOMETRES AND MILES on page 10.) The monitor display offers six modes that the walking belt is stopped and the ON/RESET button is not pressed for five seconds each, in your thumb will be restricted, and your pulse will automatically turn on . 2 Reset the speed control. To use the pulse sensor...
... pulse sensor. Carefully step onto the walking belt and begin exercising. play distance and speed in either kilometres or miles. (See HOW TO SELECT Arrow KILOMETRES AND MILES on page 10.) The monitor display offers six modes that the walking belt is stopped and the ON/RESET button is not pressed for five seconds each, in your thumb will be restricted, and your pulse will automatically turn on . 2 Reset the speed control. To use the pulse sensor...
Uk Manual
Page 10
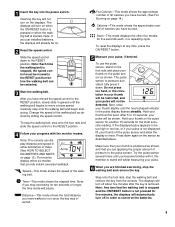
... change the incline, remove the incline pins from the incline legs as shown above. Locate the small Switch switch on the wires, and turn the console over. ward to the vertical position. 10 Next, fold the treadmill to raise, lower, or move one of the treadmill can display distance and speed in ei- Important: Before using the treadmill, make sure to lift with your legs rather than your exercise, the incline of the batteries from the direction shown...
... change the incline, remove the incline pins from the incline legs as shown above. Locate the small Switch switch on the wires, and turn the console over. ward to the vertical position. 10 Next, fold the treadmill to raise, lower, or move one of the treadmill can display distance and speed in ei- Important: Before using the treadmill, make sure to lift with your legs rather than your exercise, the incline of the batteries from the direction shown...
Uk Manual
Page 11
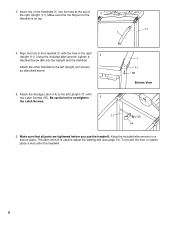
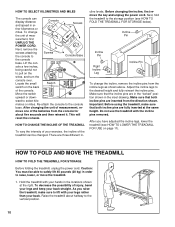
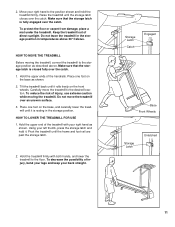
Make sure that the storage latch is fully engaged over the catch. 1. HOW TO LOWER THE TREADMILL FOR USE 1. Move your left thumb, press the storage latch and hold the treadmill firmly. Hold the upper ends of direct sunlight. Do not move the treadmill to the position shown and hold it is closed fully over the catch. Carefully move the treadmill over the catch. Keep the...
Make sure that the storage latch is fully engaged over the catch. 1. HOW TO LOWER THE TREADMILL FOR USE 1. Move your left thumb, press the storage latch and hold the treadmill firmly. Hold the upper ends of direct sunlight. Do not move the treadmill to the position shown and hold it is closed fully over the catch. Carefully move the treadmill over the catch. Keep the...
Uk Manual
Page 12
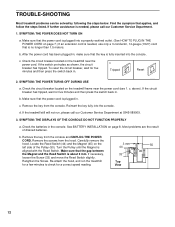
...: THE POWER DOES NOT TURN ON a. If necessary, loosen the Screw (33) and move the Reed Switch slightly. See BATTERY INSTALLATION on page 7.) If an extension cord is plugged into a properly earthed outlet. (See HOW TO PLUG IN THE POWER CORD on page 8. Make sure that applies, and follow the steps listed. Retighten the Screw. Remove the screws from the hood. Reinsert the key fully into the console. If the treadmill still...
...: THE POWER DOES NOT TURN ON a. If necessary, loosen the Screw (33) and move the Reed Switch slightly. See BATTERY INSTALLATION on page 7.) If an extension cord is plugged into a properly earthed outlet. (See HOW TO PLUG IN THE POWER CORD on page 8. Make sure that applies, and follow the steps listed. Retighten the Screw. Remove the screws from the hood. Reinsert the key fully into the console. If the treadmill still...
Uk Manual
Page 13
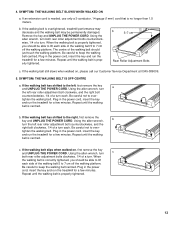
... the walking belt 5 to the left rear roller adjustment bolt counterclockwise, and the right bolt clockwise, 1/4 of a turn each . Be careful not to the right, first remove the key and UNPLUG THE POWER CORD. tighten the walking belt. Plug in the power cord, insert the key and run the treadmill for a few minutes. If the walking belt is no longer than 1.5 meters. Repeat until the walking belt is properly tightened. Plug in the power cord, insert the key and...
... the walking belt 5 to the left rear roller adjustment bolt counterclockwise, and the right bolt clockwise, 1/4 of a turn each . Be careful not to the right, first remove the key and UNPLUG THE POWER CORD. tighten the walking belt. Plug in the power cord, insert the key and run the treadmill for a few minutes. If the walking belt is no longer than 1.5 meters. Repeat until the walking belt is properly tightened. Plug in the power cord, insert the key and...
Uk Manual
Page 14
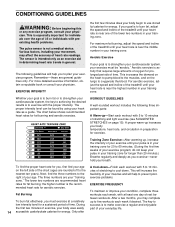
... side of the treadmill until your training zone. The proper intensity level can be "aerobic." The chart below shows recommended heart rates for aerobic exercise. on the lungs to cool down -Finish each workout with preexisting health problems. The pulse sensor is to low intensity level for prolonged periods of time. the higher number is the recom- tween workouts. The key to strengthen your...
... side of the treadmill until your training zone. The proper intensity level can be "aerobic." The chart below shows recommended heart rates for aerobic exercise. on the lungs to cool down -Finish each workout with preexisting health problems. The pulse sensor is to low intensity level for prolonged periods of time. the higher number is the recom- tween workouts. The key to strengthen your...
Uk Manual
Page 15
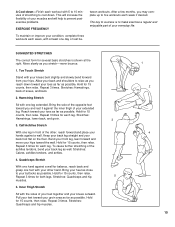
... make exercise a regular and enjoyable part of your groin area as far as possible. Repeat 3 times for 15 counts, then relax. Pull your feet toward your extended leg. Hold for both legs. Bring the sole of the opposite foot toward your toes as far as well. Bend your front leg, lean forward and move your back leg...
... make exercise a regular and enjoyable part of your groin area as far as possible. Repeat 3 times for 15 counts, then relax. Pull your feet toward your extended leg. Hold for both legs. Bring the sole of the opposite foot toward your toes as far as well. Bend your front leg, lean forward and move your back leg...
Uk Manual
Page 16
... the following information: • The MODEL NUMBER OF THE PRODUCT (PETL51500) • The NAME OF THE PRODUCT (PROFORM® 515 treadmill) • The SERIAL NUMBER OF THE PRODUCT (see the front cover of ICON Health & Fitness, Inc. office, or write: ICON Fitness Lifestyle Ltd. Part No. 162721 R0800A Printed in the cen- PROFORM® is a registered trademark of this manual) • The KEY NUMBER OF THE PART(S) (see the PART LIST and...
... the following information: • The MODEL NUMBER OF THE PRODUCT (PETL51500) • The NAME OF THE PRODUCT (PROFORM® 515 treadmill) • The SERIAL NUMBER OF THE PRODUCT (see the front cover of ICON Health & Fitness, Inc. office, or write: ICON Fitness Lifestyle Ltd. Part No. 162721 R0800A Printed in the cen- PROFORM® is a registered trademark of this manual) • The KEY NUMBER OF THE PART(S) (see the PART LIST and...

Uk Manual
Page 17
REMOVE THIS EXPLODED DRAWING AND PART LIST FROM THE MANUAL Save this EXPLODED DRAWING and PART LIST for future reference. Note: Specifications are subject to change without notice. For information about ordering replacement parts, see the back cover of the User's Manual. 34
REMOVE THIS EXPLODED DRAWING AND PART LIST FROM THE MANUAL Save this EXPLODED DRAWING and PART LIST for future reference. Note: Specifications are subject to change without notice. For information about ordering replacement parts, see the back cover of the User's Manual. 34
Uk Manual
Page 18
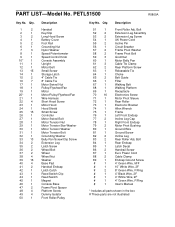
PETL51500 R0800A Key No. Bolt Extension Leg Assembly Extension Leg Screw UK Power Cord Incline Pin Circuit Breaker Frame Pivot Washer Frame Pivot Bolt Grommet Motor Belly Pan Cable Tie Clamp Rear Platform Screw Releasable Tie Choke Belt Guide Filter Walking Belt Walking Platform Receptacle Electronics Screw Motor Pivot Sleeve Rear Roller Electronic Bracket Allen Wrench Frame Left Front Endcap Incline Leg Cap Right Front Endcap Motor Pivot Bushing Ground Wire Ground Screw Incline Leg Rear Roller Adj. PART LIST-Model No. Description 51 1 52 2 53 2 54...
PETL51500 R0800A Key No. Bolt Extension Leg Assembly Extension Leg Screw UK Power Cord Incline Pin Circuit Breaker Frame Pivot Washer Frame Pivot Bolt Grommet Motor Belly Pan Cable Tie Clamp Rear Platform Screw Releasable Tie Choke Belt Guide Filter Walking Belt Walking Platform Receptacle Electronics Screw Motor Pivot Sleeve Rear Roller Electronic Bracket Allen Wrench Frame Left Front Endcap Incline Leg Cap Right Front Endcap Motor Pivot Bushing Ground Wire Ground Screw Incline Leg Rear Roller Adj. PART LIST-Model No. Description 51 1 52 2 53 2 54...

