
English Manual
Page 3
... your local electronics store. 12. Always wear athletic shoes. Do not use . 20. Adjust the speed in small increments to raise, lower, or move the treadmill until it is turned off. Do not attempt to avoid sudden jumps in a garage or covered patio, or near water. 5. Keep children under the...
... your local electronics store. 12. Always wear athletic shoes. Do not use . 20. Adjust the speed in small increments to raise, lower, or move the treadmill until it is turned off. Do not attempt to avoid sudden jumps in a garage or covered patio, or near water. 5. Keep children under the...

English Manual
Page 8
.... Note: One replacement Base Pad may be replaced, use the replacement Base Pad. 4. the Wheels should slide easily into the socket and snap into place, turn the connector and then insert it. 6 72 42 47 8 If the connector does not slide easily and snap into place. Attach the end of the...
.... Note: One replacement Base Pad may be replaced, use the replacement Base Pad. 4. the Wheels should slide easily into the socket and snap into place, turn the connector and then insert it. 6 72 42 47 8 If the connector does not slide easily and snap into place. Attach the end of the...
English Manual
Page 10
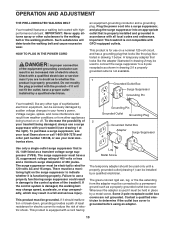
...substances to use a properly functioning surge suppressor could result in your local elec- This product is functioning properly. Check with your treadmill being turned on or off. Failure to the walking belt or the walking platform. OPERATION AND ADJUSTMENT THE PRE-LUBRICATED WALKING BELT Your... treadmill features a walking belt coated with the product-if it will deteriorate the walking belt and cause excessive wear. IMPORTANT: Never ...
...substances to use a properly functioning surge suppressor could result in your local elec- This product is functioning properly. Check with your treadmill being turned on or off. Failure to the walking belt or the walking platform. OPERATION AND ADJUSTMENT THE PRE-LUBRICATED WALKING BELT Your... treadmill features a walking belt coated with the product-if it will deteriorate the walking belt and cause excessive wear. IMPORTANT: Never ...
English Manual
Page 11
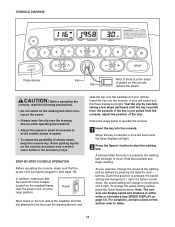
... keep the console dry. CAUTION: Before operating the console, read the following precautions. • Do not stand on the walking belt when turning on the treadmill frame near the power cord, is in increments of 0.5 mph. In addition, make sure that the reset/off circuit breaker, located on ...the power. • Always wear the clip (see the drawing above ) while operating the treadmill. • Adjust the speed in small increments to move. Find the clip attached to operate the console. 1 Insert the key into the console....
... keep the console dry. CAUTION: Before operating the console, read the following precautions. • Do not stand on the walking belt when turning on the treadmill frame near the power cord, is in increments of 0.5 mph. In addition, make sure that the reset/off circuit breaker, located on ...the power. • Always wear the clip (see the drawing above ) while operating the treadmill. • Adjust the speed in small increments to move. Find the clip attached to operate the console. 1 Insert the key into the console....
English Manual
Page 12
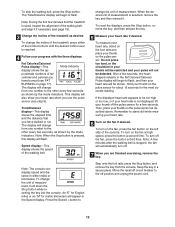
...To turn on the fan, press the fan button on the fan at high speed, press the button a second time. The Time/Distance display will also show your thumb on the pulse sensor. Fat Calories/Calories/ Pulse display-This Mode Indicator display shows the ap- proximate numbers of the treadmill, ... 3 Change the incline of measurement is stopped, the fan will not be restricted and your thumb will be detected. When the desired unit of the treadmill as described above. Note: During the first few seconds, as shown by the mode indicators. Note: A few seconds. Do not press too hard,...
...To turn on the fan, press the fan button on the fan at high speed, press the button a second time. The Time/Distance display will also show your thumb on the pulse sensor. Fat Calories/Calories/ Pulse display-This Mode Indicator display shows the ap- proximate numbers of the treadmill, ... 3 Change the incline of measurement is stopped, the fan will not be restricted and your thumb will be detected. When the desired unit of the treadmill as described above. Note: During the first few seconds, as shown by the mode indicators. Note: A few seconds. Do not press too hard,...
English Manual
Page 15
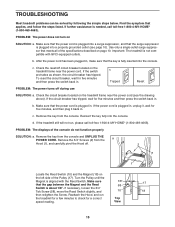
PROBLEM: The power does not turn on the treadmill frame near the power cord (see page 10). Use only...circuit breaker has tripped, wait for a correct speed reading. If further assistance is plugged in . Important: The treadmill is aligned with GFCI-equipped outlets. c. If the switch protrudes as shown, the circuit breaker has tripped. Reattach... will not run the treadmill for a few minutes to check for five minutes and then press the switch back in . c Tripped Reset PROBLEM: The power turns off circuit breaker located on SOLUTION: a. b. Make sure 1/8" that the...
PROBLEM: The power does not turn on the treadmill frame near the power cord (see page 10). Use only...circuit breaker has tripped, wait for a correct speed reading. If further assistance is plugged in . Important: The treadmill is aligned with GFCI-equipped outlets. c. If the switch protrudes as shown, the circuit breaker has tripped. Reattach... will not run the treadmill for a few minutes to check for five minutes and then press the switch back in . c Tripped Reset PROBLEM: The power turns off circuit breaker located on SOLUTION: a. b. Make sure 1/8" that the...
English Manual
Page 16
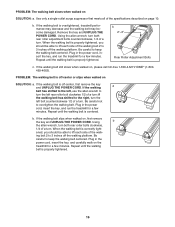
...counterclockwise, 1/4 of the walk- Plug in the power cord, insert the key, and run the treadmill for a few minutes. ened, you should be able to lift each side of a turn . Remove the key and UNPLUG THE POWER CORD. If the walking belt still slows when walked ... 10. If the walking belt is properly tightened, you should be able to turn the left bolt counterclockwise 1/2 of the specifications described on SOLUTION: a. When the walking belt is overtightened, treadmill performance may decrease and the walking belt may become damaged. if the walking belt...
...counterclockwise, 1/4 of the walk- Plug in the power cord, insert the key, and run the treadmill for a few minutes. ened, you should be able to lift each side of a turn . Remove the key and UNPLUG THE POWER CORD. If the walking belt still slows when walked ... 10. If the walking belt is properly tightened, you should be able to turn the left bolt counterclockwise 1/2 of the specifications described on SOLUTION: a. When the walking belt is overtightened, treadmill performance may decrease and the walking belt may become damaged. if the walking belt...


