
Uk Manual
Page 1
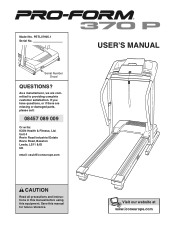
Serial Number Decal QUESTIONS? Save this equipment. USER'S MANUAL Visit our website at www.iconeurope.com As a manufacturer, we are missing or damaged parts, please call: 08457 089 009 Or write: ICON Health & Fitness, Ltd. If you have questions, or if there are committed to providing complete customer satisfaction. Model No. PETL37905.1 Serial No. Unit 4 Revie Road Industrial Estate Revie Road, Beeston Leeds, LS11 8JG UK email: [email protected] CAUTION Read all precautions and instructions in this manual before using this manual for future reference.
Serial Number Decal QUESTIONS? Save this equipment. USER'S MANUAL Visit our website at www.iconeurope.com As a manufacturer, we are missing or damaged parts, please call: 08457 089 009 Or write: ICON Health & Fitness, Ltd. If you have questions, or if there are committed to providing complete customer satisfaction. Model No. PETL37905.1 Serial No. Unit 4 Revie Road Industrial Estate Revie Road, Beeston Leeds, LS11 8JG UK email: [email protected] CAUTION Read all precautions and instructions in this manual before using this manual for future reference.

Uk Manual
Page 2
TABLE OF CONTENTS IMPORTANT PRECAUTIONS 3 BEFORE YOU BEGIN 5 ASSEMBLY 6 OPERATION AND ADJUSTMENT 11 HOW TO FOLD AND MOVE THE TREADMILL 17 TROUBLESHOOTING 19 CONDITIONING GUIDELINES 21 ORDERING REPLACEMENT PARTS Back Cover Note: An EXPLODED DRAWING and a PART LIST are attached in the center of this manual. 2
TABLE OF CONTENTS IMPORTANT PRECAUTIONS 3 BEFORE YOU BEGIN 5 ASSEMBLY 6 OPERATION AND ADJUSTMENT 11 HOW TO FOLD AND MOVE THE TREADMILL 17 TROUBLESHOOTING 19 CONDITIONING GUIDELINES 21 ORDERING REPLACEMENT PARTS Back Cover Note: An EXPLODED DRAWING and a PART LIST are attached in the center of this manual. 2
Uk Manual
Page 3
... the treadmill is not working properly.) 4. Always remove the key, unplug the power cord, and move the treadmill. 3 It is not working properly. (See TROUBLESHOOTING on each side. If an extension cord is running. The pulse sensor is capable of high speeds. Place the treadmill on /off . Never use only a 3conductor, 1mm2 (14-gauge) cord that blocks air openings. No other appliance should be on the walking belt. The treadmill is...
... the treadmill is not working properly.) 4. Always remove the key, unplug the power cord, and move the treadmill. 3 It is not working properly. (See TROUBLESHOOTING on each side. If an extension cord is running. The pulse sensor is capable of high speeds. Place the treadmill on /off . Never use only a 3conductor, 1mm2 (14-gauge) cord that blocks air openings. No other appliance should be on the walking belt. The treadmill is...
Uk Manual
Page 4
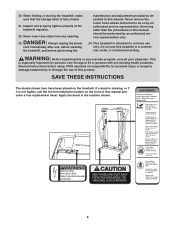
... power cord immediately after use this treadmill in this manual should be performed by an authorised service representative. 20. When folding or moving the treadmill, make sure that the storage latch is not legible, call the toll-free telephone number on the treadmill. Never remove the motor hood unless instructed to do so by an authorised service representative only. 24. Do not use , before cleaning the treadmill, and before using. SAVE THESE INSTRUCTIONS...
... power cord immediately after use this treadmill in this manual should be performed by an authorised service representative. 20. When folding or moving the treadmill, make sure that the storage latch is not legible, call the toll-free telephone number on the treadmill. Never remove the motor hood unless instructed to do so by an authorised service representative only. 24. Do not use , before cleaning the treadmill, and before using. SAVE THESE INSTRUCTIONS...

Uk Manual
Page 5
... labelled parts. reading this manual, please see the front of other treadmills. If you 're not exercising, the unique 370 P treadmill can be folded up, requiring less than half the floor space of this manual. Accessory Tray Book Holder Console Handrail Storage Latch Walking Belt Foot Rail BACK Rear Roller Adjustment Bolts Key/Clip Upright Reset/Off Circuit Breaker RIGHT SIDE Cushioned Walking Platform for the location). The model number of this manual for maximum exercise...
... labelled parts. reading this manual, please see the front of other treadmills. If you 're not exercising, the unique 370 P treadmill can be folded up, requiring less than half the floor space of this manual. Accessory Tray Book Holder Console Handrail Storage Latch Walking Belt Foot Rail BACK Rear Roller Adjustment Bolts Key/Clip Upright Reset/Off Circuit Breaker RIGHT SIDE Cushioned Walking Platform for the location). The model number of this manual for maximum exercise...
Uk Manual
Page 6
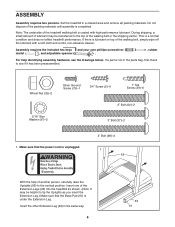
...) to tip the Uprights as you insert the Extension Leg.) Make sure that the power cord is coated with a soft cloth and a mild, non-abrasive cleaner. Insert the other Extension Leg (63) in the same way. 6 63 61 Note: The underside of the treadmill walking belt is unplugged. 4" Bolt (98)-2 1 69 With the help identifying assembly hardware, see if it...
...) to tip the Uprights as you insert the Extension Leg.) Make sure that the power cord is coated with a soft cloth and a mild, non-abrasive cleaner. Insert the other Extension Leg (63) in the same way. 6 63 61 Note: The underside of the treadmill walking belt is unplugged. 4" Bolt (98)-2 1 69 With the help identifying assembly hardware, see if it...

Uk Manual
Page 8
... 47 8 Attach the Console Base with the Silver Ground Screw (75). Start all four Screws before tightening them; Make sure that the Upright Wire (42) is routed below the two indicated round posts (A). Hold the Console Base (47) near the Left Handrail (71). 4 Attach the ends of the 5 Upright Wire (42) as shown in the bot- do not overtighten the Screws. See the lower drawing...
... 47 8 Attach the Console Base with the Silver Ground Screw (75). Start all four Screws before tightening them; Make sure that the Upright Wire (42) is routed below the two indicated round posts (A). Hold the Console Base (47) near the Left Handrail (71). 4 Attach the ends of the 5 Upright Wire (42) as shown in the bot- do not overtighten the Screws. See the lower drawing...

Uk Manual
Page 9
... under the treadmill. A Screws 9 Tighten three 3/4" Screws (2) into the slot in a secure place; Make sure that the power cord is used to pinch the Upright Wire. the large hex key is unplugged. Note: Extra hardware may be included. If you use the treadmill. Attach the Storage Latch (29) and the Latch Spacer (44) 8 to install the receiver included with the Right Grip Plate (36). Cover the Upright Wire with the chest pulse sensor. 1.
... under the treadmill. A Screws 9 Tighten three 3/4" Screws (2) into the slot in a secure place; Make sure that the power cord is used to pinch the Upright Wire. the large hex key is unplugged. Note: Extra hardware may be included. If you use the treadmill. Attach the Storage Latch (29) and the Latch Spacer (44) 8 to install the receiver included with the Right Grip Plate (36). Cover the Upright Wire with the chest pulse sensor. 1.

Uk Manual
Page 11
... local codes and ordinances. See drawing 3. IMPORTANT: Never apply silicone spray or other end of the power cord and tighten the screw in doubt as to the walking belt or the walking platform. This product is properly earthed. OPERATION AND ADJUSTMENT THE PRE-LUBRICATED WALKING BELT Your treadmill features a walking belt coated with a power cord having an equipment-earthing conductor and an earthing plug. Close the adaptor cover over...
... local codes and ordinances. See drawing 3. IMPORTANT: Never apply silicone spray or other end of the power cord and tighten the screw in doubt as to the walking belt or the walking platform. This product is properly earthed. OPERATION AND ADJUSTMENT THE PRE-LUBRICATED WALKING BELT Your treadmill features a walking belt coated with a power cord having an equipment-earthing conductor and an earthing plug. Close the adaptor cover over...
Uk Manual
Page 12
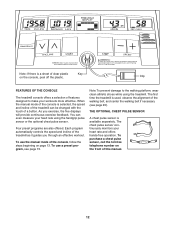
... controls the speed and incline of the heart rate and offers treadmill as it guides you exercise, the five displays THE OPTIONAL CHEST PULSE SENSOR will provide continuous exercise feedback. The chest pulse sensor con- To use the manual mode of the designed to the walking platform, wear clean athletic shoes while using the treadmill. telephone number on page 13. the front of features time the treadmill is sensor or the optional chest pulse sensor. Each program tinuously monitors your heart rate using...
... controls the speed and incline of the heart rate and offers treadmill as it guides you exercise, the five displays THE OPTIONAL CHEST PULSE SENSOR will provide continuous exercise feedback. The chest pulse sensor con- To use the manual mode of the designed to the walking platform, wear clean athletic shoes while using the treadmill. telephone number on page 13. the front of features time the treadmill is sensor or the optional chest pulse sensor. Each program tinuously monitors your heart rate using...
Uk Manual
Page 13
... USE THE MANUAL MODE 1 Insert the key into the console. When the key is pulled from the console. As you walk or run and the number of the treadmill. If a button is selected, a 1/4-mile (400-meter) track will alternate between one number and the other every few seconds, as needed. As you exercise, change in increments of 0.5 mph. 4 Change the incline of the clip as shown by pressing the Speed buttons. The display...
... USE THE MANUAL MODE 1 Insert the key into the console. When the key is pulled from the console. As you walk or run and the number of the treadmill. If a button is selected, a 1/4-mile (400-meter) track will alternate between one number and the other every few seconds, as needed. As you exercise, change in increments of 0.5 mph. 4 Change the incline of the clip as shown by pressing the Speed buttons. The display...

Uk Manual
Page 14
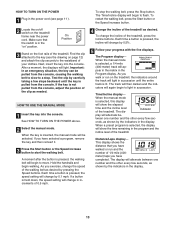
... the power cord. 14 The display will appear in the display. An "E" for English miles or an "M" for about 15 seconds. 7 When you have burned (see step 6). Before using the treadmill, move the on page 21). Step onto the foot rails, press the Stop button, and adjust the incline of fat calories and calories you are finished exercising, remove the key. While the information mode is selected, press the Speed decrease button. This mode...
... the power cord. 14 The display will appear in the display. An "E" for English miles or an "M" for about 15 seconds. 7 When you have burned (see step 6). Before using the treadmill, move the on page 21). Step onto the foot rails, press the Stop button, and adjust the incline of fat calories and calories you are finished exercising, remove the key. While the information mode is selected, press the Speed decrease button. This mode...
Uk Manual
Page 15
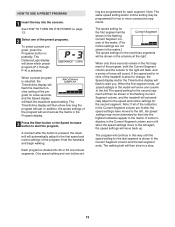
..., and the treadmill will automatically adjust to the speed and incline settings for the first segment will flash to start the program. When a preset program is shown in the Program display. 3 Press the Start button or the Speed increase button to alert you. If the speed and/or incline of the preset programs. To select a preset program, press the Programs button repeatedly. The speed setting for a few seconds, and the Speed display will move downward so that...
..., and the treadmill will automatically adjust to the speed and incline settings for the first segment will flash to start the program. When a preset program is shown in the Program display. 3 Press the Start button or the Speed increase button to alert you. If the speed and/or incline of the preset programs. To select a preset program, press the Programs button repeatedly. The speed setting for a few seconds, and the Speed display will move downward so that...

Uk Manual
Page 16
... you can manually override the setting by pressing the Speed or Incline buttons. See to the speed and incline settings for the next segment. 4 Follow your heart rate if desired. If the speed or incline setting is pressed, an additional indicator will appear or disappear in the Current Segment column. (If any time during the program, you are finished exercising, remove the key. Every few times a Speed button is too high...
... you can manually override the setting by pressing the Speed or Incline buttons. See to the speed and incline settings for the next segment. 4 Follow your heart rate if desired. If the speed or incline setting is pressed, an additional indicator will appear or disappear in the Current Segment column. (If any time during the program, you are finished exercising, remove the key. Every few times a Speed button is too high...
Uk Manual
Page 17
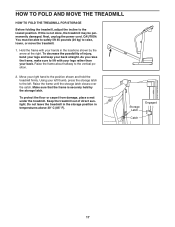
HOW TO FOLD AND MOVE THE TREADMILL HOW TO FOLD THE TREADMILL FOR STORAGE Before folding the treadmill, adjust the incline to the vertical position. 2. Move your left thumb, press the storage latch to the position shown and hold the treadmill firmly. Using your right hand to the left. Storage Latch Engaged Catch 17 As you raise the frame, make sure to raise, lower, or move the treadmill. 1. Raise the frame about...
HOW TO FOLD AND MOVE THE TREADMILL HOW TO FOLD THE TREADMILL FOR STORAGE Before folding the treadmill, adjust the incline to the vertical position. 2. Move your left thumb, press the storage latch to the position shown and hold the treadmill firmly. Using your right hand to the left. Storage Latch Engaged Catch 17 As you raise the frame, make sure to raise, lower, or move the treadmill. 1. Raise the frame about...
Uk Manual
Page 19
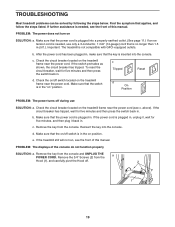
If further assistance is plugged in . Important: The treadmill is needed , see the front of the console do not function properly SOLUTION: a. d On Position PROBLEM: The power turns off . 2 1 19 Make sure that the on/off switch located on the treadmill frame near the power cord (see c. PROBLEM: The displays of this manual. c. Make sure that the power cord is needed , use SOLUTION: a. If the power cord is no longer than 1.5 m (5 ft...
If further assistance is plugged in . Important: The treadmill is needed , see the front of the console do not function properly SOLUTION: a. d On Position PROBLEM: The power turns off . 2 1 19 Make sure that the on/off switch located on the treadmill frame near the power cord (see c. PROBLEM: The displays of this manual. c. Make sure that the power cord is needed , use SOLUTION: a. If the power cord is no longer than 1.5 m (5 ft...

Uk Manual
Page 20
...), move the Reed Switch slightly, and 10 18 then retighten the Screw. If the walking belt is about 3 mm (1/8 in the power cord, insert the key, and run the treadmill for a correct speed reading. Using the hex key, turn both rear roller bolts clockwise, 1/4 of the walking belt 5 to 7 cm (2 to check for a few minutes. Then, plug in .). PROBLEM: The walking belt is centred. Be careful not to the right, turn . Repeat until the walking belt...
...), move the Reed Switch slightly, and 10 18 then retighten the Screw. If the walking belt is about 3 mm (1/8 in the power cord, insert the key, and run the treadmill for a correct speed reading. Using the hex key, turn both rear roller bolts clockwise, 1/4 of the walking belt 5 to 7 cm (2 to check for a few minutes. Then, plug in .). PROBLEM: The walking belt is centred. Be careful not to the right, turn . Repeat until the walking belt...
Uk Manual
Page 21
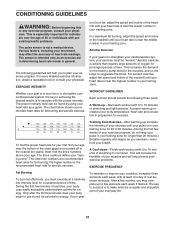
... a guide. Various factors, including your movement, may complete up -Start each workout with 5 to 60 minutes. (During the first few minutes of exercise, your body uses easily accessible carbohydrate calories for individuals over the age of your exercise until your exercise program. This is intended only as an exercise aid in determining heart rate trends in your "training zone." For aerobic exercise, adjust the speed and incline...
... a guide. Various factors, including your movement, may complete up -Start each workout with 5 to 60 minutes. (During the first few minutes of exercise, your body uses easily accessible carbohydrate calories for individuals over the age of your exercise until your exercise program. This is intended only as an exercise aid in determining heart rate trends in your "training zone." For aerobic exercise, adjust the speed and incline...
Uk Manual
Page 24
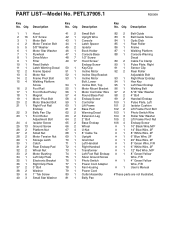
... 1 80 1 81 1 Small Bolt Upright Wire Console Latch Spacer Isolator Book Holder Console Base 1/2" Screw Hood Screw/ Endcap Screw Key/Clip Incline Motor Incline Stop Bracket Incline Motor Bolt, Lower Incline Bolt, Top Motor Mount Bracket Motor Controller Wire Round Base Pad Endcap Screw Controller Lift Frame Base Pad Warning Decal Extension Leg 2" Bolt Base Endcap Wheel U-Nut 8" Cable Tie Upright Grommet Left Handrail Right Handrail Transformer Left Foot Rail Endcap Silver Ground Screw Photo Switch Power Cord Adapter Fan Housing Power Cord Outlet Assembly Belly Pan 82 2 83...
... 1 80 1 81 1 Small Bolt Upright Wire Console Latch Spacer Isolator Book Holder Console Base 1/2" Screw Hood Screw/ Endcap Screw Key/Clip Incline Motor Incline Stop Bracket Incline Motor Bolt, Lower Incline Bolt, Top Motor Mount Bracket Motor Controller Wire Round Base Pad Endcap Screw Controller Lift Frame Base Pad Warning Decal Extension Leg 2" Bolt Base Endcap Wheel U-Nut 8" Cable Tie Upright Grommet Left Handrail Right Handrail Transformer Left Foot Rail Endcap Silver Ground Screw Photo Switch Power Cord Adapter Fan Housing Power Cord Outlet Assembly Belly Pan 82 2 83...

Uk Manual
Page 28
... following information: • the MODEL NUMBER of the product (PETL37905.1) • the NAME of the product (PROFORM 370 P treadmill) • the SERIAL NUMBER of the product (see the front of this manual) • the KEY NUMBER AND DESCRIPTION OF THE PART(S) (see the PART LIST and the EXPLODED DRAWING in the centre of this manual) Part No. 230160 R0506A Printed in Canada © 2006 ICON IP...
... following information: • the MODEL NUMBER of the product (PETL37905.1) • the NAME of the product (PROFORM 370 P treadmill) • the SERIAL NUMBER of the product (see the front of this manual) • the KEY NUMBER AND DESCRIPTION OF THE PART(S) (see the PART LIST and the EXPLODED DRAWING in the centre of this manual) Part No. 230160 R0506A Printed in Canada © 2006 ICON IP...


