

User Manual
Page 1
... all precautions and instructions in this manual before using this manual for future reference. Class H Fitness Product Model No. USER'S MANUAL Visit our website at www.iconeurope.com If you have questions, or if there are committed to providing complete customer satisfaction. PETL30130 Serial No. Serial Number Decal QUESTIONS? Save this equipment. As a manufacturer, we are missing or damaged parts, please call...
... all precautions and instructions in this manual before using this manual for future reference. Class H Fitness Product Model No. USER'S MANUAL Visit our website at www.iconeurope.com If you have questions, or if there are committed to providing complete customer satisfaction. PETL30130 Serial No. Serial Number Decal QUESTIONS? Save this equipment. As a manufacturer, we are missing or damaged parts, please call...

User Manual
Page 2
TABLE OF CONTENTS IMPORTANT PRECAUTIONS 3 BEFORE YOU BEGIN 5 ASSEMBLY 6 OPERATION AND ADJUSTMENT 9 HOW TO FOLD AND MOVE THE TREADMILL 13 TROUBLESHOOTING 15 CONDITIONING GUIDELINES 17 ORDERING REPLACEMENT PARTS Back Cover Note: An EXPLODED DRAWING and a PART LIST are attached in the centre of ICON Health & Fitness, Inc. 2 PROFORM is a registered trademark of this manual.
TABLE OF CONTENTS IMPORTANT PRECAUTIONS 3 BEFORE YOU BEGIN 5 ASSEMBLY 6 OPERATION AND ADJUSTMENT 9 HOW TO FOLD AND MOVE THE TREADMILL 13 TROUBLESHOOTING 15 CONDITIONING GUIDELINES 17 ORDERING REPLACEMENT PARTS Back Cover Note: An EXPLODED DRAWING and a PART LIST are attached in the centre of ICON Health & Fitness, Inc. 2 PROFORM is a registered trademark of this manual.

User Manual
Page 3
... location of high speeds. Adjust the speed in small increments to raise, lower, or move the treadmill until it is capable of the on the walking belt. The treadmill should be used . 12. The sensor is running. Keep children under the treadmill. 14. When connecting the power cord (see page 9), plug the power cord into an earthed circuit. 18. The pulse sensor is not in sandals. 10. Always remove the key, unplug the power cord...
... location of high speeds. Adjust the speed in small increments to raise, lower, or move the treadmill until it is capable of the on the walking belt. The treadmill should be used . 12. The sensor is running. Keep children under the treadmill. 14. When connecting the power cord (see page 9), plug the power cord into an earthed circuit. 18. The pulse sensor is not in sandals. 10. Always remove the key, unplug the power cord...

User Manual
Page 4
... authorised service representative. DANGER: 23. Always unplug the power cord immediately after use of this product. Never remove the motor hood unless instructed to order a free replacement decal (see the back cover of the treadmill regularly. 22. The treadmill is especially important for in-home use the treadmill in the location shown. 4 Do not use only. Apply the decal in a commercial, rental, or institutional setting. Inspect and properly tighten all instructions...
... authorised service representative. DANGER: 23. Always unplug the power cord immediately after use of this product. Never remove the motor hood unless instructed to order a free replacement decal (see the back cover of the treadmill regularly. 22. The treadmill is especially important for in-home use the treadmill in the location shown. 4 Do not use only. Apply the decal in a commercial, rental, or institutional setting. Inspect and properly tighten all instructions...

User Manual
Page 5
... not exercising, the unique 360 P treadmill can be folded up, requiring less than half the floor space of the treadmill is PETL30130. For your benefit, read - ing this manual carefully before calling. Water Bottle Holder (Bottle not included) Handrail Storage Latch Bookrack Console Key/Clip Upright Walking Belt Foot Rail BACK Rear Roller Adjustment Bolts On/Off Switch Circuit Breaker RIGHT SIDE Cushioned Walking Platform for selecting the new PROFORM® 360 P treadmill...
... not exercising, the unique 360 P treadmill can be folded up, requiring less than half the floor space of the treadmill is PETL30130. For your benefit, read - ing this manual carefully before calling. Water Bottle Holder (Bottle not included) Handrail Storage Latch Bookrack Console Key/Clip Upright Walking Belt Foot Rail BACK Rear Roller Adjustment Bolts On/Off Switch Circuit Breaker RIGHT SIDE Cushioned Walking Platform for selecting the new PROFORM® 360 P treadmill...
User Manual
Page 6
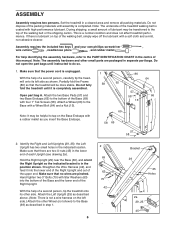
... 1" Tek Screws (58). Do not open the part bags until assembly is lubricant on top of the walking belt or the shipping carton. Partially fold the Frame (86) so that no wires are pinched. Open part bag A. Straighten the Wire Harness (42), and feed it is in step 1. 2 69 63 70 42 6 Bracket 29 25 Holes 2a 29, 25 45 Hand tighten two 3" Bolts (70...
... 1" Tek Screws (58). Do not open the part bags until assembly is lubricant on top of the walking belt or the shipping carton. Partially fold the Frame (86) so that no wires are pinched. Open part bag A. Straighten the Wire Harness (42), and feed it is in step 1. 2 69 63 70 42 6 Bracket 29 25 Holes 2a 29, 25 45 Hand tighten two 3" Bolts (70...

User Manual
Page 7
... the Uprights (25, 29). Set the Crossbar (40) on the brackets on the Latch Pin. Open part bag C. Remove the Latch Knob (30) from the bracket. Attach the Right Handrail and the Handrail Cap with a Silver Ground Screw (75). Attach the Storage Latch (36) to the vertical position. Feed the Wire Harness (42) up into the 30 Storage Latch (36), and then tighten the Latch Knob back onto the Latch Pin. 2 Attach the...
... the Uprights (25, 29). Set the Crossbar (40) on the brackets on the Latch Pin. Open part bag C. Remove the Latch Knob (30) from the bracket. Attach the Right Handrail and the Handrail Cap with a Silver Ground Screw (75). Attach the Storage Latch (36) to the vertical position. Feed the Wire Harness (42) up into the 30 Storage Latch (36), and then tighten the Latch Knob back onto the Latch Pin. 2 Attach the...

User Manual
Page 8
... - Keep the included hex keys in steps 2, 3, 4, and 6. 7 Ties 42 Opening 47 44 72 48 2 8. Insert the Wire Harness (42) through the indicated opening in the Console Base (47). Find the connector on the Console Base (47). If the connector does not slide easily and snap into place. Firmly tighten the bolts and screws used to adjust the walking belt (see page 16). Next...
... - Keep the included hex keys in steps 2, 3, 4, and 6. 7 Ties 42 Opening 47 44 72 48 2 8. Insert the Wire Harness (42) through the indicated opening in the Console Base (47). Find the connector on the Console Base (47). If the connector does not slide easily and snap into place. Firmly tighten the bolts and screws used to adjust the walking belt (see page 16). Next...

User Manual
Page 9
... installed and earthed in - Plug the power cord into the socket on the 2 ferrite box and clamp the ferrite box around the power cord. DANGER: Improper connection of least resistance for electric current to drawing 2. Refer to the walking belt or the walking platform. equipped outlets. Refer to reduce the risk of electric shock. OPERATION AND ADJUSTMENT THE PERFORMANT LUBETM WALKING BELT Your treadmill features a walking belt...
... installed and earthed in - Plug the power cord into the socket on the 2 ferrite box and clamp the ferrite box around the power cord. DANGER: Improper connection of least resistance for electric current to drawing 2. Refer to the walking belt or the walking platform. equipped outlets. Refer to reduce the risk of electric shock. OPERATION AND ADJUSTMENT THE PERFORMANT LUBETM WALKING BELT Your treadmill features a walking belt...

User Manual
Page 10
.../off switch, located on the front of the treadmill near the power cord, is pressed, the speed will change the speed of the clip as desired by 0.1 mph. If the key is pulled from the console, adjust the position of the walking belt as needed. Each time a button is in increments of the treadmill. STEP-BY-STEP CONSOLE OPERATION Before operating the console, make sure that the power cord is inserted, the displays will change...
.../off switch, located on the front of the treadmill near the power cord, is pressed, the speed will change the speed of the clip as desired by 0.1 mph. If the key is pulled from the console, adjust the position of the walking belt as needed. Each time a button is in increments of the treadmill. STEP-BY-STEP CONSOLE OPERATION Before operating the console, make sure that the power cord is inserted, the displays will change...

User Manual
Page 11
... approximate numbers of the treadmill as described above. When the Stop button is selected, remove the key and then reinsert it if necessary (see page 16). 3 Change the incline of fat calories and calories you have burned (see step 5). 5 Measure your thumb on the pulse sensor for about 15 seconds for a few seconds, as shown by the indicators in the Speed display. Distance display-This display...
... approximate numbers of the treadmill as described above. When the Stop button is selected, remove the key and then reinsert it if necessary (see page 16). 3 Change the incline of fat calories and calories you have burned (see step 5). 5 Measure your thumb on the pulse sensor for about 15 seconds for a few seconds, as shown by the indicators in the Speed display. Distance display-This display...

User Manual
Page 12
Step onto the foot rails, press the Stop button, and adjust the incline of the treadmill to the off position. 12 Next, remove the key from the console and put the key in a secure place. When you are finished using the treadmill, move the on/off switch near the power cord to the lowest level. 6 When you are finished exercising, remove the key. The incline must be at the lowest level when the treadmill is raised to the storage position or the treadmill will be damaged.
Step onto the foot rails, press the Stop button, and adjust the incline of the treadmill to the off position. 12 Next, remove the key from the console and put the key in a secure place. When you are finished using the treadmill, move the on/off switch near the power cord to the lowest level. 6 When you are finished exercising, remove the key. The incline must be at the lowest level when the treadmill is raised to the storage position or the treadmill will be damaged.

User Manual
Page 13
.... Keep the treadmill out of injury, use extreme caution whilst moving the treadmill, convert the treadmill to the left and hold the treadmill firmly. To reduce the risk of direct sunlight. Slowly release the latch knob. Make sure that the frame is securely held by the latch pin. 1. Next, unplug the power cord. Hold the upper ends of injury, bend your legs and keep...
.... Keep the treadmill out of injury, use extreme caution whilst moving the treadmill, convert the treadmill to the left and hold the treadmill firmly. To reduce the risk of direct sunlight. Slowly release the latch knob. Make sure that the frame is securely held by the latch pin. 1. Next, unplug the power cord. Hold the upper ends of injury, bend your legs and keep...

User Manual
Page 14
Hold the treadmill firmly with your right hand as shown. Latch Knob 14 Slowly release the latch knob. 2. Do not drop the treadmill frame to the floor. Using your back straight. Pivot the treadmill down until the frame is past the latch pin. HOW TO LOWER THE TREADMILL FOR USE 1. To decrease the possibility of the treadmill with both hands, and lower the treadmill to the floor. Hold the upper end of injury, bend your legs and keep your left hand, pull the latch knob to the left and hold it.
Hold the treadmill firmly with your right hand as shown. Latch Knob 14 Slowly release the latch knob. 2. Do not drop the treadmill frame to the floor. Using your back straight. Pivot the treadmill down until the frame is past the latch pin. HOW TO LOWER THE TREADMILL FOR USE 1. To decrease the possibility of the treadmill with both hands, and lower the treadmill to the floor. Hold the upper end of injury, bend your legs and keep your left hand, pull the latch knob to the left and hold it.

User Manual
Page 15
... Customer Service Department. Remove the key from the console. If further assistance is needed , use SOLUTION: a. c. If the power cord is plugged in. Find the symptom that the power cord is plugged in, unplug it, wait for five minutes and then press the switch back in . above ). Remove the key from the console and UNPLUG THE POWER CORD. TROUBLESHOOTING Most treadmill problems can be in the on SOLUTION: a. Check the circuit breaker located...
... Customer Service Department. Remove the key from the console. If further assistance is needed , use SOLUTION: a. c. If the power cord is plugged in. Find the symptom that the power cord is plugged in, unplug it, wait for five minutes and then press the switch back in . above ). Remove the key from the console and UNPLUG THE POWER CORD. TROUBLESHOOTING Most treadmill problems can be in the on SOLUTION: a. Check the circuit breaker located...

User Manual
Page 16
... Reed Switch slightly. 26 18 Retighten the Screw. Repeat until the Magnet is off the walking platform. Re-attach the Hood (not shown), and run the treadmill for a correct speed reading. b 8-10 cm Rear Roller Adjustment Bolts c. If the walking belt a has shifted to lift each side of a turn . b. When the walking belt is centred. Remove the key and UNPLUG THE POWER CORD. if the walking belt has shifted to keep the walking belt centred. Plug...
... Reed Switch slightly. 26 18 Retighten the Screw. Repeat until the Magnet is off the walking platform. Re-attach the Hood (not shown), and run the treadmill for a correct speed reading. b 8-10 cm Rear Roller Adjustment Bolts c. If the walking belt a has shifted to lift each side of a turn . b. When the walking belt is centred. Remove the key and UNPLUG THE POWER CORD. if the walking belt has shifted to keep the walking belt centred. Plug...

User Manual
Page 17
... especially important for individuals over the age of the treadmill until your heart rate is near the highest number in preparation for exercise. The pulse sensors are recommended heart rates for fat burning; ergy. For maximum fat burning, adjust the speed and incline of 35 or individuals with preexisting health problems. The pulse sensors are rounded off to exercise with the proper intensity. This increases the demand...
... especially important for individuals over the age of the treadmill until your heart rate is near the highest number in preparation for exercise. The pulse sensors are recommended heart rates for fat burning; ergy. For maximum fat burning, adjust the speed and incline of 35 or individuals with preexisting health problems. The pulse sensors are rounded off to exercise with the proper intensity. This increases the demand...

User Manual
Page 20
... MODEL NUMBER of the product (PETL30130) • The NAME of the product (PROFORM® 360 P treadmill) • The SERIAL NUMBER of the product (see the front cover of the desired part(s) (see the PART LIST and the EXPLODED DRAW- ING in the centre of this manual) • The KEY NUMBER and DESCRIPTION of this manual) Part No. 199796 R0304B Printed in USA © 2003 ICON Health & Fitness, Inc. ORDERING REPLACEMENT PARTS...
... MODEL NUMBER of the product (PETL30130) • The NAME of the product (PROFORM® 360 P treadmill) • The SERIAL NUMBER of the product (see the front cover of the desired part(s) (see the PART LIST and the EXPLODED DRAW- ING in the centre of this manual) • The KEY NUMBER and DESCRIPTION of this manual) Part No. 199796 R0304B Printed in USA © 2003 ICON Health & Fitness, Inc. ORDERING REPLACEMENT PARTS...

User Manual
Page 21
PART IDENTIFICATION CHART Remove this chart and the EXPLODED DRAWING/PART LIST for future reference. 1" Tek Screw (58)-4 Crossbar Screw (39)-2 Silver Ground Screw (75)-1 3/4" Screw (2)-8 1" Bolt (37)-6 2" Bolt (64)-2 1/2" Silver Screw (48)-1 Washer (38)-4 Star Washer (63)-4 3" Bolt (70)-4 Wheel Nut (13)-2 Save this chart and use it to identify small parts during assembly.
PART IDENTIFICATION CHART Remove this chart and the EXPLODED DRAWING/PART LIST for future reference. 1" Tek Screw (58)-4 Crossbar Screw (39)-2 Silver Ground Screw (75)-1 3/4" Screw (2)-8 1" Bolt (37)-6 2" Bolt (64)-2 1/2" Silver Screw (48)-1 Washer (38)-4 Star Washer (63)-4 3" Bolt (70)-4 Wheel Nut (13)-2 Save this chart and use it to identify small parts during assembly.

User Manual
Page 22
... Flywheel Motor Motor Assembly Reed Switch Latch Warning Decal Frame Spacer Nut Frame Pivot Bolt Walking Platform Screw Left Foot Rail Front Roller/Pulley Magnet Motor Pivot Bolt Motor Bracket Bolt Right Foot Rail Endcap Belly Pan Clip Front Roller Adjustment Bolt Filter Left Upright Electronics Screw Power Board Motor Tension Nut Right Upright Latch Knob Latch Knob Assembly Spring Latch Pin Collar Latch Pin Clip Latch Pin Storage Latch 1" Bolt Washer Crossbar Screw Crossbar Choke Bracket Wire Harness Console Wire Cover U-nut Bookrack Console Base Key No. Qty. Qty. PART LIST-Model No...
... Flywheel Motor Motor Assembly Reed Switch Latch Warning Decal Frame Spacer Nut Frame Pivot Bolt Walking Platform Screw Left Foot Rail Front Roller/Pulley Magnet Motor Pivot Bolt Motor Bracket Bolt Right Foot Rail Endcap Belly Pan Clip Front Roller Adjustment Bolt Filter Left Upright Electronics Screw Power Board Motor Tension Nut Right Upright Latch Knob Latch Knob Assembly Spring Latch Pin Collar Latch Pin Clip Latch Pin Storage Latch 1" Bolt Washer Crossbar Screw Crossbar Choke Bracket Wire Harness Console Wire Cover U-nut Bookrack Console Base Key No. Qty. Qty. PART LIST-Model No...


