

User Manual
Page 3
... administered. 6. Always remove the key, unplug the power cord and move the walking belt whilst the power is intended only as described. 3. Keep the treadmill indoors, away from heated surfaces. 15. Place the treadmill on a level surface, with bare feet, wearing only stockings, or in general. ... appliance should be used only by placing objects under the treadmill. 5. A 13 amp fuse should be able to safely lift 20 kg (45 lbs) to raise, lower, or move the treadmill until it and 0.5 m (2 ft.) on the walking belt. The treadmill is fully closed. 3 Never use . (See the drawing...
... administered. 6. Always remove the key, unplug the power cord and move the walking belt whilst the power is intended only as described. 3. Keep the treadmill indoors, away from heated surfaces. 15. Place the treadmill on a level surface, with bare feet, wearing only stockings, or in general. ... appliance should be used only by placing objects under the treadmill. 5. A 13 amp fuse should be able to safely lift 20 kg (45 lbs) to raise, lower, or move the treadmill until it and 0.5 m (2 ft.) on the walking belt. The treadmill is fully closed. 3 Never use . (See the drawing...

User Manual
Page 5
...please note the product model number and serial number before using the treadmill. If you 're not exercising, the unique 360 P treadmill can be folded up, requiring less than half the floor space of the treadmill is PETL30130. And when you have questions after read this manual ... included) Handrail Storage Latch Bookrack Console Key/Clip Upright Walking Belt Foot Rail BACK Rear Roller Adjustment Bolts On/Off Switch Circuit Breaker RIGHT SIDE Cushioned Walking Platform for selecting the new PROFORM® 360 P treadmill. The serial number can be found on a decal attached to...
...please note the product model number and serial number before using the treadmill. If you 're not exercising, the unique 360 P treadmill can be folded up, requiring less than half the floor space of the treadmill is PETL30130. And when you have questions after read this manual ... included) Handrail Storage Latch Bookrack Console Key/Clip Upright Walking Belt Foot Rail BACK Rear Roller Adjustment Bolts On/Off Switch Circuit Breaker RIGHT SIDE Cushioned Walking Platform for selecting the new PROFORM® 360 P treadmill. The serial number can be found on a decal attached to...
User Manual
Page 6
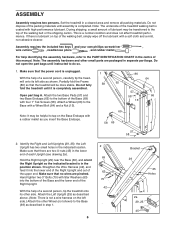
... side.) Attach the other small parts are pinched. With the help of a second person, carefully tip the treadmill onto its other side. Make sure that the power cord is in the centre of the walking belt or the shipping carton. Hold the Right Upright (29) near the Base (69), and orient the... the Base Endcaps with a Wheel Bolt (64) and a Nut (13). If there is lubricant on top of the treadmill walking belt is coated with four 1" Tek Screws (58). Do not fully fold the treadmill until it into the bottom of the Base and the lower end of the Base (69) with high-performance...
... side.) Attach the other small parts are pinched. With the help of a second person, carefully tip the treadmill onto its other side. Make sure that the power cord is in the centre of the walking belt or the shipping carton. Hold the Right Upright (29) near the Base (69), and orient the... the Base Endcaps with a Wheel Bolt (64) and a Nut (13). If there is lubricant on top of the treadmill walking belt is coated with four 1" Tek Screws (58). Do not fully fold the treadmill until it into the bottom of the Base and the lower end of the Base (69) with high-performance...

User Manual
Page 8
...47). Firmly tighten the bolts and screws used to the Console Base with four 3/4" Screws (2) (only two Screws are properly tightened before you use the treadmill. Make sure that all parts are shown). Tighten two 3/4" Screws (2) into place, turn the connec- 2 tor and then insert it. Note: Extra ...) into the red socket be included. Then, cut off the ends of the Wire Harness (42). Attach the Wire Cover (44) to adjust the walking belt (see page 16). Make sure that the connector and wires appear as shown in steps 2, 3, 4, and 6. 7 Ties 42 Opening 47 44 72 48 ...
...47). Firmly tighten the bolts and screws used to the Console Base with four 3/4" Screws (2) (only two Screws are properly tightened before you use the treadmill. Make sure that all parts are shown). Tighten two 3/4" Screws (2) into place, turn the connec- 2 tor and then insert it. Note: Extra ...) into the red socket be included. Then, cut off the ends of the Wire Harness (42). Attach the Wire Cover (44) to adjust the walking belt (see page 16). Make sure that the connector and wires appear as shown in steps 2, 3, 4, and 6. 7 Ties 42 Opening 47 44 72 48 ...

User Manual
Page 9
OPERATION AND ADJUSTMENT THE PERFORMANT LUBETM WALKING BELT Your treadmill features a walking belt coated with the product-if it will fit your outlet. HOW TO PLUG IN THE POWER CORD 1 This product must be earthed. Refer to drawing 2. Next, lift the tab on treadmill Ferrite Box Plastic Tie Tab Outlet ...as to whether the product is not compatible with GFCI- The plastic tie will deteriorate the walking belt and cause excessive wear. Plug the power cord into the socket on the treadmill. Socket on the 2 ferrite box and clamp the ferrite box around the power cord. If ...
OPERATION AND ADJUSTMENT THE PERFORMANT LUBETM WALKING BELT Your treadmill features a walking belt coated with the product-if it will fit your outlet. HOW TO PLUG IN THE POWER CORD 1 This product must be earthed. Refer to drawing 2. Next, lift the tab on treadmill Ferrite Box Plastic Tie Tab Outlet ...as to whether the product is not compatible with GFCI- The plastic tie will deteriorate the walking belt and cause excessive wear. Plug the power cord into the socket on the treadmill. Socket on the 2 ferrite box and clamp the ferrite box around the power cord. If ...

User Manual
Page 10
...the console, read the following precautions. • Do not stand on the walking belt when turning on the power. • Always wear the clip (see the drawing above ), and slide the clip onto the waistband of the treadmill. On Position Next, stand on the console will light. 2 Press the Start ...Follow the steps below to start the walking belt. Hold the handrails and begin to avoid sudden jumps in the water bottle holder. Then, insert the key into the console. If a button is pulled from the console, adjust the position of the treadmill near the power cord, is pressed, the ...
...the console, read the following precautions. • Do not stand on the walking belt when turning on the power. • Always wear the clip (see the drawing above ), and slide the clip onto the waistband of the treadmill. On Position Next, stand on the console will light. 2 Press the Start ...Follow the steps below to start the walking belt. Hold the handrails and begin to avoid sudden jumps in the water bottle holder. Then, insert the key into the console. If a button is pulled from the console, adjust the position of the treadmill near the power cord, is pressed, the ...

User Manual
Page 11
... in - When the Stop button is reached. 4 Follow your thumb on the pulse sensor for about 15 seconds for a few minutes that the treadmill is selected. Note: The console can display speed and distance in the display. For simplicity, all instructions in the display. To measure your heart...unit of measurement. To change the unit of measurement, hold the Stop button for metric kilometers will al- When the desired unit of the walking belt, and align it . The display will alternate between one or two dashes (- -) will appear, and then your heart rate when you have ...
... in - When the Stop button is reached. 4 Follow your thumb on the pulse sensor for about 15 seconds for a few minutes that the treadmill is selected. Note: The console can display speed and distance in the display. For simplicity, all instructions in the display. To measure your heart...unit of measurement. To change the unit of measurement, hold the Stop button for metric kilometers will al- When the desired unit of the walking belt, and align it . The display will alternate between one or two dashes (- -) will appear, and then your heart rate when you have ...

User Manual
Page 16
...Magnet and the Reed 10 Switch is correctly tightened, you should be able to turn ; If the walking belt slips when walked on the treadmill for a few minutes. Repeat until the Magnet is no longer than 1.5 m (5 ft.). Turn the Pulley until the ...Repeat until the walking belt is off the walking platform. If the walking belt is centred. Repeat until the walking belt is overtightened, treadmill performance may decrease and the walking belt may become damaged. Be careful to overtighten the walking belt. Top View PROBLEM: The walking belt slows when walked on ...
...Magnet and the Reed 10 Switch is correctly tightened, you should be able to turn ; If the walking belt slips when walked on the treadmill for a few minutes. Repeat until the Magnet is no longer than 1.5 m (5 ft.). Turn the Pulley until the ...Repeat until the walking belt is off the walking platform. If the walking belt is centred. Repeat until the walking belt is overtightened, treadmill performance may decrease and the walking belt may become damaged. Be careful to overtighten the walking belt. Top View PROBLEM: The walking belt slows when walked on ...

User Manual
Page 22
...Nut Left Foot Rail Endcap 1/2" Silver Ground Screw Handrail Cap Belly Pan Screw Circuit Breaker Small Bolt Receptical Belly Pan Belt Guide Belt Guide Screw Plastic Fastener Isolator Cushion Frame Releasable Tie Incline Motor Wire Cable Tie Clamp Ground Wire Right Rear Endcap Pad... 111 2 112 1 113 1 114 1 115 3 116 3 117 1 118 1 119 1 120 1 121 1 122 2 #1 #1 #1 #1 #1 #1 #1 #1 #1 #1 Right Rear Endcap Hex Key Left Rear Endcap Walking Belt Walking Platform Right Foot Rail Left Rear Endcap Pad Rear Roller Nylon Tie Rear Endcap Screw Motor Mount Bracket Power Board w/Clips Plastic Standoff Electronic...
...Nut Left Foot Rail Endcap 1/2" Silver Ground Screw Handrail Cap Belly Pan Screw Circuit Breaker Small Bolt Receptical Belly Pan Belt Guide Belt Guide Screw Plastic Fastener Isolator Cushion Frame Releasable Tie Incline Motor Wire Cable Tie Clamp Ground Wire Right Rear Endcap Pad... 111 2 112 1 113 1 114 1 115 3 116 3 117 1 118 1 119 1 120 1 121 1 122 2 #1 #1 #1 #1 #1 #1 #1 #1 #1 #1 Right Rear Endcap Hex Key Left Rear Endcap Walking Belt Walking Platform Right Foot Rail Left Rear Endcap Pad Rear Roller Nylon Tie Rear Endcap Screw Motor Mount Bracket Power Board w/Clips Plastic Standoff Electronic...


