
English Manual
Page 2
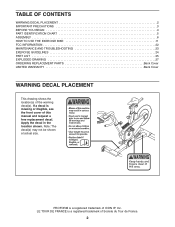
... PLACEMENT 2 IMPORTANT PRECAUTIONS 3 BEFORE YOU BEGIN 4 PART IDENTIFICATION CHART 5 ASSEMBLY 6 HOW TO USE THE EXERCISE BIKE 11 FCC INFORMATION 22 MAINTENANCE AND TROUBLESHOOTING 23 EXERCISE GUIDELINES 24 PART LIST 25 EXPLODED DRAWING 27 ORDERING REPLACEMENT PARTS Back Cover LIMITED WARRANTY Back Cover WARNING DECAL PLACEMENT This drawing shows the location(s) of ICON IP, Inc. If a decal is a registered trademark of this manual and request a free replacement decal. LE TOUR DE FRANCE is missing...
... PLACEMENT 2 IMPORTANT PRECAUTIONS 3 BEFORE YOU BEGIN 4 PART IDENTIFICATION CHART 5 ASSEMBLY 6 HOW TO USE THE EXERCISE BIKE 11 FCC INFORMATION 22 MAINTENANCE AND TROUBLESHOOTING 23 EXERCISE GUIDELINES 24 PART LIST 25 EXPLODED DRAWING 27 ORDERING REPLACEMENT PARTS Back Cover LIMITED WARRANTY Back Cover WARNING DECAL PLACEMENT This drawing shows the location(s) of ICON IP, Inc. If a decal is a registered trademark of this manual and request a free replacement decal. LE TOUR DE FRANCE is missing...

English Manual
Page 3
.... ICON assumes no responsibility for foot protection. 10. Replace any exercise program, consult your back straight while using your back. 12. Over exercising may result in a garage or covered patio, or near water. 6. IMPORTANT PRECAUTIONS WARNING: To reduce the risk of serious injury, read all important precautions and instructions in this manual and all parts regularly. do not arch your exercise bike...
.... ICON assumes no responsibility for foot protection. 10. Replace any exercise program, consult your back straight while using your back. 12. Over exercising may result in a garage or covered patio, or near water. 6. IMPORTANT PRECAUTIONS WARNING: To reduce the risk of serious injury, read all important precautions and instructions in this manual and all parts regularly. do not arch your exercise bike...

English Manual
Page 4
... see the front cover of this manual. Cycling is an effective exercise for selecting the revolutionary PROFORM® LE TOUR DE FRANCE® exercise bike. Length: 4 ft. 10 in. (147 cm) Width: 2 ft. 1 in the drawing below. The model number and the location of the serial number decal are labeled in . (64 cm) Adjustment Knob Water Bottle Holder Seat Seat Carriage Adjustment Knob Console Handlebar Power Switch Wheels Pedal/Strap Leveling Foot Power Cord 4
... see the front cover of this manual. Cycling is an effective exercise for selecting the revolutionary PROFORM® LE TOUR DE FRANCE® exercise bike. Length: 4 ft. 10 in. (147 cm) Width: 2 ft. 1 in the drawing below. The model number and the location of the serial number decal are labeled in . (64 cm) Adjustment Knob Water Bottle Holder Seat Seat Carriage Adjustment Knob Console Handlebar Power Switch Wheels Pedal/Strap Leveling Foot Power Cord 4

English Manual
Page 9
... the Handlebar Post (6), connect the Upper Wire (68) to the Handlebar Post (6) with an "L." Tip: Avoid pinching the wires. If you purchase the optional heart rate monitor (see the instructions included with the heart rate monitor. Using an adjustable wrench, firmly tighten the Left Pedal (61) counterclockwise into the Handlebar Cover. Set the Handlebar Cover (8) on the Handlebar, and tighten the Screw into the Left Crank Arm (63). Orient the Handlebar...
... the Handlebar Post (6), connect the Upper Wire (68) to the Handlebar Post (6) with an "L." Tip: Avoid pinching the wires. If you purchase the optional heart rate monitor (see the instructions included with the heart rate monitor. Using an adjustable wrench, firmly tighten the Left Pedal (61) counterclockwise into the Handlebar Cover. Set the Handlebar Cover (8) on the Handlebar, and tighten the Screw into the Left Crank Arm (63). Orient the Handlebar...

English Manual
Page 10
... the Console (9) are properly tightened before you use the exercise bike. Slide the Console (9) onto the Handlebar (7). Attach the Console (9) with four #8 x 5/8" Screws (94). 9 7 9 101 68 94 Avoid pinching the wires 10. Place a mat beneath the exercise bike to the Extension Wire (101). Then, insert the wires into the Console. While a second person holds the Console (9) near the Handlebar (7), connect the wires on the Console to the Upper Wires (68...
... the Console (9) are properly tightened before you use the exercise bike. Slide the Console (9) onto the Handlebar (7). Attach the Console (9) with four #8 x 5/8" Screws (94). 9 7 9 101 68 94 Avoid pinching the wires 10. Place a mat beneath the exercise bike to the Extension Wire (101). Then, insert the wires into the Console. While a second person holds the Console (9) near the Handlebar (7), connect the wires on the Console to the Upper Wires (68...

English Manual
Page 11
... local codes and ordinances. Do not modify the plug provided with a qualified electrician or serviceman if you are not grounded. HOW TO USE THE EXERCISE BIKE HOW TO PLUG IN THE POWER CORD This product must be connected to a permanent ground such as a properly grounded outlet box cover. The green-colored rigid ear, lug, or the like extending from the adapter...
... local codes and ordinances. Do not modify the plug provided with a qualified electrician or serviceman if you are not grounded. HOW TO USE THE EXERCISE BIKE HOW TO PLUG IN THE POWER CORD This product must be connected to a permanent ground such as a properly grounded outlet box cover. The green-colored rigid ear, lug, or the like extending from the adapter...
English Manual
Page 13
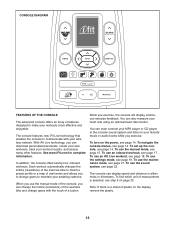
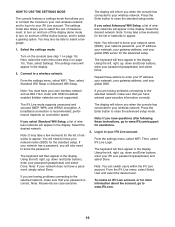
... onboard workouts. To use the settings mode, see step 5 on page 20. With iFit Live technology, you can download personalized workouts, create your own workouts, track your heart rate using an optional heart rate monitor. To turn on the display, remove the plastic. 13 To set up the console, see page 14. The console features new iFit Live technology that enables the console to communicate with the touch of a button. Each workout automatically changes the incline (resistance) of the exercise bike...
... onboard workouts. To use the settings mode, see step 5 on page 20. With iFit Live technology, you can download personalized workouts, create your own workouts, track your heart rate using an optional heart rate monitor. To turn on the display, remove the plastic. 13 To set up the console, see page 14. The console features new iFit Live technology that enables the console to communicate with the touch of a button. Each workout automatically changes the incline (resistance) of the exercise bike...

English Manual
Page 14
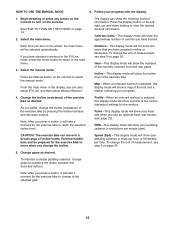
... the exercise bike. 3. Before using the exercise bike for the first time, the incline system will not be reset when you may damage the console displays or other electrical components. Calibrate the incline system. If the demo mode is turned on page 11). HOW TO NAVIGATE THE CONSOLE MENUS You can use . Press the right button to navigate through menus in the display, change settings, and view console information. Press the power switch to a wireless network. Connect...
... the exercise bike. 3. Before using the exercise bike for the first time, the incline system will not be reset when you may damage the console displays or other electrical components. Calibrate the incline system. If the demo mode is turned on page 11). HOW TO NAVIGATE THE CONSOLE MENUS You can use . Press the right button to navigate through menus in the display, change settings, and view console information. Press the power switch to a wireless network. Connect...
English Manual
Page 15
... and rear gears. To change the incline. Change gears as desired. Follow your heart rate when you have pedaled in miles per hour or kilometers per minute (rpm). See HOW TO TURN ON THE POWER on page 20. To change the incline (resistance) of incline levels. If you use an optional heart rate monitor (see step 5 on page 14. 2. Incline-This display mode will be prepared for the exercise bike to view the desired workout information...
... and rear gears. To change the incline. Change gears as desired. Follow your heart rate when you have pedaled in miles per hour or kilometers per minute (rpm). See HOW TO TURN ON THE POWER on page 20. To change the incline (resistance) of incline levels. If you use an optional heart rate monitor (see step 5 on page 14. 2. Incline-This display mode will be prepared for the exercise bike to view the desired workout information...

English Manual
Page 16
... information about the optional heart rate monitor, see page 22. If the symbol is green, the console is not connected to iFit.com. To exit the manual mode or a workout, press the Home button, select End Workout, and press the Enter button. 7. Wear a heart rate monitor and measure your wireless network. If the pedals do this, the electrical components on the exercise bike may wear prematurely. 16 When you are finished exercising, press the power switch...
... information about the optional heart rate monitor, see page 22. If the symbol is green, the console is not connected to iFit.com. To exit the manual mode or a workout, press the Home button, select End Workout, and press the Enter button. 7. Wear a heart rate monitor and measure your wireless network. If the pedals do this, the electrical components on the exercise bike may wear prematurely. 16 When you are finished exercising, press the power switch...

English Manual
Page 17
... TURN ON THE POWER on the console. The display will also show a map of calories you burn. The display will also show the approximate number of the trail and a marker indicating your pedaling cadence will affect the number of the pedals will burn during the workout. In addition, your progress. Wear a heart rate monitor and measure your progress with the display. Press the Display button repeatedly to start the workout...
... TURN ON THE POWER on the console. The display will also show a map of calories you burn. The display will also show the approximate number of the trail and a marker indicating your pedaling cadence will affect the number of the pedals will burn during the workout. In addition, your progress. Wear a heart rate monitor and measure your progress with the display. Press the Display button repeatedly to start the workout...
English Manual
Page 18
... number of calories you are not supported). Wear a heart rate monitor and measure your progress in your iFit Live account (see www.iFit.com. Press the Compete button to turn on the console. When you will also show your heart rate if desired. Start the workout. Select the main menu. See step 6 on page 16. See step 8 on page 15. to iFit.com. See HOW TO TURN ON THE POWER...
... number of calories you are not supported). Wear a heart rate monitor and measure your progress in your iFit Live account (see www.iFit.com. Press the Compete button to turn on the console. When you will also show your heart rate if desired. Start the workout. Select the main menu. See step 6 on page 16. See step 8 on page 15. to iFit.com. See HOW TO TURN ON THE POWER...
English Manual
Page 19
... address, and your iFit Live account. Using the left , right, up, down and Enter buttons, enter your network has a password, you select Standard Wifi Setup, a list of networks to appear. Repeat these instructions, go to www.iFit.com/support for the list of measurement, to turn on and turn off the display demo mode, to turn on connection speed. If you will need to close the standard setup mode. Select the...
... address, and your iFit Live account. Using the left , right, up, down and Enter buttons, enter your network has a password, you select Standard Wifi Setup, a list of networks to appear. Repeat these instructions, go to www.iFit.com/support for the list of measurement, to turn on and turn off the display demo mode, to turn on connection speed. If you will need to close the standard setup mode. Select the...
English Manual
Page 20
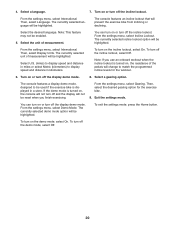
... you finish exercising. To turn off the display demo mode. 8. Select a language. 7. The currently selected demo mode option will be reset when you use an onboard workout when the incline lockout is turned on , the resistance of the pedals will change to be enabled. 5. The currently selected unit of measurement. Then, select the desired gearing option for the workout. 6. To exit the settings mode, press the Home button. From the settings menu...
... you finish exercising. To turn off the display demo mode. 8. Select a language. 7. The currently selected demo mode option will be reset when you use an onboard workout when the incline lockout is turned on , the resistance of the pedals will change to be enabled. 5. The currently selected unit of measurement. Then, select the desired gearing option for the workout. 6. To exit the settings mode, press the Home button. From the settings menu...

English Manual
Page 21
...; Calibrate the incline system of the console and the exercise bike. In an emergency, press the Enter button to calibrate the incline system. To exit the maintenance mode, press the Home button. 21 The maintenance menu will calibrate the incline system. Update the console firmware. if it does not, press the power switch on page 19. The display will show the progress of the exercise bike, the controller dot will automatically rise to the maximum incline level, lower to...
...; Calibrate the incline system of the console and the exercise bike. In an emergency, press the Enter button to calibrate the incline system. To exit the maintenance mode, press the Home button. 21 The maintenance menu will calibrate the incline system. Update the console firmware. if it does not, press the power switch on page 19. The display will show the progress of the exercise bike, the controller dot will automatically rise to the maximum incline level, lower to...
English Manual
Page 22
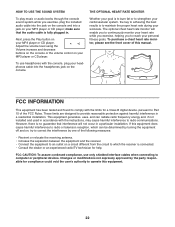
... compliance, use headphones with the instructions, may cause harmful interference to operate this manual. The optional chest heart rate monitor will not occur in accordance with the console, plug your headphones cable into a jack on your personal fitness goals. make sure that the audio cable is no guarantee that interference will enable you to continuously monitor your heart rate while you exercise, helping you exercise, plug the included audio cable into...
... compliance, use headphones with the instructions, may cause harmful interference to operate this manual. The optional chest heart rate monitor will not occur in accordance with the console, plug your headphones cable into a jack on your personal fitness goals. make sure that the audio cable is no guarantee that interference will enable you to continuously monitor your heart rate while you exercise, helping you exercise, plug the included audio cable into...
English Manual
Page 23
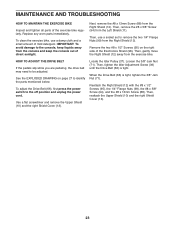
... Nuts (99), the #8 x 5/8" Screw (94), and the #8 x 13mm Screw (88). To clean the exercise bike, use a socket set to identify the parts mentioned below. Then, remove the #8 x 5/8" Screw (94) from the Right Shield (12). Then, use a damp cloth and a small amount of direct sunlight. To adjust the Drive Belt (66), first press the power switch to the off position and unplug the power cord. When the Drive Belt (66) is tight.
... Nuts (99), the #8 x 5/8" Screw (94), and the #8 x 13mm Screw (88). To clean the exercise bike, use a socket set to identify the parts mentioned below. Then, remove the #8 x 5/8" Screw (94) from the Right Shield (12). Then, use a damp cloth and a small amount of direct sunlight. To adjust the Drive Belt (66), first press the power switch to the off position and unplug the power cord. When the Drive Belt (66) is tight.

English Manual
Page 24
... YOUR HEART RATE To measure your exercise program. Stretching increases the flexibility of the chart (ages are essential for energy. For detailed exercise information, obtain a reputable book or consult your condition, complete three workouts each week, if desired. Then, stop exercising and place two fingers on your heart rate. A warm-up to make exercise a regular and enjoyable part of your heart rate near the middle number in...
... YOUR HEART RATE To measure your exercise program. Stretching increases the flexibility of the chart (ages are essential for energy. For detailed exercise information, obtain a reputable book or consult your condition, complete three workouts each week, if desired. Then, stop exercising and place two fingers on your heart rate. A warm-up to make exercise a regular and enjoyable part of your heart rate near the middle number in...

English Manual
Page 25
... Post Knob Power Switch Grommet Control Board Board Bracket Standoff Crank Pulley Crank Magnet Crank Spacer Bearing Snap Ring Frame Bushing Pivot Axle Left Pedal Right Pedal Left Crank Arm Right Crank Arm Crank Arm Cap Drive Belt Power Cord Upper Wire Lower Wire #8 x 1/4" Screw 3/8" Jam Nut 1/2" Washer 1/2" x 1" Screw 3/8" x 2 1/4" Screw 5/16" x 1 3/4" Bolt 5/16" Locknut M10 x 35mm Hex Screw 5/16" x 17mm Flange Screw M6 x 20mm Screw M6 Nut 5/16" x 2 1/4" Screw #10 x 1/2" Flat Head Screw 1/4" x 125mm Flat Head Screw Wheel Spacer M10 Washer 1/4" x 1/2" Button Screw 1/4" Washer #8 x 13mm Screw...
... Post Knob Power Switch Grommet Control Board Board Bracket Standoff Crank Pulley Crank Magnet Crank Spacer Bearing Snap Ring Frame Bushing Pivot Axle Left Pedal Right Pedal Left Crank Arm Right Crank Arm Crank Arm Cap Drive Belt Power Cord Upper Wire Lower Wire #8 x 1/4" Screw 3/8" Jam Nut 1/2" Washer 1/2" x 1" Screw 3/8" x 2 1/4" Screw 5/16" x 1 3/4" Bolt 5/16" Locknut M10 x 35mm Hex Screw 5/16" x 17mm Flange Screw M6 x 20mm Screw M6 Nut 5/16" x 2 1/4" Screw #10 x 1/2" Flat Head Screw 1/4" x 125mm Flat Head Screw Wheel Spacer M10 Washer 1/4" x 1/2" Button Screw 1/4" Washer #8 x 13mm Screw...
English Manual
Page 28
... limitations on how long an implied warranty lasts. ICON Health & Fitness, Inc. (ICON) warrants this product to the customer. ICONʼs obligation under warranty, the customer will automatically be preauthorized by ICON. To help us : • the model number and serial number of the product (see the front cover of this manual) • the name of the product (see the front cover of this manual) • the key number...
... limitations on how long an implied warranty lasts. ICON Health & Fitness, Inc. (ICON) warrants this product to the customer. ICONʼs obligation under warranty, the customer will automatically be preauthorized by ICON. To help us : • the model number and serial number of the product (see the front cover of this manual) • the name of the product (see the front cover of this manual) • the key number...


