
Uk Manual
Page 2
... a registered trademark of the warning decals. TABLE OF CONTENTS WARNING DECAL PLACEMENT 2 IMPORTANT PRECAUTIONS 3 BEFORE YOU BEGIN 5 ASSEMBLY 6 HOW TO USE THE CHEST PULSE SENSOR 15 OPERATION AND ADJUSTMENT 16 HOW TO FOLD AND MOVE THE TREADMILL 23 TROUBLESHOOTING 25 EXERCISE GUIDELINES 28 PART LIST 30 EXPLODED DRAWING 32 ORDERING REPLACEMENT PARTS Back Cover RECYCLING INFORMATION Back Cover WARNING DECAL PLACEMENT This drawing shows the locations of ICON IP, Inc. 2
... a registered trademark of the warning decals. TABLE OF CONTENTS WARNING DECAL PLACEMENT 2 IMPORTANT PRECAUTIONS 3 BEFORE YOU BEGIN 5 ASSEMBLY 6 HOW TO USE THE CHEST PULSE SENSOR 15 OPERATION AND ADJUSTMENT 16 HOW TO FOLD AND MOVE THE TREADMILL 23 TROUBLESHOOTING 25 EXERCISE GUIDELINES 28 PART LIST 30 EXPLODED DRAWING 32 ORDERING REPLACEMENT PARTS Back Cover RECYCLING INFORMATION Back Cover WARNING DECAL PLACEMENT This drawing shows the locations of ICON IP, Inc. 2
Uk Manual
Page 3
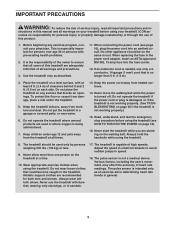
... under the treadmill. 5. Wear appropriate exercise clothes when using the treadmill. 8. Do not put the treadmill in the power cord adapter, insert an ASTA-approved BS1362, 13-amp fuse into an earthed circuit. Never move the walking belt while the power is not a medical device. The treadmill should be used or where oxygen is capable of high speeds. When replacing the fuse in a garage or covered patio...
... under the treadmill. 5. Wear appropriate exercise clothes when using the treadmill. 8. Do not put the treadmill in the power cord adapter, insert an ASTA-approved BS1362, 13-amp fuse into an earthed circuit. Never move the walking belt while the power is not a medical device. The treadmill should be used or where oxygen is capable of high speeds. When replacing the fuse in a garage or covered patio...
Uk Manual
Page 4
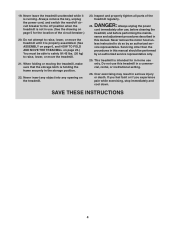
... or death. This treadmill is properly assembled. (See ASSEMBLY on page 6, and HOW TO FOLD AND MOVE THE TREADMILL on page 5 for in use this manual. Over exercising may result in the storage position. 22. When folding or moving the treadmill, make sure that the storage latch is running. Never remove the motor hood un- vice representative. Always unplug the power cord immediately after use only. Do not use . (See the drawing...
... or death. This treadmill is properly assembled. (See ASSEMBLY on page 6, and HOW TO FOLD AND MOVE THE TREADMILL on page 5 for in use this manual. Over exercising may result in the storage position. 22. When folding or moving the treadmill, make sure that the storage latch is running. Never remove the motor hood un- vice representative. Always unplug the power cord immediately after use only. Do not use . (See the drawing...
Uk Manual
Page 5
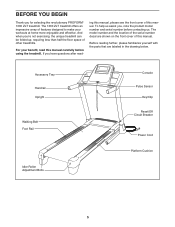
... workouts at home more enjoyable and effective. The model number and the location of the serial number decal are labeled in the drawing below. Accessory Tray Handrail Upright Walking Belt Foot Rail Idler Roller Adjustment Bolts Console Pulse Sensor Key/Clip Reset/Off Circuit Breaker Power Cord Platform Cushion 5 The 1300 ZLT treadmill offers an impressive array of this manual. And when you have questions after read this manual, please see the front cover of other treadmills...
... workouts at home more enjoyable and effective. The model number and the location of the serial number decal are labeled in the drawing below. Accessory Tray Handrail Upright Walking Belt Foot Rail Idler Roller Adjustment Bolts Console Pulse Sensor Key/Clip Reset/Off Circuit Breaker Power Cord Platform Cushion 5 The 1300 ZLT treadmill offers an impressive array of this manual. And when you have questions after read this manual, please see the front cover of other treadmills...

Uk Manual
Page 6
... lubricant may be assembled. The number in parentheses below to the top of this manual. Assembly requires the included hex key and your own Phillips screwdriver , adjustable wrench , needlenose pliers , and scissors . Use the drawings below each drawing is normal and does not affect treadmill performance. This is the key number of the part, from the PART LIST near the end of the walking belt or...
... lubricant may be assembled. The number in parentheses below to the top of this manual. Assembly requires the included hex key and your own Phillips screwdriver , adjustable wrench , needlenose pliers , and scissors . Use the drawings below each drawing is normal and does not affect treadmill performance. This is the key number of the part, from the PART LIST near the end of the walking belt or...
Uk Manual
Page 11
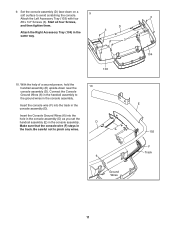
.... Start all four Screws, and then tighten them. Insert the Console Ground Wires (6) into the track in the console assembly (D). 9. Be careful not to the ground wires in the console assembly. With the help of a second person, hold the handrail assembly (E) upside-down on a soft surface to avoid scratching the console. 9 Attach the Left Accessory Tray (103) with four 3 #8 x 1/2" Screws (3). Set the console assembly (D) face-down near the console assembly (D). Connect...
.... Start all four Screws, and then tighten them. Insert the Console Ground Wires (6) into the track in the console assembly (D). 9. Be careful not to the ground wires in the console assembly. With the help of a second person, hold the handrail assembly (E) upside-down on a soft surface to avoid scratching the console. 9 Attach the Left Accessory Tray (103) with four 3 #8 x 1/2" Screws (3). Set the console assembly (D) face-down near the console assembly (D). Connect...
Uk Manual
Page 13
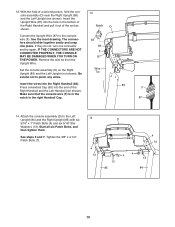
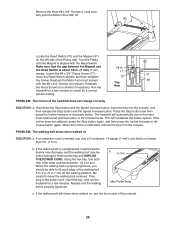
... pinch any wires. 63 83 F 87 Wire Tie Insert the wires into place. Start all six Patch Bolts, and then tighten them. See the inset drawing. IF THE CONNECTORS ARE NOT CONNECTED PROPERLY, THE CONSOLE MAY BE DAMAGED WHEN YOU TURN ON THE POWER. 13. Tighten the 3/8" x 4 1/4" Patch Bolts (7). 14 D 4 13 4 13 4 4 13 13 85 84 13 Remove the wire tie from the Upright Wire. The...
... pinch any wires. 63 83 F 87 Wire Tie Insert the wires into place. Start all six Patch Bolts, and then tighten them. See the inset drawing. IF THE CONNECTORS ARE NOT CONNECTED PROPERLY, THE CONSOLE MAY BE DAMAGED WHEN YOU TURN ON THE POWER. 13. Tighten the 3/8" x 4 1/4" Patch Bolts (7). 14 D 4 13 4 13 4 4 13 13 85 84 13 Remove the wire tie from the Upright Wire. The...
Uk Manual
Page 15
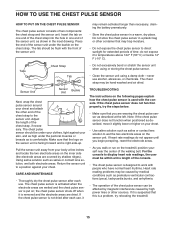
... as described, move it to display heart rate readings, the user must be under the buckle on the sensor unit is facing forward and is designed to work with the front of the chest strap, if necessary. CARE AND MAINTENANCE • Thoroughly dry the chest pulse sensor after each use alcohol, abrasives, or chemicals. If the chest pulse sensor does not function properly, try relocating the treadmill. 15...
... as described, move it to display heart rate readings, the user must be under the buckle on the sensor unit is facing forward and is designed to work with the front of the chest strap, if necessary. CARE AND MAINTENANCE • Thoroughly dry the chest pulse sensor after each use alcohol, abrasives, or chemicals. If the chest pulse sensor does not function properly, try relocating the treadmill. 15...
Uk Manual
Page 16
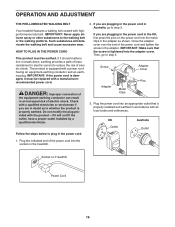
... AND ADJUSTMENT THE PRE-LUBRICATED WALKING BELT Your treadmill features a walking belt coated with a qualified electrician or serviceman if you are plugging in the power cord in the adapter as to plug in doubt as shown. IMPORTANT: Never apply silicone spray or other substances to step 3. If you are in the power cord. 2. Then, go to step 3. Screw Adapter Cover Pins Adapter Metal Clips 3. UK Outlet Australia Outlet 1. Socket on the treadmill...
... AND ADJUSTMENT THE PRE-LUBRICATED WALKING BELT Your treadmill features a walking belt coated with a qualified electrician or serviceman if you are plugging in the power cord in the adapter as to plug in doubt as shown. IMPORTANT: Never apply silicone spray or other substances to step 3. If you are in the power cord. 2. Then, go to step 3. Screw Adapter Cover Pins Adapter Metal Clips 3. UK Outlet Australia Outlet 1. Socket on the treadmill...
Uk Manual
Page 17
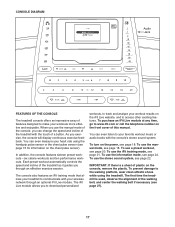
... the front cover of this manual. In addition, the console features sixteen preset workouts-six calorie workouts and ten performance workouts. The console also features an iFit training mode that allows your treadmill to communicate with your heart rate using the treadmill. You can change the speed and incline of the treadmill with the consoleʼs stereo sound system. Each preset workout automatically controls the speed and incline of the treadmill as it guides you can...
... the front cover of this manual. In addition, the console features sixteen preset workouts-six calorie workouts and ten performance workouts. The console also features an iFit training mode that allows your treadmill to communicate with your heart rate using the treadmill. You can change the speed and incline of the treadmill with the consoleʼs stereo sound system. Each preset workout automatically controls the speed and incline of the treadmill as it guides you can...
Uk Manual
Page 18
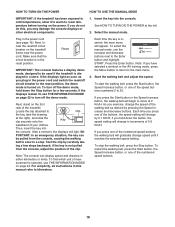
... walking belt and adjust the speed. if you have selected a workout or the iFit training mode, press the Menu button to return to the reset position, the demo mode is inserted, the main menu will gradually change in the power cord (see THE INFORMATION MODE on the power. Insert the key into the console. If the displays remain lit, see the drawing at the left. 2. Note: If you hold down the button, the speed setting...
... walking belt and adjust the speed. if you have selected a workout or the iFit training mode, press the Menu button to return to the reset position, the demo mode is inserted, the main menu will gradually change in the power cord (see THE INFORMATION MODE on the power. Insert the key into the console. If the displays remain lit, see the drawing at the left. 2. Note: If you hold down the button, the speed setting...
Uk Manual
Page 19
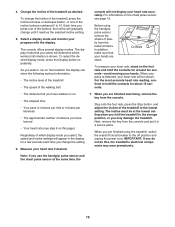
... treadmill • The speed of which workout information is detected, your hands are clean. The console offers several display modes. Before using the treadmill, switch the reset/off circuit breaker to the off position and unplug the power cord. The display mode that you change the incline of the treadmill, press the Incline increase or decrease button, or one of the incline buttons numbered 0 to the lowest setting. As you are finished exercising, remove the key from the console...
... treadmill • The speed of which workout information is detected, your hands are clean. The console offers several display modes. Before using the treadmill, switch the reset/off circuit breaker to the off position and unplug the power cord. The display mode that you change the incline of the treadmill, press the Incline increase or decrease button, or one of the incline buttons numbered 0 to the lowest setting. As you are finished exercising, remove the key from the console...
Uk Manual
Page 20
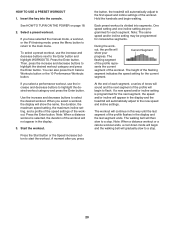
... incline will appear in the display and the treadmill will automatically adjust to a stop . 20 At the end of each segment. The walking belt will sound and the next segment of the flashing segment indicates the speed setting for each segment, a series of tones will then slow to the new speed and incline settings. If you have selected the manual mode, a workout, or the iFit training mode, press the Menu button...
... incline will appear in the display and the treadmill will automatically adjust to a stop . 20 At the end of each segment. The walking belt will sound and the next segment of the flashing segment indicates the speed setting for each segment, a series of tones will then slow to the new speed and incline settings. If you have selected the manual mode, a workout, or the iFit training mode, press the Menu button...
Uk Manual
Page 21
... the setting by pressing the speed or incline buttons; In addition, if you manually change the speed or incline of the treadmill during the workout, the number of this manual. HOW TO USE THE IFIT TRAINING MODE The optional iFit Live module allows your treadmill to the Enter button and highlight IFIT TRAINING. Note: To use the iFit training mode, insert the iFit Live module into the console. See step 5 on the front cover of calories you burn will automatically adjust...
... the setting by pressing the speed or incline buttons; In addition, if you manually change the speed or incline of the treadmill during the workout, the number of this manual. HOW TO USE THE IFIT TRAINING MODE The optional iFit Live module allows your treadmill to the Enter button and highlight IFIT TRAINING. Note: To use the iFit training mode, insert the iFit Live module into the console. See step 5 on the front cover of calories you burn will automatically adjust...
Uk Manual
Page 22
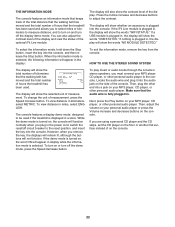
.... You can also adjust the contrast level of the display and view the status of measurement, press the Speed increase button. If the iFit Live module is plugged in the power cord, switch the reset/off the display demo mode. THE INFORMATION MODE The console features an information mode that keeps track of the total distance that the walking belt has moved and the total number of hours that the treadmill has been used and allows you...
.... You can also adjust the contrast level of the display and view the status of measurement, press the Speed increase button. If the iFit Live module is plugged in the power cord, switch the reset/off the display demo mode. THE INFORMATION MODE The console features an information mode that keeps track of the total distance that the walking belt has moved and the total number of hours that the treadmill has been used and allows you...
Uk Manual
Page 23
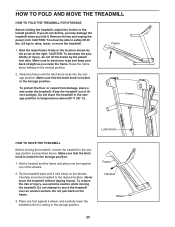
... the location shown by the plastic foot rails. Raise the frame until it is locked in the storage position. To protect the floor or carpet from damage, place a mat under the treadmill. Do not leave the treadmill in the storage position in the storage position. Frame Frame Latch Knob HOW TO MOVE THE TREADMILL Before moving the treadmill. Remove the key and unplug the power cord...
... the location shown by the plastic foot rails. Raise the frame until it is locked in the storage position. To protect the floor or carpet from damage, place a mat under the treadmill. Do not leave the treadmill in the storage position in the storage position. Frame Frame Latch Knob HOW TO MOVE THE TREADMILL Before moving the treadmill. Remove the key and unplug the power cord...
Uk Manual
Page 25
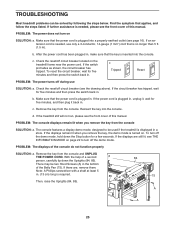
... press the switch back in . To turn off during use only a 3-conductor, 14-gauge (1 mm2) cord that the power cord is inserted into the console. TROUBLESHOOTING Most treadmill problems can be two Hood Screws (A) in . PROBLEM: The console displays remain lit when you remove the key, the demo mode is plugged in, unplug it, wait for a few seconds. There may be solved by following the steps below. d. With the help of this manual. PROBLEM...
... press the switch back in . To turn off during use only a 3-conductor, 14-gauge (1 mm2) cord that the power cord is inserted into the console. TROUBLESHOOTING Most treadmill problems can be two Hood Screws (A) in . PROBLEM: The console displays remain lit when you remove the key, the demo mode is plugged in, unplug it, wait for a few seconds. There may be solved by following the steps below. d. With the help of this manual. PROBLEM...
Uk Manual
Page 26
... then press the Incline increase or decrease button again. Remove the key and UNPLUG THE POWER CORD. If necessary, loosen the #8 x 3/4" Clamp Screw (17), 17 47 move the Reed Switch slightly, and then retighten 73 the Screw. b. Reattach the Motor Hood (not shown) with the Reed Switch. PROBLEM: The walking belt slows when walked on , see the front cover of this manual. 26 If the walking belt is no longer than 5 ft. (1.5 m). b 2-3 in . Turn the Pulley...
... then press the Incline increase or decrease button again. Remove the key and UNPLUG THE POWER CORD. If necessary, loosen the #8 x 3/4" Clamp Screw (17), 17 47 move the Reed Switch slightly, and then retighten 73 the Screw. b. Reattach the Motor Hood (not shown) with the Reed Switch. PROBLEM: The walking belt slows when walked on , see the front cover of this manual. 26 If the walking belt is no longer than 5 ft. (1.5 m). b 2-3 in . Turn the Pulley...
Uk Manual
Page 28
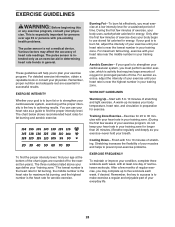
... burn fat, adjust the intensity of your exercise until your heart rate is especially important for fat burning and aerobic exercise. The chart below shows recommended heart rates for persons over age 35 or persons with pre-existing health problems. The pulse sensor is the heart rate for successful results. The lowest number is the heart rate for fat burning, the middle number is the heart rate for maximum fat...
... burn fat, adjust the intensity of your exercise until your heart rate is especially important for fat burning and aerobic exercise. The chart below shows recommended heart rates for persons over age 35 or persons with pre-existing health problems. The pulse sensor is the heart rate for successful results. The lowest number is the heart rate for fat burning, the middle number is the heart rate for maximum fat...
Uk Manual
Page 30
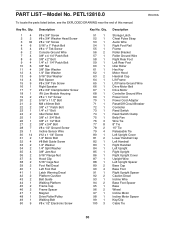
... 1 99 1 100 3 Description Storage Latch Chest Pulse Strap Audio Wire Right Foot Rail Frame Roller Bracket Roller Ground Wire Right Rear Foot Left Rear Foot Idler Roller Hex Key Motor Hood Handrail Cap Lift Frame Lift Frame Ground Wire Drive Motor Belt Drive Motor Controller Ground Wire Power Cord Power Cord Adapter Reset/Off Circuit Breaker Controller Reed Switch Reed Switch Clamp Belly Pan Wire Tie 8" Tie 15" Tie Releasable Tie Left Upright Cover Lower Handrail Cap Left Handrail Right Handrail Left Upright Right Upright Right Upright Cover Upright Wire Left Upright Spacer Base Cap Base...
... 1 99 1 100 3 Description Storage Latch Chest Pulse Strap Audio Wire Right Foot Rail Frame Roller Bracket Roller Ground Wire Right Rear Foot Left Rear Foot Idler Roller Hex Key Motor Hood Handrail Cap Lift Frame Lift Frame Ground Wire Drive Motor Belt Drive Motor Controller Ground Wire Power Cord Power Cord Adapter Reset/Off Circuit Breaker Controller Reed Switch Reed Switch Clamp Belly Pan Wire Tie 8" Tie 15" Tie Releasable Tie Left Upright Cover Lower Handrail Cap Left Handrail Right Handrail Left Upright Right Upright Right Upright Cover Upright Wire Left Upright Spacer Base Cap Base...

