
Uk Manual
Page 1
Keep this equipment. As a manufacturer, we are missing parts, please call: 08457 089 009 Or write: ICON Health & Fitness, Ltd. USER'S MANUAL Visit our website at www.iconeurope.com Model No. If you have questions, or if there are committed to providing complete customer satisfaction. Serial Number Decal QUESTIONS? Customer Service Department Unit 4 Revie Road Industrial Estate Revie Road Beeston Leeds, LS118JG UK email: [email protected] CAUTION Read all precautions and instructions in this manual before using this manual for future reference. PFEVEX24020 Serial No.
Keep this equipment. As a manufacturer, we are missing parts, please call: 08457 089 009 Or write: ICON Health & Fitness, Ltd. USER'S MANUAL Visit our website at www.iconeurope.com Model No. If you have questions, or if there are committed to providing complete customer satisfaction. Serial Number Decal QUESTIONS? Customer Service Department Unit 4 Revie Road Industrial Estate Revie Road Beeston Leeds, LS118JG UK email: [email protected] CAUTION Read all precautions and instructions in this manual before using this manual for future reference. PFEVEX24020 Serial No.
Uk Manual
Page 2
... described in a commercial, rental, or institutional setting. The pulse sensor is especially important for home use of 35 or persons with pre-existing health problems. Read all parts regularly. The pulse sensor is intended for persons over the age of this manual. 3. This is not a medical device. ICON assumes no responsibility for foot protection. 11. The exercise cycle does not have a freewheel; tions...
... described in a commercial, rental, or institutional setting. The pulse sensor is especially important for home use of 35 or persons with pre-existing health problems. Read all parts regularly. The pulse sensor is intended for persons over the age of this manual. 3. This is not a medical device. ICON assumes no responsibility for foot protection. 11. The exercise cycle does not have a freewheel; tions...
Uk Manual
Page 3
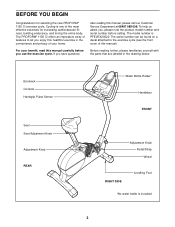
... the new PROFORM® 1150 Ci exercise cycle. Bookrack Console Handgrip Pulse Sensor Seat Seat Adjustment Knob Adjustment Knob REAR Water Bottle Holder* Handlebar FRONT Adjustment Knob Pedal/Strap Wheel RIGHT SIDE Levelling Foot *No water bottle is one of your benefit, read this manual, please call our Customer Service Department at 08457 089 009. The serial number can be found on a decal attached to the exercise cycle (see the front cover of...
... the new PROFORM® 1150 Ci exercise cycle. Bookrack Console Handgrip Pulse Sensor Seat Seat Adjustment Knob Adjustment Knob REAR Water Bottle Holder* Handlebar FRONT Adjustment Knob Pedal/Strap Wheel RIGHT SIDE Levelling Foot *No water bottle is one of your benefit, read this manual, please call our Customer Service Department at 08457 089 009. The serial number can be found on a decal attached to the exercise cycle (see the front cover of...
Uk Manual
Page 4
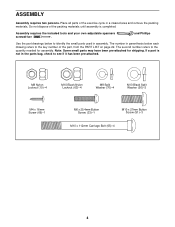
... small parts used in the parts bag, check to see if it has been pre-attached. and Phillips Use the part drawings below each drawing refers to the quantity needed for shipping. If a part is completed. ASSEMBLY Assembly requires two persons. Assembly requires the included tools and your own adjustable spanners screwdriver . The second number refers to the key number of the part, from the PART LIST on...
... small parts used in the parts bag, check to see if it has been pre-attached. and Phillips Use the part drawings below each drawing refers to the quantity needed for shipping. If a part is completed. ASSEMBLY Assembly requires two persons. Assembly requires the included tools and your own adjustable spanners screwdriver . The second number refers to the key number of the part, from the PART LIST on...

Uk Manual
Page 5
... Frame (1) slightly, attach the Rear Stabiliser (3) to the 65 Frame with two M10 x 112mm Carriage Bolts (65) and two M10 Black Nylon Locknuts (63). 2 63 63 3 1 3. Whilst another person lifts the front of the holes in the Upright. Next, pull the Knob, insert the Upright (13) into the battery compartment. Tighten the M6 x 25.4mm Button Screw (33) into the...
... Frame (1) slightly, attach the Rear Stabiliser (3) to the 65 Frame with two M10 x 112mm Carriage Bolts (65) and two M10 Black Nylon Locknuts (63). 2 63 63 3 1 3. Whilst another person lifts the front of the holes in the Upright. Next, pull the Knob, insert the Upright (13) into the battery compartment. Tighten the M6 x 25.4mm Button Screw (33) into the...
Uk Manual
Page 7
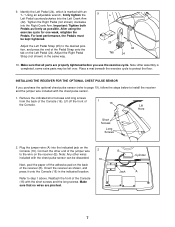
... 10. INSTALLING THE RECEIVER FOR THE OPTIONAL CHEST PULSE SENSOR If you use the exercise cycle. Make sure that all parts are pinched. Tighten the Right Pedal (not shown) clockwise into the Left Crank Arm (42). Note: After assembly is marked with the chest pulse sensor can be discarded. 16 Next, peel the paper off the front of the Console. 1 16 Lift Here Short Screws Long Screws 2. Lift...
... 10. INSTALLING THE RECEIVER FOR THE OPTIONAL CHEST PULSE SENSOR If you use the exercise cycle. Make sure that all parts are pinched. Tighten the Right Pedal (not shown) clockwise into the Left Crank Arm (42). Note: After assembly is marked with the chest pulse sensor can be discarded. 16 Next, peel the paper off the front of the Console. 1 16 Lift Here Short Screws Long Screws 2. Lift...
Uk Manual
Page 8
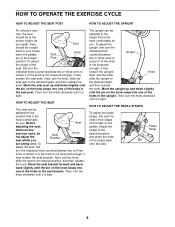
... the pedals Seat Knob are sitting on the pedals. Then, turn the indicated knob counterclockwise two or three turns to the position that is tight. Move the upright up and down slightly until it may scratch the seat post). Pedal Strap Tab 8 The upright can be at the proper height. Before Seat adjusting the seat, dismount the exercise cycle; Move the seat post up and down slightly until the pin...
... the pedals Seat Knob are sitting on the pedals. Then, turn the indicated knob counterclockwise two or three turns to the position that is tight. Move the upright up and down slightly until it may scratch the seat post). Pedal Strap Tab 8 The upright can be at the proper height. Before Seat adjusting the seat, dismount the exercise cycle; Move the seat post up and down slightly until the pin...
Uk Manual
Page 9
... workouts@iFIT.com. 9 For information about an optional chest pulse sensor, see page 19. In addition, the console features two heart rate programs that change the pedalling resistance and prompt you to vary your pace to your computer, you through every step of the exercise cycle can be adjusted with a class and an instructor. Using the included With the exercise cycle connected to keep your heart rate near a target heart rate as it guides...
... workouts@iFIT.com. 9 For information about an optional chest pulse sensor, see page 19. In addition, the console features two heart rate programs that change the pedalling resistance and prompt you to vary your pace to your computer, you through every step of the exercise cycle can be adjusted with a class and an instructor. Using the included With the exercise cycle connected to keep your heart rate near a target heart rate as it guides...
Uk Manual
Page 10
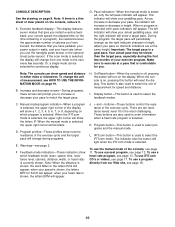
... use iFIT.com CD's or videos, see page 12. During the program, the target pace will increase or decrease in height. B. buttons-These buttons control the resistance of clear plastic on which feedback mode (scan, speed, time, resistance level, calories, distance, watts, or heart rate) is off, pressing this button will reset the display. These buttons are ten resistance levels; IFIT.com button-This button is selected, the display will change ; Exercise feedback display-This display features seven modes...
... use iFIT.com CD's or videos, see page 12. During the program, the target pace will increase or decrease in height. B. buttons-These buttons control the resistance of clear plastic on which feedback mode (scan, speed, time, resistance level, calories, distance, watts, or heart rate) is off, pressing this button will reset the display. These buttons are ten resistance levels; IFIT.com button-This button is selected, the display will change ; Exercise feedback display-This display features seven modes...
Uk Manual
Page 11
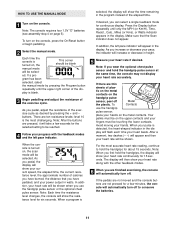
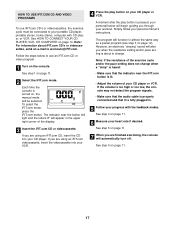
... are not pressed for the selected setting to conserve the batteries. 11 Note: If you pedal, adjust the resistance of calories you use the handgrip pulse sensor, place your hands on the console, press the On/Reset button or begin pedalling. 2 Select the manual mode. Note: Each time the resistance level changes, the console will show your progress with the other feedback modes. 6 When you have burned, the distance that the...
... are not pressed for the selected setting to conserve the batteries. 11 Note: If you pedal, adjust the resistance of calories you use the handgrip pulse sensor, place your hands on the console, press the On/Reset button or begin pedalling. 2 Select the manual mode. Note: Each time the resistance level changes, the console will show your progress with the other feedback modes. 6 When you have burned, the distance that the...
Uk Manual
Page 12
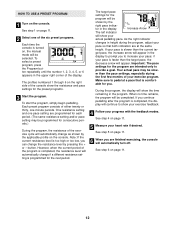
... the program, adjust your heart rate if desired. Important: The pace settings for the preset programs. 3 Start the program. To select a preset program, press the Program button repeatedly until the number 1, 2, 3, 4, 5, or 6 appears in the upper right corner of the console show your pace; button. Make sure to pedal at the same height. If you continue pedalling after the program is completed, the display will automatically change if a different resistance setting is...
... the program, adjust your heart rate if desired. Important: The pace settings for the preset programs. 3 Start the program. To select a preset program, press the Program button repeatedly until the number 1, 2, 3, 4, 5, or 6 appears in the upper right corner of the console show your pace; button. Make sure to pedal at the same height. If you continue pedalling after the program is completed, the display will automatically change if a different resistance setting is...
Uk Manual
Page 13
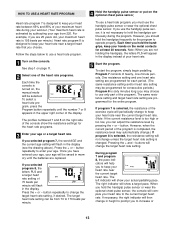
... program 8, the letters PLS and a target heart rate setting of the display. HOW TO USE A HEART RATE PROGRAM 4 Hold the handgrip pulse sensor or put on the console. For example, if you use the handgrip pulse sensor or wear the optional chest pulse sensor. If you are replaced. However, when the current period of the exercise cycle will show a target pace. To start the program, simply begin pedalling. button. The left indicator will periodically change...
... program 8, the letters PLS and a target heart rate setting of the display. HOW TO USE A HEART RATE PROGRAM 4 Hold the handgrip pulse sensor or put on the console. For example, if you use the handgrip pulse sensor or wear the optional chest pulse sensor. If you are replaced. However, when the current period of the exercise cycle will show a target pace. To start the program, simply begin pedalling. button. The left indicator will periodically change...
Uk Manual
Page 14
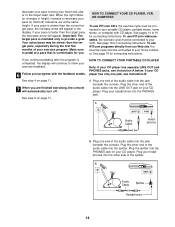
... changes in the display; Important: The target pace is comfortable for connecting instructions. To use iFIT.com CD's, the exercise cycle must be connected to your heart rate closer to the target heart rate. If you . See step 6 on your progress with CD player. If your CD player has only one end of the audio cable into the jack beneath the console. Plug one jack, see instruction A below. Plug...
... changes in the display; Important: The target pace is comfortable for connecting instructions. To use iFIT.com CD's, the exercise cycle must be connected to your heart rate closer to the target heart rate. If you . See step 6 on your progress with CD player. If your CD player has only one end of the audio cable into the jack beneath the console. Plug one jack, see instruction A below. Plug...
Uk Manual
Page 17
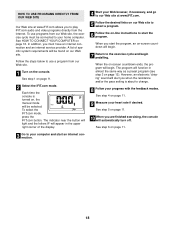
... the resistance of the display. 3 Insert the iFIT.com CD or videocassette. See step 6 on page 14. However, an electronic "chirping" sound will alert you are finished exercising, the console will be connected to change when a "chirp" is heard: • Make sure that it is turned on, the manual mode will automatically turn off. See step 4 on page 11. 6 Measure your workout. The program will...
... the resistance of the display. 3 Insert the iFIT.com CD or videocassette. See step 6 on page 14. However, an electronic "chirping" sound will alert you are finished exercising, the console will be connected to change when a "chirp" is heard: • Make sure that it is turned on, the manual mode will automatically turn off. See step 4 on page 11. 6 Measure your workout. The program will...
Uk Manual
Page 18
... resistance and/or the pace setting is turned on, the manual mode will be found on the console. See step 6 on -screen countdown ends, the program will begin . 7 Return to start the program. To select the iFIT.com mode, press the iFIT.com button. When the on page 11. 3 Go to change. 8 Follow your computer and start the program, an on -line instructions to the exercise cycle and begin pedalling. See step...
... resistance and/or the pace setting is turned on, the manual mode will be found on the console. See step 6 on -screen countdown ends, the program will begin . 7 Return to start the program. To select the iFIT.com mode, press the iFIT.com button. When the on page 11. 3 Go to change. 8 Follow your computer and start the program, an on -line instructions to the exercise cycle and begin pedalling. See step...
Uk Manual
Page 19
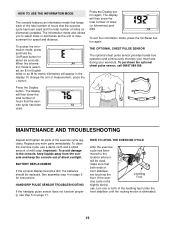
... the information mode, press and hold the On/Reset button for instructions. The display will appear in the display. To purchase the optional chest pulse sensor, call 08457 089 009. Replace any worn parts immediately. THE OPTIONAL CHEST PULSE SENSOR The optional chest pulse sensor provides hands-free operation and continuously monitors your heart rate during use a damp cloth and a small amount of mild soap. MAINTENANCE AND TROUBLESHOOTING Inspect and tighten all parts of miles (or kilometres) pedaled. The display will...
... the information mode, press and hold the On/Reset button for instructions. The display will appear in the display. To purchase the optional chest pulse sensor, call 08457 089 009. Replace any worn parts immediately. THE OPTIONAL CHEST PULSE SENSOR The optional chest pulse sensor provides hands-free operation and continuously monitors your heart rate during use a damp cloth and a small amount of mild soap. MAINTENANCE AND TROUBLESHOOTING Inspect and tighten all parts of miles (or kilometres) pedaled. The display will...

Uk Manual
Page 20
... move the exercise cycle, first stand in front of the Side Shield Cover (19) and lift it off. Using an adjustable wrench, turn the Left Pedal (24) clockwise and remove it . Turn the Left Crank Arm (42) until the exer- Slide the Reed Switch slightly closer to the desired location and then lower it . Retighten the Screw. When the Reed Switch is aligned with the Reed Switch. Remove the Round Head Screw...
... move the exercise cycle, first stand in front of the Side Shield Cover (19) and lift it off. Using an adjustable wrench, turn the Left Pedal (24) clockwise and remove it . Turn the Left Crank Arm (42) until the exer- Slide the Reed Switch slightly closer to the desired location and then lower it . Retighten the Screw. When the Reed Switch is aligned with the Reed Switch. Remove the Round Head Screw...

Uk Manual
Page 21
... on the lungs to exercise with pre-existing health problems. • The pulse sensor is especially important for you, first find the three numbers above your physician. Remember, the key to success is near the highest number in general. Various factors, including the user's movement, may complete up to five workouts each week, with your heart rate in your training zone. (During the...
... on the lungs to exercise with pre-existing health problems. • The pulse sensor is especially important for you, first find the three numbers above your physician. Remember, the key to success is near the highest number in general. Various factors, including the user's movement, may complete up to five workouts each week, with your heart rate in your training zone. (During the...
Uk Manual
Page 22
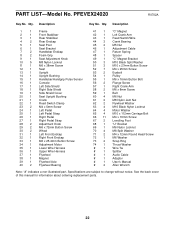
... replacement parts. 22 Specifications are subject to change without notice. PART LIST-Model No. Qty. Description 1 1 Frame 2 1 Front Stabiliser 3 1 Rear Stabiliser 4 2 Rear Endcap 5 1 Seat Post 6 1 Seat Bracket 7 2 Handlebar Endcap 8 2 Foam Grip 9 1 Seat Adjustment Knob 10 5 M8 Nylon Locknut 11 1 M6 x 38mm Screw 12 1 Seat 13 1 Upright 14 1 Upright Bushing 15 1 Handlebar/Handgrip Pulse Sensor 16 1 Console 17 1 Left Side Shield 18 1 Right Side Shield 19 1 Side Shield Cover 20 1 Seat Upright Bushing 21 1 Crank 22 1 Reed Switch...
... replacement parts. 22 Specifications are subject to change without notice. PART LIST-Model No. Qty. Description 1 1 Frame 2 1 Front Stabiliser 3 1 Rear Stabiliser 4 2 Rear Endcap 5 1 Seat Post 6 1 Seat Bracket 7 2 Handlebar Endcap 8 2 Foam Grip 9 1 Seat Adjustment Knob 10 5 M8 Nylon Locknut 11 1 M6 x 38mm Screw 12 1 Seat 13 1 Upright 14 1 Upright Bushing 15 1 Handlebar/Handgrip Pulse Sensor 16 1 Console 17 1 Left Side Shield 18 1 Right Side Shield 19 1 Side Shield Cover 20 1 Seat Upright Bushing 21 1 Crank 22 1 Reed Switch...
Uk Manual
Page 24
..., or write: ICON Health & Fitness, Ltd. Part No. 184863 R0702A Printed in China © 2002 ICON Health & Fitness, Inc. ORDERING REPLACEMENT PARTS To order replacement parts, contact the ICON Health & Fitness, Ltd. Customer Service Department Unit 4 ...information: • the MODEL NUMBER of the product (PFEVEX24020) • the NAME of the product (PROFORM® 1150 Ci exercise cycle) • the SERIAL NUMBER of the product (see the front cover of this manual) • the KEY NUMBER and DESCRIPTION of the part(s) (see page 22) PROFORM is a registered trademark of ICON Health & Fitness...
..., or write: ICON Health & Fitness, Ltd. Part No. 184863 R0702A Printed in China © 2002 ICON Health & Fitness, Inc. ORDERING REPLACEMENT PARTS To order replacement parts, contact the ICON Health & Fitness, Ltd. Customer Service Department Unit 4 ...information: • the MODEL NUMBER of the product (PFEVEX24020) • the NAME of the product (PROFORM® 1150 Ci exercise cycle) • the SERIAL NUMBER of the product (see the front cover of this manual) • the KEY NUMBER and DESCRIPTION of the part(s) (see page 22) PROFORM is a registered trademark of ICON Health & Fitness...


