ProForm 920ci Support and Manuals
Get Help and Manuals for this ProForm item

View All Support Options Below
Free ProForm 920ci manuals!
Problems with ProForm 920ci?
Ask a Question
Free ProForm 920ci manuals!
Problems with ProForm 920ci?
Ask a Question
Most Recent ProForm 920ci Questions

What Is The Price Of A Proform 920ci Weight Machine
(Posted by jkm58137 10 years ago)
Popular ProForm 920ci Manual Pages
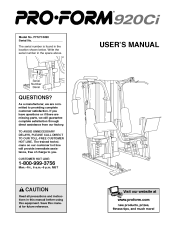
English Manual - Page 1
... in the location shown below.
Visit our website at www.proform.com
new products, prizes, fitness tips, and much more! If you have questions or if there are committed to you. MST
CAUTION
Read all precautions and instructions in this manual before using this manual for future reference. The serial number is found in...
English Manual - Page 2
... in the center of this manual and in a commercial, rental or institutional setting. 11. Always wear athletic shoes for protection. 5. Never release the press arms, butterfly arms, leg lever, lat bar, or ab strap while weights are exercising, stop immediately and begin cooling down. 4. The decal shown at all instructions in this manual. WARNING:
2 Inspect and tighten...
English Manual - Page 3

... reading further, please familiarize yourself with the parts that are labeled in . Width: 78 in the drawing below.
Low Pulley Station
3 If you for selecting the versatile PROFORM® 920Ci weight system. For your cardiovascular system, the PROFORM® 920Ci will help us assist you, please note the product model number and serial number before using the...
English Manual - Page 4
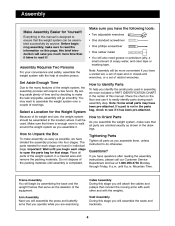
... questions after reading the assembly instructions, please call our Customer Service Department toll-free at 1-800-999-3756 Monday through Friday, 6 a.m.
Note: Assembly will assemble the press and butterfly arms that serve as the skeleton of evenings. Note: Some small parts may want to Identify Parts
To help of the weight system, the assembly process will...
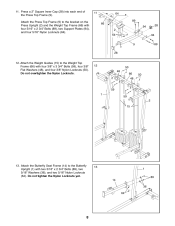
English Manual - Page 7

... Frame (66) on the indicated brackets on the bottom. Slide a Top Weight (16) onto the Weight Guides (15). Tighten all of both Weight Guides (15) are on the Uprights (1, 2). Press three 2" Square Inner Caps (28) into each Upright (1, 2) with four 5/16" x 2 3/4" Bolts (89), two Support Plates (94), and four 5/16" Nylon Locknuts (64).
10 89 28 94...
English Manual - Page 8
... 15
13. Do not tighten the Nylon Locknuts yet.
13
1 89 14 36 64
8 Attach the Weight Guides (15) to the Weight Top Frame (66) with two 5/16" x 2 3/4" Bolts (89), two 5/16" Washers (36...Attach the Butterfly Seat Frame (14) to the bracket on the Press Upright (2) and the Weight Top Frame (66) with four 5/16" x 2 3/4" Bolts (89), two Support Plates (94), and four 5/16" Nylon Locknuts (64).
11
...
English Manual - Page 21

... set of shrouds (not shown) over the pulleys. Make sure that the cables move smoothly, find and correct the problem. See TroubleShooting and Maintenance on the Weight Base (5) with the Lock Pin (22). Be sure that the Lock Pin (22) is used. Attach the Press Plate (55) to make sure that all parts are not properly installed...
English Manual - Page 24
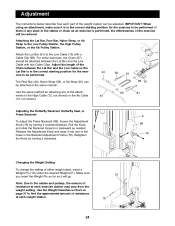
...or Press Backrest To adjust the Press Backrest (99), loosen the Adjustment Knob (78) by turning it clockwise.
2 99 78
Changing the Weight Setting To change the setting of resistance at each weight station....). Make sure you insert the Weight Pin as far as needed. Adjustment
The instructions below describe how each exercise station may vary from the weight setting. Use the same method for ...
English Manual - Page 25

...) through the Press Front Leg and the Press Plate.
55 20
Trouble-shooting and Maintenance
Inspect and tighten all parts each time you use solvents. The weight system can be removed from a set of holes in the bracket on the weight system, can stretch slightly when it further away from the Press Plate (55) and the Press Front Leg (20). Moving...
English Manual - Page 26
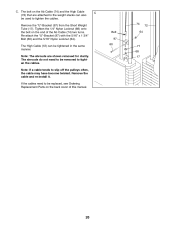
... onto the bolt on the end of this manual. The shrouds do not need to be used to tighten the cables. Note: The shrouds are attached to the weight stacks can be removed to slip off the pulleys... (72) can also be replaced, see Ordering Replacement Parts on the Ab Cable (74) and the High Cable (72) that are shown removed for clarity. Remove the cable and re-install it. The bolt on the...
English Manual - Page 27
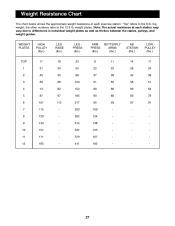
... exercise station. "Top" refers to the 12.5 lb. the other numbers refer to the 6 lb.
WEIGHT PLATES
HIGH PULLEY (lbs.)
LEG RAISE (lbs.)
LEG PRESS (lbs.)
ARM PRESS (lbs.)
BUTTERFLY ARMS (lbs.)
AB STATION (lbs.)
LOW PULLEY (lbs.)
TOP 1 2 3 4... vary due to differences in individual weight plates as well as friction between the cables, pulleys, and weight guides. top weight; weight plates.
English Manual - Page 28

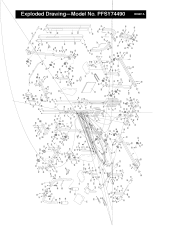
Part Identification Chart-Model No. PFSY74490
R0401A
5/16" Washer (36) 3/8" Flat Washer (48)
1/2" Nylon Jam Nut (106 )
1" Tap Screw (80)
1/4" Flat Washer (71) 3/8" Nylon Jam Nut (63) 1/4" x 3/4" Bolt (49)
1/4" ...
English Manual - Page 31

...Decal Support Plate 1/4" x 5/8" Screw Long Weight Tube "U" Bracket 2" x 3" Inner Cap Press Backrest Plastic Bushing 1/4" x 1 1/2" Carriage Bolt 4 1/2" Pulley Angle Spacer 3/8" x 4" Carriage Bolt 1/2" x 3 1/2" Bolt 1/2" Nylon Jam Nut Curl Post 3/8" x 5" Bolt Left Shroud User's Manual
Note: "#" indicates a non-illustrated part. Specifications are subject to change without notice. Part List-Model No...
English Manual - Page 32
...
50
25 24 57 106
40
63
94 48 25 89 105 6 92 104 24 50 24 100 25 52 50 8 48 56
Exploded Drawing-Model No. PFSY74490
30
28
42
30
43
54 4 25 92
R0401A
28
92
English Manual - Page 33
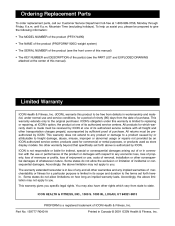
... the product (PROFORM® 920Ci weight system) • The SERIAL NUMBER of the product (see the front cover of this manual) • The KEY NUMBER and DESCRIPTION of the part(s) (see the PART LIST and EXPLODED DRAWING attached at 1-800-999-3756, Monday through Friday, 6 a.m. You may also have other warranty beyond that specifically set forth herein. until...
ProForm 920ci Reviews
We have not received any reviews for ProForm yet.