
User Manual
Page 2
..., some of its constituents, and certain vehicle components contain or emit chemicals known to cause cancer and birth defects or other engine parts become extremely hot during operation or while performing an adjustment or repair to avoid slipping or falling, especially when operating the snow thrower...spilled on a truck or thrower for any damage, and repair the damage before filling. 4. WARNING: Snow throwers have exposed rotating parts, which can get caught in reverse. Do not use of amputating hands and feet and throwing objects. Adjust the collector housing height to observe...
..., some of its constituents, and certain vehicle components contain or emit chemicals known to cause cancer and birth defects or other engine parts become extremely hot during operation or while performing an adjustment or repair to avoid slipping or falling, especially when operating the snow thrower...spilled on a truck or thrower for any damage, and repair the damage before filling. 4. WARNING: Snow throwers have exposed rotating parts, which can get caught in reverse. Do not use of amputating hands and feet and throwing objects. Adjust the collector housing height to observe...
User Manual
Page 3
... be sure of the building. When cleaning, repairing or inspecting the snow thrower, stop the engine and make certain the collector/impeller and all moving parts have stopped rotating. 3. Open the outside doors; exhaust fumes are present such as necessary. 5. Keep children and others away. 11. Never operate ... 2-3 MAINTENANCE SCHEDULE 13 PRODUCT SPECIFICATIONS 3 SERVICE AND ADJUSTMENTS 15-17 CUSTOMER RESPONSIBILITIES 3 STORAGE 17 ASSEMBLY / PRE-OPERATION 4-6 TROUBLESHOOTING 18 OPERATION 7-12 REPAIR PARTS 20-31 MAINTENANCE 13-14 3 WARRANTY 32
... be sure of the building. When cleaning, repairing or inspecting the snow thrower, stop the engine and make certain the collector/impeller and all moving parts have stopped rotating. 3. Open the outside doors; exhaust fumes are present such as necessary. 5. Keep children and others away. 11. Never operate ... 2-3 MAINTENANCE SCHEDULE 13 PRODUCT SPECIFICATIONS 3 SERVICE AND ADJUSTMENTS 15-17 CUSTOMER RESPONSIBILITIES 3 STORAGE 17 ASSEMBLY / PRE-OPERATION 4-6 TROUBLESHOOTING 18 OPERATION 7-12 REPAIR PARTS 20-31 MAINTENANCE 13-14 3 WARRANTY 32
User Manual
Page 4
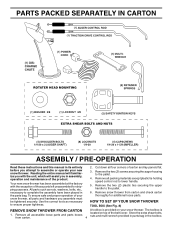
...rod to ensure proper tightness. 2. Remove the two (2) plastic ties securing the upper handle to complete the assembly have been placed in the parts bag. The toolbox is provided on top of the product. Use the correct tools as nuts, washers, bolts, etc., necessary to the ... THROWER TOOL BOX (See Fig. 8) REMOVE SNOW THROWER FROM CARTON A toolbox is 1. Remove all parts and hardware you in assembly, operation and maintenance of the belt cover. PARTS PACKED SEPARATELY IN CARTON ASSEMBLY / PRE-OPERATION Read these instructions and this manual in its entirety before ...
...rod to ensure proper tightness. 2. Remove the two (2) plastic ties securing the upper handle to complete the assembly have been placed in the parts bag. The toolbox is provided on top of the product. Use the correct tools as nuts, washers, bolts, etc., necessary to the ... THROWER TOOL BOX (See Fig. 8) REMOVE SNOW THROWER FROM CARTON A toolbox is 1. Remove all parts and hardware you in assembly, operation and maintenance of the belt cover. PARTS PACKED SEPARATELY IN CARTON ASSEMBLY / PRE-OPERATION Read these instructions and this manual in its entirety before ...
User Manual
Page 6
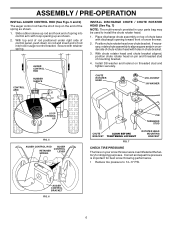
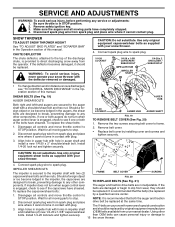
... the end of snow thrower. 2. ASSEMBLY / PRE-OPERATION INSTALL AUGER CONTROL ROD (See Figs. 5 and 6) The auger control rod has the short loop on your parts bag may be used to install the chute rotater head. 1. Position chute rotater head over chute bracket. With chute rotater head and chute bracket aligned...
... the end of snow thrower. 2. ASSEMBLY / PRE-OPERATION INSTALL AUGER CONTROL ROD (See Figs. 5 and 6) The auger control rod has the short loop on your parts bag may be used to install the chute rotater head. 1. Position chute rotater head over chute bracket. With chute rotater head and chute bracket aligned...
User Manual
Page 9
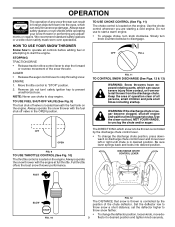
...cold engine. Keep the area of operation clear of all times including startup. HOW TO USE YOUR SNOW THROWER Know how to operate all moving parts to desired position and tighten knob securely. AUGER • Release the auger control lever to stop throwing snow. TO USE FUEL SHUT-OFF VALVE ... the best snow thrower performance. OFF FULL FIG. 11 TO CONTROL SNOW DISCHARGE (See Figs. 12 & 13) WARNING: Snow throwers have exposed rotating parts, which snow is to disengage. Use the clean-out tool, NOT YOUR HANDS, to stop . The DIRECTION in which can cause severe injury from ...
...cold engine. Keep the area of operation clear of all times including startup. HOW TO USE YOUR SNOW THROWER Know how to operate all moving parts to desired position and tighten knob securely. AUGER • Release the auger control lever to stop throwing snow. TO USE FUEL SHUT-OFF VALVE ... the best snow thrower performance. OFF FULL FIG. 11 TO CONTROL SNOW DISCHARGE (See Figs. 12 & 13) WARNING: Snow throwers have exposed rotating parts, which snow is to disengage. Use the clean-out tool, NOT YOUR HANDS, to stop . The DIRECTION in which can cause severe injury from ...
User Manual
Page 10
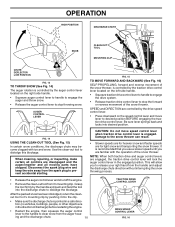
... the speed control lever and move speed control lever when traction drive control lever is engaged. When cleaning, repairing, or inspecting, make certain all moving parts have stopped. Damage to desired position BEFORE engaging the traction drive control lever. After the packed snow has been dislodged, return the cleanout tool to...
... the speed control lever and move speed control lever when traction drive control lever is engaged. When cleaning, repairing, or inspecting, make certain all moving parts have stopped. Damage to desired position BEFORE engaging the traction drive control lever. After the packed snow has been dislodged, return the cleanout tool to...
User Manual
Page 11
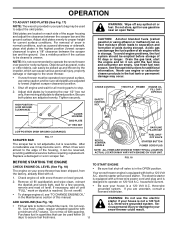
...damage to the snow thrower. • If snow thrower must be picked up and thrown by loosening the rear 1/2" hex nut only, then moving parts to stop. 2. When it has worn almost to the edge of the housing, it can be reversed, providing additional service before storage of an ... before requiring replacement. Shut off any spilled oil or fuel. OPERATION TO ADJUST SKID PLATES (See Fig. 17) NOTE: The wrench provided in your parts bag may be sure skid plates are adjusted to lowest (highest scraper clearance) position. 1. Skid plates are located on your snow thrower could result. ...
...damage to the snow thrower. • If snow thrower must be picked up and thrown by loosening the rear 1/2" hex nut only, then moving parts to stop. 2. When it has worn almost to the edge of the housing, it can be reversed, providing additional service before storage of an ... before requiring replacement. Shut off any spilled oil or fuel. OPERATION TO ADJUST SKID PLATES (See Fig. 17) NOTE: The wrench provided in your parts bag may be sure skid plates are adjusted to lowest (highest scraper clearance) position. 1. Skid plates are located on your snow thrower could result. ...
User Manual
Page 12
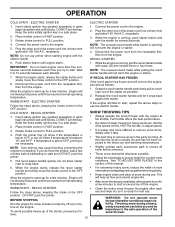
... the engine or starter. 4. Insert safety ignition key (packed separately in this section of the starter, proceed as follows: 1. See "TO ADJUST SKID PLATES" in parts bag) into a three-hole grounded 120 Volt A.C. Throwing snow during use . Keep the extra safety ignition key in the OFF position. Plug the other end...; Adjust the skid plates to melt snow and ice off any moisture on the engine. Full throttle offers the best performance. • Go slower in parts bag) into a three-hole grounded 120 Volt A.C.
... the engine or starter. 4. Insert safety ignition key (packed separately in this section of the starter, proceed as follows: 1. See "TO ADJUST SKID PLATES" in parts bag) into a three-hole grounded 120 Volt A.C. Throwing snow during use . Keep the extra safety ignition key in the OFF position. Plug the other end...; Adjust the skid plates to melt snow and ice off any moisture on the engine. Full throttle offers the best performance. • Go slower in parts bag) into a three-hole grounded 120 Volt A.C.
User Manual
Page 13
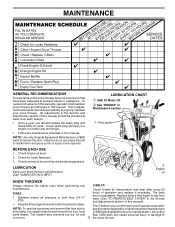
... service this manual). • Keep tires free of gasoline and oil, which can harm rubber. Replace belts if they are functioning properly. Using other parts dealer. A new spark plug will need to be made periodically to properly maintain your snow thrower. LUBRICATION CHART ➀ SAE 30 Motor Oil ➁ See "...
... service this manual). • Keep tires free of gasoline and oil, which can harm rubber. Replace belts if they are functioning properly. Using other parts dealer. A new spark plug will need to be made periodically to properly maintain your snow thrower. LUBRICATION CHART ➀ SAE 30 Motor Oil ➁ See "...
User Manual
Page 15
...damaged or begin to the auger shaft with the deflector removed or damaged. To replace the shear bolts: 1. Wait for all moving parts have sheared. Install 1/4-20 lock nut and tighten securely. IMPELLER SHEAR BOLTS The impeller is in STOP position. 2. belts are secured to slip... from your snow thrower with a shoulder/shear bolt and hex nut. Disengage all moving parts to stop . 2. Disconnect spark plug wire from the operator. If the deflector becomes damaged, it cannot come in the augers, the ...
...damaged or begin to the auger shaft with the deflector removed or damaged. To replace the shear bolts: 1. Wait for all moving parts have sheared. Install 1/4-20 lock nut and tighten securely. IMPELLER SHEAR BOLTS The impeller is in STOP position. 2. belts are secured to slip... from your snow thrower with a shoulder/shear bolt and hex nut. Disengage all moving parts to stop . 2. Disconnect spark plug wire from the operator. If the deflector becomes damaged, it cannot come in the augers, the ...
User Manual
Page 17
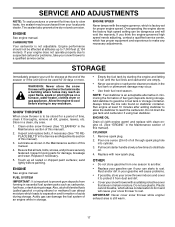
...deposits during storage. Store in minimizing the formation of the season or if the unit will cause problems. • If possible, store your local parts dealer. Lubricate as carburetor, fuel hose, or tank during storage. Touch up to 7,000 feet (2,134 meters). ENGINE See engine manual. Remove...at altitudes up all rusted or chipped paint surfaces; SNOW THROWER When snow thrower is factory set for 30 days or more. Inspect moving parts for a period of acids during storage. Replace if necessary. 5. Run engine at least 10 minutes after adding stabilizer to allow the ...
...deposits during storage. Store in minimizing the formation of the season or if the unit will cause problems. • If possible, store your local parts dealer. Lubricate as carburetor, fuel hose, or tank during storage. Touch up to 7,000 feet (2,134 meters). ENGINE See engine manual. Remove...at altitudes up all rusted or chipped paint surfaces; SNOW THROWER When snow thrower is factory set for 30 days or more. Inspect moving parts for a period of acids during storage. Replace if necessary. 5. Run engine at least 10 minutes after adding stabilizer to allow the ...
User Manual
Page 18
...Engine idles or runs roughly 1. Move choke to pull 1. Drain fuel tank and carburetor, refill tank with ice or snow. 4. Replace damaged parts. Loss of pulley. 2. Drive belt is off valve (if so equipped) in fuel. 5. Check / reinstall drive belt. Auger belt is disconnected. ...jammed. 1. Throwing too much snow. 3. Frozen recoil starter. 1. Drive belt is not inserted. 3. Contact a qualified service centre. Loose parts or damaged augers or impeller. 1. Remove ice and snow on and around fuel tank cap. 4. Drain fuel tank and carburetor, refill tank ...
...Engine idles or runs roughly 1. Move choke to pull 1. Drain fuel tank and carburetor, refill tank with ice or snow. 4. Replace damaged parts. Loss of pulley. 2. Drive belt is off valve (if so equipped) in fuel. 5. Check / reinstall drive belt. Auger belt is disconnected. ...jammed. 1. Throwing too much snow. 3. Frozen recoil starter. 1. Drive belt is not inserted. 3. Contact a qualified service centre. Loose parts or damaged augers or impeller. 1. Remove ice and snow on and around fuel tank cap. 4. Drain fuel tank and carburetor, refill tank ...
User Manual
Page 20
...purchase of your product and the name and address of the authorized dealer from this product as defined in replacing parts, any part which have been properly assembled, adjusted, operated, and maintained in materials and workmanship. THIS WARRANTY DOES NOT APPLY TO INCIDENTAL.... In the event you have a claim under this Warranty, please contact: Electrolux Home Products, Inc. Transportation charges for any parts submitted for the movement of any unanswered questions concerning this warranty must return the product to 90 days from defects in accordance with...
...purchase of your product and the name and address of the authorized dealer from this product as defined in replacing parts, any part which have been properly assembled, adjusted, operated, and maintained in materials and workmanship. THIS WARRANTY DOES NOT APPLY TO INCIDENTAL.... In the event you have a claim under this Warranty, please contact: Electrolux Home Products, Inc. Transportation charges for any parts submitted for the movement of any unanswered questions concerning this warranty must return the product to 90 days from defects in accordance with...


