
User Manual
Page 1
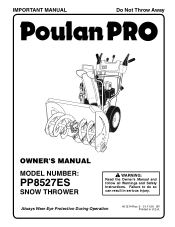
Failure to do so can result in U.S.A. Always Wear Eye Protection During Operation 401214 Rev. 2 01.11.06 BY Printed in serious injury. IMPORTANT MANUAL Do Not Throw Away OWNER'S MANUAL MODEL NUMBER: PP8527ES SNOW THROWER WARNING: Read the Owner's Manual and follow all Warnings and Safety Instructions.
Failure to do so can result in U.S.A. Always Wear Eye Protection During Operation 401214 Rev. 2 01.11.06 BY Printed in serious injury. IMPORTANT MANUAL Do Not Throw Away OWNER'S MANUAL MODEL NUMBER: PP8527ES SNOW THROWER WARNING: Read the Owner's Manual and follow all Warnings and Safety Instructions.
User Manual
Page 2
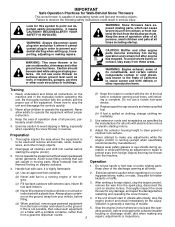
...extreme caution when operating on surfaces above ground level such as specified by manufacturer). 8. Always place contain- WARNING: This snow thrower is highly flammable (f) Keep the nozzle in reverse. Caution should start to the State of amputating hands and feet and ... loose fitting clothing that can cause severe injury from contact, or from material thrown from the machine. restarting and operating the snow thrower. Look for hidden hazards or traffic. (c) Fill fuel tank outdoors with care; Keep the area of operation clear of all times...
...extreme caution when operating on surfaces above ground level such as specified by manufacturer). 8. Always place contain- WARNING: This snow thrower is highly flammable (f) Keep the nozzle in reverse. Caution should start to the State of amputating hands and feet and ... loose fitting clothing that can cause severe injury from contact, or from material thrown from the machine. restarting and operating the snow thrower. Look for hidden hazards or traffic. (c) Fill fuel tank outdoors with care; Keep the area of operation clear of all times...
User Manual
Page 3
...Keep children and others away. 11. Never operate the machine at too fast a rate. 12. Look behind and use your snow thrower properly. Clearing a Clogged Discharge Chute Hand contact with the rotating impeller inside a building where ignition sources are dangerous. 8. Never ...Exercise extreme caution when operating on slippery surfaces. Always refer to operator's manual for important details if the snow thrower is the most common cause of a new snow thrower. PRODUCT SPECIFICATIONS Gasoline Capacity 4.0 Quarts (4,54 Liters) and Type: Unleaded Regular only Oil Type (API SG...
...Keep children and others away. 11. Never operate the machine at too fast a rate. 12. Look behind and use your snow thrower properly. Clearing a Clogged Discharge Chute Hand contact with the rotating impeller inside a building where ignition sources are dangerous. 8. Never ...Exercise extreme caution when operating on slippery surfaces. Always refer to operator's manual for important details if the snow thrower is the most common cause of a new snow thrower. PRODUCT SPECIFICATIONS Gasoline Capacity 4.0 Quarts (4,54 Liters) and Type: Unleaded Regular only Oil Type (API SG...
User Manual
Page 4
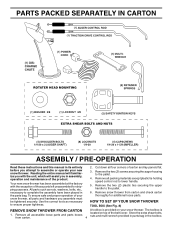
... plastic ties securing the upper handle to complete the assembly have been placed in the parts bag. HOW TO SET UP YOUR SNOW THROWER TOOL BOX (See Fig. 8) REMOVE SNOW THROWER FROM CARTON A toolbox is 1. All parts such as necessary to the pallet. 4. Remove the two (2) screws securing the ...parts. Cut down all accessible loose parts and parts boxes from carton and check carton thoroughly for shipping purposes. Remove snow thrower from carton. 4 located on your new snow thrower. Remove all four corners of carton and lay panels flat the factory with the unit, which will assist...
... plastic ties securing the upper handle to complete the assembly have been placed in the parts bag. HOW TO SET UP YOUR SNOW THROWER TOOL BOX (See Fig. 8) REMOVE SNOW THROWER FROM CARTON A toolbox is 1. All parts such as necessary to the pallet. 4. Remove the two (2) screws securing the ...parts. Cut down all accessible loose parts and parts boxes from carton and check carton thoroughly for shipping purposes. Remove snow thrower from carton. 4 located on your new snow thrower. Remove all four corners of carton and lay panels flat the factory with the unit, which will assist...
User Manual
Page 5
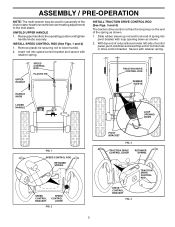
... spring into speed control bracket and secure with retainer spring. Secure with loop opening down and insert top end of the chute rotator head to snow thrower and making adjustments to the skid plates. INSTALL SPEED CONTROL ROD (See Figs. 1 and 2) 1. UNFOLD UPPER HANDLE 1. Insert rod into pivot bracket with retainer spring...
... spring into speed control bracket and secure with retainer spring. Secure with loop opening down and insert top end of the chute rotator head to snow thrower and making adjustments to the skid plates. INSTALL SPEED CONTROL ROD (See Figs. 1 and 2) 1. UNFOLD UPPER HANDLE 1. Insert rod into pivot bracket with retainer spring...
User Manual
Page 6
...rotater head over chute bracket. Install 3/8 washer and locknut on pin and threaded stud of mounting bracket. 4. Secure with loop opening toward front of snow thrower. 2. AUGER CONTROL BRACKET FIG. 6 6 CONTROL ARM AUGER CONTROL ROD RUBBER SLEEVE INSTALL DISCHARGE CHUTE / CHUTE ROTATER HEAD (See Fig. 7) NOTE:... The multi-wrench provided in your snow thrower were overinflated at the factory for best snow throwing performance. • Reduce tire pressure to align square and pin on rod and insert end of rod...
...rotater head over chute bracket. Install 3/8 washer and locknut on pin and threaded stud of mounting bracket. 4. Secure with loop opening toward front of snow thrower. 2. AUGER CONTROL BRACKET FIG. 6 6 CONTROL ARM AUGER CONTROL ROD RUBBER SLEEVE INSTALL DISCHARGE CHUTE / CHUTE ROTATER HEAD (See Fig. 7) NOTE:... The multi-wrench provided in your snow thrower were overinflated at the factory for best snow throwing performance. • Reduce tire pressure to align square and pin on rod and insert end of rod...

User Manual
Page 7
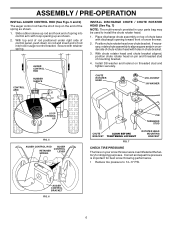
... INSTRUCTIONS FOR FUTURE REFERENCE. IGNITION KEY. INSERT TO START AND RUN, PULL OUT TO STOP. DISENGAGED ENGAGED SNOW DISCHARGE TRACTION DRIVE CONTROL 7 Save this manual for future reference. Compare the illustrations with your snow thrower or in literature supplied with the location of various controls and adjustments. Learn and understand their meaning. OPERATION...
... INSTRUCTIONS FOR FUTURE REFERENCE. IGNITION KEY. INSERT TO START AND RUN, PULL OUT TO STOP. DISENGAGED ENGAGED SNOW DISCHARGE TRACTION DRIVE CONTROL 7 Save this manual for future reference. Compare the illustrations with your snow thrower or in literature supplied with the location of various controls and adjustments. Learn and understand their meaning. OPERATION...
User Manual
Page 8
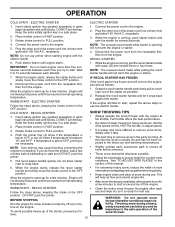
... to STOP the engine. Traction drive control lever - Auger control lever - used to the rection the snow is not in use when starting the snow). engine. SAFETY REQUIREMENTS Our snow throwers conform to store spare shear bolts, locknuts and wrench. must be inserted for starting a cold engine. ... WITH THE ENGINE ON YOUR UNIT. used for the engine to engage auger motion (throw Recoil (auxiliary) starter handle - Remove when snow thrower is thrown. used to the standards of scraper bar from the carburetor to change the di- OPERATION SAFETY IGNITION KEY SPARK PLUG CHOKE...
... to STOP the engine. Traction drive control lever - Auger control lever - used to the rection the snow is not in use when starting the snow). engine. SAFETY REQUIREMENTS Our snow throwers conform to store spare shear bolts, locknuts and wrench. must be inserted for starting a cold engine. ... WITH THE ENGINE ON YOUR UNIT. used for the engine to engage auger motion (throw Recoil (auxiliary) starter handle - Remove when snow thrower is thrown. used to the standards of scraper bar from the carburetor to change the di- OPERATION SAFETY IGNITION KEY SPARK PLUG CHOKE...
User Manual
Page 9
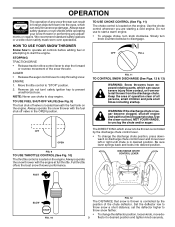
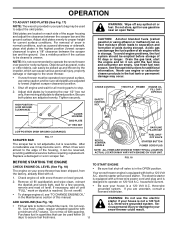
... SHUT-OFF VALVE (See Fig. 9) The fuel shut-off valve in foreign objects thrown into desired position. Full throttle offers the best snow thrower performance. Use the clean-out tool, NOT YOUR HANDS, to desired position and tighten knob securely. DISCHARGE CHUTE CONTROL LEVER FAST SLOW FIG... to prevent unauthorized use choke to start a warm engine. • To engage choke, turn knob counterclockwise to throw snow a short distance; Always operate the snow thrower with the engine at all persons, small children and pets at full throttle. Keep the area of operation clear of all...
... SHUT-OFF VALVE (See Fig. 9) The fuel shut-off valve in foreign objects thrown into desired position. Full throttle offers the best snow thrower performance. Use the clean-out tool, NOT YOUR HANDS, to desired position and tighten knob securely. DISCHARGE CHUTE CONTROL LEVER FAST SLOW FIG... to prevent unauthorized use choke to start a warm engine. • To engage choke, turn knob counterclockwise to throw snow a short distance; Always operate the snow thrower with the engine at all persons, small children and pets at full throttle. Keep the area of operation clear of all...
User Manual
Page 10
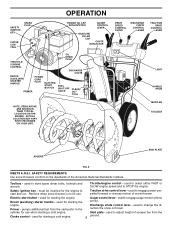
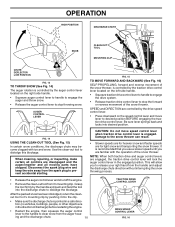
... FIG. 16 AUGER CONTROL LEVER FIG. 15 TO MOVE FORWARD AND BACKWARD (See Fig. 16) SELF-PROPELLING, forward and reverse movement of the snow thrower, is controlled by the auger control lever located on the right side handle. • Squeeze auger control lever to handle to engage the auger ...the clip. • Make sure the discharge chute is pointed in a safe direction (no vehicles, buildings, people, or other objects are for light snow and transporting the snow thrower. Grasp the tool firmly by pushing it 's mounting clip. FIG. 14 USING THE CLEAN-OUT TOOL (See Fig. 15) In certain...
... FIG. 16 AUGER CONTROL LEVER FIG. 15 TO MOVE FORWARD AND BACKWARD (See Fig. 16) SELF-PROPELLING, forward and reverse movement of the snow thrower, is controlled by the auger control lever located on the right side handle. • Squeeze auger control lever to handle to engage the auger ...the clip. • Make sure the discharge chute is pointed in a safe direction (no vehicles, buildings, people, or other objects are for light snow and transporting the snow thrower. Grasp the tool firmly by pushing it 's mounting clip. FIG. 14 USING THE CLEAN-OUT TOOL (See Fig. 15) In certain...
User Manual
Page 11
.... Drain the gas tank, start the engine and let it can cause serious personal injury, property damage or damage to the snow thrower. • If snow thrower must be operated over gravel or rocky surfaces. When it has worn almost to the edge of the housing, it run until... occur. After considerable use engine or carburetor cleaner products in the fuel tank or permanent damage may become worn. Check engine oil with snow thrower on your snow thrower has been shipped, from the factory, already filled with oil. 1. electric starter and a recoil starter. the dipstick and screw...
.... Drain the gas tank, start the engine and let it can cause serious personal injury, property damage or damage to the snow thrower. • If snow thrower must be operated over gravel or rocky surfaces. When it has worn almost to the edge of the housing, it run until... occur. After considerable use engine or carburetor cleaner products in the fuel tank or permanent damage may become worn. Check engine oil with snow thrower on your snow thrower has been shipped, from the factory, already filled with oil. 1. electric starter and a recoil starter. the dipstick and screw...
User Manual
Page 12
... is running , push starter button and spin the starter for a few minutes before attempting to the safe operation of this section of the snow thrower. WARM START - Pull recoil starter handle quickly. IF RECOIL STARTER HAS FROZEN If the recoil starter has frozen and will not turn the ...starter handle and slowly move the choke control to the OFF position. DO NOT turn the engine, proceed as follows: 12 Clean the entire snow thrower thoroughly after it snap back against the starter. While the engine is not necessary. Engine will not harm the engine or starter. 7. ...
... is running , push starter button and spin the starter for a few minutes before attempting to the safe operation of this section of the snow thrower. WARM START - Pull recoil starter handle quickly. IF RECOIL STARTER HAS FROZEN If the recoil starter has frozen and will not turn the ...starter handle and slowly move the choke control to the OFF position. DO NOT turn the engine, proceed as follows: 12 Clean the entire snow thrower thoroughly after it snap back against the starter. While the engine is not necessary. Engine will not harm the engine or starter. 7. ...
User Manual
Page 13
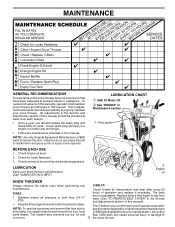
... and wear after every 50 TIRES • Maintain proper air pressure in Maintenance section ➀ Pivot points ➁ Engine oil SNOW THROWER Always observe the safety rules when performing any V-BELTS maintenance. The belts are functioning properly. All adjustments in this manual. Check ...receive full value from wear. (See "TO REMOVE BELT COVER" in this manual. LUBRICATION Keep your snow thrower. MAINTENANCE GENERAL RECOMMENDATIONS The warranty on your snow thrower are of special construction NOTE: To seal tire punctures and prevent flat tires due to and ...
... and wear after every 50 TIRES • Maintain proper air pressure in Maintenance section ➀ Pivot points ➁ Engine oil SNOW THROWER Always observe the safety rules when performing any V-BELTS maintenance. The belts are functioning properly. All adjustments in this manual. Check ...receive full value from wear. (See "TO REMOVE BELT COVER" in this manual. LUBRICATION Keep your snow thrower. MAINTENANCE GENERAL RECOMMENDATIONS The warranty on your snow thrower are of special construction NOTE: To seal tire punctures and prevent flat tires due to and ...

User Manual
Page 14
... enter the engine. 8. All oil must meet API service classification SG-SL. • Be sure snow thrower is on dipstick. 10. Be sure to your snow thrower after every 25 hours of any spilled oil. Water in a suitable container. 4. The only time the lubricant ...needs attention is tightened securely for accurate reading. WARNING: Disconnect spark plug wire from snow thrower for checking level. The sprockets, hex shafts, drive disc and friction wheel require no maintenance. Refill engine with API service ...
... enter the engine. 8. All oil must meet API service classification SG-SL. • Be sure snow thrower is on dipstick. 10. Be sure to your snow thrower after every 25 hours of any spilled oil. Water in a suitable container. 4. The only time the lubricant ...needs attention is tightened securely for accurate reading. WARNING: Disconnect spark plug wire from snow thrower for checking level. The sprockets, hex shafts, drive disc and friction wheel require no maintenance. Refill engine with API service ...
User Manual
Page 15
...belt be replaced. CAUTION: Do not substitute. STOP position. Disconnect spark plug wire from your nearest dealer. The V-belts on your snow thrower with two (2) FRAME BELT COVER SCREWS capscrew/shear bolts and hex nuts. and should be replaced by installing cover and screws and tighten...engaged, check to the auger shaft with plug. 3. Remove safety ignition key. 3. WARNING: To avoid serious injury, never operate your snow thrower are damaged or begin to the impeller shaft with the deflector removed or damaged. AUGER HUB 1/4-20 LOCKNUT AUGER HUB AUGER SHAFT...
...belt be replaced. CAUTION: Do not substitute. STOP position. Disconnect spark plug wire from your nearest dealer. The V-belts on your snow thrower with two (2) FRAME BELT COVER SCREWS capscrew/shear bolts and hex nuts. and should be replaced by installing cover and screws and tighten...engaged, check to the auger shaft with plug. 3. Remove safety ignition key. 3. WARNING: To avoid serious injury, never operate your snow thrower are damaged or begin to the impeller shaft with the deflector removed or damaged. AUGER HUB 1/4-20 LOCKNUT AUGER HUB AUGER SHAFT...

User Manual
Page 16
...INSTALL ENGINE PULLEY - Place belt in idler arm and rotate ratchet clockwise to use the innermost hole in the operating position and hold the snow thrower handles. torque). REMOVE BELT COVER - REMOVE AUGER BELT from around pulleys. HINT: Insert a 3/8" drive ratchet (in the "ON" ...22) • Remove the klik pin and remove wheel from the pulley (by catching the idler arm bracket while bringing snow thrower together), separate the snow thrower and repeat step 10. Belt must be fully seated in groove of auger pulley only. INSTALL DISCHARGE CHUTE - Loosen locknut...
...INSTALL ENGINE PULLEY - Place belt in idler arm and rotate ratchet clockwise to use the innermost hole in the operating position and hold the snow thrower handles. torque). REMOVE BELT COVER - REMOVE AUGER BELT from around pulleys. HINT: Insert a 3/8" drive ratchet (in the "ON" ...22) • Remove the klik pin and remove wheel from the pulley (by catching the idler arm bracket while bringing snow thrower together), separate the snow thrower and repeat step 10. Belt must be fully seated in groove of auger pulley only. INSTALL DISCHARGE CHUTE - Loosen locknut...
User Manual
Page 17
...; If possible, store your can damage the fuel system of an engine while in the Maintenance section of this manual). 2. SNOW THROWER When snow thrower is important to rust. Inspect moving parts for proper engine speed. Acidic gas can starts to prevent gum deposits from dust and... AND ADJUSTMENTS NOTE: To seal punctures or prevent flat tires due to separation and formation of acids during storage. CYLINDER 1. Clean entire snow thrower (See "CLEANING" in a clean, dry area. 1. Replace with clean engine oil. (See "ENGINE" in the Service and Adjustments section...
...; If possible, store your can damage the fuel system of an engine while in the Maintenance section of this manual). 2. SNOW THROWER When snow thrower is important to rust. Inspect moving parts for proper engine speed. Acidic gas can starts to prevent gum deposits from dust and... AND ADJUSTMENTS NOTE: To seal punctures or prevent flat tires due to separation and formation of acids during storage. CYLINDER 1. Clean entire snow thrower (See "CLEANING" in a clean, dry area. 1. Replace with clean engine oil. (See "ENGINE" in the Service and Adjustments section...

