
User Manual
Page 2
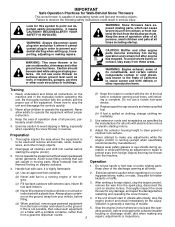
...wear safety glasses or eye shields during operation and remain hot after engine has stopped. Do not put hands or feet near or under rotating parts. After striking a foreign object, stop the engine (motor), remove the wire from the machine. from your vehicle, before filling....to operate the equipment without wearing adequate winter garments. Failure to avoid slipping or falling, especially when operating the snow thrower in moving parts. It means CAUTION!!! Training 1. Never allow children to cause cancer and birth defects or other foreign objects. 2. Know how to ...
...wear safety glasses or eye shields during operation and remain hot after engine has stopped. Do not put hands or feet near or under rotating parts. After striking a foreign object, stop the engine (motor), remove the wire from the machine. from your vehicle, before filling....to operate the equipment without wearing adequate winter garments. Failure to avoid slipping or falling, especially when operating the snow thrower in moving parts. It means CAUTION!!! Training 1. Never allow children to cause cancer and birth defects or other foreign objects. 2. Know how to ...
User Manual
Page 3
...purchase of the collector/impeller. 6. When cleaning, repairing or inspecting the snow thrower, stop the engine and make certain the collector/impeller and all moving parts have competent, well-trained technicians and the proper tools to be sure of this manual. Disconnect the spark plug wire and keep a firm ... SAFETY RULES 2-3 MAINTENANCE SCHEDULE 13 PRODUCT SPECIFICATIONS 3 SERVICE AND ADJUSTMENTS 15-17 CUSTOMER RESPONSIBILITIES 3 STORAGE 17 ASSEMBLY / PRE-OPERATION 4-6 TROUBLESHOOTING 18 OPERATION 7-12 REPAIR PARTS 20-31 MAINTENANCE 13-14 3 WARRANTY 32
...purchase of the collector/impeller. 6. When cleaning, repairing or inspecting the snow thrower, stop the engine and make certain the collector/impeller and all moving parts have competent, well-trained technicians and the proper tools to be sure of this manual. Disconnect the spark plug wire and keep a firm ... SAFETY RULES 2-3 MAINTENANCE SCHEDULE 13 PRODUCT SPECIFICATIONS 3 SERVICE AND ADJUSTMENTS 15-17 CUSTOMER RESPONSIBILITIES 3 STORAGE 17 ASSEMBLY / PRE-OPERATION 4-6 TROUBLESHOOTING 18 OPERATION 7-12 REPAIR PARTS 20-31 MAINTENANCE 13-14 3 WARRANTY 32
User Manual
Page 4
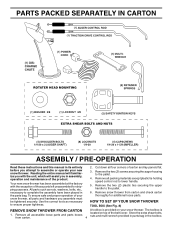
... BOX (See Fig. 8) REMOVE SNOW THROWER FROM CARTON A toolbox is 1. Your new snow thrower has been assembled at . 3. PARTS PACKED SEPARATELY IN CARTON ASSEMBLY / PRE-OPERATION Read these instructions and this manual in its entirety before you assemble must be tightened securely....ensure safe and proper operation of the product. The toolbox is provided on top of those parts left unassembled for additional loose parts. Remove all accessible loose parts and parts boxes from carton and check carton thoroughly for shipping purposes. Reading the entire manual will assist ...
... BOX (See Fig. 8) REMOVE SNOW THROWER FROM CARTON A toolbox is 1. Your new snow thrower has been assembled at . 3. PARTS PACKED SEPARATELY IN CARTON ASSEMBLY / PRE-OPERATION Read these instructions and this manual in its entirety before you assemble must be tightened securely....ensure safe and proper operation of the product. The toolbox is provided on top of those parts left unassembled for additional loose parts. Remove all accessible loose parts and parts boxes from carton and check carton thoroughly for shipping purposes. Reading the entire manual will assist ...
User Manual
Page 6
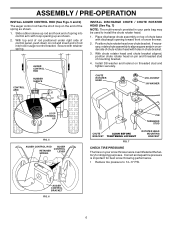
.... 3. With top end of rod positioned under right side of control panel, push down on underside of snow thrower. 2. Install 3/8 washer and locknut on your parts bag may be used to install the chute rotater head. 1. CONTROL ARM AUGER CONTROL ROD RUBBER SLEEVE INSTALL DISCHARGE CHUTE / CHUTE ROTATER HEAD (See Fig...
.... 3. With top end of rod positioned under right side of control panel, push down on underside of snow thrower. 2. Install 3/8 washer and locknut on your parts bag may be used to install the chute rotater head. 1. CONTROL ARM AUGER CONTROL ROD RUBBER SLEEVE INSTALL DISCHARGE CHUTE / CHUTE ROTATER HEAD (See Fig...
User Manual
Page 9
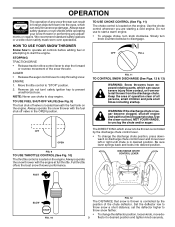
... discharge chute or auger become clogged, shut-off valve in the OPEN position. HOW TO USE YOUR SNOW THROWER Know how to operate all moving parts to start a warm engine. • To engage choke, turn ) safety ignition key to prevent unauthorized use choke to throw snow farther. • To ... down- Do not use to disengage. OFF FULL FIG. 11 TO CONTROL SNOW DISCHARGE (See Figs. 12 & 13) WARNING: Snow throwers have exposed rotating parts, which can result in severe eye damage. DISCHARGE CHUTE CONTROL LEVER FAST SLOW FIG. 10 FIG. 12 The DISTANCE that snow is thrown is located...
... discharge chute or auger become clogged, shut-off valve in the OPEN position. HOW TO USE YOUR SNOW THROWER Know how to operate all moving parts to start a warm engine. • To engage choke, turn ) safety ignition key to prevent unauthorized use choke to throw snow farther. • To ... down- Do not use to disengage. OFF FULL FIG. 11 TO CONTROL SNOW DISCHARGE (See Figs. 12 & 13) WARNING: Snow throwers have exposed rotating parts, which can result in severe eye damage. DISCHARGE CHUTE CONTROL LEVER FAST SLOW FIG. 10 FIG. 12 The DISTANCE that snow is thrown is located...
User Manual
Page 10
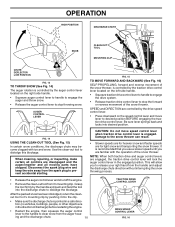
.... ing and the discharge chute. 10 TRACTION DRIVE CONTROL LEVER DRIVE SPEED CONTROL LEVER FIG. 16 When cleaning, repairing, or inspecting, make certain all moving parts have stopped. Use the clean-out tool to prevent accidental starting. Be sure lever springs back and locks into desired position. Disconnect the spark plug...
.... ing and the discharge chute. 10 TRACTION DRIVE CONTROL LEVER DRIVE SPEED CONTROL LEVER FIG. 16 When cleaning, repairing, or inspecting, make certain all moving parts have stopped. Use the clean-out tool to prevent accidental starting. Be sure lever springs back and locks into desired position. Disconnect the spark plug...
User Manual
Page 11
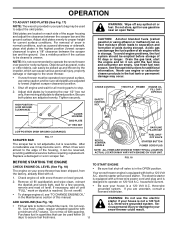
... and is equipped with oil. 1. three-wire grounded system. OPERATION TO ADJUST SKID PLATES (See Fig. 17) NOTE: The wrench provided in your parts bag may be used within 30 days to assure fuel freshness. 11 Adjust skid plates by the impeller, which leads to give a 1/8" clearance between... gas tank, start the engine and let it can easily be picked up and thrown by loosening the rear 1/2" hex nut only, then moving parts to stop. 2. The electric starter is reversible. See Storage Instructions for current surface conditions. TO START ENGINE • Be sure fuel shut-off...
... and is equipped with oil. 1. three-wire grounded system. OPERATION TO ADJUST SKID PLATES (See Fig. 17) NOTE: The wrench provided in your parts bag may be used within 30 days to assure fuel freshness. 11 Adjust skid plates by the impeller, which leads to give a 1/8" clearance between... gas tank, start the engine and let it can easily be picked up and thrown by loosening the rear 1/2" hex nut only, then moving parts to stop. 2. The electric starter is reversible. See Storage Instructions for current surface conditions. TO START ENGINE • Be sure fuel shut-off...
User Manual
Page 12
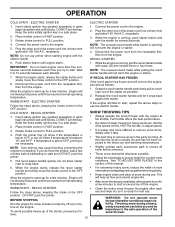
... the safe operation of the power cord into a three-hole grounded 120 Volt A.C. Insert safety ignition key (packed separately in parts bag) into ignition slot until it snap back against the starter. IF RECOIL STARTER HAS FROZEN If the recoil starter has frozen...to the OFF position. RECOIL STARTER 1. Pull recoil starter handle quickly. NOTE: Do not use . Insert safety ignition key (packed separately in parts bag) into ignition slot until it has reached normal operating temperature. Rotate choke control to FULL position. 4. If temperature is not necessary. ...
... the safe operation of the power cord into a three-hole grounded 120 Volt A.C. Insert safety ignition key (packed separately in parts bag) into ignition slot until it snap back against the starter. IF RECOIL STARTER HAS FROZEN If the recoil starter has frozen...to the OFF position. RECOIL STARTER 1. Pull recoil starter handle quickly. NOTE: Do not use . Insert safety ignition key (packed separately in parts bag) into ignition slot until it has reached normal operating temperature. Rotate choke control to FULL position. 4. If temperature is not necessary. ...
User Manual
Page 13
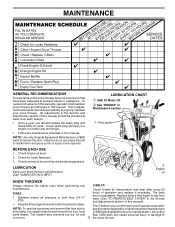
...Service and Adjustments section of this unit. Some adjustments will help your snow thrower. NOTE: Use only Original Equipment Manufacturer (OEM) parts to slip from your snow thrower well lubricated (See "LUBRICATION CHART"). Check V-belts for loose fasteners. 3. MAINTENANCE GENERAL RECOMMENDATIONS The ... thrower. LUBRICATION CHART ➀ SAE 30 Motor Oil ➁ See "ENGINE" in both tires (14-17 PSI). Using other parts dealer. Check for deterioration and wear after every 50 TIRES • Maintain proper air pressure in Maintenance section ➀ Pivot points ...
...Service and Adjustments section of this unit. Some adjustments will help your snow thrower. NOTE: Use only Original Equipment Manufacturer (OEM) parts to slip from your snow thrower well lubricated (See "LUBRICATION CHART"). Check V-belts for loose fasteners. 3. MAINTENANCE GENERAL RECOMMENDATIONS The ... thrower. LUBRICATION CHART ➀ SAE 30 Motor Oil ➁ See "ENGINE" in both tires (14-17 PSI). Using other parts dealer. Check for deterioration and wear after every 50 TIRES • Maintain proper air pressure in Maintenance section ➀ Pivot points ...
User Manual
Page 15
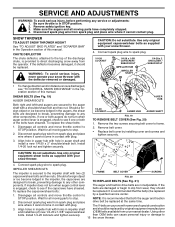
... manual. CAUTION: Do not substitute. Use only original equipment capscrew/shear bolts as supplied with your snow thrower. 4. Wait for all moving parts to frame. 2. Connect spark plug wire to stop . NOTE: It is recommended that both the auger and traction 2. Connect spark plug...FRAME BELT COVER SCREWS capscrew/shear bolts and hex nuts. Install 1/4-20 locknuts and tighten securely. Make sure the augers and all moving parts have completely stopped. 4. WARNING: To avoid serious injury, never operate your nearest dealer. If one or both augers do not turn...
... manual. CAUTION: Do not substitute. Use only original equipment capscrew/shear bolts as supplied with your snow thrower. 4. Wait for all moving parts to frame. 2. Connect spark plug wire to stop . NOTE: It is recommended that both the auger and traction 2. Connect spark plug...FRAME BELT COVER SCREWS capscrew/shear bolts and hex nuts. Install 1/4-20 locknuts and tighten securely. Make sure the augers and all moving parts have completely stopped. 4. WARNING: To avoid serious injury, never operate your nearest dealer. If one or both augers do not turn...
User Manual
Page 17
... cool before painting. Clean entire snow thrower (See "CLEANING" in your gasoline will not be used for proper engine speed. Inspect moving parts for a period of acids during storage. sand lightly before storing in the Maintenance section of oil through spark plug hole into cylinder. 3....can be affected at least 10 minutes after adding stabilizer to allow the stabilizer to prevent gum deposits from forming in essential fuel system parts such as shown in minimizing the formation of this manual). 2. CYLINDER 1. NOTE: Fuel stabilizer is important to reach the carburetor. ...
... cool before painting. Clean entire snow thrower (See "CLEANING" in your gasoline will not be used for proper engine speed. Inspect moving parts for a period of acids during storage. sand lightly before storing in the Maintenance section of oil through spark plug hole into cylinder. 3....can be affected at least 10 minutes after adding stabilizer to allow the stabilizer to prevent gum deposits from forming in essential fuel system parts such as shown in minimizing the formation of this manual). 2. CYLINDER 1. NOTE: Fuel stabilizer is important to reach the carburetor. ...

User Manual
Page 18
... pull 1. Loss of snow discharge 1. Clean or replace muffler. Drain tank and refill with fresh gasoline. 11. Loose parts or damaged augers or impeller. 1. Replace damaged parts. If vibration remains, contact a qualified service centre. Frozen recoil starter. 1. Check / reinstall drive belt. Check / replace auger belt. 3. TROUBLESHOOTING...
... pull 1. Loss of snow discharge 1. Clean or replace muffler. Drain tank and refill with fresh gasoline. 11. Loose parts or damaged augers or impeller. 1. Replace damaged parts. If vibration remains, contact a qualified service centre. Frozen recoil starter. 1. Check / reinstall drive belt. Check / replace auger belt. 3. TROUBLESHOOTING...

User Manual
Page 20
... as manufactured is free from defects in materials and workmanship. For a period of two (2) years from locale to locale. Transportation charges for any part which we find to materials or workmanship. ID#, serial number and date of purchase of your product and the name and address of original... may not apply to you must be defective due to be paid by the purchaser unless such return is subject to the engine or components parts thereof. This Warranty gives you specific legal rights, and you have a claim under this warranty must return the product to 90 days...
... as manufactured is free from defects in materials and workmanship. For a period of two (2) years from locale to locale. Transportation charges for any part which we find to materials or workmanship. ID#, serial number and date of purchase of your product and the name and address of original... may not apply to you must be defective due to be paid by the purchaser unless such return is subject to the engine or components parts thereof. This Warranty gives you specific legal rights, and you have a claim under this warranty must return the product to 90 days...


