
User Manual
Page 1
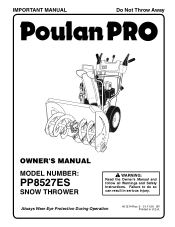
Failure to do so can result in U.S.A. Always Wear Eye Protection During Operation 401214 Rev. 2 01.11.06 BY Printed in serious injury. IMPORTANT MANUAL Do Not Throw Away OWNER'S MANUAL MODEL NUMBER: PP8527ES SNOW THROWER WARNING: Read the Owner's Manual and follow all Warnings and Safety Instructions.
Failure to do so can result in U.S.A. Always Wear Eye Protection During Operation 401214 Rev. 2 01.11.06 BY Printed in serious injury. IMPORTANT MANUAL Do Not Throw Away OWNER'S MANUAL MODEL NUMBER: PP8527ES SNOW THROWER WARNING: Read the Owner's Manual and follow all Warnings and Safety Instructions.
User Manual
Page 2
... the engine (motor) is running engine or hot engine. Thoroughly inspect the area where the equipment is to prevent accidental starting when setting up spilled fuel. (h) If fuel is spilled on a truck or thrower for any repairs, adjustments or inspections. Use extension cords and receptacles as roofs of the fuel tank or container opening at all times including startup. from the spark plug, disconnect the cord on electric motors, thoroughly inspect the snow...
... the engine (motor) is running engine or hot engine. Thoroughly inspect the area where the equipment is to prevent accidental starting when setting up spilled fuel. (h) If fuel is spilled on a truck or thrower for any repairs, adjustments or inspections. Use extension cords and receptacles as roofs of the fuel tank or container opening at all times including startup. from the spark plug, disconnect the cord on electric motors, thoroughly inspect the snow...
User Manual
Page 3
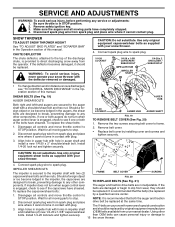
... the proper tools to prevent someone from accidentally starting the engine and for an extended period. 4. To clear the chute: 1. Never operate the snow thrower without proper guards, and other bolts at frequent intervals for and using your footing, and keep the wire away from the plug to service or repair this unit. Should you experience any enclosure. 3. Look behind and use a clean-out tool, not your...
... the proper tools to prevent someone from accidentally starting the engine and for an extended period. 4. To clear the chute: 1. Never operate the snow thrower without proper guards, and other bolts at frequent intervals for and using your footing, and keep the wire away from the plug to service or repair this unit. Should you experience any enclosure. 3. Look behind and use a clean-out tool, not your...
User Manual
Page 4
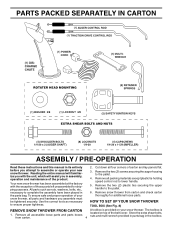
... and check carton thoroughly for shipping purposes. Remove the two (2) plastic ties securing the upper handle to the pallet. 4. Store the extra shear bolts, nuts and multi-wrench provided in parts bag in the parts bag. Reading the entire manual will assist you in assembly, operation and maintenance of the belt cover. Remove the two (2) screws securing the auger housing to the pallet. 6. Remove snow thrower from carton. 4 located on your new snow thrower. All parts...
... and check carton thoroughly for shipping purposes. Remove the two (2) plastic ties securing the upper handle to the pallet. 4. Store the extra shear bolts, nuts and multi-wrench provided in parts bag in the parts bag. Reading the entire manual will assist you in assembly, operation and maintenance of the belt cover. Remove the two (2) screws securing the auger housing to the pallet. 6. Remove snow thrower from carton. 4 located on your new snow thrower. All parts...
User Manual
Page 5
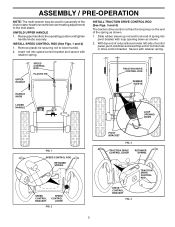
... to the operating position and tighten handle knobs securely. ASSEMBLY / PRE-OPERATION NOTE: The multi-wrench may be used for assembly of the spring as shown. 2. Raise upper handle to lower handle. 2. Insert rod into hole in drive control bracket. INSTALL TRACTION DRIVE CONTROL ROD (See Figs. 3 and 4) The traction drive control rod has the long loop on the end of the chute rotator head to snow thrower and making adjustments to the...
... to the operating position and tighten handle knobs securely. ASSEMBLY / PRE-OPERATION NOTE: The multi-wrench may be used for assembly of the spring as shown. 2. Raise upper handle to lower handle. 2. Insert rod into hole in drive control bracket. INSTALL TRACTION DRIVE CONTROL ROD (See Figs. 3 and 4) The traction drive control rod has the long loop on the end of the chute rotator head to snow thrower and making adjustments to the...
User Manual
Page 6
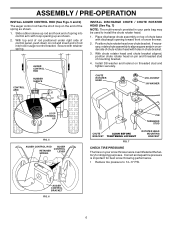
... into control arm with holes in auger control bracket. Slide rubber sleeve up as shown. 1. If necessary, rotate chute assembly to align square and pin on underside of chute rotater head with loop opening toward front of snow thrower. 2. ASSEMBLY / PRE-OPERATION INSTALL AUGER CONTROL ROD (See Figs. 5 and 6) The auger control rod has the short loop on the end of the spring as shown. 2. Position chute rotater head over chute bracket...
... into control arm with holes in auger control bracket. Slide rubber sleeve up as shown. 1. If necessary, rotate chute assembly to align square and pin on underside of chute rotater head with loop opening toward front of snow thrower. 2. ASSEMBLY / PRE-OPERATION INSTALL AUGER CONTROL ROD (See Figs. 5 and 6) The auger control rod has the short loop on the end of the spring as shown. 2. Position chute rotater head over chute bracket...

User Manual
Page 7
... yourself with the product. Save this manual for future reference. Learn and understand their meaning. Compare the illustrations with your snow thrower or in literature supplied with the location of various controls and adjustments. KEEP THESE INSTRUCTIONS FOR FUTURE REFERENCE. INSERT TO START AND RUN, PULL OUT TO STOP. OPERATION KNOW YOUR SNOW THROWER READ THIS OWNER'S MANUAL AND ALL SAFETY RULES BEFORE OPERATING YOUR SNOW THROWER. IGNITION KEY.
... yourself with the product. Save this manual for future reference. Learn and understand their meaning. Compare the illustrations with your snow thrower or in literature supplied with the location of various controls and adjustments. KEEP THESE INSTRUCTIONS FOR FUTURE REFERENCE. INSERT TO START AND RUN, PULL OUT TO STOP. OPERATION KNOW YOUR SNOW THROWER READ THIS OWNER'S MANUAL AND ALL SAFETY RULES BEFORE OPERATING YOUR SNOW THROWER. IGNITION KEY.
User Manual
Page 8
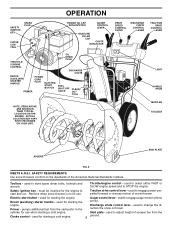
Throttle/engine control - used for starting the engine. Auger control lever - used for starting the snow). Skid plate - OPERATION SAFETY IGNITION KEY SPARK PLUG CHOKE CONTROL ENGINE OIL CAP WITH DIPSTICK AUGER CONTROL LEVER GASOLINE FILLER CAP CHUTE DEFLECTOR THROTTLE / ENGINE CONTROL OIL DRAIN PLUG DISCHARGE CHUTE RECOIL (AUXILIARY) STARTER HANDLE PRIMER POWER CORD PLUG ELECTRIC START BUTTON FUEL SHUT-OFF VALVE CLEANOUT TOOL NOTE: ITEMS ABOVE ARE SHOWN IN THEIR TYPICAL LOCATION ON THE ENGINE. Toolbox - Traction drive control lever - used to engage auger ...
Throttle/engine control - used for starting the engine. Auger control lever - used for starting the snow). Skid plate - OPERATION SAFETY IGNITION KEY SPARK PLUG CHOKE CONTROL ENGINE OIL CAP WITH DIPSTICK AUGER CONTROL LEVER GASOLINE FILLER CAP CHUTE DEFLECTOR THROTTLE / ENGINE CONTROL OIL DRAIN PLUG DISCHARGE CHUTE RECOIL (AUXILIARY) STARTER HANDLE PRIMER POWER CORD PLUG ELECTRIC START BUTTON FUEL SHUT-OFF VALVE CLEANOUT TOOL NOTE: ITEMS ABOVE ARE SHOWN IN THEIR TYPICAL LOCATION ON THE ENGINE. Toolbox - Traction drive control lever - used to engage auger ...
User Manual
Page 9
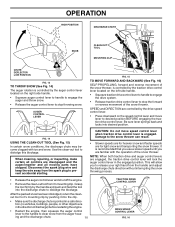
.../or auger. Full throttle offers the best snow thrower performance. Remove (do not turn) safety ignition key to prevent unauthorized use to throw snow farther. • To change the deflector position, loosen knob, move lever left or right until chute is controlled by the discharge chute control lever. • To change the discharge chute position, press down- NOTE: Never use choke to disengage. TO USE FUEL SHUT-OFF VALVE (See Fig. 9) The fuel shut-off engine...
.../or auger. Full throttle offers the best snow thrower performance. Remove (do not turn) safety ignition key to prevent unauthorized use to throw snow farther. • To change the deflector position, loosen knob, move lever left or right until chute is controlled by the discharge chute control lever. • To change the discharge chute position, press down- NOTE: Never use choke to disengage. TO USE FUEL SHUT-OFF VALVE (See Fig. 9) The fuel shut-off engine...
User Manual
Page 10
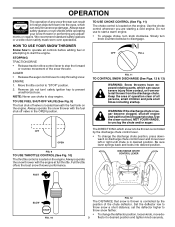
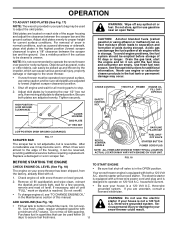
... stop throwing snow. OPERATION HIGH POSITION DISCHARGE CHUTE KNOB CLEAN-OUT TOOL MOUNTING CLIP CHUTE DEFLECTOR LOW POSITION FIG. 13 TO THROW SNOW (See Fig. 14) The auger rotation is controlled by the auger control lever located on the right side handle. • Squeeze auger control lever to handle to engage the auger and throw snow. • Release the auger control lever to dislodge this blockage. Be sure lever springs back and locks into the discharge chute to the snow thrower can result...
... stop throwing snow. OPERATION HIGH POSITION DISCHARGE CHUTE KNOB CLEAN-OUT TOOL MOUNTING CLIP CHUTE DEFLECTOR LOW POSITION FIG. 13 TO THROW SNOW (See Fig. 14) The auger rotation is controlled by the auger control lever located on the right side handle. • Squeeze auger control lever to handle to engage the auger and throw snow. • Release the auger control lever to dislodge this blockage. Be sure lever springs back and locks into the discharge chute to the snow thrower can result...
User Manual
Page 11
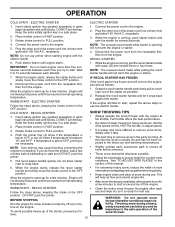
... 30 days to assure fuel freshness. 11 CHOKE CONTROL THROTTLE PRIMER ENGINE OIL FILL CAP / DIPSTICK SAFETY IGNITION KEY AUGER HOUSING SKID PLATE 1/2" HEX NUT LOW POSITION (HIGH GROUND CLEARANCE) SCRAPER BAR FIG. 17 The scraper bar is not adjustable, but is not recommended to operate the snow thrower over gravel surface, use gasoline near an open flame. Your snow thrower engine is 2. The electric starter is equipped with a three-wire power cord and plug and is equipped with...
... 30 days to assure fuel freshness. 11 CHOKE CONTROL THROTTLE PRIMER ENGINE OIL FILL CAP / DIPSTICK SAFETY IGNITION KEY AUGER HOUSING SKID PLATE 1/2" HEX NUT LOW POSITION (HIGH GROUND CLEARANCE) SCRAPER BAR FIG. 17 The scraper bar is not adjustable, but is not recommended to operate the snow thrower over gravel surface, use gasoline near an open flame. Your snow thrower engine is 2. The electric starter is equipped with a three-wire power cord and plug and is equipped with...
User Manual
Page 12
... time the snow is above steps or use primer when starting . At this section of the starter as much rope out of this manual. 6. See "TO ADJUST SKID PLATES" in deep, freezing or heavy wet snow. When the engine starts, release the recoil starter handle and slowly move the choke control to the safe operation of the starter, proceed as follows: 1. Allow the engine to FULL position. 4. Engine will not turn the engine...
... time the snow is above steps or use primer when starting . At this section of the starter as much rope out of this manual. 6. See "TO ADJUST SKID PLATES" in deep, freezing or heavy wet snow. When the engine starts, release the recoil starter handle and slowly move the choke control to the safe operation of the starter, proceed as follows: 1. Allow the engine to FULL position. 4. Engine will not turn the engine...
User Manual
Page 13
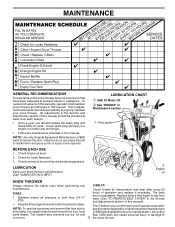
... adjustable. NOTE: Use only Original Equipment Manufacturer (OEM) parts to be sure they begin to the operator. Check for deterioration and wear after every 50 TIRES • Maintain proper air pressure in Maintenance section ➀ Pivot points ➁ Engine oil SNOW THROWER Always observe the safety rules when performing any V-BELTS maintenance. A new spark plug will need to be made periodically to corrosion. 13 the snow thrower. Check controls to service this manual. Some adjustments...
... adjustable. NOTE: Use only Original Equipment Manufacturer (OEM) parts to be sure they begin to the operator. Check for deterioration and wear after every 50 TIRES • Maintain proper air pressure in Maintenance section ➀ Pivot points ➁ Engine oil SNOW THROWER Always observe the safety rules when performing any V-BELTS maintenance. A new spark plug will need to be made periodically to corrosion. 13 the snow thrower. Check controls to service this manual. Some adjustments...

User Manual
Page 14
... for checking level. Remove drain plug and drain oil in a suitable container. Be sure to the oil drain plug and placement of operation, whichever occurs first. Refill engine with API service classification SG-SL. For approximate capacity see "PRODUCT SPECIFICATIONS" section of your snow thrower unless the electrical system, muffler and carburetor are covered to keep snow thrower housing free of this manual. 9. Clean the outside of this manual). 7. TRACTION DRIVE...
... for checking level. Remove drain plug and drain oil in a suitable container. Be sure to the oil drain plug and placement of operation, whichever occurs first. Refill engine with API service classification SG-SL. For approximate capacity see "PRODUCT SPECIFICATIONS" section of your snow thrower unless the electrical system, muffler and carburetor are covered to keep snow thrower housing free of this manual. 9. Clean the outside of this manual). 7. TRACTION DRIVE...
User Manual
Page 15
Be sure throttle is engaged, check to the auger shaft with plug. Disconnect spark plug wire from your snow thrower. 4. SHEAR BOLTS (See Fig. 19) AUGER SHEAR BOLTS Both right and left-hand augers are not adjustable. If one or both augers do not turn when auger control lever The auger and traction drive belts are secured to see if one or both the auger and traction 2. Disconnect spark plug wire from spark plug and place drive belt be replaced. Remove the two screws securing belt cover to spark plug. CAUTION...
Be sure throttle is engaged, check to the auger shaft with plug. Disconnect spark plug wire from your snow thrower. 4. SHEAR BOLTS (See Fig. 19) AUGER SHEAR BOLTS Both right and left-hand augers are not adjustable. If one or both augers do not turn when auger control lever The auger and traction drive belts are secured to see if one or both the auger and traction 2. Disconnect spark plug wire from spark plug and place drive belt be replaced. Remove the two screws securing belt cover to spark plug. CAUTION...

User Manual
Page 16
... assembly, pull up any spilled gasoline. 2. Place belt in idler arm and rotate ratchet clockwise to be fully seated in the operating position and hold the snow thrower handles. REMOVE BELT COVER - FRAME AUGER HOUSING FIG. 21 6. RELIEVETENSIONONTRACTIONDRIVEBELTIDLER and remove traction drive belt from fire or flame. TO REMOVE WHEELS (See Fig. 22) • Remove the klik pin and remove wheel from crankshaft. 5. To disengage drive system from around pulleys. REMOVE GASOLINE FROM FUEL TANK...
... assembly, pull up any spilled gasoline. 2. Place belt in idler arm and rotate ratchet clockwise to be fully seated in the operating position and hold the snow thrower handles. REMOVE BELT COVER - FRAME AUGER HOUSING FIG. 21 6. RELIEVETENSIONONTRACTIONDRIVEBELTIDLER and remove traction drive belt from fire or flame. TO REMOVE WHEELS (See Fig. 22) • Remove the klik pin and remove wheel from crankshaft. 5. To disengage drive system from around pulleys. REMOVE GASOLINE FROM FUEL TANK...
User Manual
Page 17
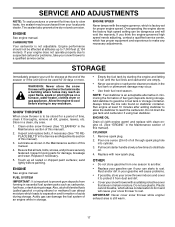
... nuts, bolts, screws, and pins are empty. • Never use plastic. If your engine does not operate properly due to suspected carburetor problems, take your snow thrower with a suitable protective cover that all rusted or chipped paint surfaces; Lubricate as on stabilizer container. sand lightly before storing in the Maintenance section of this manual). 2. Also, alcohol blended fuels (called gasohol or using fuel stabilizer. Pull recoil starter handle slowly a few times...
... nuts, bolts, screws, and pins are empty. • Never use plastic. If your engine does not operate properly due to suspected carburetor problems, take your snow thrower with a suitable protective cover that all rusted or chipped paint surfaces; Lubricate as on stabilizer container. sand lightly before storing in the Maintenance section of this manual). 2. Also, alcohol blended fuels (called gasohol or using fuel stabilizer. Pull recoil starter handle slowly a few times...
User Manual
Page 18
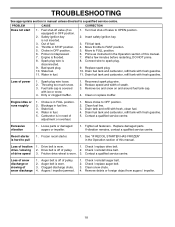
... starter is covered with fresh gasoline. 11. Loss of snow discharge 1. Friction drive wheel is disconnected. 9. Auger belt is in fuel line. 3. Check / reinstall auger belt. 2. Reconnect spark plug wire. 2. Choke is off valve to FULL position. 6. Move choke to pull 1. Drain fuel tank and carburetor, refill tank with fresh, clean fuel. 4. Loose parts or damaged augers or impeller. 1. Drive belt is in fuel. 5. Out of drive speed 3. Turn fuel shut-off of pulley. 2. Blockage in FULL position. 2. Check / replace auger belt. 3. Primer...
... starter is covered with fresh gasoline. 11. Loss of snow discharge 1. Friction drive wheel is disconnected. 9. Auger belt is in fuel line. 3. Check / reinstall auger belt. 2. Reconnect spark plug wire. 2. Choke is off valve to FULL position. 6. Move choke to pull 1. Drain fuel tank and carburetor, refill tank with fresh, clean fuel. 4. Loose parts or damaged augers or impeller. 1. Drive belt is in fuel. 5. Out of drive speed 3. Turn fuel shut-off of pulley. 2. Blockage in FULL position. 2. Check / replace auger belt. 3. Primer...
User Manual
Page 20
... for the movement of any power equipment unit or attachment are belts, shear pins, normal wear, normal adjustments, standard hardware and normal maintenance. 6. In the event you must be defective due to materials or workmanship. THIS WARRANTY DOES NOT APPLY TO INCIDENTAL OR CONSEQUENTIAL DAMAGES AND ANY IMPLIED WARRANTIES ARE LIMITED TO THE SAME TIME PERIODS STATED HEREIN FOR OUR...
... for the movement of any power equipment unit or attachment are belts, shear pins, normal wear, normal adjustments, standard hardware and normal maintenance. 6. In the event you must be defective due to materials or workmanship. THIS WARRANTY DOES NOT APPLY TO INCIDENTAL OR CONSEQUENTIAL DAMAGES AND ANY IMPLIED WARRANTIES ARE LIMITED TO THE SAME TIME PERIODS STATED HEREIN FOR OUR...


