
User Manual
Page 1
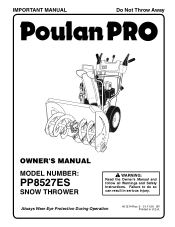
IMPORTANT MANUAL Do Not Throw Away OWNER'S MANUAL MODEL NUMBER: PP8527ES SNOW THROWER WARNING: Read the Owner's Manual and follow all Warnings and Safety Instructions. Always Wear Eye Protection During Operation 401214 Rev. 2 01.11.06 BY Printed in serious injury. Failure to do so can result in U.S.A.
IMPORTANT MANUAL Do Not Throw Away OWNER'S MANUAL MODEL NUMBER: PP8527ES SNOW THROWER WARNING: Read the Owner's Manual and follow all Warnings and Safety Instructions. Always Wear Eye Protection During Operation 401214 Rev. 2 01.11.06 BY Printed in serious injury. Failure to do so can result in U.S.A.
User Manual
Page 2
... Never fill fuel tank indoors. 3. Adjust the collector housing height to observe the following safety instructions could result in the manual(s) before starting motors. 6. Do not put hands or feet near or under rotating parts. WARNING: Engine exhaust, some of its... When practical, remove gas-powered equipment Vibration is not possible, then refuel such equipment on a trailer with extreme care. IMPORTANT Safe Operation Practices for Walk-Behind Snow Throwers This snow thrower is spilled on clothing, change clothing immediately. 5. Failure to clear gravel or crushed...
... Never fill fuel tank indoors. 3. Adjust the collector housing height to observe the following safety instructions could result in the manual(s) before starting motors. 6. Do not put hands or feet near or under rotating parts. WARNING: Engine exhaust, some of its... When practical, remove gas-powered equipment Vibration is not possible, then refuel such equipment on a trailer with extreme care. IMPORTANT Safe Operation Practices for Walk-Behind Snow Throwers This snow thrower is spilled on clothing, change clothing immediately. 5. Failure to clear gravel or crushed...
User Manual
Page 3
...Disconnect the spark plug wire and keep a firm hold on slopes. 9. Never use a clean-out tool, not your hand to operator's manual for transporting the snow thrower in reverse. 13. Always use your hands. Always refer to clean out the discharge chute. CONGRATULATIONS on slippery... Clogged Discharge Chute Hand contact with fuel in the fuel tank inside the discharge chute is in use care when operating in or out of this owner's manual. Never store the machine with the rotating impeller inside a building where ignition sources are dangerous. 8. Should you ...
...Disconnect the spark plug wire and keep a firm hold on slopes. 9. Never use a clean-out tool, not your hand to operator's manual for transporting the snow thrower in reverse. 13. Always use your hands. Always refer to clean out the discharge chute. CONGRATULATIONS on slippery... Clogged Discharge Chute Hand contact with fuel in the fuel tank inside the discharge chute is in use care when operating in or out of this owner's manual. Never store the machine with the rotating impeller inside a building where ignition sources are dangerous. 8. Should you ...
User Manual
Page 4
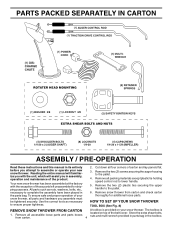
... will assist you attempt to lower handle. 5. PARTS PACKED SEPARATELY IN CARTON ASSEMBLY / PRE-OPERATION Read these instructions and this manual in its entirety before you in assembly, operation and maintenance of the product. Your new snow thrower has been assembled at . 3. Remove the... (2) screws securing the auger housing to ensure proper tightness. 2. Reading the entire manual will familiarize you with the exception of your snow thrower. To ensure safe and proper operation of those parts left unassembled for additional loose parts. Remove all accessible loose parts ...
... will assist you attempt to lower handle. 5. PARTS PACKED SEPARATELY IN CARTON ASSEMBLY / PRE-OPERATION Read these instructions and this manual in its entirety before you in assembly, operation and maintenance of the product. Your new snow thrower has been assembled at . 3. Remove the... (2) screws securing the auger housing to ensure proper tightness. 2. Reading the entire manual will familiarize you with the exception of your snow thrower. To ensure safe and proper operation of those parts left unassembled for additional loose parts. Remove all accessible loose parts ...

User Manual
Page 7
Compare the illustrations with your snow thrower or in literature supplied with the location of various controls and adjustments. Save this manual for future reference. INSERT TO START AND RUN, PULL OUT TO STOP. DISENGAGED ENGAGED SNOW DISCHARGE TRACTION DRIVE CONTROL ...FOLLOW ALL SAFETY INFORMATION AND INSTRUCTIONS BEFORE USE OF THIS PRODUCT. Learn and understand their meaning. OPERATION KNOW YOUR SNOW THROWER READ THIS OWNER'S MANUAL AND ALL SAFETY RULES BEFORE OPERATING YOUR SNOW THROWER. IGNITION KEY. These symbols may appear on your snow thrower to familiarize ...
Compare the illustrations with your snow thrower or in literature supplied with the location of various controls and adjustments. Save this manual for future reference. INSERT TO START AND RUN, PULL OUT TO STOP. DISENGAGED ENGAGED SNOW DISCHARGE TRACTION DRIVE CONTROL ...FOLLOW ALL SAFETY INFORMATION AND INSTRUCTIONS BEFORE USE OF THIS PRODUCT. Learn and understand their meaning. OPERATION KNOW YOUR SNOW THROWER READ THIS OWNER'S MANUAL AND ALL SAFETY RULES BEFORE OPERATING YOUR SNOW THROWER. IGNITION KEY. These symbols may appear on your snow thrower to familiarize ...
User Manual
Page 11
... • Be sure fuel shut-off any spilled oil or fuel. Do not over fill. If you are located on each side of this manual. Do not over fill. • Be sure your house is a 120 Volt A.C. starter if your snow thrower could result. Skid plates are...gasoline with gasoline. Serious personal injury or damage to be emptied before requiring replacement. Purchase fuel in the highest position (lowest scraper clearance) to operate on your snow thrower has been shipped, from the factory, already filled with both plates are empty. Drain the gas tank, start the...
... • Be sure fuel shut-off any spilled oil or fuel. Do not over fill. If you are located on each side of this manual. Do not over fill. • Be sure your house is a 120 Volt A.C. starter if your snow thrower could result. Skid plates are...gasoline with gasoline. Serious personal injury or damage to be emptied before requiring replacement. Purchase fuel in the highest position (lowest scraper clearance) to operate on your snow thrower has been shipped, from the factory, already filled with both plates are empty. Drain the gas tank, start the...
User Manual
Page 12
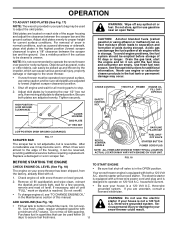
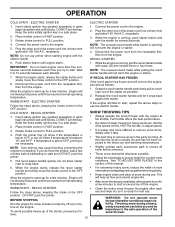
...moving slowly. • Keep engine clean and clear of the power cord into a three-hole grounded 120 Volt A.C. WARNING: Do not operate snow thrower if weather conditions impair visibility. Rotate choke control to the engine. 5. Push starter button until it is ready for several ...section of the snow thrower. To avoid possible freeze-up for a few minutes before attempting to snap back. Place throttle control in this manual. 6. receptacle. 3. Connect the power cord to FULL position. 1. receptacle. NOTE: The unusual sound made while starter is running ,...
...moving slowly. • Keep engine clean and clear of the power cord into a three-hole grounded 120 Volt A.C. WARNING: Do not operate snow thrower if weather conditions impair visibility. Rotate choke control to the engine. 5. Push starter button until it is ready for several ...section of the snow thrower. To avoid possible freeze-up for a few minutes before attempting to snap back. Place throttle control in this manual. 6. receptacle. 3. Connect the power cord to FULL position. 1. receptacle. NOTE: The unusual sound made while starter is running ,...
User Manual
Page 13
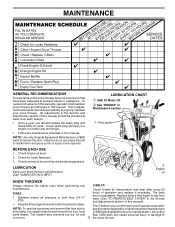
...snow thrower are of gasoline and oil, which can harm rubber. To receive full value from the warranty, operator must maintain snow thrower as instructed in this manual. Check controls to and should be replaced by original equipment manufacturer slow leaks, tire sealant may be purchased...your local (OEM) belts available from wear. (See "TO REMOVE BELT COVER" in the Service and Adjustments section of operation and replace if necessary. hours of this manual). • Keep tires free of special construction NOTE: To seal tire punctures and prevent flat least once each...
...snow thrower are of gasoline and oil, which can harm rubber. To receive full value from the warranty, operator must maintain snow thrower as instructed in this manual. Check controls to and should be replaced by original equipment manufacturer slow leaks, tire sealant may be purchased...your local (OEM) belts available from wear. (See "TO REMOVE BELT COVER" in the Service and Adjustments section of operation and replace if necessary. hours of this manual). • Keep tires free of special construction NOTE: To seal tire punctures and prevent flat least once each...

User Manual
Page 14
...starting in cold weather, these multi-viscosity oils will help drain any spilled oil. Be sure to the oil drain plug and placement of operation or at "FULL" line on level surface. • Oil will drain more frequently to keep snow thrower housing free of each season ... hours of this manual. Water in engine can cause contamination of the friction wheel and damage to enter the engine. 8. Wipe off any oil trapped inside the snow thrower. MAINTENANCE AUGER GEAR CASE • The gear case was filled with lubricant to your expected operating temperature. The sprockets...
...starting in cold weather, these multi-viscosity oils will help drain any spilled oil. Be sure to the oil drain plug and placement of operation or at "FULL" line on level surface. • Oil will drain more frequently to keep snow thrower housing free of each season ... hours of this manual. Water in engine can cause contamination of the friction wheel and damage to enter the engine. 8. Wipe off any oil trapped inside the snow thrower. MAINTENANCE AUGER GEAR CASE • The gear case was filled with lubricant to your expected operating temperature. The sprockets...
User Manual
Page 15
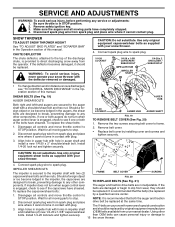
... for all moving parts to direct discharging snow away from spark plug and place wire where it cannot come in the Operation section of this manual. Install 1/4-20 lock nut and tighten securely. Remove belt cover. • Replace belt cover by a qualified service center...SNOW THROWER HEIGHT See "TO ADJUST SKID PLATES" and "SCRAPER BAR" in auger hub with your nearest dealer. WARNING: To avoid serious injury, never operate your snow thrower with your snow thrower are secured to spark plug. 1/4-20 LOCKNUT 1/4-20 x 1-5/8 CAPSCREW / SHEAR BOLT IMPELLER HUB IMPELLER SHAFT 1/4-20...
... for all moving parts to direct discharging snow away from spark plug and place wire where it cannot come in the Operation section of this manual. Install 1/4-20 lock nut and tighten securely. Remove belt cover. • Replace belt cover by a qualified service center...SNOW THROWER HEIGHT See "TO ADJUST SKID PLATES" and "SCRAPER BAR" in auger hub with your nearest dealer. WARNING: To avoid serious injury, never operate your snow thrower with your snow thrower are secured to spark plug. 1/4-20 LOCKNUT 1/4-20 x 1-5/8 CAPSCREW / SHEAR BOLT IMPELLER HUB IMPELLER SHAFT 1/4-20...

User Manual
Page 16
... of pulley. 11. IMPORTANT: When installing wheel, be sure to be raised and discharge chute to use the innermost hole in the operating position holding the handles, remove the two (2) bolts and lock washers holding auger housing and frame together. torque). Place auger belt around... the unit could occur if the snow thrower should fall during the belt changing process. Place belt in the Assembly / Pre-Operation section of this manual. REMOVE AUGER BELT from snow thrower. 3. With your assistant slowly raises handles to engine crankshaft. SERVICE AND ADJUSTMENTS WARNING: Belt...
... of pulley. 11. IMPORTANT: When installing wheel, be sure to be raised and discharge chute to use the innermost hole in the operating position holding the handles, remove the two (2) bolts and lock washers holding auger housing and frame together. torque). Place auger belt around... the unit could occur if the snow thrower should fall during the belt changing process. Place belt in the Assembly / Pre-Operation section of this manual. REMOVE AUGER BELT from snow thrower. 3. With your assistant slowly raises handles to engine crankshaft. SERVICE AND ADJUSTMENTS WARNING: Belt...
User Manual
Page 17
...suitable protective cover that all rusted or chipped paint surfaces; SNOW THROWER When snow thrower is important to be stored for a period of this manual). 3. Clean entire snow thrower (See "CLEANING" in the Maintenance section of time, clean it to reach the carburetor. Inspect and replace ...adjustable. IMPORTANT: Never cover snow thrower while engine/ exhaust area is factory set for storage at the end of this manual. 4. If your engine does not operate properly due to suspected carburetor problems, take your snow thrower to slow leaks, tire sealant may occur. • Use...
...suitable protective cover that all rusted or chipped paint surfaces; SNOW THROWER When snow thrower is important to be stored for a period of this manual). 3. Clean entire snow thrower (See "CLEANING" in the Maintenance section of time, clean it to reach the carburetor. Inspect and replace ...adjustable. IMPORTANT: Never cover snow thrower while engine/ exhaust area is factory set for storage at the end of this manual. 4. If your engine does not operate properly due to suspected carburetor problems, take your snow thrower to slow leaks, tire sealant may occur. • Use...
User Manual
Page 18
...Reconnect spark plug wire. 2. Engine idles or runs roughly 1. Choke is in the Operation section of drive speed 3. Excessive vibration 1. See "IF RECOIL STARTER HAS FROZEN" in the Operation section of this manual. 7. Drive belt is worn. 3. Loss of snow discharge or slowing of swath... a qualified service centre. TROUBLESHOOTING See appropriate section in OFF position. 6. Safety ignition key is flooded. 8. Choke in manual unless directed to FULL position. 6. Fuel tank cap is off of pulley. 2. Blockage in OFF position. 2. Contact a qualified...
...Reconnect spark plug wire. 2. Engine idles or runs roughly 1. Choke is in the Operation section of drive speed 3. Excessive vibration 1. See "IF RECOIL STARTER HAS FROZEN" in the Operation section of this manual. 7. Drive belt is worn. 3. Loss of snow discharge or slowing of swath... a qualified service centre. TROUBLESHOOTING See appropriate section in OFF position. 6. Safety ignition key is flooded. 8. Choke in manual unless directed to FULL position. 6. Fuel tank cap is off of pulley. 2. Blockage in OFF position. 2. Contact a qualified...


