
Owner's Manual
Page 4
... THX modes 27 Using the Advanced surround effects 27 Listening in a safe place for buying this Pioneer product. After you start Features 6 Checking what's in the box 7 Ventilation 7 Installing the receiver 7 Loading the batteries 7 02 5 minute guide Introduction to home theater 8 Listening to Surround ... speaker system setup 19 Connecting antennas 19 Connecting external antennas 20 Plugging in the receiver 20 AC outlet 20 04 Controls and displays Front panel 21 Operating range of remote control unit 22 Display 23 Remote control 24 05 Listening to your model properly.
... THX modes 27 Using the Advanced surround effects 27 Listening in a safe place for buying this Pioneer product. After you start Features 6 Checking what's in the box 7 Ventilation 7 Installing the receiver 7 Loading the batteries 7 02 5 minute guide Introduction to home theater 8 Listening to Surround ... speaker system setup 19 Connecting antennas 19 Connecting external antennas 20 Plugging in the receiver 20 AC outlet 20 04 Controls and displays Front panel 21 Operating range of remote control unit 22 Display 23 Remote control 24 05 Listening to your model properly.
Owner's Manual
Page 5
...AV options 63 Making an audio or a video recording 64 Reducing the level of an analog signal 65 Using the sleep timer 65 Dimming the display 65 Switching the speaker impedance 65 Checking your system settings 65 Resetting the system 66 Default system settings 66 11 Controlling the rest of the remote... purposes (such as long-term use for business purposes in a restaurant or use for other Pioneer components with this receiver with a Pioneer plasma display . . . 57 Using the SR+ mode with a Pioneer plasma display 58 Connecting a PC for Advanced MCACC output . . . . . 58 Advanced...
...AV options 63 Making an audio or a video recording 64 Reducing the level of an analog signal 65 Using the sleep timer 65 Dimming the display 65 Switching the speaker impedance 65 Checking your system settings 65 Resetting the system 66 Default system settings 66 11 Controlling the rest of the remote... purposes (such as long-term use for business purposes in a restaurant or use for other Pioneer components with this receiver with a Pioneer plasma display . . . 57 Using the SR+ mode with a Pioneer plasma display 58 Connecting a PC for Advanced MCACC output . . . . . 58 Advanced...

Owner's Manual
Page 7
... hot place, such as leakage and bursting. Observe the following precautions: • Never use LCD remote control The remote control gives you not only complete control over every function of this receiver, but also over the main functions for other components in your country or area. • Do...improve heat dispersal (at least 20 cm (8 in the box Please check that have different voltages. Do not use of preset codes, you 've received the following places: - DOWN DOWN 7 En This may distort) - It can cause batteries to operate a wide range of used batteries, please ...
... hot place, such as leakage and bursting. Observe the following precautions: • Never use LCD remote control The remote control gives you not only complete control over every function of this receiver, but also over the main functions for other components in your country or area. • Do...improve heat dispersal (at least 20 cm (8 in the box Please check that have different voltages. Do not use of preset codes, you 've received the following places: - DOWN DOWN 7 En This may distort) - It can cause batteries to operate a wide range of used batteries, please ...
Owner's Manual
Page 8
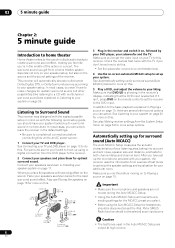
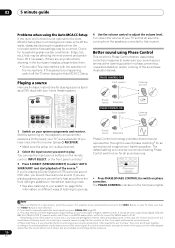
... you should not be disconnected and the iPod, XM or SIRIUS Radio function should have a big effect on your speaker setup. This receiver will automatically decode multichannel Dolby Digital, DTS, or Dolby Surround sources according to optimize the speaker settings and equalization for surround sound in ...by your DVD player, your system hooked up for surround sound (Auto MCACC) below for realistic surround sound, but also on the remote control to set up using the Auto MCACC Setup the headphones should be selected as an input source. After you have to make ...
... you should not be disconnected and the iPod, XM or SIRIUS Radio function should have a big effect on your speaker setup. This receiver will automatically decode multichannel Dolby Digital, DTS, or Dolby Surround sources according to optimize the speaker settings and equalization for surround sound in ...by your DVD player, your system hooked up for surround sound (Auto MCACC) below for realistic surround sound, but also on the remote control to set up using the Auto MCACC Setup the headphones should be selected as an input source. After you have to make ...
Owner's Manual
Page 10
...sound from the front left/right speakers in the upper section of the diagram above) then the sound will be set this receiver. Sound source Subwoofer PHASE CONTROL ON Front speaker Listening position Sound source Subwoofer Phase Control technology provides coherent sound reproduction through the... you want multichannel surround sound. 4 Phase matching is coming from the microphone) the final settings may need to do this receiver to the VIDEO 1 jacks on the remote control, INPUT SELECT, or the front panel controls.2 3 Press S.DIRECT (STREAM DIRECT) to select 'AUTO SURROUND' and ...
...sound from the front left/right speakers in the upper section of the diagram above) then the sound will be set this receiver. Sound source Subwoofer PHASE CONTROL ON Front speaker Listening position Sound source Subwoofer Phase Control technology provides coherent sound reproduction through the... you want multichannel surround sound. 4 Phase matching is coming from the microphone) the final settings may need to do this receiver to the VIDEO 1 jacks on the remote control, INPUT SELECT, or the front panel controls.2 3 Press S.DIRECT (STREAM DIRECT) to select 'AUTO SURROUND' and ...
Owner's Manual
Page 11
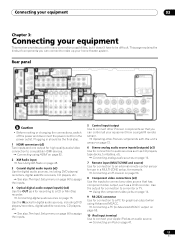
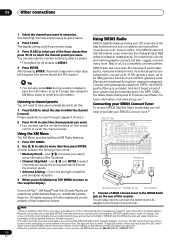
... Caution • Before making or changing the connections, switch off the power and disconnect the power cord from a single IR remote sensor. Operating other Pioneer components so that you can control all your equipment from the power outlet. Use the output for connection to a monitor or... See Using XM Radio on page 48. 3 Coaxial digital audio inputs (x2) Use for digital audio sources, including DVD players/ recorders, digital satellite receivers, CD players, etc. See also The Input Setup menu on page 60 to assign the inputs. 4 Optical digital audio output/input(s) (...
... Caution • Before making or changing the connections, switch off the power and disconnect the power cord from a single IR remote sensor. Operating other Pioneer components so that you can control all your equipment from the power outlet. Use the output for connection to a monitor or... See Using XM Radio on page 48. 3 Coaxial digital audio inputs (x2) Use for digital audio sources, including DVD players/ recorders, digital satellite receivers, CD players, etc. See also The Input Setup menu on page 60 to assign the inputs. 4 Optical digital audio output/input(s) (...
Owner's Manual
Page 16
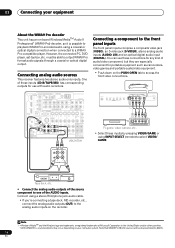
... WMA9 Pro-encoded audio using a coaxial or optical digital connection when connected to access the front video connections. Connecting analog audio sources This receiver features two stereo audio-only inputs. VIDEO VIDEO INPUT VIDEO L AUDIO R DIGITAL IN MCACC SETUP MIC PUSH OPEN OPTICAL MULTI-ZONE & ...such as camcorders, video games and portable audio/video equipment. • Push down on the recorder. Connect using INPUT SELECT (remote) to output WMA9 Pro format audio signals through a coaxial or optical digital output. However, the connected PC, DVD player, set-top box, etc...
... WMA9 Pro-encoded audio using a coaxial or optical digital connection when connected to access the front video connections. Connecting analog audio sources This receiver features two stereo audio-only inputs. VIDEO VIDEO INPUT VIDEO L AUDIO R DIGITAL IN MCACC SETUP MIC PUSH OPEN OPTICAL MULTI-ZONE & ...such as camcorders, video games and portable audio/video equipment. • Push down on the recorder. Connect using INPUT SELECT (remote) to output WMA9 Pro format audio signals through a coaxial or optical digital output. However, the connected PC, DVD player, set-top box, etc...
Owner's Manual
Page 21
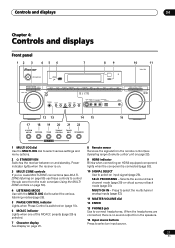
... on page 22). 9 HDMI indicator Blinks when connecting an HDMI-equipped component; Power indicator lights when the receiver is selected. 7 Character display See Display on page 23. 8 Remote sensor Receives the signals from the speakers. 14 Input source buttons Press to select an input source. 21 En Controls... or virtual surround back mode (page 30). lights when the component is switched on (page 10). 6 MCACC indicator Lights when one of remote control unit on and standby. VIDEO VIDEO/GAME INPUT VIDEO L AUDIO R DIGITAL IN MCACC SETUP MIC SIGNAL SB ch MULTI CH SELECT PROCESSING...
... on page 22). 9 HDMI indicator Blinks when connecting an HDMI-equipped component; Power indicator lights when the receiver is selected. 7 Character display See Display on page 23. 8 Remote sensor Receives the signals from the speakers. 14 Input source buttons Press to select an input source. 21 En Controls... or virtual surround back mode (page 30). lights when the component is switched on (page 10). 6 MCACC indicator Lights when one of remote control unit on and standby. VIDEO VIDEO/GAME INPUT VIDEO L AUDIO R DIGITAL IN MCACC SETUP MIC SIGNAL SB ch MULTI CH SELECT PROCESSING...
Owner's Manual
Page 22
...• There are obstacles between the remote control and the receiver's remote sensor. • Direct sunlight or fluorescent light is shining onto the remote sensor. • The receiver is located near a device that is emitting infrared rays. • The receiver is operated simultaneously with the MULTI JOG ...dial to memorize and name stations for recall (page 32). 22 SPEAKERS Use to select preset stations (page 32). 21 TUNER EDIT Use with another infrared remote control unit. 30 30 DOWN DOWN ...
...• There are obstacles between the remote control and the receiver's remote sensor. • Direct sunlight or fluorescent light is shining onto the remote sensor. • The receiver is located near a device that is emitting infrared rays. • The receiver is operated simultaneously with the MULTI JOG ...dial to memorize and name stations for recall (page 32). 22 SPEAKERS Use to select preset stations (page 32). 21 TUNER EDIT Use with another infrared remote control unit. 30 30 DOWN DOWN ...

Owner's Manual
Page 24
... AV options (page 63). DVD controls (page 71) • Blue - Press RECEIVER first to make dialog stand out when watching TV or a movie (page 31). ANALOG ATT - MIDNIGHT/LOUDNESS - SETUP - Use Midnight when listening to movie soundtracks at low volume (page 31). 04 Controls and displays Remote control RECEIVER ... SIGNAL SEL SBch DVD CH STEREO/ F.S.SURR MULTI OPE THX STANDARD ADV.SURR SHIFT PHASE MCACC S.DIRECT 16 17 18 RECEIVER The remote has been conveniently color-coded according to component control using the number buttons (page 32). Other controls (page 71...
... AV options (page 63). DVD controls (page 71) • Blue - Press RECEIVER first to make dialog stand out when watching TV or a movie (page 31). ANALOG ATT - MIDNIGHT/LOUDNESS - SETUP - Use Midnight when listening to movie soundtracks at low volume (page 31). 04 Controls and displays Remote control RECEIVER ... SIGNAL SEL SBch DVD CH STEREO/ F.S.SURR MULTI OPE THX STANDARD ADV.SURR SHIFT PHASE MCACC S.DIRECT 16 17 18 RECEIVER The remote has been conveniently color-coded according to component control using the number buttons (page 32). Other controls (page 71...

Owner's Manual
Page 25
...turn on /off the power of the TV. See Programming signals from which you have one of the remote control button settings on page 68. 14 RECEIVER Switches the remote to control the receiver (used to control a component after you have selected it has been muted (adjusting the volume also ...restores the sound). 17 Receiver controls SIGNAL SEL - See Multi Operation and System Off on page 68. RENAME - RESET - See Resetting the remote control presets on page 69. See Confirming preset codes on page 68. SB ch - ...
...turn on /off the power of the TV. See Programming signals from which you have one of the remote control button settings on page 68. 14 RECEIVER Switches the remote to control the receiver (used to control a component after you have selected it has been muted (adjusting the volume also ...restores the sound). 17 Receiver controls SIGNAL SEL - See Multi Operation and System Off on page 68. RENAME - RESET - See Resetting the remote control presets on page 69. See Confirming preset codes on page 68. SB ch - ...

Owner's Manual
Page 32
...DVR 2 DVR 1 TV CTRL CD-R/TAPE HDMI 2 CD ZONE 2 iPod HDMI 1 TUNER RECEIVER DIALOG E D.ACCESS +10 AV PARAMETER TOP MENU TUNE ST SETUP ENTER CLASS DISC ENTER CH LEVEL MENU ST T.EDIT RETURN ... tuning in each . If you make a mistake halfway through, press D.ACCESS twice to switch the receiver into mono reception mode. Improving FM stereo sound If the TUNED or STEREO indicators don't light when ...tuning to FM and AM radio broadcasts using the number buttons on the remote control. 1 Press the TUNER button to select the tuner. 2 Use the BAND button to the...
...DVR 2 DVR 1 TV CTRL CD-R/TAPE HDMI 2 CD ZONE 2 iPod HDMI 1 TUNER RECEIVER DIALOG E D.ACCESS +10 AV PARAMETER TOP MENU TUNE ST SETUP ENTER CLASS DISC ENTER CH LEVEL MENU ST T.EDIT RETURN ... tuning in each . If you make a mistake halfway through, press D.ACCESS twice to switch the receiver into mono reception mode. Improving FM stereo sound If the TUNED or STEREO indicators don't light when ...tuning to FM and AM radio broadcasts using the number buttons on the remote control. 1 Press the TUNER button to select the tuner. 2 Use the BAND button to the...

Owner's Manual
Page 33
... station presets You will need to have named a station preset, you want. • You can also use the number buttons on the remote control to switch the display between name and frequency. Tip • To erase a station name, simply repeat steps 1 to 3 and ...the first character position. 3 Input the name you haven't done this . ABCDEFGHIJKLMNOPQRSTUVWXYZ abcdefghijklmnopqrstuvwxyz 0123456789 space] • Use the ST / buttons (remote) to select characters. • Press ENTER to four characters long. If no character is input, a space is input. • The name is...
... station presets You will need to have named a station preset, you want. • You can also use the number buttons on the remote control to switch the display between name and frequency. Tip • To erase a station name, simply repeat steps 1 to 3 and ...the first character position. 3 Input the name you haven't done this . ABCDEFGHIJKLMNOPQRSTUVWXYZ abcdefghijklmnopqrstuvwxyz 0123456789 space] • Use the ST / buttons (remote) to select characters. • Press ENTER to four characters long. If no character is input, a space is input. • The name is...

Owner's Manual
Page 34
... speakers you 've connected to the digital and component video inputs (see Manual speaker setup on page 61). TUNE 2 Press RECESTIVER onST the remote control, then press the SETUP buttoTUNEn.2 An on-screen display (OSD) appears on your speaker settings and customize the Acoustic Calibration EQ (see ...SOURCE XM RADIO DVD SIRIUS TV DVR 2 DVR 1 TV CTRL CD-R/TAPE iPod HDMI 2 HDMI 1 CD TUNER ZONE 2 RECEIVER SR+ DIMMER DIALOG E MIDNIGHT/ LOUDNESS D.ACCESS +10 AV PARAMETER TOP MENU TUNE ST SETUP ENTER CLASS DISC ENTER CH LEVEL MENU ST T.EDIT RETURN GUIDE TUNE TV CONTROL BAND TV...
... speakers you 've connected to the digital and component video inputs (see Manual speaker setup on page 61). TUNE 2 Press RECESTIVER onST the remote control, then press the SETUP buttoTUNEn.2 An on-screen display (OSD) appears on your speaker settings and customize the Acoustic Calibration EQ (see ...SOURCE XM RADIO DVD SIRIUS TV DVR 2 DVR 1 TV CTRL CD-R/TAPE iPod HDMI 2 HDMI 1 CD TUNER ZONE 2 RECEIVER SR+ DIMMER DIALOG E MIDNIGHT/ LOUDNESS D.ACCESS +10 AV PARAMETER TOP MENU TUNE ST SETUP ENTER CLASS DISC ENTER CH LEVEL MENU ST T.EDIT RETURN GUIDE TUNE TV CONTROL BAND TV...

Owner's Manual
Page 45
... [ 10.0ft ] [ 10.0ft ] [ 10.0ft ] [ 10.0ft ] [ 10.0ft ] :Finish 2 Adjust the distance of each speaker using / on the remote control. You will be able to specify the distance of your room size: Room size (ft2) ≤400 ≤550 ≤650 ≤800 ≤...Curve Most soundtracks mixed for cinema sound too bright when played back in 0.5 foot increments. 3 When you 're finished, press RETURN. The receiver can adjust the distance of -3.0dB/oct). Use / to switch speakers. Speaker Distance For good sound depth and separation from your main...
... [ 10.0ft ] [ 10.0ft ] [ 10.0ft ] [ 10.0ft ] [ 10.0ft ] :Finish 2 Adjust the distance of each speaker using / on the remote control. You will be able to specify the distance of your room size: Room size (ft2) ≤400 ≤550 ≤650 ≤800 ≤...Curve Most soundtracks mixed for cinema sound too bright when played back in 0.5 foot increments. 3 When you 're finished, press RETURN. The receiver can adjust the distance of -3.0dB/oct). Use / to switch speakers. Speaker Distance For good sound depth and separation from your main...
Owner's Manual
Page 50
...you get up to 16 NFL games a week, up to 40 NBA games a week and up to recall the channel preset. Connect SIRIUS on the remote control to 40 NHL games a week. (Games are trademarks of world-class sports, news and entertainment. You can also press during their respective... is available in the US for subscribers with addresses in the continental US and is available in which uniquely identifies your SIRIUS Connect Tuner To receive SIRIUS Satellite Radio broadcasts, you will need the SIRIUS ID (SID) which the channel is XM001. Visit sirius.com for your saved song ...
...you get up to 16 NFL games a week, up to 40 NBA games a week and up to recall the channel preset. Connect SIRIUS on the remote control to 40 NHL games a week. (Games are trademarks of world-class sports, news and entertainment. You can also press during their respective... is available in the US for subscribers with addresses in the continental US and is available in which uniquely identifies your SIRIUS Connect Tuner To receive SIRIUS Satellite Radio broadcasts, you will need the SIRIUS ID (SID) which the channel is XM001. Visit sirius.com for your saved song ...

Owner's Manual
Page 51
You can also use the number buttons on the remote control to save the information of the OSDs. Good ... channels in which the channel is stored. After pressing ENTER, the preset class and number stop blinking and the receiver stores the SIRIUS channel. Using the SIRIUS Menu The SIRIUS Menu provides additional SIRIUS Radio features. 1 Press TOP ...switch through pages with parental lock cannot be saved on page 51. 2 It's easiest if you want to do this receiver to SIRIUS Radio After connecting, you want. SIRIUS Decades The '50s A A0 SR005 Chuck Berry Johnny B. The display...
You can also use the number buttons on the remote control to save the information of the OSDs. Good ... channels in which the channel is stored. After pressing ENTER, the preset class and number stop blinking and the receiver stores the SIRIUS channel. Using the SIRIUS Menu The SIRIUS Menu provides additional SIRIUS Radio features. 1 Press TOP ...switch through pages with parental lock cannot be saved on page 51. 2 It's easiest if you want to do this receiver to SIRIUS Radio After connecting, you want. SIRIUS Decades The '50s A A0 SR005 Chuck Berry Johnny B. The display...
Owner's Manual
Page 56
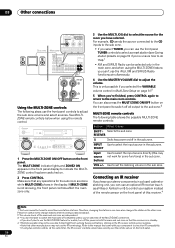
...the input source in one station at the same time), the IR receiver's remote sensor takes priority over the remote sensor on the IR receiver remote sensor window. • Note that other zone. If MULTI-ZONE is in standby. 4 • Remote operation may not be selected only in the sub zone. You ...the listening volume in the main zone, and when using the remote control. Make sure that came with your system instead of the remote sensor on . 2 Press CONTROL. SELECT Input Use to select the input source directly (this receiver is not showing, the front panel controls affect the main ...
...the input source in one station at the same time), the IR receiver's remote sensor takes priority over the remote sensor on the IR receiver remote sensor window. • Note that other zone. If MULTI-ZONE is in standby. 4 • Remote operation may not be selected only in the sub zone. You ...the listening volume in the main zone, and when using the remote control. Make sure that came with your system instead of the remote sensor on . 2 Press CONTROL. SELECT Input Use to select the input source directly (this receiver is not showing, the front panel controls affect the main ...
Owner's Manual
Page 58
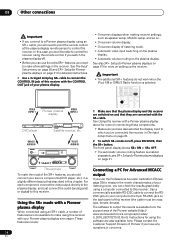
... DIMMER ANALOG ATT MIDNIGHT/ LOUDNESS VIDEO INPUT 1 Pioneer plasma display VIDEO INPUT 2 DVD player Satellite receiver, etc. see page 39) to measure the reverb characteristics of the SR+ features, you use the extra SR+ features, you need to point the remote control at the plasma display remote sensor to which you've connected the...
... DIMMER ANALOG ATT MIDNIGHT/ LOUDNESS VIDEO INPUT 1 Pioneer plasma display VIDEO INPUT 2 DVD player Satellite receiver, etc. see page 39) to measure the reverb characteristics of the SR+ features, you use the extra SR+ features, you need to point the remote control at the plasma display remote sensor to which you've connected the...
Owner's Manual
Page 60
... see Switching components on and off (in Setting the AV options on page 63), you must tell the receiver which input you connected it at the plasma display's remote sensor after making this receiver using the same type of the receiver. • If you change the DVD/LD input ...function's Digital In setting from a plasma display, select the display input to which , in turn, correspond with a Pioneer plasma display on this receiver from COAX 1 ...
... see Switching components on and off (in Setting the AV options on page 63), you must tell the receiver which input you connected it at the plasma display's remote sensor after making this receiver using the same type of the receiver. • If you change the DVD/LD input ...function's Digital In setting from a plasma display, select the display input to which , in turn, correspond with a Pioneer plasma display on this receiver from COAX 1 ...


