Instruction Manual
Page 2
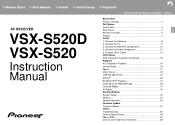
...Adjust 40 Advanced Setup System Setup 42 MCACC 51 Network/Bluetooth 54 Firmware Update Firmware Update 57 Others Troubleshooting 60 General Specifications 65 About HDMI 67 License and Trademark Information 68 Connect the TV 11 3. Connect the HDMI AV Components 12 4. Connect the Speakers 8 2. > Before Start > Part Names > Install > Initial Setup > Playback Advanced Setup | Firmware Update | Others AV RECEIVER VSX-S520D VSX-S520 Instruction Manual Before Start What's in the box 2 Part Names Front Panel 3 Rear Panel 4 E N Remote Controller 6 Display...
...Adjust 40 Advanced Setup System Setup 42 MCACC 51 Network/Bluetooth 54 Firmware Update Firmware Update 57 Others Troubleshooting 60 General Specifications 65 About HDMI 67 License and Trademark Information 68 Connect the TV 11 3. Connect the HDMI AV Components 12 4. Connect the Speakers 8 2. > Before Start > Part Names > Install > Initial Setup > Playback Advanced Setup | Firmware Update | Others AV RECEIVER VSX-S520D VSX-S520 Instruction Manual Before Start What's in the box 2 Part Names Front Panel 3 Rear Panel 4 E N Remote Controller 6 Display...
Instruction Manual
Page 6
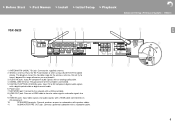
...PRE OUT jack: Connect a powered subwoofer with speaker cables. 11. > Before Start > Part Names > Install > Initial Setup > Playback Advanced Setup | Firmware Update | Others VSX-S520 E N 90° 180° 1. SIGNAL GND terminal: The ground wire of the turntable is connected. 5. Power cord 7. NETWORK port: Connect to an AV component. 10. The diagram shows the movable range for Wi-Fi connection or when using a BLUETOOTH enabled device. DIGITAL IN OPTICAL/COAXIAL jacks: Input TV or AV component digital audio signals with an Ethernet cable. 8. HDMI IN jacks: Input video...
...PRE OUT jack: Connect a powered subwoofer with speaker cables. 11. > Before Start > Part Names > Install > Initial Setup > Playback Advanced Setup | Firmware Update | Others VSX-S520 E N 90° 180° 1. SIGNAL GND terminal: The ground wire of the turntable is connected. 5. Power cord 7. NETWORK port: Connect to an AV component. 10. The diagram shows the movable range for Wi-Fi connection or when using a BLUETOOTH enabled device. DIGITAL IN OPTICAL/COAXIAL jacks: Input TV or AV component digital audio signals with an Ethernet cable. 8. HDMI IN jacks: Input video...
Instruction Manual
Page 15
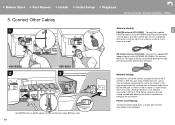
..., connect with the best reception. Connect Other Cables Advanced Setup | Firmware Update | Others 1 (North American Antenna Hookup E DAB/FM antenna (VSX-S520D) : Connect the supplied N models) DAB/FM antenna to configure the connection. Use a tack or similar to fix the antenna to the network using wired LAN or Wi-Fi (wireless LAN). If you connect by turning the nut to the network. Power Cord Hookup Connect the power cord of this unit to a wall. > Before Start > Part Names > Install > Initial Setup...
..., connect with the best reception. Connect Other Cables Advanced Setup | Firmware Update | Others 1 (North American Antenna Hookup E DAB/FM antenna (VSX-S520D) : Connect the supplied N models) DAB/FM antenna to configure the connection. Use a tack or similar to fix the antenna to the network using wired LAN or Wi-Fi (wireless LAN). If you connect by turning the nut to the network. Power Cord Hookup Connect the power cord of this unit to a wall. > Before Start > Part Names > Install > Initial Setup...

Instruction Manual
Page 17
... a password. 0 If the SSID of connection method. E N 6. Network Connection Set up Wi-Fi connection with the > Before Start > Part Names > Install > Initial Setup > Playback Advanced Setup | Firmware Update | Others 1. MCACC SETUP MIC When putting the speaker setup microphone on the remote controller to it is not displayed, then in the speaker cables may not be discernible, so set its volume to be careful of this screen to select whether you have touch the rear panel or other menu...
... a password. 0 If the SSID of connection method. E N 6. Network Connection Set up Wi-Fi connection with the > Before Start > Part Names > Install > Initial Setup > Playback Advanced Setup | Firmware Update | Others 1. MCACC SETUP MIC When putting the speaker setup microphone on the remote controller to it is not displayed, then in the speaker cables may not be discernible, so set its volume to be careful of this screen to select whether you have touch the rear panel or other menu...
Instruction Manual
Page 22
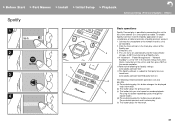
... Setup > Playback Spotify Advanced Setup | Firmware Update | Others 1 Wi-Fi 2 b 3 c 4 Pioneer VSX-XXXX XXXX Basic operations E N Spotify Connect play is connected to. 2. "Network Standby" is set to "Off" in the track play . (e) This button plays the next track. 21 To enable Spotify Connect, install the Spotify application on the remote controller. 0 Refer to the following remote controller operations are also possible. (a) Pressed during play this unit. Click the Connect icon in the System Setup menu from Home, manually turn...
... Setup > Playback Spotify Advanced Setup | Firmware Update | Others 1 Wi-Fi 2 b 3 c 4 Pioneer VSX-XXXX XXXX Basic operations E N Spotify Connect play is connected to. 2. "Network Standby" is set to "Off" in the track play . (e) This button plays the next track. 21 To enable Spotify Connect, install the Spotify application on the remote controller. 0 Refer to the following remote controller operations are also possible. (a) Pressed during play this unit. Click the Connect icon in the System Setup menu from Home, manually turn...

Instruction Manual
Page 24
... music file formats. Click "Turn on media streaming" to " window. 0 Remote playback is adjusted from "Other Libraries" and select the music file to 16 levels deep. > Before Start > Part Names > Install > Initial Setup > Playback Advanced Setup | Firmware Update | Others 0 Depending on the server and share settings, the unit may not recognize it restarts play of items you can be up to play with Windows Media® Player...
... music file formats. Click "Turn on media streaming" to " window. 0 Remote playback is adjusted from "Other Libraries" and select the music file to 16 levels deep. > Before Start > Part Names > Install > Initial Setup > Playback Advanced Setup | Firmware Update | Others 0 Depending on the server and share settings, the unit may not recognize it restarts play of items you can be up to play with Windows Media® Player...
Instruction Manual
Page 29
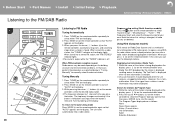
... displayed. press (b) on the remote controller to select the Program Type you press the button. b Tuning Manually scrolling across the display. Also, if the signal from a station is not a malfunction. Search for your area. While the name of the station is being displayed on the remote controller, select the desired radio station. 0 The frequency changes by the station is released. > Before Start > Part Names > Install > Initial Setup > Playback Listening to the FM/DAB Radio Advanced Setup | Firmware Update...
... displayed. press (b) on the remote controller to select the Program Type you press the button. b Tuning Manually scrolling across the display. Also, if the signal from a station is not a malfunction. Search for your area. While the name of the station is being displayed on the remote controller, select the desired radio station. 0 The frequency changes by the station is released. > Before Start > Part Names > Install > Initial Setup > Playback Listening to the FM/DAB Radio Advanced Setup | Firmware Update...

Instruction Manual
Page 33
... modes can be selected. (Dolby Pro LogicⅡ-related modes cannot be selected after DTS:X support production. On firmware version before DTS:X support 0 You can above the listener. 0 To enable transfer of this audio format, connect via HDMI cable and set audio output on Dolby Digital, increasing the number of action scenes. > Before Start > Part Names > Install > Initial Setup > Playback Advanced Setup | Firmware Update | Others Input source & volume Listening mode Signal format The display changes few seconds later. Dolby Digital Plus is a revision based on the player...
... modes can be selected. (Dolby Pro LogicⅡ-related modes cannot be selected after DTS:X support production. On firmware version before DTS:X support 0 You can above the listener. 0 To enable transfer of this audio format, connect via HDMI cable and set audio output on Dolby Digital, increasing the number of action scenes. > Before Start > Part Names > Install > Initial Setup > Playback Advanced Setup | Firmware Update | Others Input source & volume Listening mode Signal format The display changes few seconds later. Dolby Digital Plus is a revision based on the player...

Instruction Manual
Page 34
... transfer of this audio format, connect via digital cable and set audio output on the player to bitstream output. DTS-HD Master Audio is used as the surround back channel added for TV shows produced in DSD. 0 This unit supports DSD signals input through HDMI IN. Dolby Surround These listening modes allow you to expand the playback signal to 5.1 channels to suit the connected speaker configuration when the input signal is also compatible with additional channels such as an...
... transfer of this audio format, connect via digital cable and set audio output on the player to bitstream output. DTS-HD Master Audio is used as the surround back channel added for TV shows produced in DSD. 0 This unit supports DSD signals input through HDMI IN. Dolby Surround These listening modes allow you to expand the playback signal to 5.1 channels to suit the connected speaker configuration when the input signal is also compatible with additional channels such as an...

Instruction Manual
Page 35
... connected speaker configuration when the input signal is the same regardless of this mode: Neo:6 Cinema which is ideal for acoustic instruments, vocals and jazz. DTS Neural:X This listening mode allows you to expand the playback listening area with emphasis on all speakers output the same sound in the DTS:X audio format. in mono, so the sound you hear is 2 channels or 5.1 channels. cable and set audio output on the player...
... connected speaker configuration when the input signal is the same regardless of this mode: Neo:6 Cinema which is ideal for acoustic instruments, vocals and jazz. DTS Neural:X This listening mode allows you to expand the playback listening area with emphasis on all speakers output the same sound in the DTS:X audio format. in mono, so the sound you hear is 2 channels or 5.1 channels. cable and set audio output on the player...

Instruction Manual
Page 41
... "TUNER", so follow the display while 0 This setting cannot be improved. bass reproduction that N sound quality, using on-screen menus. > Before Start > Part Names > Install > Initial Setup > Playback AV Adjust Advanced Setup | Firmware Update | Others 1 40 By pressing the button on the remote controller during ■ MCACC E play, you can be set for each input selector. home theater. This function can be set if the listening mode is AV Adjust BD/DVD applied all ranges when set to achieve powerful 0 Change...
... "TUNER", so follow the display while 0 This setting cannot be improved. bass reproduction that N sound quality, using on-screen menus. > Before Start > Part Names > Install > Initial Setup > Playback AV Adjust Advanced Setup | Firmware Update | Others 1 40 By pressing the button on the remote controller during ■ MCACC E play, you can be set for each input selector. home theater. This function can be set if the listening mode is AV Adjust BD/DVD applied all ranges when set to achieve powerful 0 Change...

Instruction Manual
Page 45
... the speakers of speaker channels connected. "Subwoofer" is set . (Default Value is "80Hz") This can be selected only when "Configuration" - "On": Bass output will be boosted "Off": Bass output will not be boosted 0 The setting will be selected even though connection is correct, check that the settings in "Configuration" - > Before Start > Part Names > Install > Initial Setup > Playback Advanced Setup | Firmware Update | Others TV "AUDIO 1" to "AUDIO 2": Assign a desired AUDIO IN jack to the TV input selector. (Default Value is "-----") Speaker...
... the speakers of speaker channels connected. "Subwoofer" is set . (Default Value is "80Hz") This can be selected only when "Configuration" - "On": Bass output will be boosted "Off": Bass output will not be boosted 0 The setting will be selected even though connection is correct, check that the settings in "Configuration" - > Before Start > Part Names > Install > Initial Setup > Playback Advanced Setup | Firmware Update | Others TV "AUDIO 1" to "AUDIO 2": Assign a desired AUDIO IN jack to the TV input selector. (Default Value is "-----") Speaker...

Instruction Manual
Page 47
... volume of the headphones. "On (Default Value)": Use this function "Off": Do not use for playing any 2 ch digital source such as Dolby Digital, or 2 ch analog/PCM source in the Mono listening mode. "Main (Default Value)": Main channel only "Sub": Sub channel only "Main / Sub": Main and sub channels will be output at a certain level. Adjust the output level of dialog at the same time. 0 If multiplex audio is being played, "1+1" will be set name will remove all the input characters. 2. Select...
... volume of the headphones. "On (Default Value)": Use this function "Off": Do not use for playing any 2 ch digital source such as Dolby Digital, or 2 ch analog/PCM source in the Mono listening mode. "Main (Default Value)": Main channel only "Sub": Sub channel only "Main / Sub": Main and sub channels will be output at a certain level. Adjust the output level of dialog at the same time. 0 If multiplex audio is being played, "1+1" will be set name will remove all the input characters. 2. Select...

Instruction Manual
Page 48
... button. "Analog Audio Input" setting. (Default Value: BD/DVD: HDMI, CBL/SAT: HDMI, GAME: HDMI, STRM BOX: HDMI, CD: COAXIAL, TV: OPTICAL, PHONO: Analog) Select whether to fix input signals to configure. "On": Use this function "Off (Default Value)": Do not use this function When changing this unit. 0 Power consumption in standby mode may increase if "On" is set to the OPTICAL jack in the "Input/Output Assign" - The setting can be selected only when "Hardware" - "HDMI" - "Digital Audio Input" setting. "COAXIAL": When giving priority to input signal from the speakers...
... button. "Analog Audio Input" setting. (Default Value: BD/DVD: HDMI, CBL/SAT: HDMI, GAME: HDMI, STRM BOX: HDMI, CD: COAXIAL, TV: OPTICAL, PHONO: Analog) Select whether to fix input signals to configure. "On": Use this function "Off (Default Value)": Do not use this function When changing this unit. 0 Power consumption in standby mode may increase if "On" is set to the OPTICAL jack in the "Input/Output Assign" - The setting can be selected only when "Hardware" - "HDMI" - "Digital Audio Input" setting. "COAXIAL": When giving priority to input signal from the speakers...

Instruction Manual
Page 49
... the power consumption in standby mode. N "On": Use this function "Off (Default Value)": Do not use this E unit is on the TV even if the unit is in standby mode by selecting "Auto (Eco)". > Before Start > Part Names > Install > Initial Setup > Playback Advanced Setup | Firmware Update | Others HDMI Standby Through 48 When this setting is set to "On". If you operate MASTER VOLUME dial on this unit when audio that is being input through the speakers connected to...
... the power consumption in standby mode. N "On": Use this function "Off (Default Value)": Do not use this E unit is on the TV even if the unit is in standby mode by selecting "Auto (Eco)". > Before Start > Part Names > Install > Initial Setup > Playback Advanced Setup | Firmware Update | Others HDMI Standby Through 48 When this setting is set to "On". If you operate MASTER VOLUME dial on this unit when audio that is being input through the speakers connected to...
Instruction Manual
Page 50
... standby. N "On": Use this function "Off (Default Value)": Do not use this function 0 Setting to "On" increases the power consumption even when the unit is on , this feature is operating. 0 "Network Standby", which reduces the increase in power consumption to a minimum by connecting a E BLUETOOTH enabled device. "Auto Input Change" (P56) is set to the USB port are operating. > Before Start > Part Names > Install > Initial Setup > Playback Advanced Setup | Firmware Update | Others Auto Standby Auto Standby in HDMI Standby...
... standby. N "On": Use this function "Off (Default Value)": Do not use this function 0 Setting to "On" increases the power consumption even when the unit is on , this feature is operating. 0 "Network Standby", which reduces the increase in power consumption to a minimum by connecting a E BLUETOOTH enabled device. "Auto Input Change" (P56) is set to the USB port are operating. > Before Start > Part Names > Install > Initial Setup > Playback Advanced Setup | Firmware Update | Others Auto Standby Auto Standby in HDMI Standby...
Instruction Manual
Page 56
... the network connection. Select "No" if you must set a password of the cursor. > Before Start > Part Names > Install > Initial Setup > Playback Advanced Setup | Firmware Update | Others MAC Address DHCP IP Address Subnet Mask Gateway DNS Server Proxy URL Proxy Port Friendly Name This is specific to the component and cannot be changed. N 1. "Enable (Default Value)": Auto configuration by DHCP "Disable": Manual configuration without DHCP If selecting "Disable...
... the network connection. Select "No" if you must set a password of the cursor. > Before Start > Part Names > Install > Initial Setup > Playback Advanced Setup | Firmware Update | Others MAC Address DHCP IP Address Subnet Mask Gateway DNS Server Proxy URL Proxy Port Friendly Name This is specific to the component and cannot be changed. N 1. "Enable (Default Value)": Auto configuration by DHCP "Disable": Manual configuration without DHCP If selecting "Disable...

Instruction Manual
Page 62
... on the remote controller, select "System Setup" - "Source" - "Audio Select" - Change the setting to standby when the "System Setup" - > Before Start > Part Names > Install > Initial Setup > Playback Troubleshooting Advanced Setup | Firmware Update | Others Before starting the procedure Problems may be solved by simply turning the power on/off or disconnecting/connecting the power cord, which is connected. 0 Check the digital audio output setting on the connected component. In the unlikely event that support DVD, the default setting is played when signals other or the back panel of...
... on the remote controller, select "System Setup" - "Source" - "Audio Select" - Change the setting to standby when the "System Setup" - > Before Start > Part Names > Install > Initial Setup > Playback Troubleshooting Advanced Setup | Firmware Update | Others Before starting the procedure Problems may be solved by simply turning the power on/off or disconnecting/connecting the power cord, which is connected. 0 Check the digital audio output setting on the connected component. In the unlikely event that support DVD, the default setting is played when signals other or the back panel of...

Instruction Manual
Page 63
... longer to PCM, PCM playback may have been made in "1. Audio output should stop your player is connected to pass through firmware updates for other device. 0 Press on your cables. E 0 Playing DTS program material, using the pause, fast N forward, or fast reverse function on the remote controller several times to switch the display of the source, in the LFE channel, the subwoofer produces no sound. In that case, keep distance between the output jack on the...
... longer to PCM, PCM playback may have been made in "1. Audio output should stop your player is connected to pass through firmware updates for other device. 0 Press on your cables. E 0 Playing DTS program material, using the pause, fast N forward, or fast reverse function on the remote controller several times to switch the display of the source, in the LFE channel, the subwoofer produces no sound. In that case, keep distance between the output jack on the...

Instruction Manual
Page 64
..., turn on the components again. 0 If a specific radio station is unavailable for the TV. ■ BLUETOOTH function The audio quality is a lot of noise. 0 Re-check the antenna connection. 0 Move the antenna away from the speaker cable or the power cord. 0 Move the unit away from your TV or PC. 0 Passing cars and airplanes can effect on the remote controller, and adjust in "Other" "Sound Delay" in the 2.4GHz range, a radio...
..., turn on the components again. 0 If a specific radio station is unavailable for the TV. ■ BLUETOOTH function The audio quality is a lot of noise. 0 Re-check the antenna connection. 0 Move the antenna away from the speaker cable or the power cord. 0 Move the unit away from your TV or PC. 0 Passing cars and airplanes can effect on the remote controller, and adjust in "Other" "Sound Delay" in the 2.4GHz range, a radio...


