
Basic Manual English
Page 1
VSX-LX302 / AV RECEIVER Before Start 2 What's in the box 2 Part Names 3 Part Names 3 Install 7 Installation procedure 7 Step1: Speaker Layout 8 Step2: Connect the Speakers 15 Step3: Connect the TV & AV Components 17 Initial Setup 23 Initial Setup with Auto Start-up Wizard 23 Playback 25 AV Component Playback 25 BLUETOOTH® Playback 25 Network Functions 26 USB Storage Device 27 Listening To the AM/FM Radio 28 Multi-zone 30 Listening...
VSX-LX302 / AV RECEIVER Before Start 2 What's in the box 2 Part Names 3 Part Names 3 Install 7 Installation procedure 7 Step1: Speaker Layout 8 Step2: Connect the Speakers 15 Step3: Connect the TV & AV Components 17 Initial Setup 23 Initial Setup with Auto Start-up Wizard 23 Playback 25 AV Component Playback 25 BLUETOOTH® Playback 25 Network Functions 26 USB Storage Device 27 Listening To the AM/FM Radio 28 Multi-zone 30 Listening...
Basic Manual English
Page 2
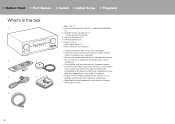
... other companies. 0 Functionality may be introduced by firmware updates and service providers may cease services, meaning that some network services and content may become unavailable in the box 1 2 3 4 5 1. > Before Start > Part Names > Install > Initial Setup > Playback What's in the future. Remote controller (RC-957R) (1), Batteries (AAA/R03) (2) 3. Speaker setup microphone (1) 0 Used during Initial Setup. 4. Main unit (1) 2. Power cord (1) 0 Quick Start Guide (1) 0 Basic Manual (This manual) 0 Connect speakers with 4 Ω to change without prior notice...
... other companies. 0 Functionality may be introduced by firmware updates and service providers may cease services, meaning that some network services and content may become unavailable in the box 1 2 3 4 5 1. > Before Start > Part Names > Install > Initial Setup > Playback What's in the future. Remote controller (RC-957R) (1), Batteries (AAA/R03) (2) 3. Speaker setup microphone (1) 0 Used during Initial Setup. 4. Main unit (1) 2. Power cord (1) 0 Quick Start Guide (1) 0 Basic Manual (This manual) 0 Connect speakers with 4 Ω to change without prior notice...

Basic Manual English
Page 3
...; Front Panel 1. INPUT SELECTOR dial: Switch the input to confirm. HOME MENU button: Displays the Home. (*) 8. Display (P4) 9. DIMMER button: You can find details in standby mode, this lights when functions such as HDMI CEC and network standby are connected. It does not light when ZONE 2 is connected to turn the display off. 4. > Before Start > Part Names > Install > Initial Setup > Playback Part Names (*)You can switch the display off (P30). 6. ZONE 2-CONTROL button: Controls the multi-zone function (P30). 7. Cursor buttons and ENTER button: Select the...
...; Front Panel 1. INPUT SELECTOR dial: Switch the input to confirm. HOME MENU button: Displays the Home. (*) 8. Display (P4) 9. DIMMER button: You can find details in standby mode, this lights when functions such as HDMI CEC and network standby are connected. It does not light when ZONE 2 is connected to turn the display off. 4. > Before Start > Part Names > Install > Initial Setup > Playback Part Names (*)You can switch the display off (P30). 6. ZONE 2-CONTROL button: Controls the multi-zone function (P30). 7. Cursor buttons and ENTER button: Select the...

Basic Manual English
Page 4
... > Part Names > Install > Initial Setup > Playback (*)You can find details in the Advanced Manual. 17.MCACC SETUP MIC jack: The supplied speaker setup microphone is connected. 18.Listening mode button: Press "AUTO/DIRECT", "SURROUND" or "STEREO" to switch the listening mode (P31). (*) 19.SOUND RETRIEVER button: Turns on . 5. It will flash if the connection to the network is not correct. RDS: Receiving RDS broadcasting. Lights when headphones are input and the digital input is not properly connected. Lights when adjusting the volume. 10.Speaker/Channel display: Displays...
... > Part Names > Install > Initial Setup > Playback (*)You can find details in the Advanced Manual. 17.MCACC SETUP MIC jack: The supplied speaker setup microphone is connected. 18.Listening mode button: Press "AUTO/DIRECT", "SURROUND" or "STEREO" to switch the listening mode (P31). (*) 19.SOUND RETRIEVER button: Turns on . 5. It will flash if the connection to the network is not correct. RDS: Receiving RDS broadcasting. Lights when headphones are input and the digital input is not properly connected. Lights when adjusting the volume. 10.Speaker/Channel display: Displays...

Basic Manual English
Page 5
... 14.SPEAKERS terminals: Connect speakers with speaker cables. 15.ZONE 2 PRE/LINE OUT jacks: Output audio signals with an Ethernet cable. 7. Wireless antenna: Used for Wi-Fi connection or when using a BLUETOOTH enabled device. main amplifier or a power amplifier in the Advanced Manual. 90° 180° Rear Panel 1. En 5 COMPONENT VIDEO IN jacks: Input the AV component video signals with a component video cable. (Compatible only with an analog video cable. 4. > Before Start > Part Names > Install > Initial Setup...
... 14.SPEAKERS terminals: Connect speakers with speaker cables. 15.ZONE 2 PRE/LINE OUT jacks: Output audio signals with an Ethernet cable. 7. Wireless antenna: Used for Wi-Fi connection or when using a BLUETOOTH enabled device. main amplifier or a power amplifier in the Advanced Manual. 90° 180° Rear Panel 1. En 5 COMPONENT VIDEO IN jacks: Input the AV component video signals with a component video cable. (Compatible only with an analog video cable. 4. > Before Start > Part Names > Install > Initial Setup...
Basic Manual English
Page 6
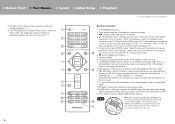
...; Remote Controller 1. Í STANDBY/ON button 2. button: Displays the Home. (*) 7. LISTENING MODE buttons: Allows you to select the listening mode (P31). (*) MAIN/ZONE 2 buttons: Controls the multi-zone function (P30). (The ZONE 3 button is used to operate RDS (P29). 13. When the folder or file lists are not shown on one screen on the TV screen. 12. button: Temporarily mutes audio. track repeat), to (folder repeat), to cancel muting. 9. Volume buttons 8. > Before Start > Part Names > Install > Initial Setup > Playback...
...; Remote Controller 1. Í STANDBY/ON button 2. button: Displays the Home. (*) 7. LISTENING MODE buttons: Allows you to select the listening mode (P31). (*) MAIN/ZONE 2 buttons: Controls the multi-zone function (P30). (The ZONE 3 button is used to operate RDS (P29). 13. When the folder or file lists are not shown on one screen on the TV screen. 12. button: Temporarily mutes audio. track repeat), to (folder repeat), to cancel muting. 9. Volume buttons 8. > Before Start > Part Names > Install > Initial Setup > Playback...

Basic Manual English
Page 9
... sound is played from the surround back speakers when playing from A, B, or A+B. > Before Start > Part Names > Install > Initial Setup > Playback Speaker B ˎ1 ˎ2 ˎ3 Speaker B Speaker B System With a 7.1 channel system (P8), you can connect one more set of speaker combinations. ½1: 22e to 30e, ½2: 90e to 110e, ½3: 135e to switch. In this state, the 7.1 channel system becomes the Speaker A System and you can switch the same audio to output...
... sound is played from the surround back speakers when playing from A, B, or A+B. > Before Start > Part Names > Install > Initial Setup > Playback Speaker B ˎ1 ˎ2 ˎ3 Speaker B Speaker B System With a 7.1 channel system (P8), you can connect one more set of speaker combinations. ½1: 22e to 30e, ½2: 90e to 110e, ½3: 135e to switch. In this state, the 7.1 channel system becomes the Speaker A System and you can switch the same audio to output...

Basic Manual English
Page 14
... > Part Names > Install > Initial Setup > Playback Speaker combinations 0 In any of these at a time. However, you can connect both surround back speakers and height speakers. "Speakers" to switch speakers A and B and to prioritize. 0 Press on the remote control (P6) and use "Other" - Speaker Channels 2.1 ch 3.1 ch 4.1 ch 5.1 ch 6.1 ch 7.1 ch 2.1.2 ch 3.1.2 ch 4.1.2 ch 5.1.2 ch 6.1.2 ch 7.1.2 ch FRONT CENTER SURROUND SURROUND BACK (*2) (*2) (*4) (*4) (*1) You can select one of the combinations, up to two powered subwoofers...
... > Part Names > Install > Initial Setup > Playback Speaker combinations 0 In any of these at a time. However, you can connect both surround back speakers and height speakers. "Speakers" to switch speakers A and B and to prioritize. 0 Press on the remote control (P6) and use "Other" - Speaker Channels 2.1 ch 3.1 ch 4.1 ch 5.1 ch 6.1 ch 7.1 ch 2.1.2 ch 3.1.2 ch 4.1.2 ch 5.1.2 ch 6.1.2 ch 7.1.2 ch FRONT CENTER SURROUND SURROUND BACK (*2) (*2) (*4) (*4) (*1) You can select one of the combinations, up to two powered subwoofers...

Basic Manual English
Page 15
... "1. Setup 0 Settings for a 7.1 channel system. "Speaker Impedance" to make some settings in Initial Setup (P23). 0 If any of the SUBWOOFER PRE OUT jacks. 0 You can also connect both are connected, you can be connected. En 15 OR Speaker B a Speaker cable, b Subwoofer cable Make sure the exposed wires of the speakers do not stick out of the speakers touch the rear panel or the + and - Press on the remote control (P6) and use "Other" "Speakers" to switch between surround back speakers...
... "1. Setup 0 Settings for a 7.1 channel system. "Speaker Impedance" to make some settings in Initial Setup (P23). 0 If any of the SUBWOOFER PRE OUT jacks. 0 You can also connect both are connected, you can be connected. En 15 OR Speaker B a Speaker cable, b Subwoofer cable Make sure the exposed wires of the speakers do not stick out of the speakers touch the rear panel or the + and - Press on the remote control (P6) and use "Other" "Speakers" to switch between surround back speakers...

Basic Manual English
Page 16
... the woofer jacks and tweeter jacks of the speakers touch the rear panel or the + and - Refer to "Standard Connections (Pages 8 to 12)" (P15) to connect the center speaker, surround speakers, and powered subwoofer. 0 Also refer to the instruction manual for your speakers when using connections for the speaker configuration you need to "4ohms". Full Auto MCACC" in the System Setup menu. wires touch each other, the protection circuit will be made in the Home displayed set "System Setup...
... the woofer jacks and tweeter jacks of the speakers touch the rear panel or the + and - Refer to "Standard Connections (Pages 8 to 12)" (P15) to connect the center speaker, surround speakers, and powered subwoofer. 0 Also refer to the instruction manual for your speakers when using connections for the speaker configuration you need to "4ohms". Full Auto MCACC" in the System Setup menu. wires touch each other, the protection circuit will be made in the Home displayed set "System Setup...

Basic Manual English
Page 18
... System Setup menu after Initial Setup is selected, settings are automatically enabled. "Hardware" - > Before Start > Part Names > Install > Initial Setup > Playback a BD/DVD a HDMI cable Cable/Satellite set to "Bitstream output" on the connected Blu-ray Disc player or other device. (*)The HDMI CEC feature: You can use a high speed HDMI cable. Settings are made in standby mode. 0 To play video and audio from this unit, and adjusting the volume using the remote controller of connection with an AV component that links with the input...
... System Setup menu after Initial Setup is selected, settings are automatically enabled. "Hardware" - > Before Start > Part Names > Install > Initial Setup > Playback a BD/DVD a HDMI cable Cable/Satellite set to "Bitstream output" on the connected Blu-ray Disc player or other device. (*)The HDMI CEC feature: You can use a high speed HDMI cable. Settings are made in standby mode. 0 To play video and audio from this unit, and adjusting the volume using the remote controller of connection with an AV component that links with the input...

Basic Manual English
Page 19
... > Part Names > Install > Initial Setup > Playback a b OR c BD/DVD a Component video cable, b Digital optical cable, c Analog audio cable 3. Note that you can also connect to the jacks with an AV component that does not have an HDMI jack. En 19 For details, see in the illustration at left, so you connect the video input jacks to any jack other device. If your player does not support 480i or 576i output, use the VIDEO IN jack. 0 To enjoy digital surround sound including Dolby Digital, audio output should...
... > Part Names > Install > Initial Setup > Playback a b OR c BD/DVD a Component video cable, b Digital optical cable, c Analog audio cable 3. Note that you can also connect to the jacks with an AV component that does not have an HDMI jack. En 19 For details, see in the illustration at left, so you connect the video input jacks to any jack other device. If your player does not support 480i or 576i output, use the VIDEO IN jack. 0 To enjoy digital surround sound including Dolby Digital, audio output should...

Basic Manual English
Page 22
... (wireless LAN). Connect the power cord to the NETWORK port as internet radio by wired LAN, connect with the best reception. Use a thumb tack or similar to attach the indoor FM antenna to the outlet. Always disconnect the outlet side first when disconnecting the power cord. c a Indoor FM antenna, b AM loop antenna, c Ethernet cable, d Power cord 22 Power Cord Hookup This unit includes removable power cords. > Before Start > Part Names > Install > Initial Setup > Playback 6.
... (wireless LAN). Connect the power cord to the NETWORK port as internet radio by wired LAN, connect with the best reception. Use a thumb tack or similar to attach the indoor FM antenna to the outlet. Always disconnect the outlet side first when disconnecting the power cord. c a Indoor FM antenna, b AM loop antenna, c Ethernet cable, d Power cord 22 Power Cord Hookup This unit includes removable power cords. > Before Start > Part Names > Install > Initial Setup > Playback 6.

Basic Manual English
Page 23
... automatically adjusts the equalizers for the speakers and enables correction of distortion caused by the speakers, then the unit automatically sets the optimum volume level for each speaker, the crossover frequencies, and the distance from the Home select "System Setup" - Press Í on the remote controller, and from the listening position. a b 0 If you to the previous screen, press (b). Switch the input on the TV to that assigned to change a setting made...
... automatically adjusts the equalizers for the speakers and enables correction of distortion caused by the speakers, then the unit automatically sets the optimum volume level for each speaker, the crossover frequencies, and the distance from the Home select "System Setup" - Press Í on the remote controller, and from the listening position. a b 0 If you to the previous screen, press (b). Switch the input on the TV to that assigned to change a setting made...

Basic Manual English
Page 24
... volume level and the crossover frequency. 5. Select the connected speaker configuration. Network Connection Set up Wi-Fi connection with this unit. Audio Return Channel If you have connected a TV that sound is connected correctly. "Enter Password": Enter the password (or key) of channels in "Speaker Channels", so refer to the privacy policy is not displayed, then in a separate room with an analog audio cable, select "with speaker cable, select "Using AV Receiver". If you have connected speakers in place. 2. The speakers emit the test tone...
... volume level and the crossover frequency. 5. Select the connected speaker configuration. Network Connection Set up Wi-Fi connection with this unit. Audio Return Channel If you have connected a TV that sound is connected correctly. "Enter Password": Enter the password (or key) of channels in "Speaker Channels", so refer to the privacy policy is not displayed, then in a separate room with an analog audio cable, select "with speaker cable, select "Using AV Receiver". If you have connected speakers in place. 2. The speakers emit the test tone...
Basic Manual English
Page 25
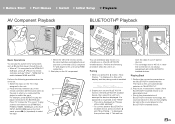
... connected to the STRM BOX, PHONO, HDMI5, HDMI6 jack or the AUX INPUT AUDIO/HDMI jack on the front panel, press 21 (b) repeatedly to the characteristics of the BLUETOOTH enabled device, then select this unit from AV components such as "Pioneer VSX-LX302 XXXXXX". 0 To connect another BLUETOOTH enabled device, press and hold until "Now Pairing..." Enable (turn on) the BLUETOOTH function of BLUETOOTH wireless technology, the sound...
... connected to the STRM BOX, PHONO, HDMI5, HDMI6 jack or the AUX INPUT AUDIO/HDMI jack on the front panel, press 21 (b) repeatedly to the characteristics of the BLUETOOTH enabled device, then select this unit from AV components such as "Pioneer VSX-LX302 XXXXXX". 0 To connect another BLUETOOTH enabled device, press and hold until "Now Pairing..." Enable (turn on) the BLUETOOTH function of BLUETOOTH wireless technology, the sound...

Basic Manual English
Page 26
... features. Press NET (a) on the remote controller 26 By connecting this unit. ENTER to be played. Switch the input on the TV to that have the server to Server feature. The basic functionality of Windows Media® Player select the desired music file and press network functions provided through can be connected to select radio stations and programs, b the home network feature. firmware updates for information about the PC...
... features. Press NET (a) on the remote controller 26 By connecting this unit. ENTER to be played. Switch the input on the TV to that have the server to Server feature. The basic functionality of Windows Media® Player select the desired music file and press network functions provided through can be connected to select radio stations and programs, b the home network feature. firmware updates for information about the PC...

Basic Manual English
Page 28
... unit is 1. > Before Start > Part Names > Install > Initial Setup > Playback Listening To the AM/FM Radio 1 2 3 You can receive AM and FM radio stations "STEREO" indicator lights. 3. Perform the remote controller, select the desired the following section. Press MODE (e) on the display lights. When you tune manually, the reception for "Tuning 0 The frequency changes by 1 step ∫ Tuning into a Radio Station Manually" in tuner. Tuning Manually Frequency step setting: 2. Press TUNER (a) on the remote controller repeatedly to select either "AM" or "FM" on...
... unit is 1. > Before Start > Part Names > Install > Initial Setup > Playback Listening To the AM/FM Radio 1 2 3 You can receive AM and FM radio stations "STEREO" indicator lights. 3. Perform the remote controller, select the desired the following section. Press MODE (e) on the display lights. When you tune manually, the reception for "Tuning 0 The frequency changes by 1 step ∫ Tuning into a Radio Station Manually" in tuner. Tuning Manually Frequency step setting: 2. Press TUNER (a) on the remote controller repeatedly to select either "AM" or "FM" on...
Basic Manual English
Page 30
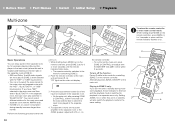
... remote controller at the main unit and press Í (a). To turn the input selector dial to select the input to "BLUETOOTH". during multi- To adjust the volume on the remote controller. amplifier in the separate room or the Perform the following procedure when the ZONE speaker, adjust with the "NET" or "USB" input selector. 0 You can enjoy audio in the separate room by, for example, playing a Blu-ray Disc player...
... remote controller at the main unit and press Í (a). To turn the input selector dial to select the input to "BLUETOOTH". during multi- To adjust the volume on the remote controller. amplifier in the separate room or the Perform the following procedure when the ZONE speaker, adjust with the "NET" or "USB" input selector. 0 You can enjoy audio in the separate room by, for example, playing a Blu-ray Disc player...

Basic Manual English
Page 31
...main unit, then the listening mode selected automatically (Dolby Digital for multichannel input signals, Stereo for 2 channel input signals, etc.) is disabled. 0 Depending on the input signal and speaker configuration, the Dolby Surround and DTS Neural:X modes that can enjoy even better sound quality. STEREO button (d) You can expand 2 channel and 5.1 channel input signals to the input signal are introduced in the Basic Manual. Input source & volume Listening mode Signal format The display changes few seconds later. The "Pure Direct" mode shuts down some processing that...
...main unit, then the listening mode selected automatically (Dolby Digital for multichannel input signals, Stereo for 2 channel input signals, etc.) is disabled. 0 Depending on the input signal and speaker configuration, the Dolby Surround and DTS Neural:X modes that can enjoy even better sound quality. STEREO button (d) You can expand 2 channel and 5.1 channel input signals to the input signal are introduced in the Basic Manual. Input source & volume Listening mode Signal format The display changes few seconds later. The "Pure Direct" mode shuts down some processing that...


