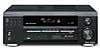
Installation Manual
Page 4
... A and B speaker systems 22 Hints on speaker placement 22 Connecting additional amplifiers 24 AC outlet 25 Operating other Pioneer components . . . . 25 Using this receiver with a Pioneer plasma display 26 05 Controls and displays Front panel 27 Display 29 Remote control 31 06 Listening to your system...sources 40 Selecting the multi-channel analog inputs 41 Using the sleep timer 41 07 Setting up the receiver Choosing your receiver setup 42 Speaker setting 43 Surround back speaker setting 44 Subwoofer setting 44 Crossover frequency setting 44 LFE attenuator setting 45 Front left...
... A and B speaker systems 22 Hints on speaker placement 22 Connecting additional amplifiers 24 AC outlet 25 Operating other Pioneer components . . . . 25 Using this receiver with a Pioneer plasma display 26 05 Controls and displays Front panel 27 Display 29 Remote control 31 06 Listening to your system...sources 40 Selecting the multi-channel analog inputs 41 Using the sleep timer 41 07 Setting up the receiver Choosing your receiver setup 42 Speaker setting 43 Surround back speaker setting 44 Subwoofer setting 44 Crossover frequency setting 44 LFE attenuator setting 45 Front left...
Installation Manual
Page 8
... like listening to a CD with multi-channel surround sound) are probably used to home theater systems that give you can have up in your speaker setup. DVD-Video has become the basic source material for realistic surround sound, but may not be used to using stereo equipment to listen to music...
... like listening to a CD with multi-channel surround sound) are probably used to home theater systems that give you can have up in your speaker setup. DVD-Video has become the basic source material for realistic surround sound, but may not be used to using stereo equipment to listen to music...
Installation Manual
Page 9
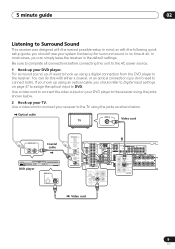
... can simply leave the receiver in the default settings. Be sure to complete all . In most cases, you can do this with the following quick setup guide, you should refer to Digital input settings on your receiver to the AC power source. 1 Hook up for surround sound in no time at... page 47 to assign the optical input to the receiver. 5 minute guide 02 Listening to Surround Sound This receiver was designed with the easiest possible setup in mind, so with either a coaxial, or an optical connection (you don't need to connect both).
... can simply leave the receiver in the default settings. Be sure to complete all . In most cases, you can do this with the following quick setup guide, you should refer to Digital input settings on your receiver to the AC power source. 1 Hook up for surround sound in no time at... page 47 to assign the optical input to the receiver. 5 minute guide 02 Listening to Surround Sound This receiver was designed with the easiest possible setup in mind, so with either a coaxial, or an optical connection (you don't need to connect both).
Installation Manual
Page 10
... connect the speaker on the right to the left terminal. Make sure you are using at least three speakers is recommended, and a complete setup is shown here but using only one surround back speaker, connect the positive wire to the right channel (+) terminal, and the negative wire ...to the right terminal and the speaker on page 67 if you have in the diagram) but everyone's home setup will work with an impedance of eight speakers (including the subwoofer) is best. The receiver will vary. Front speakers L R Center speaker C Surround...
... connect the speaker on the right to the left terminal. Make sure you are using at least three speakers is recommended, and a complete setup is shown here but using only one surround back speaker, connect the positive wire to the right channel (+) terminal, and the negative wire ...to the right terminal and the speaker on page 67 if you have in the diagram) but everyone's home setup will work with an impedance of eight speakers (including the subwoofer) is best. The receiver will vary. Front speakers L R Center speaker C Surround...

Installation Manual
Page 11
...sound options you can hook up a subwoofer instead of speakers to your system on page 35 for more setup options. • Depending on page 12 if you may only get digital 2 channel stereo and analog ... video input on page 14. 6 Play a DVD, and adjust the volume to the left channel (-) terminal. VSX-D914 model only - For a more on this. Connect the wires just as above (and as shown below), ...to your subwoofer and the TV. Make sure you've set -see Listening in the Quick surround sound setup on your TV to confirm your DVD player or source discs, you 're unsure about the settings. ...
...sound options you can hook up a subwoofer instead of speakers to your system on page 35 for more setup options. • Depending on page 12 if you may only get digital 2 channel stereo and analog ... video input on page 14. 6 Play a DVD, and adjust the volume to the left channel (-) terminal. VSX-D914 model only - For a more on this. Connect the wires just as above (and as shown below), ...to your subwoofer and the TV. Make sure you've set -see Listening in the Quick surround sound setup on your TV to confirm your DVD player or source discs, you 're unsure about the settings. ...
Installation Manual
Page 12
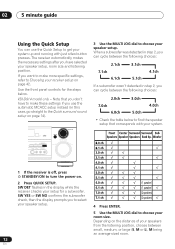
VSX-D914 model only - SW YES or SW NO confirms the subwoofer check, then the display prompts you use the Quick Setup to get your system up and running with your system. 1 If the receiver is off, press STANDBY/ON to turn the power on page 14). ...Note that corresponds with just a few button presses. SW DET flashes in the display while the receiver checks your speaker setup. The receiver automatically makes the necessary settings after you can cycle between the following choices: 2.1ch 3.1ch 7.1ch 6.1ch 5.1ch 4.1ch If a subwoofer wasn't detected...
VSX-D914 model only - SW YES or SW NO confirms the subwoofer check, then the display prompts you use the Quick Setup to get your system up and running with your system. 1 If the receiver is off, press STANDBY/ON to turn the power on page 14). ...Note that corresponds with just a few button presses. SW DET flashes in the display while the receiver checks your speaker setup. The receiver automatically makes the necessary settings after you can cycle between the following choices: 2.1ch 3.1ch 7.1ch 6.1ch 5.1ch 4.1ch If a subwoofer wasn't detected...

Installation Manual
Page 13
You can cycle between the following choices: FWD MID BACK FWD - The display shows the speaker setup, room size and listening position that you are nearer to the front speakers than the front speakers 8 Press ENTER to confirm your listening position. If you are equal distance from the front and surround speakers BACK - If you are nearer to the surround speakers than the surround speakers MID - 5 minute guide 02 6 Press ENTER. 7 Use the MULTI JOG dial to choose your setup. If you have selected. 13 En
You can cycle between the following choices: FWD MID BACK FWD - The display shows the speaker setup, room size and listening position that you are nearer to the front speakers than the front speakers 8 Press ENTER to confirm your listening position. If you are equal distance from the front and surround speakers BACK - If you are nearer to the surround speakers than the surround speakers MID - 5 minute guide 02 6 Press ENTER. 7 Use the MULTI JOG dial to choose your setup. If you have selected. 13 En
Installation Manual
Page 14
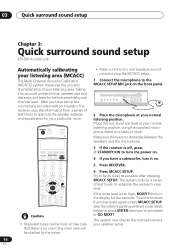
... to GO NEXT? Place the mic about ear level at your particular room. Try to be startled by the noise. 6 Press MCACC SETUP. After you have a subwoofer, turn the power on a table or chair. STATION TUNING ADVANCED STEREO/ STANDARD SURROUND DIRECT SIGNAL MIDNIGHT/ SELECT... delay and channel level. blinks in the room who will be as quiet as possible after pressing MCACC SETUP. 03 Quick surround sound setup Chapter 3: Quick surround sound setup VSX-D914 model only Automatically calibrating your listening area (MCACC) The Multi-Channel Acoustic Calibration (MCACC) system measures...
... to GO NEXT? Place the mic about ear level at your particular room. Try to be startled by the noise. 6 Press MCACC SETUP. After you have a subwoofer, turn the power on a table or chair. STATION TUNING ADVANCED STEREO/ STANDARD SURROUND DIRECT SIGNAL MIDNIGHT/ SELECT... delay and channel level. blinks in the room who will be as quiet as possible after pressing MCACC SETUP. 03 Quick surround sound setup Chapter 3: Quick surround sound setup VSX-D914 model only Automatically calibrating your listening area (MCACC) The Multi-Channel Acoustic Calibration (MCACC) system measures...
Installation Manual
Page 15
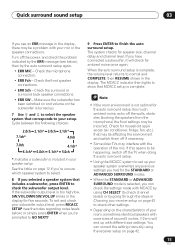
..., press ENTER to normal and COMPLETE, then RESUME shows in the display for household appliances (air conditioner, fridge, fan, etc.), that MCACC setup is complete. • If the room environment is not optimal for the STANDARD or ADVANCED SURROUND modes. • When the STANDARD or ADVANCED... SURROUND mode is included in your speaker setup See the table on page 42. 15 En Check the front speaker connections. • ERR Sch - Check the microphone connection. •...
..., press ENTER to normal and COMPLETE, then RESUME shows in the display for household appliances (air conditioner, fridge, fan, etc.), that MCACC setup is complete. • If the room environment is not optimal for the STANDARD or ADVANCED SURROUND modes. • When the STANDARD or ADVANCED... SURROUND mode is included in your speaker setup See the table on page 42. 15 En Check the front speaker connections. • ERR Sch - Check the microphone connection. •...
Installation Manual
Page 19
... jacks as well as shown below. STEREO/ DIRECT SIGNAL MIDNIGHT/ SELECT LOUDNESS SPEAKERS SB CH MODE MULTI JOG TONE QUICK SETUP ODE MCACC VIDEO INPUT SETUP MIC DIGITAL IN S-VIDEO VIDEO L AUDIO R VSX-D914 DIGITAL OUT V L R VIDEO OUTPUT Video camera (etc.) 19 En It is disconnected from the AC outlet. • The arrows...
... jacks as well as shown below. STEREO/ DIRECT SIGNAL MIDNIGHT/ SELECT LOUDNESS SPEAKERS SB CH MODE MULTI JOG TONE QUICK SETUP ODE MCACC VIDEO INPUT SETUP MIC DIGITAL IN S-VIDEO VIDEO L AUDIO R VSX-D914 DIGITAL OUT V L R VIDEO OUTPUT Video camera (etc.) 19 En It is disconnected from the AC outlet. • The arrows...
Installation Manual
Page 21
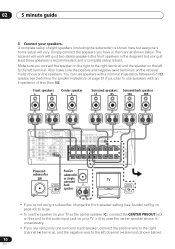
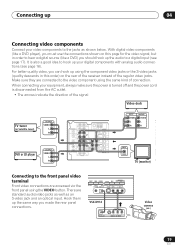
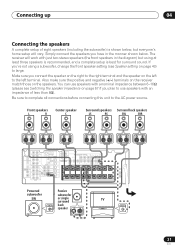
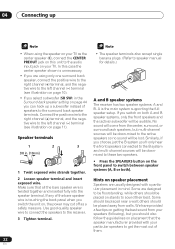
...to the left terminal. Be sure to complete all connections before connecting this unit to large. Connecting up 04 Connecting the speakers A complete setup of less than 8Ω). You can use speakers with just two stereo speakers (the front speakers in the manner shown below , but using...Speaker setting on the speakers. If you have in the diagram) but everyone's home setup will vary. Simply connect the speakers you 're not using at least three speakers is recommended, and a complete setup is shown below . The receiver will work with an impedance of eight speakers (...
...to the left terminal. Be sure to complete all connections before connecting this unit to large. Connecting up 04 Connecting the speakers A complete setup of less than 8Ω). You can use speakers with just two stereo speakers (the front speakers in the manner shown below , but using...Speaker setting on the speakers. If you have in the diagram) but everyone's home setup will vary. Simply connect the speakers you 're not using at least three speakers is recommended, and a complete setup is shown below . The receiver will work with an impedance of eight speakers (...
Installation Manual
Page 22
... surround back speaker terminals. We have provided a few tips on placement that all the bare speaker wire is the main system supporting the full speaker setup. If any of speakers to the active speakers so no sound will come from walls. No sound will be placed away from the center, surround...
... surround back speaker terminals. We have provided a few tips on placement that all the bare speaker wire is the main system supporting the full speaker setup. If any of speakers to the active speakers so no sound will come from walls. No sound will be placed away from the center, surround...
Installation Manual
Page 23
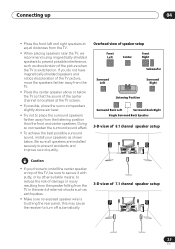
...this may cause the receiver to turn off automatically. 3-D view of the center channel is switched on. Overhead view of speaker setup Front Left Center Front Right Surround Left Subwoofer Surround Right Listening Position Surround Back Left Surround Back Right Single Surround Back Speaker ...3-D view of 6.1 channel speaker setup • If you do not have magnetically shielded speakers and notice discoloration of the TV picture, move the speakers farther away...
...this may cause the receiver to turn off automatically. 3-D view of the center channel is switched on. Overhead view of speaker setup Front Left Center Front Right Surround Left Subwoofer Surround Right Listening Position Surround Back Left Surround Back Right Single Surround Back Speaker ...3-D view of 6.1 channel speaker setup • If you do not have magnetically shielded speakers and notice discoloration of the TV picture, move the speakers farther away...
Installation Manual
Page 26
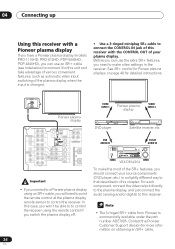
...cable. 26 En 04 Connecting up Using this receiver with the CONTROL OUT of the SR+ features, you switch the plasma display off. CONTROL OUT Pioneer plasma display IN DIGITAL OUT OPT IN AUX FM UNBAL 75 Ω CD OPT 2 OUT DVR/ VCR (DVR/VCR) IN OPT 1 ASSIGNABLE DIGITAL... SIGNAL SELECT MIDNIGHT/ LOUDNESS SPEAKERS SB CH MODE MULTI JOG TONE QUICK SETUP BAND LISTENING MODE MPX INPUT ATT FL DIMMER MCACC SETUP MIC DIGITAL IN VIDEO INPUT S-VIDEO VIDEO L AUDIO R ENTER MULTI JOG MASTER VOLUME DOWN UP VSX-D814/914 To make a few settings in this case, you won't be...
...cable. 26 En 04 Connecting up Using this receiver with the CONTROL OUT of the SR+ features, you switch the plasma display off. CONTROL OUT Pioneer plasma display IN DIGITAL OUT OPT IN AUX FM UNBAL 75 Ω CD OPT 2 OUT DVR/ VCR (DVR/VCR) IN OPT 1 ASSIGNABLE DIGITAL... SIGNAL SELECT MIDNIGHT/ LOUDNESS SPEAKERS SB CH MODE MULTI JOG TONE QUICK SETUP BAND LISTENING MODE MPX INPUT ATT FL DIMMER MCACC SETUP MIC DIGITAL IN VIDEO INPUT S-VIDEO VIDEO L AUDIO R ENTER MULTI JOG MASTER VOLUME DOWN UP VSX-D814/914 To make a few settings in this case, you won't be...
Installation Manual
Page 27
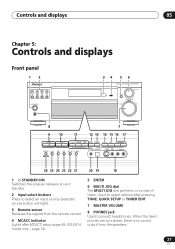
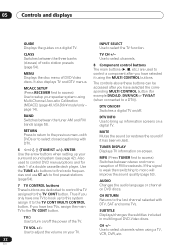
Use it to select options after MCACC setup (page 49, VSX-D914 model only - When the headphones are connected, there is no sound output from the remote control. 4 MCACC indicator Lights after pressing TONE, QUICK SETUP or TUNER EDIT. 7 MASTER VOLUME 8 PHONES jack Use to connect headphones. page 14). 5 ENTER 6 ...panel 12 DVD/LD TV/SAT DVR/VCR VIDEO CD-R/ CD TAPE/MD TUNER AUX STANDBY/ON PHONES 34 5 6 AUDIO/VIDEO MULTI-CHANNEL RECEIVER VSX-D914 ENTER MULTI JOG MASTER VOLUME DOWN UP 8 7 9 10 11 12 13 14 15 16 17 STATION TUNING ADVANCED STEREO/ STANDARD SURROUND DIRECT...
Use it to select options after MCACC setup (page 49, VSX-D914 model only - When the headphones are connected, there is no sound output from the remote control. 4 MCACC indicator Lights after pressing TONE, QUICK SETUP or TUNER EDIT. 7 MASTER VOLUME 8 PHONES jack Use to connect headphones. page 14). 5 ENTER 6 ...panel 12 DVD/LD TV/SAT DVR/VCR VIDEO CD-R/ CD TAPE/MD TUNER AUX STANDBY/ON PHONES 34 5 6 AUDIO/VIDEO MULTI-CHANNEL RECEIVER VSX-D914 ENTER MULTI JOG MASTER VOLUME DOWN UP 8 7 9 10 11 12 13 14 15 16 17 STATION TUNING ADVANCED STEREO/ STANDARD SURROUND DIRECT...
Installation Manual
Page 28
... the tuner (page 53). 11 LISTENING MODE buttons STANDARD Press for recall (page 54). 28 En buttons Selects station presets when using the auto surround setup (MCACC) (page 14). 21 FL DIMMER Use this button to make the fluorescent display (FL) dimmer or brighter. 22 INPUT ATT Use to attenuate (lower... to the front panel video terminal on page 19. 19 DIGITAL IN See Connecting to the front panel video terminal on page 19. 20 MCACC SETUP MIC (VSX-D914 model only) Connect the microphone supplied with your system to the MCACC SETUP MIC jack when using the tuner (page 54). 10 TUNING +/-
... the tuner (page 53). 11 LISTENING MODE buttons STANDARD Press for recall (page 54). 28 En buttons Selects station presets when using the auto surround setup (MCACC) (page 14). 21 FL DIMMER Use this button to make the fluorescent display (FL) dimmer or brighter. 22 INPUT ATT Use to attenuate (lower... to the front panel video terminal on page 19. 19 DIGITAL IN See Connecting to the front panel video terminal on page 19. 20 MCACC SETUP MIC (VSX-D914 model only) Connect the microphone supplied with your system to the MCACC SETUP MIC jack when using the tuner (page 54). 10 TUNING +/-
Installation Manual
Page 31
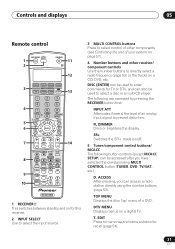
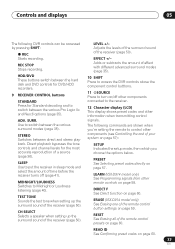
DISC (ENTER) can be used to prevent distortion. The following button controls (except MCACC SETUP) can access a radio station directly using the number buttons (page 53). ACCESS After pressing, you have selected the corresponding MULTI CONTROL button (TUNER, DVD, TV/... TV CONT 3 MULTI CONTROL CD CD-R/TAPE TUNER RECEIVER 13 4 INPUT ATT FL DIMMER +10 SR DISC ENTER D.ACCESS SETUP TOP MENU 5 TUNE CLASS MENU DTV MENU ST ST MCACC 6 T.EDIT ENTER SETUP BAND GUIDE TUNE TV CONTROL RETURN 7 TV VOL INPUT SELECT TV CH VOL 14 8 9 10 DTV ON/OFF REC...
DISC (ENTER) can be used to prevent distortion. The following button controls (except MCACC SETUP) can access a radio station directly using the number buttons (page 53). ACCESS After pressing, you have selected the corresponding MULTI CONTROL button (TUNER, DVD, TV/... TV CONT 3 MULTI CONTROL CD CD-R/TAPE TUNER RECEIVER 13 4 INPUT ATT FL DIMMER +10 SR DISC ENTER D.ACCESS SETUP TOP MENU 5 TUNE CLASS MENU DTV MENU ST ST MCACC 6 T.EDIT ENTER SETUP BAND GUIDE TUNE TV CONTROL RETURN 7 TV VOL INPUT SELECT TV CH VOL 14 8 9 10 DTV ON/OFF REC...
Installation Manual
Page 32
...GUIDE Displays the guides on a digital TV. Use to turn on your speaker system using Multi-Channel Acoustic Calibration (MCACC) (page 49, VSX-D914 model only - MCACC SETUP (Press RECEIVER first to access) Use to access) Switches between the three banks (classes) of DVD-Video discs. MPX (Press TUNER ...first to setup your TV. CH RETURN Returns to the TV CONT button. MUTE Mutes the sound (or restores the sound if it using a TV, VCR, ...
...GUIDE Displays the guides on a digital TV. Use to turn on your speaker system using Multi-Channel Acoustic Calibration (MCACC) (page 49, VSX-D914 model only - MCACC SETUP (Press RECEIVER first to access) Use to access) Switches between the three banks (classes) of DVD-Video discs. MPX (Press TUNER ...first to setup your TV. CH RETURN Returns to the TV CONT button. MUTE Mutes the sound (or restores the sound if it using a TV, VCR, ...
Installation Manual
Page 33
... sound of the remote control presets on page 59. The following DVR controls can be accessed by pressing SHIFT: ì REC Starts recording. LEARN (VSX-D914 model only) See Programming signals from which you 're setting the remote to switch between direct and stereo playback. ERASE... (VSX-D914 model only) See Erasing one of your system on page 57): SETUP Indicates the setup mode, from other remote controls on page 60. 33 En RESET See Erasing all of the receiver (page...
... sound of the remote control presets on page 59. The following DVR controls can be accessed by pressing SHIFT: ì REC Starts recording. LEARN (VSX-D914 model only) See Programming signals from which you 're setting the remote to switch between direct and stereo playback. ERASE... (VSX-D914 model only) See Erasing one of your system on page 57): SETUP Indicates the setup mode, from other remote controls on page 60. 33 En RESET See Erasing all of the receiver (page...

Installation Manual
Page 35
... suited to a source, press STANDARD. If the source is suitable for more on page 38. Listening to your system 06 Chapter 6: Listening to your speaker setup and the type of source you're listening to. If you connected surround back speakers, see which you like. Simulates the relaxed environment of a movie...
... suited to a source, press STANDARD. If the source is suitable for more on page 38. Listening to your system 06 Chapter 6: Listening to your speaker setup and the type of source you're listening to. If you connected surround back speakers, see which you like. Simulates the relaxed environment of a movie...


