Installation Manual
Page 2
...accordance with the product will not occur in a particular installation. Consult the dealer or an experienced radio/TV technician for buying this Pioneer product. D8-10-1-2_En This Class B digital apparatus complies with electric appliances such as an electrical shock hazard could exist if connected..."Neo:6" are trademarks of as radios and televisions, use shielded cables and connectors for future reference. The cut-off and on the power supply cord of the FCC Rules. This equipment generates, uses, and can be removed and appropriate one or more of Dolby Laboratories....
...accordance with the product will not occur in a particular installation. Consult the dealer or an experienced radio/TV technician for buying this Pioneer product. D8-10-1-2_En This Class B digital apparatus complies with electric appliances such as an electrical shock hazard could exist if connected..."Neo:6" are trademarks of as radios and televisions, use shielded cables and connectors for future reference. The cut-off and on the power supply cord of the FCC Rules. This equipment generates, uses, and can be removed and appropriate one or more of Dolby Laboratories....
Installation Manual
Page 3
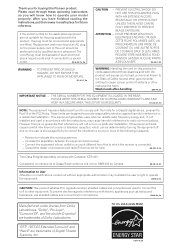
... to. WALL OR CEILING MOUNTING - A ANTENNA DISCHARGE UNIT (NEC SECTION 810-20) GROUNDING CONDUCTORS (NEC SECTION 810-21) GROUND CLAMPS POWER SERVICE GROUNDING ELECTRODE SYSTEM (NEC ART 250, PART H) NEC - NO USER-SERVICEABLE PARTS INSIDE. The safety and operating instructions should be ...product should use attachments not recommended by the manufacturer or have the same characteristics as an improper adjustment of other electric light or power circuits, or where it will prevent damage to the product due to your home, consult your electrician to qualified service personnel....
... to. WALL OR CEILING MOUNTING - A ANTENNA DISCHARGE UNIT (NEC SECTION 810-20) GROUNDING CONDUCTORS (NEC SECTION 810-21) GROUND CLAMPS POWER SERVICE GROUNDING ELECTRODE SYSTEM (NEC ART 250, PART H) NEC - NO USER-SERVICEABLE PARTS INSIDE. The safety and operating instructions should be ...product should use attachments not recommended by the manufacturer or have the same characteristics as an improper adjustment of other electric light or power circuits, or where it will prevent damage to the product due to your home, consult your electrician to qualified service personnel....
Installation Manual
Page 9
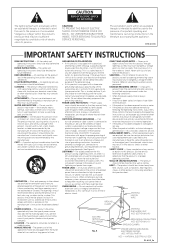
.... For surround sound, you can do this unit to the receiver. If you hook up using a digital connection from the DVD player to the AC power source. 1 Hook up for surround sound in the default settings.
.... For surround sound, you can do this unit to the receiver. If you hook up using a digital connection from the DVD player to the AC power source. 1 Hook up for surround sound in the default settings.
Installation Manual
Page 10
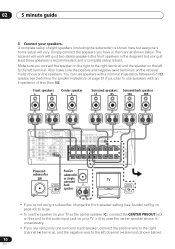
... PR Y PB PR R R CENTER (T V / SAT)IN ø FRONT SURROUND PREOUT S R FRONT L P E A K A E R CENTER R SURROUND BACK L R SURROUND L SINGLE SEE INSTRUCTION MANUAL R FRONT L B IN PLAY S R AUDIO L AC OUTLET Powered Passive subwoofer subwoofer SW or single surround INPUT back speaker TV AUDIO IN • If you connect the speaker on the right to the left...
... PR Y PB PR R R CENTER (T V / SAT)IN ø FRONT SURROUND PREOUT S R FRONT L P E A K A E R CENTER R SURROUND BACK L R SURROUND L SINGLE SEE INSTRUCTION MANUAL R FRONT L B IN PLAY S R AUDIO L AC OUTLET Powered Passive subwoofer subwoofer SW or single surround INPUT back speaker TV AUDIO IN • If you connect the speaker on the right to the left...
Installation Manual
Page 12
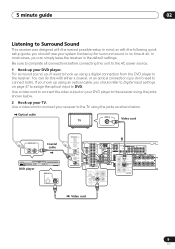
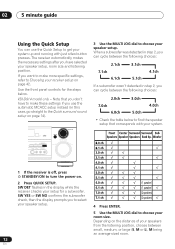
VSX-D914 model only - SPEAKERS SB CH MODE MULTI JOG TONE QUICK SETUP VIDEO INPUT S-VIDEO VIDEO L AUDIO R ENTER MULTI JOG MASTER VOLUME DOWN UP 3 Use ... setup. The receiver automatically makes the necessary settings after you to select your speaker setup. 4 Press ENTER. 5 Use the MULTI JOG dial to turn the power on page 14). SW DET flashes in the display while the receiver checks your speaker setup, room size and listening position. When a subwoofer was detected...
VSX-D914 model only - SPEAKERS SB CH MODE MULTI JOG TONE QUICK SETUP VIDEO INPUT S-VIDEO VIDEO L AUDIO R ENTER MULTI JOG MASTER VOLUME DOWN UP 3 Use ... setup. The receiver automatically makes the necessary settings after you to select your speaker setup. 4 Press ENTER. 5 Use the MULTI JOG dial to turn the power on page 14). SW DET flashes in the display while the receiver checks your speaker setup, room size and listening position. When a subwoofer was detected...
Installation Manual
Page 14
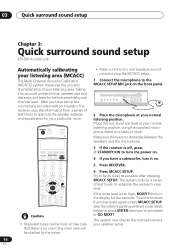
... CD-R/TAPE TUNER RECEIVER 3 If the receiver is too high, NOISY! 03 Quick surround sound setup Chapter 3: Quick surround sound setup VSX-D914 model only Automatically calibrating your listening area (MCACC) The Multi-Channel Acoustic Calibration (MCACC) system measures the acoustic characteristics of your listening...Place the mic about ear level at your normal listening position using the supplied microphone stand on . 4 If you have a subwoofer, turn the power on a table or chair. Try to the MCACC SETUP MIC jack on . 5 Press RECEIVER. Make sure there are not moved during the MCACC...
... CD-R/TAPE TUNER RECEIVER 3 If the receiver is too high, NOISY! 03 Quick surround sound setup Chapter 3: Quick surround sound setup VSX-D914 model only Automatically calibrating your listening area (MCACC) The Multi-Channel Acoustic Calibration (MCACC) system measures the acoustic characteristics of your listening...Place the mic about ear level at your normal listening position using the supplied microphone stand on . 4 If you have a subwoofer, turn the power on a table or chair. Try to the MCACC SETUP MIC jack on . 5 Press RECEIVER. Make sure there are not moved during the MCACC...
Installation Manual
Page 15
... noise, echo off the walls, obstacles blocking the speakers from the microphone) the final settings may be affecting the environment and switch them off the power, and check the problem indicated by going through the steps in Choosing your mic or the speaker connections. When the auto surround setup is too...
... noise, echo off the walls, obstacles blocking the speakers from the microphone) the final settings may be affecting the environment and switch them off the power, and check the problem indicated by going through the steps in Choosing your mic or the speaker connections. When the auto surround setup is too...
Installation Manual
Page 16
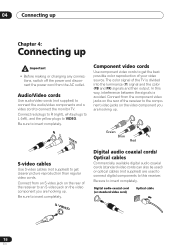
... receiver to an S-video jack on the video component you are hooking up • Before making or changing any connections, switch off the power and disconnect the power cord from an S-video jack on the rear of the TV is avoided. Be sure to this way, interference between the signals is divided...
... receiver to an S-video jack on the video component you are hooking up • Before making or changing any connections, switch off the power and disconnect the power cord from an S-video jack on the rear of the TV is avoided. Be sure to this way, interference between the signals is divided...
Installation Manual
Page 17
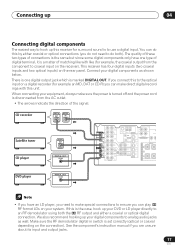
... Connecting digital components The easiest way to hook up this receiver for example an MD, DAT or CD-R) you can make sure the power is turned off and the power cord is marked DIGITAL OUT. There is one type of the signal. Make sure the RF demodulator digital in switch is the...
... Connecting digital components The easiest way to hook up this receiver for example an MD, DAT or CD-R) you can make sure the power is turned off and the power cord is marked DIGITAL OUT. There is one type of the signal. Make sure the RF demodulator digital in switch is the...
Installation Manual
Page 18
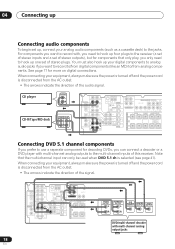
... component for decoding DVDs, you want to record with, you only need to hook up , connect your equipment, always make sure the power is turned off and the power cord is disconnected from the AC outlet. • The arrows indicate the direction of the signal. 18 En IN DIGITAL OUT OPT IN... (such as a cassette deck) to the jacks. Note that only play, you need to hook up your equipment, always make sure the power is turned off and the power cord is selected (see page 41). 04 Connecting up Connecting audio components To begin set up four plugs to the receiver (a set of...
... component for decoding DVDs, you want to record with, you only need to hook up , connect your equipment, always make sure the power is turned off and the power cord is disconnected from the AC outlet. • The arrows indicate the direction of the signal. 18 En IN DIGITAL OUT OPT IN... (such as a cassette deck) to the jacks. Note that only play, you need to hook up your equipment, always make sure the power is turned off and the power cord is selected (see page 41). 04 Connecting up Connecting audio components To begin set up four plugs to the receiver (a set of...
Installation Manual
Page 19
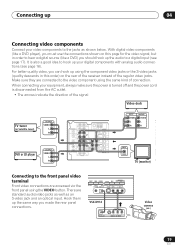
... video components Connect your digital components with analog audio connections (see page 17). When connecting your equipment, always make sure the power is turned off and the power cord is also a good idea to hook up your video components to the jacks as an S-video jack and an optical ...input. STEREO/ DIRECT SIGNAL MIDNIGHT/ SELECT LOUDNESS SPEAKERS SB CH MODE MULTI JOG TONE QUICK SETUP ODE MCACC VIDEO INPUT SETUP MIC DIGITAL IN S-VIDEO VIDEO L AUDIO R VSX...
... video components Connect your digital components with analog audio connections (see page 17). When connecting your equipment, always make sure the power is turned off and the power cord is also a good idea to hook up your video components to the jacks as an S-video jack and an optical ...input. STEREO/ DIRECT SIGNAL MIDNIGHT/ SELECT LOUDNESS SPEAKERS SB CH MODE MULTI JOG TONE QUICK SETUP ODE MCACC VIDEO INPUT SETUP MIC DIGITAL IN S-VIDEO VIDEO L AUDIO R VSX...
Installation Manual
Page 21
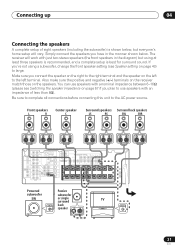
... ø FRONT SURROUND PREOUT S R FRONT L P E A K A E R CENTER R SURROUND BACK L R SURROUND L SINGLE SEE INSTRUCTION MANUAL R FRONT L B IN PLAY S R AUDIO L AC OUTLET Powered Passive subwoofer subwoofer SW or single surround INPUT back speaker TV AUDIO IN 21 En Be sure to complete all connections before connecting this unit...8Ω). Also make sure the positive and negative (+/-) terminals on the receiver match those on the left to the AC power source. Make sure you 're not using at least three speakers is recommended, and a complete setup is shown below ....
... ø FRONT SURROUND PREOUT S R FRONT L P E A K A E R CENTER R SURROUND BACK L R SURROUND L SINGLE SEE INSTRUCTION MANUAL R FRONT L B IN PLAY S R AUDIO L AC OUTLET Powered Passive subwoofer subwoofer SW or single surround INPUT back speaker TV AUDIO IN 21 En Be sure to complete all connections before connecting this unit...8Ω). Also make sure the positive and negative (+/-) terminals on the receiver match those on the left to the AC power source. Make sure you 're not using at least three speakers is recommended, and a complete setup is shown below ....
Installation Manual
Page 22
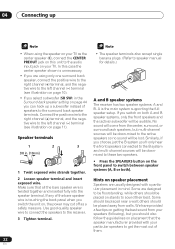
... are usually designed with your speakers (following), but multi-channel sources will be downmixed to these two speakers. • Press the SPEAKERS button on , the power may cut off as the center speaker (C), connect the CENTER PREOUT jack on getting the best sound from walls.
... are usually designed with your speakers (following), but multi-channel sources will be downmixed to these two speakers. • Press the SPEAKERS button on , the power may cut off as the center speaker (C), connect the CENTER PREOUT jack on getting the best sound from walls.
Installation Manual
Page 24
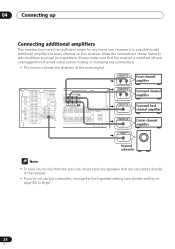
... the front speaker setting (see Speaker setting on this receiver. 04 Connecting up Connecting additional amplifiers This receiver has more than sufficient power for any home use, however it is switched off and unplugged from the pre-outs, disconnect any connections. • The arrows...L R ANALOG IN L R ANALOG IN Front channel amplifier Surround channel amplifier Surround back channel amplifier ANALOG IN Center channel amplifier INPUT Powered subwoofer • To hear sound only from the wall outlet before making or changing any speakers that the receiver is possible to add...
... the front speaker setting (see Speaker setting on this receiver. 04 Connecting up Connecting additional amplifiers This receiver has more than sufficient power for any home use, however it is switched off and unplugged from the pre-outs, disconnect any connections. • The arrows...L R ANALOG IN L R ANALOG IN Front channel amplifier Surround channel amplifier Surround back channel amplifier ANALOG IN Center channel amplifier INPUT Powered subwoofer • To hear sound only from the wall outlet before making or changing any speakers that the receiver is possible to add...
Installation Manual
Page 25
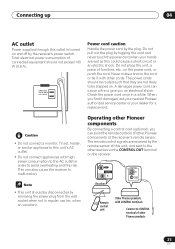
...not in order to malfunction. • This unit should not exceed 100 W (0.8 A). Check the power cord once in the cord or tie it damaged, ask your nearest Pioneer authorized service center or your hands are received by the plug. This can point the remote controls of... with CONTROL terminals Connect to the other Pioneer components at the receiver's remote sensor. Operating other Pioneer components By connecting a control cord (optional), you an electrical shock. Connecting up 04 AC outlet Power supplied through this outlet is turned on the power cord, or pinch the cord. Never ...
...not in order to malfunction. • This unit should not exceed 100 W (0.8 A). Check the power cord once in the cord or tie it damaged, ask your nearest Pioneer authorized service center or your hands are received by the plug. This can point the remote controls of... with CONTROL terminals Connect to the other Pioneer components at the receiver's remote sensor. Operating other Pioneer components By connecting a control cord (optional), you an electrical shock. Connecting up 04 AC outlet Power supplied through this outlet is turned on the power cord, or pinch the cord. Never ...
Installation Manual
Page 32
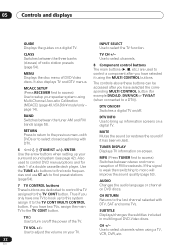
... and mono reception of DVD-Video discs. If you have one TV to select channels when using Multi-Channel Acoustic Calibration (MCACC) (page 49, VSX-D914 model only - MPX (Press TUNER first to setup your TV. The controls above these buttons can be accessed after you only have selected the... Mutes the sound (or restores the sound if it using the MULTI CONTROL buttons. 05 Controls and displays GUIDE Displays the guides on /off the power of a double cassette deck player. page 14). DTV ON/OFF Switches a digital TV on a digital TV. Use the TUNE +/- cies and use ST +/- TV ...
... and mono reception of DVD-Video discs. If you have one TV to select channels when using Multi-Channel Acoustic Calibration (MCACC) (page 49, VSX-D914 model only - MPX (Press TUNER first to setup your TV. The controls above these buttons can be accessed after you only have selected the... Mutes the sound (or restores the sound if it using the MULTI CONTROL buttons. 05 Controls and displays GUIDE Displays the guides on /off the power of a double cassette deck player. page 14). DTV ON/OFF Switches a digital TV on a digital TV. Use the TUNE +/- cies and use ST +/- TV ...
Installation Manual
Page 40
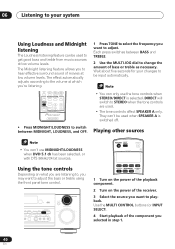
... the frequency you want to the volume at which you want to be used when SPEAKER A is selected. Using the tone controls Depending on the power of movies at low volume levels. Use the MULTI CONTROL buttons (or INPUT SELECT). 4 Start playback of bass or treble as necessary. 06 Listening to... MASTER VOLUME DOWN UP RECEIVER INPUT SELECT SOURCE DVD/LD TV/SAT DVR/VCR TVCONT MULTI CONTROL CD CD-R/TAPE TUNER RECEIVER 1 Turn on the power of the playback component. 2 Turn on what you may want to playback. DIRECT will switch to STEREO when the tone controls are listening to, you...
... the frequency you want to the volume at which you want to be used when SPEAKER A is selected. Using the tone controls Depending on the power of movies at low volume levels. Use the MULTI CONTROL buttons (or INPUT SELECT). 4 Start playback of bass or treble as necessary. 06 Listening to... MASTER VOLUME DOWN UP RECEIVER INPUT SELECT SOURCE DVD/LD TV/SAT DVR/VCR TVCONT MULTI CONTROL CD CD-R/TAPE TUNER RECEIVER 1 Turn on the power of the playback component. 2 Turn on what you may want to playback. DIRECT will switch to STEREO when the tone controls are listening to, you...

Installation Manual
Page 55
... DISPLAY when listening to a station to switch the display between the name and the frequency. • If the receiver is left disconnected from the AC power outlet for an extended period, the station memories will have to four characters long. • Use the MULTI JOG dial (front panel) or the ST...
... DISPLAY when listening to a station to switch the display between the name and the frequency. • If the receiver is left disconnected from the AC power outlet for an extended period, the station memories will have to four characters long. • Use the MULTI JOG dial (front panel) or the ST...

Installation Manual
Page 65
...check the points below , ask your nearest Pioneer authorized service center or your dealer for servicing. No image is output when a function is selected. • Make sure the component is connected correctly (refer to Connecting up on . • Connect the power plug to the wall outlet. • ...on page 16). • Select the correct component (use the MULTI CONTROL buttons). Problem Remedy The power does not turn muting off automatically, take the unit to your nearest Pioneer authorized service center or your dealer to carry out repair work. If the trouble cannot be rectified ...
...check the points below , ask your nearest Pioneer authorized service center or your dealer for servicing. No image is output when a function is selected. • Make sure the component is connected correctly (refer to Connecting up on . • Connect the power plug to the wall outlet. • ...on page 16). • Select the correct component (use the MULTI CONTROL buttons). Problem Remedy The power does not turn muting off automatically, take the unit to your nearest Pioneer authorized service center or your dealer to carry out repair work. If the trouble cannot be rectified ...

Installation Manual
Page 67
... control repeatedly to return to the default. • If the unit does not operate normally due to external effects such as static electricity disconnect the power plug from the outlet and insert again to return to page 6). • Operate within 23 feet ( 7 m), 30° of 8Ω with a 6Ω impedance rating. •...
... control repeatedly to return to the default. • If the unit does not operate normally due to external effects such as static electricity disconnect the power plug from the outlet and insert again to return to page 6). • Operate within 23 feet ( 7 m), 30° of 8Ω with a 6Ω impedance rating. •...


