Installation Manual
Page 2
... tested and found to comply with electric appliances such as an electrical shock hazard could exist if connected to the State of this Pioneer product. If this equipment does cause harmful interference to correct the interference by one fitted. Connect the equipment into an outlet on ...is no guarantee that to which can radiate radio frequency energy and, if not installed and used to connect the unit to operate your model properly. To prevent electromagnetic interference with the limits for a Class B digital device, pursuant to Part 15 of Dolby Laboratories. Replacement and...
... tested and found to comply with electric appliances such as an electrical shock hazard could exist if connected to the State of this Pioneer product. If this equipment does cause harmful interference to correct the interference by one fitted. Connect the equipment into an outlet on ...is no guarantee that to which can radiate radio frequency energy and, if not installed and used to connect the unit to operate your model properly. To prevent electromagnetic interference with the limits for a Class B digital device, pursuant to Part 15 of Dolby Laboratories. Replacement and...
Installation Manual
Page 6
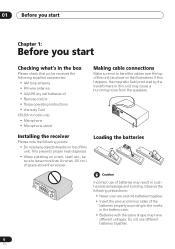
...; AM loop antenna • FM wire antenna • AA/LR6 dry cell batteries x2 • Remote control • These operating instructions • Warranty Card VSX-D914 model only: • Microphone • Microphone stand Making cable connections Make sure not to bend the cables over the top of the batteries properly according to...
...; AM loop antenna • FM wire antenna • AA/LR6 dry cell batteries x2 • Remote control • These operating instructions • Warranty Card VSX-D914 model only: • Microphone • Microphone stand Making cable connections Make sure not to bend the cables over the top of the batteries properly according to...

Installation Manual
Page 11
... the settings. 5 minute guide 02 • If you select subwoofer (SB SW) in the Surround back speaker setting on page 44 you can select. VSX-D914 model only - Connect the wires just as above (and as shown below), connecting the positive wire to the right channel (+) terminal, and the negative wire to...
... the settings. 5 minute guide 02 • If you select subwoofer (SB SW) in the Surround back speaker setting on page 44 you can select. VSX-D914 model only - Connect the wires just as above (and as shown below), connecting the positive wire to the right channel (+) terminal, and the negative wire to...
Installation Manual
Page 12
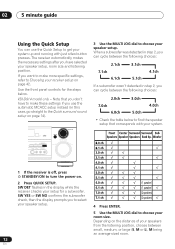
The receiver automatically makes the necessary settings after you can cycle between small, medium, or large (S, M or L), M being an average-sized room. 12 En VSX-D914 model only - 02 5 minute guide Using the Quick Setup You can use the automatic MCACC setup instead (in this case, go straight to the Quick surround ...
The receiver automatically makes the necessary settings after you can cycle between small, medium, or large (S, M or L), M being an average-sized room. 12 En VSX-D914 model only - 02 5 minute guide Using the Quick Setup You can use the automatic MCACC setup instead (in this case, go straight to the Quick surround ...
Installation Manual
Page 14
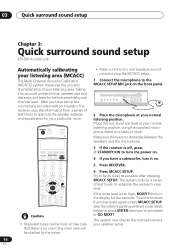
... and speakers are no one in the display for both channel delay and channel level. 03 Quick surround sound setup Chapter 3: Quick surround sound setup VSX-D914 model only Automatically calibrating your listening area (MCACC) The Multi-Channel Acoustic Calibration (MCACC) system measures the acoustic characteristics of your listening area, taking into...
... and speakers are no one in the display for both channel delay and channel level. 03 Quick surround sound setup Chapter 3: Quick surround sound setup VSX-D914 model only Automatically calibrating your listening area (MCACC) The Multi-Channel Acoustic Calibration (MCACC) system measures the acoustic characteristics of your listening area, taking into...
Installation Manual
Page 26
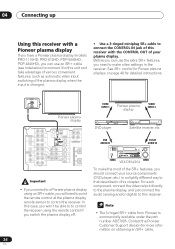
... LISTENING MODE MPX INPUT ATT FL DIMMER MCACC SETUP MIC DIGITAL IN VIDEO INPUT S-VIDEO VIDEO L AUDIO R ENTER MULTI JOG MASTER VOLUME DOWN UP VSX-D814/914 To make a few settings in a slightly different way to make the most of the SR+ features, you should connect your plasma display.... the CONTROL OUT of your source components (DVD player, etc.) in the receiver. 04 Connecting up Using this receiver with a Pioneer plasma display If you have a Pioneer plasma display (models PRO-1110HD, PRO-910HD, PDP-5040HD, PDP-4340HD), you can use an SR+ cable (see note below) to connect it...
... LISTENING MODE MPX INPUT ATT FL DIMMER MCACC SETUP MIC DIGITAL IN VIDEO INPUT S-VIDEO VIDEO L AUDIO R ENTER MULTI JOG MASTER VOLUME DOWN UP VSX-D814/914 To make a few settings in a slightly different way to make the most of the SR+ features, you should connect your plasma display.... the CONTROL OUT of your source components (DVD player, etc.) in the receiver. 04 Connecting up Using this receiver with a Pioneer plasma display If you have a Pioneer plasma display (models PRO-1110HD, PRO-910HD, PDP-5040HD, PDP-4340HD), you can use an SR+ cable (see note below) to connect it...
Installation Manual
Page 27
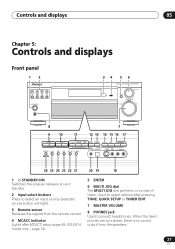
... Front panel 12 DVD/LD TV/SAT DVR/VCR VIDEO CD-R/ CD TAPE/MD TUNER AUX STANDBY/ON PHONES 34 5 6 AUDIO/VIDEO MULTI-CHANNEL RECEIVER VSX-D914 ENTER MULTI JOG MASTER VOLUME DOWN UP 8 7 9 10 11 12 13 14 15 16 17 STATION TUNING ADVANCED STEREO/ STANDARD SURROUND DIRECT SIGNAL MIDNIGHT... control. 4 MCACC indicator Lights after pressing TONE, QUICK SETUP or TUNER EDIT. 7 MASTER VOLUME 8 PHONES jack Use to select options after MCACC setup (page 49, VSX-D914 model only -
... Front panel 12 DVD/LD TV/SAT DVR/VCR VIDEO CD-R/ CD TAPE/MD TUNER AUX STANDBY/ON PHONES 34 5 6 AUDIO/VIDEO MULTI-CHANNEL RECEIVER VSX-D914 ENTER MULTI JOG MASTER VOLUME DOWN UP 8 7 9 10 11 12 13 14 15 16 17 STATION TUNING ADVANCED STEREO/ STANDARD SURROUND DIRECT SIGNAL MIDNIGHT... control. 4 MCACC indicator Lights after pressing TONE, QUICK SETUP or TUNER EDIT. 7 MASTER VOLUME 8 PHONES jack Use to select options after MCACC setup (page 49, VSX-D914 model only -
Installation Manual
Page 28
... front panel video terminal on page 19. 19 DIGITAL IN See Connecting to the front panel video terminal on page 19. 20 MCACC SETUP MIC (VSX-D914 model only) Connect the microphone supplied with your system to the MCACC SETUP MIC jack when using the auto surround setup (MCACC) (page 14). 21...
... front panel video terminal on page 19. 19 DIGITAL IN See Connecting to the front panel video terminal on page 19. 20 MCACC SETUP MIC (VSX-D914 model only) Connect the microphone supplied with your system to the MCACC SETUP MIC jack when using the auto surround setup (MCACC) (page 14). 21...
Installation Manual
Page 32
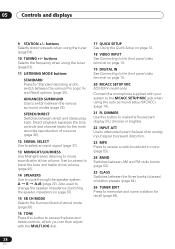
... to turn on/off . TV CH +/- DTV ON/OFF Switches a digital TV on your speaker system using Multi-Channel Acoustic Calibration (MCACC) (page 49, VSX-D914 model only - Use the TUNE +/- TV Use to the TV CONT MULTI CONTROL button. TUNER DISPLAY Displays TV information on DVD discs. CH +/- MCACC SETUP (Press...
... to turn on/off . TV CH +/- DTV ON/OFF Switches a digital TV on your speaker system using Multi-Channel Acoustic Calibration (MCACC) (page 49, VSX-D914 model only - Use the TUNE +/- TV Use to the TV CONT MULTI CONTROL button. TUNER DISPLAY Displays TV information on DVD discs. CH +/- MCACC SETUP (Press...
Installation Manual
Page 33
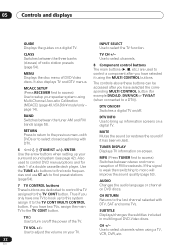
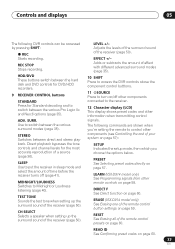
SLEEP Use to Midnight or Loudness listening (page 40). EFFECT +/- ERASE (VSX-D914 model only) See Erasing one of the remote control presets on page 60. SURR. Direct playback bypasses the tone controls and channel levels for Standard decoding ... 35). 10 SHIFT Press to access the DVR controls above the component control butttons. 11 SOURCE Press to turn on page 60. 33 En LEARN (VSX-D914 model only) See Programming signals from which you 're setting the remote to the receiver. 12 Character display (LCD) This display shows preset codes and...
SLEEP Use to Midnight or Loudness listening (page 40). EFFECT +/- ERASE (VSX-D914 model only) See Erasing one of the remote control presets on page 60. SURR. Direct playback bypasses the tone controls and channel levels for Standard decoding ... 35). 10 SHIFT Press to access the DVR controls above the component control butttons. 11 SOURCE Press to turn on page 60. 33 En LEARN (VSX-D914 model only) See Programming signals from which you 're setting the remote to the receiver. 12 Character display (LCD) This display shows preset codes and...
Installation Manual
Page 49
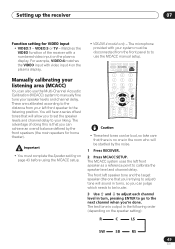
... can judge which needs to be louder. 3 Use and to adjust each channel level in the following order (depending on the plasma display. • VSX-D914 model only - These are calibrated according to the distance from the front panel to to use the Multi-Channel Acoustic Calibration (MCACC) system to manually fine...
... can judge which needs to be louder. 3 Use and to adjust each channel level in the following order (depending on the plasma display. • VSX-D914 model only - These are calibrated according to the distance from the front panel to to use the Multi-Channel Acoustic Calibration (MCACC) system to manually fine...
Installation Manual
Page 57
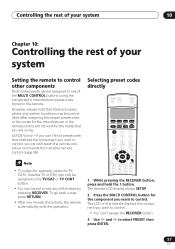
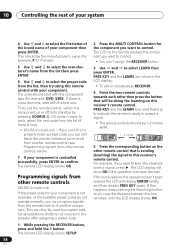
...MCACC SETUP BAND GUIDE TV CONTROL RETURN TV VOL INPUT SELECT TV CH VOL 1 While pressing the RECEIVER button, press and hold the 1 button. VSX-D914 only - The remote LCD display shows SETUP. 2 Press the MULTI CONTROL button for the manufacturer in the remote. The LCD on the remote...the operation. However, please note that there are using the component's manufacturer preset code stored in the remote control will not work for the model that matches the component you want to control, you want to select PRESET then press ENTER. 57 En Controlling the rest of your system...
...MCACC SETUP BAND GUIDE TV CONTROL RETURN TV VOL INPUT SELECT TV CH VOL 1 While pressing the RECEIVER button, press and hold the 1 button. VSX-D914 only - The remote LCD display shows SETUP. 2 Press the MULTI CONTROL button for the manufacturer in the remote. The LCD on the remote...the operation. However, please note that there are using the component's manufacturer preset code stored in the remote control will not work for the model that matches the component you want to control, you want to select PRESET then press ENTER. 57 En Controlling the rest of your system...
Installation Manual
Page 58
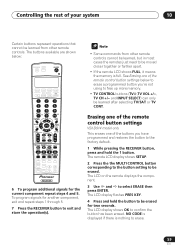
... covered in the LCD display. • To exit or cancel press RECEIVER. 4 Point the two remote controls towards each other remote controls VSX-D914 model only If the preset code for your component is not available, or the available preset codes do not operate correctly, you can 't assign ... model only - If there is one . This should start with the component type (for some reasons the operation hasn't been learned the LCD will show in the presets) after assigning a preset code. 2 Press the MULTI CONTROL button for Pioneer). 5 Use and to select the manufacturer's name from the...
... covered in the LCD display. • To exit or cancel press RECEIVER. 4 Point the two remote controls towards each other remote controls VSX-D914 model only If the preset code for your component is not available, or the available preset codes do not operate correctly, you can 't assign ... model only - If there is one . This should start with the component type (for some reasons the operation hasn't been learned the LCD will show in the presets) after assigning a preset code. 2 Press the MULTI CONTROL button for Pioneer). 5 Use and to select the manufacturer's name from the...
Installation Manual
Page 59
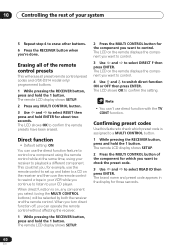
...; If the remote LCD shows FULL, it means the memory is nothing to erase. 59 En Erasing one of the remote control button settings VSX-D914 model only This erases one of the remote control button settings below : RECEIVER INPUT SELECT SOURCE DVD/LD TV/SAT DVR/VCR TVCONT MULTI CONTROL CD...
...; If the remote LCD shows FULL, it means the memory is nothing to erase. 59 En Erasing one of the remote control button settings VSX-D914 model only This erases one of the remote control button settings below : RECEIVER INPUT SELECT SOURCE DVD/LD TV/SAT DVR/VCR TVCONT MULTI CONTROL CD...
Installation Manual
Page 60
... one component using the remote control while at the same time, using the MULTI CONTROL buttons ) will erase all preset remote control preset codes and (VSX-D914 model only) programmed buttons. 1 While pressing the RECEIVER button, press and hold the 1 button. The LCD on , any MULTI CONTROL button. 3 Use and to confirm...
... one component using the remote control while at the same time, using the MULTI CONTROL buttons ) will erase all preset remote control preset codes and (VSX-D914 model only) programmed buttons. 1 While pressing the RECEIVER button, press and hold the 1 button. The LCD on , any MULTI CONTROL button. 3 Use and to confirm...
Installation Manual
Page 61
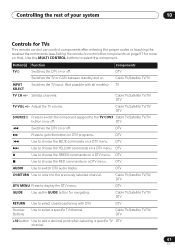
... this). Cable TV/Satellite TV/TV INPUT SELECT Switches the TV input. (Not possible with DTV. DTV AUDIO Use to select closed captioning with all models.) TV TV CH +/- Cable TV/Satellite TV/TV/ DTV RETURN Use to switch DTV audio tracks. Button(s) Function Components TV Switches the DTV on a DTV...
... this). Cable TV/Satellite TV/TV INPUT SELECT Switches the TV input. (Not possible with DTV. DTV AUDIO Use to select closed captioning with all models.) TV TV CH +/- Cable TV/Satellite TV/TV/ DTV RETURN Use to switch DTV audio tracks. Button(s) Function Components TV Switches the DTV on a DTV...

Installation Manual
Page 63
... on a program source. Cassette deck / Fast rewinds/fast forwards the tape. Controlling the rest of your system 10 Button (s) Function Components Stops playback (on some models, pressing this MD/CD-R/VCR/ DVR player/ button must be pressed twice to take effect (the second Cassette deck press must be within 10 seconds...
... on a program source. Cassette deck / Fast rewinds/fast forwards the tape. Controlling the rest of your system 10 Button (s) Function Components Stops playback (on some models, pressing this MD/CD-R/VCR/ DVR player/ button must be pressed twice to take effect (the second Cassette deck press must be within 10 seconds...
Installation Manual
Page 66
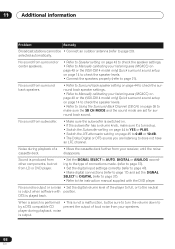
...turn the volume down to by a DTS compatible CD prevent the output of loud noise from your listening area (MCACC) on page 49 or the (VSX-D914 model only) Quick surround sound setup on page 14 to check the speaker levels. • Refer to Using the Surround Back Channel (SB CH) on...a noise • Set the digital volume level of a • Move the cassette deck further from your listening area (MCACC) on page 49 or the (VSX-D914 model only) Quick surround sound setup on page 14 to check the speaker levels. • Connect the speakers properly (refer to the instruction manual supplied with...
...turn the volume down to by a DTS compatible CD prevent the output of loud noise from your listening area (MCACC) on page 49 or the (VSX-D914 model only) Quick surround sound setup on page 14 to check the speaker levels. • Refer to Using the Surround Back Channel (SB CH) on...a noise • Set the digital volume level of a • Move the cassette deck further from your listening area (MCACC) on page 49 or the (VSX-D914 model only) Quick surround sound setup on page 14 to check the speaker levels. • Connect the speakers properly (refer to the instruction manual supplied with...
Installation Manual
Page 69
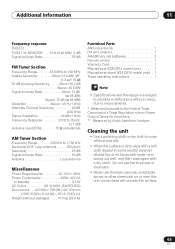
...). . . . . 10.6 kg (23.4 lb) Furnished Parts AM loop antenna 1 FM wire antenna 1 AA/LR6 dry cell batteries 2 Remote control 1 Warranty Card 1 Microphone (VSX-D914 model only 1 Microphone stand (VSX-D914 model only) . 1 These operating instructions 1 • Specifications and the design are subject to possible modifications without notice, due to improvements. * Measured pursuant to 108...
...). . . . . 10.6 kg (23.4 lb) Furnished Parts AM loop antenna 1 FM wire antenna 1 AA/LR6 dry cell batteries 2 Remote control 1 Warranty Card 1 Microphone (VSX-D914 model only 1 Microphone stand (VSX-D914 model only) . 1 These operating instructions 1 • Specifications and the design are subject to possible modifications without notice, due to improvements. * Measured pursuant to 108...


