Owner's Manual
Page 1
AUDIO/VIDEO MULTI-CHANNEL RECEIVER VSX-D409 VSX-D509S Operating Instructions
AUDIO/VIDEO MULTI-CHANNEL RECEIVER VSX-D409 VSX-D509S Operating Instructions
Owner's Manual
Page 2
...to operate the equipment. 2 If this equipment does cause harmful interference to radio communications. Reorient or relocate the receiving antenna. - Information to User Alteration or modifications carried out without appropriate authorization may cause harmful interference to radio or television ...connected. - These limits are designed to operate your model properly. Increase the separation between the equipment and receiver. - Please write this fine Pioneer product. Congratulations on the base. Consult the dealer or an experienced radio/TV technician for a Class ...
...to operate the equipment. 2 If this equipment does cause harmful interference to radio communications. Reorient or relocate the receiving antenna. - Information to User Alteration or modifications carried out without appropriate authorization may cause harmful interference to radio or television ...connected. - These limits are designed to operate your model properly. Increase the separation between the equipment and receiver. - Please write this fine Pioneer product. Congratulations on the base. Consult the dealer or an experienced radio/TV technician for a Class ...

Owner's Manual
Page 5
Table of Contents Set up Features 4 Introductory Information 6 Checking the Supplied Accessories 6 Using this Manual ...6 Installing the Receiver 6 Preparing the Remote Control 7 Connecting Your Equipment 8 Connecting Audio Components 8 Connecting DVD 5.1 Channel Components 9 AC outlet [switched ... Programming a Different Component into the MULTI CONTROL button (VSX-D509S) ....... 29 Checking Preset Code (VSX-D509S 29 Displays & Controls 30 Front Panel ...30 Display ...31 Remote Control (VSX-D509S 32 Remote Control (VSX-D409 34 Sound Modes 36 Learning about the Sound Modes 36...
Table of Contents Set up Features 4 Introductory Information 6 Checking the Supplied Accessories 6 Using this Manual ...6 Installing the Receiver 6 Preparing the Remote Control 7 Connecting Your Equipment 8 Connecting Audio Components 8 Connecting DVD 5.1 Channel Components 9 AC outlet [switched ... Programming a Different Component into the MULTI CONTROL button (VSX-D509S) ....... 29 Checking Preset Code (VSX-D509S 29 Displays & Controls 30 Front Panel ...30 Display ...31 Remote Control (VSX-D509S 32 Remote Control (VSX-D409 34 Sound Modes 36 Learning about the Sound Modes 36...

Owner's Manual
Page 6
... TOP MENU FQ SOUCE CLASS MPX BAND 7 8 3 D.ACCESS 1¡ CHANNEL 4¢ LOUDNESS FUNCTION MUTING RECEIVER FL DIMMER REMOTE SETUP MASTER VOLUME AUDIO/VIDEO PRE-PROGRAMMED REMOTE CONTROL UNIT VSX-D409 SOURCE RECEIVER DVD RCV TV VCR MULTI CONTROL CD TUN CD-R TVC 1 2 3 MIDNIGHT 5.1CH ATT 4 5 6... this manual: memo Provides detailed precautions and advice on top of this Manual VSX-D509S Remote control units This manual is for the VSX-D409/ VSX-D509S audio/video multi-channel receivers. In the Additional Information section (p.51-58) you to come from the ...
... TOP MENU FQ SOUCE CLASS MPX BAND 7 8 3 D.ACCESS 1¡ CHANNEL 4¢ LOUDNESS FUNCTION MUTING RECEIVER FL DIMMER REMOTE SETUP MASTER VOLUME AUDIO/VIDEO PRE-PROGRAMMED REMOTE CONTROL UNIT VSX-D409 SOURCE RECEIVER DVD RCV TV VCR MULTI CONTROL CD TUN CD-R TVC 1 2 3 MIDNIGHT 5.1CH ATT 4 5 6... this manual: memo Provides detailed precautions and advice on top of this Manual VSX-D509S Remote control units This manual is for the VSX-D409/ VSX-D509S audio/video multi-channel receivers. In the Additional Information section (p.51-58) you to come from the ...

Owner's Manual
Page 7
...the batteries VSX-D409 VSX-D509S Dry cell batteries (AA size IEC R6P × 2) CAUTION! This type of remote control unit memo The remote control may not work properly if: ¶ There are received by pointing the receiver's remote ...receiver is operated simultaneously with the same shape may result in such hazards as leakage and bursting. Incorrect use of this unit, even when operating other Pioneer components By connecting a control cord (optional), you can also control Pioneer components by the remote sensor of batteries may have different voltages. VSX-D409/ VSX...
...the batteries VSX-D409 VSX-D509S Dry cell batteries (AA size IEC R6P × 2) CAUTION! This type of remote control unit memo The remote control may not work properly if: ¶ There are received by pointing the receiver's remote ...receiver is operated simultaneously with the same shape may result in such hazards as leakage and bursting. Incorrect use of this unit, even when operating other Pioneer components By connecting a control cord (optional), you can also control Pioneer components by the remote sensor of batteries may have different voltages. VSX-D409/ VSX...

Owner's Manual
Page 8
... red plugs to R (right) and white plugs to insert completely. NOTE • Only the VSX-D509S has S-video jacks and optical digital out jack. • The arrows indicate the direction of...analog components, you experience noise, move the cassette deck farther away from the transformer in the receiver. Be sure to L (left). If you must hook up your digital components to the...up four plugs (a set of stereo ins and a set of stereo outs), but it is disconnected from the wall outlet. VSX-D509S IN AM LOOP ANTENNA IN O U T IN AUX CD VCR / DVR IN CONTROL OUT OUT IN IN FM UNBAL...
... red plugs to R (right) and white plugs to insert completely. NOTE • Only the VSX-D509S has S-video jacks and optical digital out jack. • The arrows indicate the direction of...analog components, you experience noise, move the cassette deck farther away from the transformer in the receiver. Be sure to L (left). If you must hook up your digital components to the...up four plugs (a set of stereo ins and a set of stereo outs), but it is disconnected from the wall outlet. VSX-D509S IN AM LOOP ANTENNA IN O U T IN AUX CD VCR / DVR IN CONTROL OUT OUT IN IN FM UNBAL...
Owner's Manual
Page 9
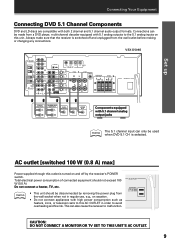
... outputs to the 5.1 analog inputs on and off and unplugged from a DVD player, multi-channel decoder equipped with both 2 channel and 5.1 channel audio output formats. VSX-D509S IN AM LOOP ANTENNA IN O U T IN AUX CD VCR / DVR IN CONTROL OUT OUT IN IN FM UNBAL 75Ω FM ANTENNA R E C P L A... OUT R CD - memo • This unit should not exceed 100 W (0.8 A). This can be disconnnected by the receiver's POWER switch. Always make sure that the receiver is switched off by removing the power plug from the wall socket when not in order to avoid overheating and fire risk...
... outputs to the 5.1 analog inputs on and off and unplugged from a DVD player, multi-channel decoder equipped with both 2 channel and 5.1 channel audio output formats. VSX-D509S IN AM LOOP ANTENNA IN O U T IN AUX CD VCR / DVR IN CONTROL OUT OUT IN IN FM UNBAL 75Ω FM ANTENNA R E C P L A... OUT R CD - memo • This unit should not exceed 100 W (0.8 A). This can be disconnnected by the receiver's POWER switch. Always make sure that the receiver is switched off by removing the power plug from the wall socket when not in order to avoid overheating and fire risk...
Owner's Manual
Page 10
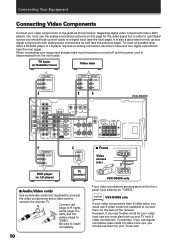
...see the next page). Be sure to insert completely. 10 7 Front Video camera (etc.) S-VIDEO VIDEO INPUT VIDEO L AUDIO R VIDEO INPUT V L R VSX-D509S only Front video connections are accessed via the front panel input selector as shown here) and two digital connections (see the previous page). TV...Digital source you should use them for video hook ups, you use the analog connections pictured on the back of the receiver. Connecting Your Equipment Connecting Video Components Connect your video components to the jacks as well. It is disconnected from the wall outlet. ...
...see the next page). Be sure to insert completely. 10 7 Front Video camera (etc.) S-VIDEO VIDEO INPUT VIDEO L AUDIO R VIDEO INPUT V L R VSX-D509S only Front video connections are accessed via the front panel input selector as shown here) and two digital connections (see the previous page). TV...Digital source you should use them for video hook ups, you use the analog connections pictured on the back of the receiver. Connecting Your Equipment Connecting Video Components Connect your video components to the jacks as well. It is disconnected from the wall outlet. ...
Owner's Manual
Page 11
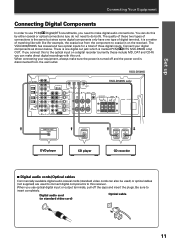
... is the same but since some digital components only have one digital out jack which is marked PCM/2/DTS (VSX-D509S only) OUT. If you connect this to the optical input on the receiver). VSX-D509S IN AM LOOP ANTENNA IN O U T IN AUX CD VCR / DVR IN CONTROL OUT OUT IN IN ...connecting your digital components as shown below. Be sure to this receiver. There is one type of digital terminal, it is turned off the caps and insert the plugs. Digital audio cord Optical cable (or standard video cord) 11 The VSX-D409/D509S has coaxial and two optical inputs for a total of matching...
... is the same but since some digital components only have one digital out jack which is marked PCM/2/DTS (VSX-D509S only) OUT. If you connect this to the optical input on the receiver). VSX-D509S IN AM LOOP ANTENNA IN O U T IN AUX CD VCR / DVR IN CONTROL OUT OUT IN IN ...connecting your digital components as shown below. Be sure to this receiver. There is one type of digital terminal, it is turned off the caps and insert the plugs. Digital audio cord Optical cable (or standard video cord) 11 The VSX-D409/D509S has coaxial and two optical inputs for a total of matching...

Owner's Manual
Page 13
... FM reception Connect an external FM antenna. 7 To improve AM reception Connect a 15-18 feet length of vinyl-coated wire to the receiver. Connecting Your Equipment Connecting Antennas Connect the AM loop antenna and the FM wire antenna as shown below ). For the best possible reception,... IN A FRONT SPEAKERS RL CENTER SPEAKERS CENTER PREOUT S TV / IN SAT S IN DVD / LD SURROUND SPEAKERS RL B FRONT SPEAKERS RL AC OUTLET VSX-D509S FM wire antenna Connect the FM wire antenna and fully extend vertically along a window frame or other suitable area, etc. 3/8 in the direction that...
... FM reception Connect an external FM antenna. 7 To improve AM reception Connect a 15-18 feet length of vinyl-coated wire to the receiver. Connecting Your Equipment Connecting Antennas Connect the AM loop antenna and the FM wire antenna as shown below ). For the best possible reception,... IN A FRONT SPEAKERS RL CENTER SPEAKERS CENTER PREOUT S TV / IN SAT S IN DVD / LD SURROUND SPEAKERS RL B FRONT SPEAKERS RL AC OUTLET VSX-D509S FM wire antenna Connect the FM wire antenna and fully extend vertically along a window frame or other suitable area, etc. 3/8 in the direction that...
Owner's Manual
Page 14
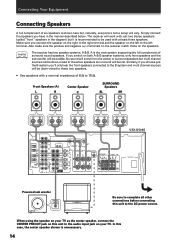
... nominal impedance of six speakers is recommended to the B system and multi channel sources will be down -mixed to the AC power source. memo The receiver has two speaker systems, A & B. Similarly, if you choose just the B system you connect the speaker on the right to the right terminal ...OUT VCR / DVR S IN A FRONT SPEAKERS RL CENTER SPEAKERS CENTER PREOUT S TV / IN SAT S IN DVD / LD SURROUND SPEAKERS RL B FRONT SPEAKERS RL VSX-D509S AC OUTLET Powered sub woofer INPUT Be sure to complete all other connections before connecting this case, the center speaker shown is the main...
... nominal impedance of six speakers is recommended to the B system and multi channel sources will be down -mixed to the AC power source. memo The receiver has two speaker systems, A & B. Similarly, if you choose just the B system you connect the speaker on the right to the right terminal ...OUT VCR / DVR S IN A FRONT SPEAKERS RL CENTER SPEAKERS CENTER PREOUT S TV / IN SAT S IN DVD / LD SURROUND SPEAKERS RL B FRONT SPEAKERS RL VSX-D509S AC OUTLET Powered sub woofer INPUT Be sure to complete all other connections before connecting this case, the center speaker shown is the main...

Owner's Manual
Page 15
Connecting Your Equipment 2 Loosen speaker terminal and insert exposed wire. 3 Tighten terminal. 1/2 inches Use good quality speaker wire to connect the speakers to the receiver. 1 Twist around 1/2 inch of bare wire strands together. 2 Unclip the speaker terminal and insert the wire. ª 3 Snap shut the speaker terminal to secure. · ...
Connecting Your Equipment 2 Loosen speaker terminal and insert exposed wire. 3 Tighten terminal. 1/2 inches Use good quality speaker wire to connect the speakers to the receiver. 1 Twist around 1/2 inch of bare wire strands together. 2 Unclip the speaker terminal and insert the wire. ª 3 Snap shut the speaker terminal to secure. · ...
Owner's Manual
Page 16
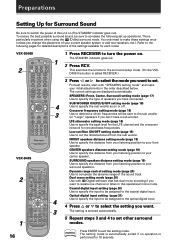
...your listening position to specify the distance from the sub woofer. The setting is particularly important when using the 2 (Dolby) surround mode. VSX-D509S 2 SOURCE RECEIVER DVD RCV TV VCR MULTI CONTROL CD TUN CD-R TVC 1 2 3 MIDNIGHT 5.1CH ATT 4 5 6 SIGNAL SELECT 7 EFFECT 8...SELECT CH LEVEL FL DIMMER LOUDNESS FUNCTION MUTING SETUP Î 1 4 3 AV PRE-PROGRAMMED AND LEARNING REMOTE CONTROL UNIT VSX-D409 2 1 Î MULTI CONTROL DVD/LD TV/SAT VCR/DVR CD RECEIVER TUNER CD-R/ TAPE/MD TV CONT 2 DSP MODE MIDNIGHT 5.1CH 1 2 3 4 CHANNEL TEST SELECT TONE 5 ...
...your listening position to specify the distance from the sub woofer. The setting is particularly important when using the 2 (Dolby) surround mode. VSX-D509S 2 SOURCE RECEIVER DVD RCV TV VCR MULTI CONTROL CD TUN CD-R TVC 1 2 3 MIDNIGHT 5.1CH ATT 4 5 6 SIGNAL SELECT 7 EFFECT 8...SELECT CH LEVEL FL DIMMER LOUDNESS FUNCTION MUTING SETUP Î 1 4 3 AV PRE-PROGRAMMED AND LEARNING REMOTE CONTROL UNIT VSX-D409 2 1 Î MULTI CONTROL DVD/LD TV/SAT VCR/DVR CD RECEIVER TUNER CD-R/ TAPE/MD TV CONT 2 DSP MODE MIDNIGHT 5.1CH 1 2 3 4 CHANNEL TEST SELECT TONE 5 ...

Owner's Manual
Page 17
...most bass and set up. Use the % or fi buttons. Speaker size is connected. In the display, "F", "C", and "S" refer to a previous receiver setting. 17 So, for small speakers, and " " (asterisk) if no speaker is * denoted as "L" for large speakers, "S" for example, here you..., all your speaker set to decide which speakers should match your speakers cannot be set . The configurations shown on the front of the receiver. Set up Preparations SPEAKERS (Front, Center, Surround) setting mode This setting establishes the size and configuration of the speaker system you have ...
...most bass and set up. Use the % or fi buttons. Speaker size is connected. In the display, "F", "C", and "S" refer to a previous receiver setting. 17 So, for small speakers, and " " (asterisk) if no speaker is * denoted as "L" for large speakers, "S" for example, here you..., all your speaker set to decide which speakers should match your speakers cannot be set . The configurations shown on the front of the receiver. Set up Preparations SPEAKERS (Front, Center, Surround) setting mode This setting establishes the size and configuration of the speaker system you have ...

Owner's Manual
Page 18
... the speakers. • Initial setting is "0 dB". ∗∗ memo • When ∞ is selected ( appears in the display), LFE is the point where the receiver divides the high and low sounds (the frequencies) between the speakers. We recommend setting this setting allows you to send those sounds to the sub...
... the speakers. • Initial setting is "0 dB". ∗∗ memo • When ∞ is selected ( appears in the display), LFE is the point where the receiver divides the high and low sounds (the frequencies) between the speakers. We recommend setting this setting allows you to send those sounds to the sub...

Owner's Manual
Page 20
...on , the ch1 setting will play the soundtrack independently of each other . Thus, it is with Dolby Digital mode on the front of the receiver. 20 There are audible yet the louder sounds don't get distorted. In the ch2 setting you won't be jolted by compressing the dynamic range.... memo • Initial setting is switched on the other . When watching a movie at low volumes, set to "MAX" for example CD, the receiver will play channel 2 though your center speaker and the MIX setting will automatically change to route the sound in the DIGITAL/ANALOG indicator on , the...
...on , the ch1 setting will play the soundtrack independently of each other . Thus, it is with Dolby Digital mode on the front of the receiver. 20 There are audible yet the louder sounds don't get distorted. In the ch2 setting you won't be jolted by compressing the dynamic range.... memo • Initial setting is switched on the other . When watching a movie at low volumes, set to "MAX" for example CD, the receiver will play channel 2 though your center speaker and the MIX setting will automatically change to route the sound in the DIGITAL/ANALOG indicator on , the...

Owner's Manual
Page 21
...input jack 2. After you assign the component to a digital jack, like optical one , whenever you select that component, for example CD, the receiver will automatically change to the optical input jack 1. memo • Initial setting is "CD". After you assign the component to a digital jack,... like optical one , whenever you select that component, for example CD, the receiver will automatically change to the digital input setting. Press % or fi to select the optical digital input 1 dB (DVD, TV, CD, CD...
...input jack 2. After you assign the component to a digital jack, like optical one , whenever you select that component, for example CD, the receiver will automatically change to the optical input jack 1. memo • Initial setting is "CD". After you assign the component to a digital jack,... like optical one , whenever you select that component, for example CD, the receiver will automatically change to the digital input setting. Press % or fi to select the optical digital input 1 dB (DVD, TV, CD, CD...

Owner's Manual
Page 22
... MENU FQ SOURCE CLASS MPX BAND 7 8 3 D.ACCESS 1¡ CHANNEL 4¢ LOUDNESS FUNCTION MUTING RECEIVER FL DIMMER REMOTE SETUP MASTER VOLUME AUDIO/VIDEO PRE-PROGRAMMED REMOTE CONTROL UNIT 6 Press TEST TONE to turn off the test tone. 4,6 3 22 VSX-D409 memo • Levels can be set for each speaker when seated in the following...
... MENU FQ SOURCE CLASS MPX BAND 7 8 3 D.ACCESS 1¡ CHANNEL 4¢ LOUDNESS FUNCTION MUTING RECEIVER FL DIMMER REMOTE SETUP MASTER VOLUME AUDIO/VIDEO PRE-PROGRAMMED REMOTE CONTROL UNIT 6 Press TEST TONE to turn off the test tone. 4,6 3 22 VSX-D409 memo • Levels can be set for each speaker when seated in the following...

Owner's Manual
Page 23
...2 Press the MULTI CONTROL button for the component you how to recall preset codes for three seconds to the previous operation mode. Recalling preset codes (VSX-D509S) The following components DVD : DVD/LD player or DVD Recorder TV : TV , Satellite tuner or Cable TV tuner CD : CD player... can refer to page 26 to teach the remote control individual commands. Preparations Set up Setting Up the Remote Control In addition to controlling the receiver, the supplied remote control can operate your other components (DVD, MD, VCR, TV, LD, CD, etc.). memo • Refer to "...
...2 Press the MULTI CONTROL button for the component you how to recall preset codes for three seconds to the previous operation mode. Recalling preset codes (VSX-D509S) The following components DVD : DVD/LD player or DVD Recorder TV : TV , Satellite tuner or Cable TV tuner CD : CD player... can refer to page 26 to teach the remote control individual commands. Preparations Set up Setting Up the Remote Control In addition to controlling the receiver, the supplied remote control can operate your other components (DVD, MD, VCR, TV, LD, CD, etc.). memo • Refer to "...

Owner's Manual
Page 24
... the components and manufacturers available. • Refer to "Controlling the Rest of the component's manufacturer. If no commands are entered the receiver automatically exits the preset code mode after 20 seconds. 3 Press % or fi repeatedly to display the name of Your System" on...Recalling preset codes (VSX-D409) The following components DVD/LD : DVD or LD player SOURCE CLASS MPX BAND 7 8 3 TV/SAT : TV or Satellite tuner D.ACCESS 1¡ CHANNEL 4¢ VCR/DVR : VCR or Digital Video Recorder LOUDNESS FUNCTION MUTING CD : CD player RECEIVER FL DIMMER REMOTE ...
... the components and manufacturers available. • Refer to "Controlling the Rest of the component's manufacturer. If no commands are entered the receiver automatically exits the preset code mode after 20 seconds. 3 Press % or fi repeatedly to display the name of Your System" on...Recalling preset codes (VSX-D409) The following components DVD/LD : DVD or LD player SOURCE CLASS MPX BAND 7 8 3 TV/SAT : TV or Satellite tuner D.ACCESS 1¡ CHANNEL 4¢ VCR/DVR : VCR or Digital Video Recorder LOUDNESS FUNCTION MUTING CD : CD player RECEIVER FL DIMMER REMOTE ...


