User Manual
Page 4
... 29 Default receiver settings 29 Connecting a satellite/cable receiver or other set-top box 11 09 The System Setup menu Connecting other video components 12 Making receiver settings from the System Setup Connecting equipment to the front panel inputs . . . 13 menu 30 Installing your speaker system 13 Setup menu options 30 Connecting the speakers 14 SR+ control for Pioneer plasma displays 32 Placing the speakers 14 Using the SR+ mode with a Pioneer plasma Connecting antennas 15 display 32 AM loop antenna 15 Setting individual channel levels 33 FM wire antenna 15...
... 29 Default receiver settings 29 Connecting a satellite/cable receiver or other set-top box 11 09 The System Setup menu Connecting other video components 12 Making receiver settings from the System Setup Connecting equipment to the front panel inputs . . . 13 menu 30 Installing your speaker system 13 Setup menu options 30 Connecting the speakers 14 SR+ control for Pioneer plasma displays 32 Placing the speakers 14 Using the SR+ mode with a Pioneer plasma Connecting antennas 15 display 32 AM loop antenna 15 Setting individual channel levels 33 FM wire antenna 15...

User Manual
Page 5
... plastic shielding from each speaker cable. 2 Connect a powered subwoofer to the SUBWOOFER OUT jack, as shown in the diagram below . and the surround speakers to the FRONT L/R terminals; VSX-C302 SPEAKERS FRONT R L CENTER SURROUND R L ANTENNA AM LOOP FMUNBAL75Ω DIGITAL IN SUB WOOFER OUT TV/SAT (DVD) OPT1 DVR/VCR OPT2 DVD (TV/SAT) COAX IN OUT CONTROL VIDEO IN IN IN L L OUT L R R R DVD TV/SAT DVR/VCR AUDIO TWO VOLTAGE SELECTORS MONITOR OUT 220 -230V...
... plastic shielding from each speaker cable. 2 Connect a powered subwoofer to the SUBWOOFER OUT jack, as shown in the diagram below . and the surround speakers to the FRONT L/R terminals; VSX-C302 SPEAKERS FRONT R L CENTER SURROUND R L ANTENNA AM LOOP FMUNBAL75Ω DIGITAL IN SUB WOOFER OUT TV/SAT (DVD) OPT1 DVR/VCR OPT2 DVD (TV/SAT) COAX IN OUT CONTROL VIDEO IN IN IN L L OUT L R R R DVD TV/SAT DVR/VCR AUDIO TWO VOLTAGE SELECTORS MONITOR OUT 220 -230V...
User Manual
Page 6
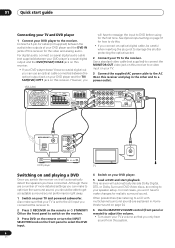
...VSX-C302 SPEAKERS FRONT R L CENTER SURROUND R L ANTENNA AM LOOP FMUNBAL75Ω DIGITAL IN SUB WOOFER OUT TV/SAT (DVD) OPT1 DVR/VCR OPT2 DVD (TV/SAT) COAX will automatically decode Dolby Digital, DTS, or Dolby Surround DVD-Video discs, according to get acceptable surround sound performance right away. 1 Switch on your DVD player. 5 Load a DVD and start guide Connecting your TV and DVD player 1 Connect your TV and powered subwoofer. Connect a 3-pin AV cable (not supplied) between the optical output jack on your speaker setup. However, you connect an optical digital...
...VSX-C302 SPEAKERS FRONT R L CENTER SURROUND R L ANTENNA AM LOOP FMUNBAL75Ω DIGITAL IN SUB WOOFER OUT TV/SAT (DVD) OPT1 DVR/VCR OPT2 DVD (TV/SAT) COAX will automatically decode Dolby Digital, DTS, or Dolby Surround DVD-Video discs, according to get acceptable surround sound performance right away. 1 Switch on your DVD player. 5 Load a DVD and start guide Connecting your TV and DVD player 1 Connect your TV and powered subwoofer. Connect a 3-pin AV cable (not supplied) between the optical output jack on your speaker setup. However, you connect an optical digital...

User Manual
Page 8
... jack (page 11) Optical digital audio jack for the DVR/VCR input. • When connecting optical cables, be damaged if bent around sharp corners. 8 En 03 Connecting your equipment Chapter 3 Connecting your equipment Rear panel 1 SPEAKERS FRONT R L CENTER SURROUND R L 2 ANTENNA AM LOOP FMUNBAL75Ω 3 IN OUT CONTROL 4 AC IN VSX-C302 SPEAKERS FRONT R L CENTER SURROUND R L ANTENNA AM LOOP FMUNBAL75Ω DIGITAL IN SUB WOOFER OUT TV/SAT (DVD) OPT1 DVR/VCR OPT2 DVD (TV/SAT) COAX DIGITAL IN IN OUT CONTROL VIDEO...
... jack (page 11) Optical digital audio jack for the DVR/VCR input. • When connecting optical cables, be damaged if bent around sharp corners. 8 En 03 Connecting your equipment Chapter 3 Connecting your equipment Rear panel 1 SPEAKERS FRONT R L CENTER SURROUND R L 2 ANTENNA AM LOOP FMUNBAL75Ω 3 IN OUT CONTROL 4 AC IN VSX-C302 SPEAKERS FRONT R L CENTER SURROUND R L ANTENNA AM LOOP FMUNBAL75Ω DIGITAL IN SUB WOOFER OUT TV/SAT (DVD) OPT1 DVR/VCR OPT2 DVD (TV/SAT) COAX DIGITAL IN IN OUT CONTROL VIDEO...

User Manual
Page 10
This connection carries stereo and multichannel digital audio. This connection carries video from this input is possible to use it to the DVD input before you can use an optical connection to the TV/ SAT(DVD) OPT1 jack. VSX-C302 SPEAKERS FRONT R L CENTER SURROUND R L ANTENNA AM LOOP FMUNBAL75Ω DIGITAL IN SUB WOOFER OUT TV/SAT (DVD) OPT1 DVR/VCR OPT2 DVD (TV/SAT) COAX IN OUT CONTROL VIDEO IN IN IN L L OUT L R R R DVD TV/SAT DVR/VCR AUDIO TWO VOLTAGE...
This connection carries stereo and multichannel digital audio. This connection carries video from this input is possible to use it to the DVD input before you can use an optical connection to the TV/ SAT(DVD) OPT1 jack. VSX-C302 SPEAKERS FRONT R L CENTER SURROUND R L ANTENNA AM LOOP FMUNBAL75Ω DIGITAL IN SUB WOOFER OUT TV/SAT (DVD) OPT1 DVR/VCR OPT2 DVD (TV/SAT) COAX IN OUT CONTROL VIDEO IN IN IN L L OUT L R R R DVD TV/SAT DVR/VCR AUDIO TWO VOLTAGE...
User Manual
Page 11
digital audio out jack, it . This connection carries stereo and multichannel digital audio. VSX-C302 SPEAKERS FRONT R L CENTER SURROUND R L ANTENNA AM LOOP FMUNBAL75Ω DIGITAL IN SUB WOOFER OUT TV/SAT (DVD) OPT1 DVR/VCR OPT2 DVD (TV/SAT) COAX IN OUT CONTROL VIDEO IN IN IN L L OUT L R R R DVD TV/SAT DVR/VCR AUDIO TWO VOLTAGE SELECTORS MONITOR OUT 220 -230V 240V 110V 120-127V AC IN 110V 120 -127V 220 -230V 240V DIGITAL OUT...
digital audio out jack, it . This connection carries stereo and multichannel digital audio. VSX-C302 SPEAKERS FRONT R L CENTER SURROUND R L ANTENNA AM LOOP FMUNBAL75Ω DIGITAL IN SUB WOOFER OUT TV/SAT (DVD) OPT1 DVR/VCR OPT2 DVD (TV/SAT) COAX IN OUT CONTROL VIDEO IN IN IN L L OUT L R R R DVD TV/SAT DVR/VCR AUDIO TWO VOLTAGE SELECTORS MONITOR OUT 220 -230V 240V 110V 120-127V AC IN 110V 120 -127V 220 -230V 240V DIGITAL OUT...

User Manual
Page 12
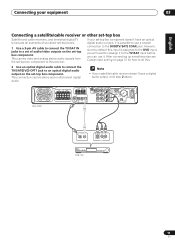
03 Connecting your equipment Connecting other video components The DVR/VCR IN/OUT jacks and associated digital audio connection (the DVR/VCR OPT2 jack) can be used with analog or digital video components, such as a VCR or DVD recorder. 1 Use two 3-pin AV cables to connect the DVR/VCR IN/OUT jacks to a set of audio/video input/output jacks on your VCR, DVD recorder (or other video component). VSX-C302 SPEAKERS FRONT R L CENTER SURROUND R L ANTENNA AM LOOP FMUNBAL75Ω DIGITAL IN SUB WOOFER OUT TV/SAT (DVD) OPT1...
03 Connecting your equipment Connecting other video components The DVR/VCR IN/OUT jacks and associated digital audio connection (the DVR/VCR OPT2 jack) can be used with analog or digital video components, such as a VCR or DVD recorder. 1 Use two 3-pin AV cables to connect the DVR/VCR IN/OUT jacks to a set of audio/video input/output jacks on your VCR, DVD recorder (or other video component). VSX-C302 SPEAKERS FRONT R L CENTER SURROUND R L ANTENNA AM LOOP FMUNBAL75Ω DIGITAL IN SUB WOOFER OUT TV/SAT (DVD) OPT1...
User Manual
Page 13
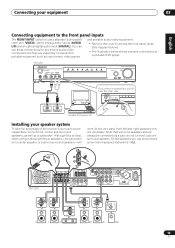
VSX-C302 STANDBY/ON DIGITAL IN FRONT INPUT VIDEO L AUDIO R PHONES STANDBY 2DIGITAL DTS STEREO 2PRO LOGICII ADVANCED PHONES SOUND MODE INPUT SELECTOR AUDIO/VIDEO MULTI-CHANNEL RECEIVER VSX-C302 MASTER VOLUME R DOWN UP VIDEO IN/OUT AUDIO IN/OUT COLOR BRIGHT MONITOR Push where indicated then pull off from the other configurations with fewer speakers-no subwoofer or no center speaker, or even no surround speakers-will work. Although this is ideal, other side. All the speakers you use these connections for portable equipment such...
VSX-C302 STANDBY/ON DIGITAL IN FRONT INPUT VIDEO L AUDIO R PHONES STANDBY 2DIGITAL DTS STEREO 2PRO LOGICII ADVANCED PHONES SOUND MODE INPUT SELECTOR AUDIO/VIDEO MULTI-CHANNEL RECEIVER VSX-C302 MASTER VOLUME R DOWN UP VIDEO IN/OUT AUDIO IN/OUT COLOR BRIGHT MONITOR Push where indicated then pull off from the other configurations with fewer speakers-no subwoofer or no center speaker, or even no surround speakers-will work. Although this is ideal, other side. All the speakers you use these connections for portable equipment such...

User Manual
Page 17
.... See Using the remote control with other components on page 34 for grounding purposes. 1 Decide which can also set of furniture, etc., on the power cable, or pinch the cable. CONTROL IN OUT CONTROL IN OUT VSX-C302 SPEAKERS FRONT R L CENTER SURROUND R L ANTENNA AM LOOP FMUNBAL75Ω DIGITAL IN SUB WOOFER OUT TV/SAT (DVD) OPT1 DVR/VCR OPT2 DVD (TV/SAT) COAX IN OUT CONTROL VIDEO IN IN IN L L OUT L R R R DVD TV/SAT...
.... See Using the remote control with other components on page 34 for grounding purposes. 1 Decide which can also set of furniture, etc., on the power cable, or pinch the cable. CONTROL IN OUT CONTROL IN OUT VSX-C302 SPEAKERS FRONT R L CENTER SURROUND R L ANTENNA AM LOOP FMUNBAL75Ω DIGITAL IN SUB WOOFER OUT TV/SAT (DVD) OPT1 DVR/VCR OPT2 DVD (TV/SAT) COAX IN OUT CONTROL VIDEO IN IN IN L L OUT L R R R DVD TV/SAT...

User Manual
Page 18
...4 Controls and displays Front panel 12 3 4 5 6 78 9 STANDBY/ON DIGITAL IN FRONT INPUT VIDEO L AUDIO R PHONES STANDBY 2DIGITAL DTS STEREO 2PRO LOGICII ADVANCED PHONES SOUND MODE INPUT SELECTOR AUDIO/VIDEO MULTI-CHANNEL RECEIVER VSX-C302 MASTER VOLUME R DOWN UP 1 PHONES jack When headphones are connected there is no sound output from the speakers. 2 STANDBY/ON button Press to switch the receiver on or into standby. 3 FRONT INPUT jacks (page 13) Use to connect an audio/video component. 4 STANDBY Lights when the receiver is in the front panel display. 9 MASTER VOLUME knob...
...4 Controls and displays Front panel 12 3 4 5 6 78 9 STANDBY/ON DIGITAL IN FRONT INPUT VIDEO L AUDIO R PHONES STANDBY 2DIGITAL DTS STEREO 2PRO LOGICII ADVANCED PHONES SOUND MODE INPUT SELECTOR AUDIO/VIDEO MULTI-CHANNEL RECEIVER VSX-C302 MASTER VOLUME R DOWN UP 1 PHONES jack When headphones are connected there is no sound output from the speakers. 2 STANDBY/ON button Press to switch the receiver on or into standby. 3 FRONT INPUT jacks (page 13) Use to connect an audio/video component. 4 STANDBY Lights when the receiver is in the front panel display. 9 MASTER VOLUME knob...
User Manual
Page 20
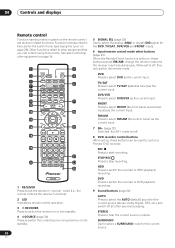
... HDD DVR/VCR FM/AM DVD ADVANCED AUTO STEREO SURROUND SURROUND SOUND MODE VIRTUAL DIALOG SB MUTE MASTER VOLUME DISC NAVIGATOR ROOM SETUP SYSTEM SETUP DTV ST TUNE ST ENTER MENU T.EDIT AUDIO TUNE RETURN CH SELECT DTV GUIDE ANT TEST TONE BAND DTV INFO DISPLAY CLASS MPX D.ACCESS TIMER REC ENTER CLEAR +10 TV CONTROL SLEEP INPUT CHANNEL VOLUME CHANNEL DIMMER 2 4 6 11 14 17 21 22 23 RECEIVER 1 RECEIVER Press to put the remote in blue are receiver-related functions.
... HDD DVR/VCR FM/AM DVD ADVANCED AUTO STEREO SURROUND SURROUND SOUND MODE VIRTUAL DIALOG SB MUTE MASTER VOLUME DISC NAVIGATOR ROOM SETUP SYSTEM SETUP DTV ST TUNE ST ENTER MENU T.EDIT AUDIO TUNE RETURN CH SELECT DTV GUIDE ANT TEST TONE BAND DTV INFO DISPLAY CLASS MPX D.ACCESS TIMER REC ENTER CLEAR +10 TV CONTROL SLEEP INPUT CHANNEL VOLUME CHANNEL DIMMER 2 4 6 11 14 17 21 22 23 RECEIVER 1 RECEIVER Press to put the remote in blue are receiver-related functions.

User Manual
Page 21
... SELECT First press RECEIVER, then press CH SELECT repeatedly to select a speaker channel to adjust. 17 TEST TONE First press RECEIVER, then press TEST TONE to select a SOUND MODE for the current source. The display will light brightly for external components, such as DVD and CD players. SOUND MODE Use to start/ stop the test tone. 18 Playback controls (page 36) Playback controls for about two seconds when you operate the receiver with the display off or dimmed. (Note that the master volume...
... SELECT First press RECEIVER, then press CH SELECT repeatedly to select a speaker channel to adjust. 17 TEST TONE First press RECEIVER, then press TEST TONE to select a SOUND MODE for the current source. The display will light brightly for external components, such as DVD and CD players. SOUND MODE Use to start/ stop the test tone. 18 Playback controls (page 36) Playback controls for about two seconds when you operate the receiver with the display off or dimmed. (Note that the master volume...
User Manual
Page 23
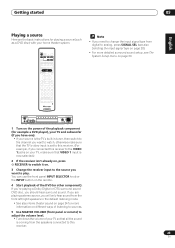
... basic instructions for more detailed surround sound setup, see also Selecting the input signal type on page 28). • For more information on different ways of listening to sources. 5 Use MASTER VOLUME (front panel or remote) to adjust the volume level. • Turn down the volume of the DVD (or other component). MASTER VOLUME RECEIVER STANDBY/ON DIGITAL IN FRONT INPUT VIDEO L AUDIO R PHONES 2DIGITAL DTS AUTO STEREO 2PRO LOGICII ADVANCED PHONES SOUND MODE INPUT SELECTOR AUDIO/VIDEO MULTI-CHANNEL RECEIVER VSX-C302 MASTER VOLUME R DOWN UP 1 Turn on the power of...
... basic instructions for more detailed surround sound setup, see also Selecting the input signal type on page 28). • For more information on different ways of listening to sources. 5 Use MASTER VOLUME (front panel or remote) to adjust the volume level. • Turn down the volume of the DVD (or other component). MASTER VOLUME RECEIVER STANDBY/ON DIGITAL IN FRONT INPUT VIDEO L AUDIO R PHONES 2DIGITAL DTS AUTO STEREO 2PRO LOGICII ADVANCED PHONES SOUND MODE INPUT SELECTOR AUDIO/VIDEO MULTI-CHANNEL RECEIVER VSX-C302 MASTER VOLUME R DOWN UP 1 Turn on the power of...

User Manual
Page 26
..., see Memorizing station presets on page 27 for more on the remote control to put it is weak, press MPX (remote control only) to switch the receiver into standby. 2 Press AM/FM and BAND at a time, press the TUNE +/- In this . Once you are tuned to a station you can simply enter the frequency directly using the automatic (search) and manual (step) tuning functions. This should improve the sound quality and...
..., see Memorizing station presets on page 27 for more on the remote control to put it is weak, press MPX (remote control only) to switch the receiver into standby. 2 Press AM/FM and BAND at a time, press the TUNE +/- In this . Once you are tuned to a station you can simply enter the frequency directly using the automatic (search) and manual (step) tuning functions. This should improve the sound quality and...

User Manual
Page 29
... in Using the remote control with other components can be reset. Setting type Input Master volume Listening mode Default setting DVD - - - When you reset the system, the receiver reverts to these defaults (see Resetting the system above reset doesn't affect the presets that you to control other components on page 34. 29 En dB (no sound) AUTO (all inputs) DVD(TV/SAT) COAX DVD jack assignment TV/SAT(DVD) OPT1 TV/SAT jack assignment Channel levels Front: 0 dB Center: 0 dB Surround: 0 dB Subwoofer: 0 dB Room Setup M / MID...
... in Using the remote control with other components can be reset. Setting type Input Master volume Listening mode Default setting DVD - - - When you reset the system, the receiver reverts to these defaults (see Resetting the system above reset doesn't affect the presets that you to control other components on page 34. 29 En dB (no sound) AUTO (all inputs) DVD(TV/SAT) COAX DVD jack assignment TV/SAT(DVD) OPT1 TV/SAT jack assignment Channel levels Front: 0 dB Center: 0 dB Surround: 0 dB Subwoofer: 0 dB Room Setup M / MID...

User Manual
Page 31
... the other sources you see Using the Sound Modes on page 8. LFE channel is reduced (loud sounds are reduced in increments of 0.1 m. Cch 9.0 m. - Each input has its own attenuator setting; Assigns the input to the front speakers: • Fch 0.1 m. - The System Setup menu 09 English LFE attenuator setting Dolby Digital and DTS audio sources include ultra-low bass tones. The LFE channel is automatically set in the display), switch on Coaxial input setting Specifies which receiver function the optical input (TV/ SAT(DVD) OPT1 jack) relates to the surround speakers...
... the other sources you see Using the Sound Modes on page 8. LFE channel is reduced (loud sounds are reduced in increments of 0.1 m. Cch 9.0 m. - Each input has its own attenuator setting; Assigns the input to the front speakers: • Fch 0.1 m. - The System Setup menu 09 English LFE attenuator setting Dolby Digital and DTS audio sources include ultra-low bass tones. The LFE channel is automatically set in the display), switch on Coaxial input setting Specifies which receiver function the optical input (TV/ SAT(DVD) OPT1 jack) relates to the surround speakers...
User Manual
Page 32
... connecting these components. 2 To switch SR+ mode on/off . • The automatic volume muting feature is switched off , press the SR+ button on the plasma display. Matches the DVR/VCR function of the receiver with a numbered video input on the plasma display you have connected a Pioneer plasma display to make using an SR+ cable. FRONT:5 or TV - 09 The System Setup menu SR+ control for Pioneer plasma displays Make the following settings if you 've connected. DVD...
... connecting these components. 2 To switch SR+ mode on/off . • The automatic volume muting feature is switched off , press the SR+ button on the plasma display. Matches the DVR/VCR function of the receiver with a numbered video input on the plasma display you have connected a Pioneer plasma display to make using an SR+ cable. FRONT:5 or TV - 09 The System Setup menu SR+ control for Pioneer plasma displays Make the following settings if you 've connected. DVD...

User Manual
Page 34
...-in tuner) TV (Pioneer) RECEIVER SOURCE RECEIVER 1 SIGNAL SEL DVD TV/SAT DVR/VCR SR+ 2 FRONT FM/AM REC STOP REC HDD DVD 3 ADVANCED AUTO STEREO SURROUND SURROUND 4 SOUND VIRTUAL MODE DIALOG SB MUTE MASTER VOLUME DISC NAVIGATOR ROOM SETUP SYSTEM SETUP TUNE MENU T.EDIT ST ST ENTER AUDIO TUNE RETURN CH SELECT TEST TONE DTV GUIDE ANT BAND DTV INFO DISPLAY CLASS MPX D.ACCESS 5 TIMER REC ENTER CLEAR +10 TV CONTROL SLEEP INPUT CHANNEL VOLUME CHANNEL 6 RECEIVER 1 SOURCE According to the current remote mode, switches an external component...
...-in tuner) TV (Pioneer) RECEIVER SOURCE RECEIVER 1 SIGNAL SEL DVD TV/SAT DVR/VCR SR+ 2 FRONT FM/AM REC STOP REC HDD DVD 3 ADVANCED AUTO STEREO SURROUND SURROUND 4 SOUND VIRTUAL MODE DIALOG SB MUTE MASTER VOLUME DISC NAVIGATOR ROOM SETUP SYSTEM SETUP TUNE MENU T.EDIT ST ST ENTER AUDIO TUNE RETURN CH SELECT TEST TONE DTV GUIDE ANT BAND DTV INFO DISPLAY CLASS MPX D.ACCESS 5 TIMER REC ENTER CLEAR +10 TV CONTROL SLEEP INPUT CHANNEL VOLUME CHANNEL 6 RECEIVER 1 SOURCE According to the current remote mode, switches an external component...

User Manual
Page 39
... out repair work. If the trouble cannot be selected automatically. • The radio signal is faulty. • The receiver has a serious problem. • Unplug the receiver from the equipment causing the noise. the buttons are pressed. • Make sure the component is connected correctly (see page 8). • Sound is muted. • Press MUTE on the remote control. • The volume is set incorrectly for 10 seconds to switch...
... out repair work. If the trouble cannot be selected automatically. • The radio signal is faulty. • The receiver has a serious problem. • Unplug the receiver from the equipment causing the noise. the buttons are pressed. • Make sure the component is connected correctly (see page 8). • Sound is muted. • Press MUTE on the remote control. • The volume is set incorrectly for 10 seconds to switch...
User Manual
Page 40
... strands of speaker wire touching the metal casing of the receiver. • Turn the volume down to the instruction manual supplied with the DVD/video player. 11 Additional information Symptom Cause Remedy No sound from subwoofer. • The subwoofer is on. light when playing Dolby/DTS software. • The player's sound output settings are incorrect. • Make digital connections (see page 31). DTS signal out is disconnected or switched • Connect or switch on (consult the ones (DVD, LD...
... strands of speaker wire touching the metal casing of the receiver. • Turn the volume down to the instruction manual supplied with the DVD/video player. 11 Additional information Symptom Cause Remedy No sound from subwoofer. • The subwoofer is on. light when playing Dolby/DTS software. • The player's sound output settings are incorrect. • Make digital connections (see page 31). DTS signal out is disconnected or switched • Connect or switch on (consult the ones (DVD, LD...


