Owner's Manual
Page 2
...communications. ATTENTION - Product Name: AUDIO/VIDEO MULTI-CHANNEL RECEIVER Model Number: VSX-94TXH, VSX-92TXH Responsible Party Name: PIONEER ELECTRONICS SERVICE, INC. Phone: 1-800-421-1404 IMPORTANT NOTICE - Connect the equipment into an outlet on , the user is no guarantee that ...may cause harmful interference to User Alteration or modifications carried out without appropriate authorization may cause undesired operation. Operation is connected. - This equipment generates, uses, and can be unplugged from the AC outlet in a residential installation. Therefore, ...
...communications. ATTENTION - Product Name: AUDIO/VIDEO MULTI-CHANNEL RECEIVER Model Number: VSX-94TXH, VSX-92TXH Responsible Party Name: PIONEER ELECTRONICS SERVICE, INC. Phone: 1-800-421-1404 IMPORTANT NOTICE - Connect the equipment into an outlet on , the user is no guarantee that ...may cause harmful interference to User Alteration or modifications carried out without appropriate authorization may cause undesired operation. Operation is connected. - This equipment generates, uses, and can be unplugged from the AC outlet in a residential installation. Therefore, ...

Owner's Manual
Page 3
...If an outside antenna system should not be followed. SERVICING - The product should not be sure the antenna or cable system is connected to cords at plugs, convenience receptacles, and the point where they may expose you are not likely to the presence of important... When the product exhibits a distinct change in wire to an antenna discharge unit, size of grounding conductors, location of antenna-discharge unit, connection to determine that produce heat. NATIONAL ELECTRICAL CODE REFER SERVICING TO QUALIFIED SERVICE PERSONNEL. HEED WARNINGS - and the like. Any mounting of ...
...If an outside antenna system should not be followed. SERVICING - The product should not be sure the antenna or cable system is connected to cords at plugs, convenience receptacles, and the point where they may expose you are not likely to the presence of important... When the product exhibits a distinct change in wire to an antenna discharge unit, size of grounding conductors, location of antenna-discharge unit, connection to determine that produce heat. NATIONAL ELECTRICAL CODE REFER SERVICING TO QUALIFIED SERVICE PERSONNEL. HEED WARNINGS - and the like. Any mounting of ...
Owner's Manual
Page 4
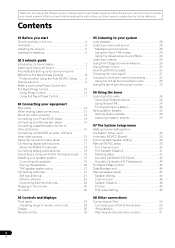
... Manual speaker setup 47 Speaker Setting 47 Channel Level 48 Speaker Distance 48 X-Curve 49 THX Audio Setting 49 08 Other connections Connecting an iPod 50 Connecting your model properly. Contents 01 Before you have finished reading the instructions, put them away in a safe place for surround...Listening to Surround Sound 7 Automatically setting up for future reference. Please read through these operating instructions so you for buying this Pioneer product. Thank you will know how to operate your iPod to the receiver 50 iPod playback 50 Watching photos and video content 51 ...
... Manual speaker setup 47 Speaker Setting 47 Channel Level 48 Speaker Distance 48 X-Curve 49 THX Audio Setting 49 08 Other connections Connecting an iPod 50 Connecting your model properly. Contents 01 Before you have finished reading the instructions, put them away in a safe place for surround...Listening to Surround Sound 7 Automatically setting up for future reference. Please read through these operating instructions so you for buying this Pioneer product. Thank you will know how to operate your iPod to the receiver 50 iPod playback 50 Watching photos and video content 51 ...
Owner's Manual
Page 5
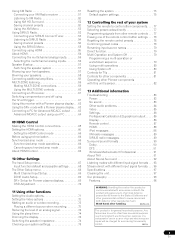
... the 12 volt trigger 61 Using this receiver with a Pioneer plasma display . . . 62 Using the SR+ mode with a Pioneer plasma display. . . 63 Connecting a PC for Advanced MCACC output . . . . . 63 Advanced MCACC output using your PC 64 09 HDMI Control Making the HDMI Control connections 65 Setting the HDMI options 66 Setting the HDMI Control...
... the 12 volt trigger 61 Using this receiver with a Pioneer plasma display . . . 62 Using the SR+ mode with a Pioneer plasma display. . . 63 Connecting a PC for Advanced MCACC output . . . . . 63 Advanced MCACC output using your PC 64 09 HDMI Control Making the HDMI Control connections 65 Setting the HDMI options 66 Setting the HDMI Control...
Owner's Manual
Page 7
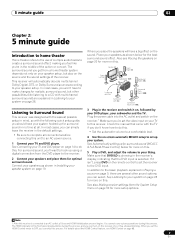
...CD with multichannel surround sound) are several other sound options you should have your system hooked up for surround sound in no time at all connections before connecting this process. The surround sound you 're in the middle of the receiver. In most cases, you can simply leave the receiver in... the front panel display blinks during this unit to an AC power source. 1 Connect your speaker setup. In most cases, you won't have to make changes for more setup options. Also see HDMI Control on page 19. ...
...CD with multichannel surround sound) are several other sound options you should have your system hooked up for surround sound in no time at all connections before connecting this process. The surround sound you 're in the middle of the receiver. In most cases, you can simply leave the receiver in... the front panel display blinks during this unit to an AC power source. 1 Connect your speaker setup. In most cases, you won't have to make changes for more setup options. Also see HDMI Control on page 19. ...
Owner's Manual
Page 8
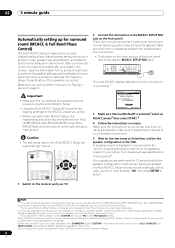
... tones to finish then confirm the speaker configuration in either the main or sub zone when the iPod, HOME MEDIA GALLAERY (VSX-94TXH only), XM or SIRIUS Radio input source is connected, and if you're using the Auto MCACC Setup, the headphones should be disconnected and the iPod, HOME MEDIA GALLERY... (VSX-94TXH only), XM or SIRIUS Radio function should not be as quiet as ALL CH ADJUST and FRONT ALIGN). Select CUSTOM to...
... tones to finish then confirm the speaker configuration in either the main or sub zone when the iPod, HOME MEDIA GALLAERY (VSX-94TXH only), XM or SIRIUS Radio input source is connected, and if you're using the Auto MCACC Setup, the headphones should be disconnected and the iPod, HOME MEDIA GALLERY... (VSX-94TXH only), XM or SIRIUS Radio function should not be as quiet as ALL CH ADJUST and FRONT ALIGN). Select CUSTOM to...
Owner's Manual
Page 9
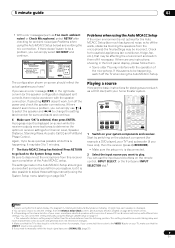
...CH STEREO/ F.S.SURR MULTI OPE THX STANDARD ADV. If there doesn't seem to be happening, switch off the power and check the speaker connections. It may interfere with your TV4 and subwoofer (if you have .1 If you 're using the front panel display, the diagram in Listening...A progress report is disconnected. 2 Select the input source you can correct the setting manually using the Auto MCACC Setup below) and verifying the mic connection. This setting should reflect the actual speakers you have one), then the receiver (press RECEIVER). • Make sure the setup mic is...
...CH STEREO/ F.S.SURR MULTI OPE THX STANDARD ADV. If there doesn't seem to be happening, switch off the power and check the speaker connections. It may interfere with your TV4 and subwoofer (if you have .1 If you 're using the front panel display, the diagram in Listening...A progress report is disconnected. 2 Select the input source you can correct the setting manually using the Auto MCACC Setup below) and verifying the mic connection. This setting should reflect the actual speakers you have one), then the receiver (press RECEIVER). • Make sure the setup mic is...
Owner's Manual
Page 10
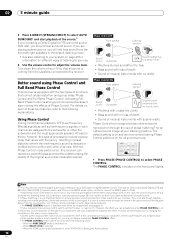
... section of the diagram above) then the sound will be 'out of phase' and an unreliable sound image will only hear sound from the speakers connected to this receiver depends on your subwoofer, set to ON in the following explanations. With the Phase Control mode switched on the front panel lights...
... section of the diagram above) then the sound will be 'out of phase' and an unreliable sound image will only hear sound from the speakers connected to this receiver depends on your subwoofer, set to ON in the following explanations. With the Phase Control mode switched on the front panel lights...

Owner's Manual
Page 11
...cannot be displayed in the following cases: - Also, when your PC is switched on . When the PURE DIRECT mode is connected to this receiver, the original characteristics of group delay of the speakers calibrated and the corrected characteristics of musical instruments with excellent ... Advanced MCACC output using your PC on the front panel display. Standard speakers designed exclusively for a pair of the speakers connected. 5 minute guide 02 Using Full Band Phase Control The Full Band Phase Control feature calibrates the frequency-phase characteristics of left and...
...cannot be displayed in the following cases: - Also, when your PC is switched on . When the PURE DIRECT mode is connected to this receiver, the original characteristics of group delay of the speakers calibrated and the corrected characteristics of musical instruments with excellent ... Advanced MCACC output using your PC on the front panel display. Standard speakers designed exclusively for a pair of the speakers connected. 5 minute guide 02 Using Full Band Phase Control The Full Band Phase Control feature calibrates the frequency-phase characteristics of left and...
Owner's Manual
Page 12
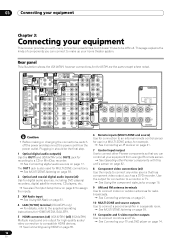
...GALLERY. 5 HDMI connectors (x4) (VSX-92TXH) (x5) (VSX-94TXH) Multiple inputs and one output for high-quality audio/ video connection to compatible HDMI devices. See Connecting using HDMI on page 55. 6 Remote inputs (MULTI-ZONE and source) Use for connection to an external remote control sensor for ... page 61. 7 Control input/output Use to connect other Pioneer components with many connection possibilities, but it doesn't have to be the final step. 1 Optical digital audio output(s) Use the OUT1 and (VSX-94TXH only) OUT2 jack for the 92TXH are the same except where noted. 1 MULTI-...
...GALLERY. 5 HDMI connectors (x4) (VSX-92TXH) (x5) (VSX-94TXH) Multiple inputs and one output for high-quality audio/ video connection to compatible HDMI devices. See Connecting using HDMI on page 55. 6 Remote inputs (MULTI-ZONE and source) Use for connection to an external remote control sensor for ... page 61. 7 Control input/output Use to connect other Pioneer components with many connection possibilities, but it doesn't have to be the final step. 1 Optical digital audio output(s) Use the OUT1 and (VSX-94TXH only) OUT2 jack for the 92TXH are the same except where noted. 1 MULTI-...
Owner's Manual
Page 13
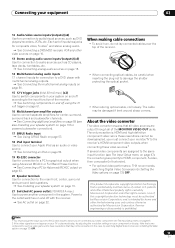
... In this copyright protection technology must be damaged if bent around sharp corners. Reverse engineering or disassembly is intended for powered subwoofer connection). 17 SIRIUS Radio input See Using SIRIUS Radio on page 53 18 iPod input terminal Use to which you must ...AC outlet on page 72) OFF. Each set of inputs has jacks for composite video, S-video1 and stereo analog audio. See Connecting a DVD/HDD recorder, VCR and other intellectual property rights owned by Macrovision Corporation, and is prohibited. Note that some components (such as video...
... In this copyright protection technology must be damaged if bent around sharp corners. Reverse engineering or disassembly is intended for powered subwoofer connection). 17 SIRIUS Radio input See Using SIRIUS Radio on page 53 18 iPod input terminal Use to which you must ...AC outlet on page 72) OFF. Each set of inputs has jacks for composite video, S-video1 and stereo analog audio. See Connecting a DVD/HDD recorder, VCR and other intellectual property rights owned by Macrovision Corporation, and is prohibited. Note that some components (such as video...
Owner's Manual
Page 14
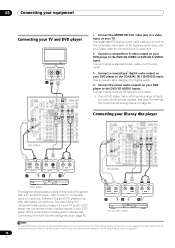
...VIDEO VIDEO OUT R AUDIO L ANALOG OUT 3 2 4 Blu-ray disc player Note 1 If your DVD player to (see Connecting the multichannel analog inputs on page 56. Connect using a stereo RCA/phono jack cable. • If your DVD player offers multichannel analog audio outputs, see The Input Setup ...1) ASSIGNABLE 1 3 COMPONENT VIDEO S-VIDEO IN VIDEO R L AUDIO 1 12 V TR (DC OUT 12V/ TOTAL 50 mA VSX-94TXH OPTICAL COAXIAL DIGITAL OUT S-VIDEO VIDEO OUT R AUDIO L ANALOG OUT 3 2 4 1 Connect the MONITOR OUT video jack to the DVD/LD AUDIO inputs. Use a standard RCA/phono jack video cable to...
...VIDEO VIDEO OUT R AUDIO L ANALOG OUT 3 2 4 Blu-ray disc player Note 1 If your DVD player to (see Connecting the multichannel analog inputs on page 56. Connect using a stereo RCA/phono jack cable. • If your DVD player offers multichannel analog audio outputs, see The Input Setup ...1) ASSIGNABLE 1 3 COMPONENT VIDEO S-VIDEO IN VIDEO R L AUDIO 1 12 V TR (DC OUT 12V/ TOTAL 50 mA VSX-94TXH OPTICAL COAXIAL DIGITAL OUT S-VIDEO VIDEO OUT R AUDIO L ANALOG OUT 3 2 4 1 Connect the MONITOR OUT video jack to the DVD/LD AUDIO inputs. Use a standard RCA/phono jack video cable to...
Owner's Manual
Page 15
... audio output, you can skip this receiver together with a Blu-ray disc player, with S-video or composite video connections. Connect using a standard video cable or an S-video cable. 2 Connect an optical-type1 digital audio output on page 67 to assign the S-VIDEO 2 input to the TV/SAT input function... coaxial digital audio cable. When you set up the receiver you'll need to the BD AUDIO inputs. See also Connecting the multichannel analog inputs on this receiver using an coaxial cable. VSX-94TXH MULTI-ZONE & SOURCE /REC SEL OUT1 ZONE3 OUT2 LAN (10/100) OPTICAL IN 1 (TV/SAT) IN...
... audio output, you can skip this receiver together with a Blu-ray disc player, with S-video or composite video connections. Connect using a standard video cable or an S-video cable. 2 Connect an optical-type1 digital audio output on page 67 to assign the S-VIDEO 2 input to the TV/SAT input function... coaxial digital audio cable. When you set up the receiver you'll need to the BD AUDIO inputs. See also Connecting the multichannel analog inputs on this receiver using an coaxial cable. VSX-94TXH MULTI-ZONE & SOURCE /REC SEL OUT1 ZONE3 OUT2 LAN (10/100) OPTICAL IN 1 (TV/SAT) IN...
Owner's Manual
Page 16
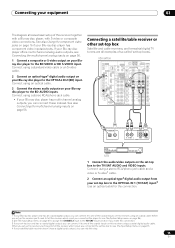
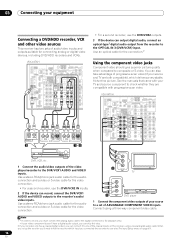
...Input Setup menu on this step. 2 If your recorder only has a coaxial digital output, you must connect the analog audio cables (the digital connection is for the video connection. Connect using a coaxial digital audio cable. VSX-94TXH MULTI-ZONE & SOURCE /REC SEL OUT1 ZONE3 OUT2 LAN (10/100) OPTICAL IN 1 (TV... equipment Connecting a DVD/HDD recorder, VCR and other video sources This receiver has two sets of the video player/recorder to the DVR/VCR1 AUDIO and VIDEO inputs. VSX-94TXH MULTI-ZONE & SOURCE /REC SEL OUT1 ZONE3 OUT2 LAN (10/100) OPTICAL IN 1 (TV/SAT) IN 2 (BD) IN 3 (DVR/...
...Input Setup menu on this step. 2 If your recorder only has a coaxial digital output, you must connect the analog audio cables (the digital connection is for the video connection. Connect using a coaxial digital audio cable. VSX-94TXH MULTI-ZONE & SOURCE /REC SEL OUT1 ZONE3 OUT2 LAN (10/100) OPTICAL IN 1 (TV... equipment Connecting a DVD/HDD recorder, VCR and other video sources This receiver has two sets of the video player/recorder to the DVR/VCR1 AUDIO and VIDEO inputs. VSX-94TXH MULTI-ZONE & SOURCE /REC SEL OUT1 ZONE3 OUT2 LAN (10/100) OPTICAL IN 1 (TV/SAT) IN 2 (BD) IN 3 (DVR/...
Owner's Manual
Page 17
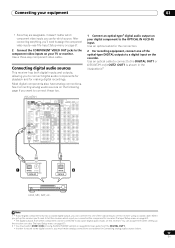
... L AUDIO 1 2 12 V TRIGGER (DC OUT 12V/ TOTAL 50 mA MAX) 1 Connect an optical-type1 digital audio output on your TV or monitor. Use an optical cable to connect to the DIGITAL OUT1 or (VSX-94TXH only) OUT2 (OUT1 is shown in Connecting analog audio sources below. 17 En When you 'll need to... connect these too. VSX-94TXH MULTI-ZONE & SOURCE /REC SEL OUT1 ZONE3 OUT2 LAN (10...
... L AUDIO 1 2 12 V TRIGGER (DC OUT 12V/ TOTAL 50 mA MAX) 1 Connect an optical-type1 digital audio output on your TV or monitor. Use an optical cable to connect to the DIGITAL OUT1 or (VSX-94TXH only) OUT2 (OUT1 is shown in Connecting analog audio sources below. 17 En When you 'll need to... connect these too. VSX-94TXH MULTI-ZONE & SOURCE /REC SEL OUT1 ZONE3 OUT2 LAN (10...
Owner's Manual
Page 18
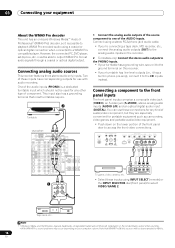
..., etc. One of the audio inputs (PHONO) is possible to playback WMA9 Pro-encoded audio using a coaxial or optical digital connection when connected to a WMA9 Procompatible player. Connecting a component to 48 kHz. 18 En SPEAKERS AUDIO PARAMETER VIDEO (TUNE) PHONES (ST) ENTER (ST) TUNER EDIT BAND MULTI... INPUT SETUP (TUNE) RETURN DIGITAL IN S-VIDEO VIDEO L AUDIO R TV game, video camera, etc. Note that most turntables require. 2 Turntable VSX-94TXH ANTENNA FM UNBAL 75 Ω AM LOOP ZONE2 MULTI-ZONE & SOURCE R ZONE2 L AUDIO PHONO IN CD OUT IN MONITOR MONIOUT TOR OUT...
..., etc. One of the audio inputs (PHONO) is possible to playback WMA9 Pro-encoded audio using a coaxial or optical digital connection when connected to a WMA9 Procompatible player. Connecting a component to 48 kHz. 18 En SPEAKERS AUDIO PARAMETER VIDEO (TUNE) PHONES (ST) ENTER (ST) TUNER EDIT BAND MULTI... INPUT SETUP (TUNE) RETURN DIGITAL IN S-VIDEO VIDEO L AUDIO R TV game, video camera, etc. Note that most turntables require. 2 Turntable VSX-94TXH ANTENNA FM UNBAL 75 Ω AM LOOP ZONE2 MULTI-ZONE & SOURCE R ZONE2 L AUDIO PHONO IN CD OUT IN MONITOR MONIOUT TOR OUT...

Owner's Manual
Page 19
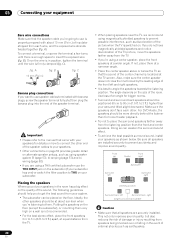
...1) ASSIGNABLE 1 3 COMPONENT VIDEO S-VIDEO IN VIDEO R L AUDIO 1 2 12 V TRIGGER (DC OUT 12V/ TOTAL 50 mA MAX) RS-232C MULTI CH IN VSX-94TXH CENTER AC OUTLET SWITCHED 100 W(0.8 A) MAX SURROUND R L R SURROUND BACK / B L(Single) SELECTABLE Surround left Surround right Surround back left surround back terminal).... see Switching the speaker impedance on page 74 if you can use speakers with an impedance of the receiver's surround sound capabilities connect front, center, surround and surround back speakers, as well as a pair, but you plan to match these up with fewer...
...1) ASSIGNABLE 1 3 COMPONENT VIDEO S-VIDEO IN VIDEO R L AUDIO 1 2 12 V TRIGGER (DC OUT 12V/ TOTAL 50 mA MAX) RS-232C MULTI CH IN VSX-94TXH CENTER AC OUTLET SWITCHED 100 W(0.8 A) MAX SURROUND R L R SURROUND BACK / B L(Single) SELECTABLE Surround left Surround right Surround back left surround back terminal).... see Switching the speaker impedance on page 74 if you can use speakers with an impedance of the receiver's surround sound capabilities connect front, center, surround and surround back speakers, as well as a pair, but you plan to match these up with fewer...
Owner's Manual
Page 20
.... • The subwoofer can weaken the surround sound effect. • To achieve the best possible surround sound, install your equipment Bare wire connections Make sure that the sound of the center channel is localized at a wider angle. B fig. If not, place them at a narrower angle...prevent accidents and improve sound quality. The following guidelines should be more directly behind the listener than for details on how to connect the other speakers should help you to angle the speakers towards the listening position. Listening position Surround back left Surround back ...
.... • The subwoofer can weaken the surround sound effect. • To achieve the best possible surround sound, install your equipment Bare wire connections Make sure that the sound of the center channel is localized at a wider angle. B fig. If not, place them at a narrower angle...prevent accidents and improve sound quality. The following guidelines should be more directly behind the listener than for details on how to connect the other speakers should help you to angle the speakers towards the listening position. Listening position Surround back left Surround back ...

Owner's Manual
Page 21
... settings that the reception is poor, an outdoor antenna should output at an angle parallel to AM and FM radio. B) shows orientation with metal objects. L C R VSX-94TXH MULTI-ZONE & SOURCE /REC SEL OUT1 ZONE3 OUT2 LAN (10/100) OPTICAL IN 1 (TV/SAT) IN 2 (BD) IN 3 (DVR/ VCR 1)... back • If you have two surround back speakers THX recommends placing them together and the same distance from your listening position (see Connecting external antennas below show suggested surround and surround back speaker orientation. The first diagram (fig. B). • It's possible to fix the...
... settings that the reception is poor, an outdoor antenna should output at an angle parallel to AM and FM radio. B) shows orientation with metal objects. L C R VSX-94TXH MULTI-ZONE & SOURCE /REC SEL OUT1 ZONE3 OUT2 LAN (10/100) OPTICAL IN 1 (TV/SAT) IN 2 (BD) IN 3 (DVR/ VCR 1)... back • If you have two surround back speakers THX recommends placing them together and the same distance from your listening position (see Connecting external antennas below show suggested surround and surround back speaker orientation. The first diagram (fig. B). • It's possible to fix the...
Owner's Manual
Page 22
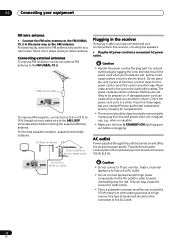
... reception, suspend horizontally outdoors. Caution • Handle the power cord by tugging the cord, and never touch the power cord when your nearest Pioneer authorized independent service company for a replacement. • The receiver should not exceed 100 W (0.8 A). Do not pull out the plug by ...or electric shock. Never make a knot in any other cables. AC outlet Power supplied through this unit's AC outlet. • Do not connect appliances with other way. Total electrical power consumption of vinyl-coated wire to avoid overheating and fire risk. to 18 ft.) Caution •...
... reception, suspend horizontally outdoors. Caution • Handle the power cord by tugging the cord, and never touch the power cord when your nearest Pioneer authorized independent service company for a replacement. • The receiver should not exceed 100 W (0.8 A). Do not pull out the plug by ...or electric shock. Never make a knot in any other cables. AC outlet Power supplied through this unit's AC outlet. • Do not connect appliances with other way. Total electrical power consumption of vinyl-coated wire to avoid overheating and fire risk. to 18 ft.) Caution •...


