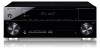

Owner's Manual
Page 4
...24 Connecting your DVD player with no HDMI input. . . 26 Connecting a satellite receiver or other digital set-top box 27 Connecting an HDD/DVD recorder, VCR and other video sources 27 Using the component video jacks... Checking what's in the box 7 Loading the batteries 7 Installing the receiver 7 Ventilation 8 04 Basic Setup Automatically setting up for surround sound (MCACC 31 Other problems when using the Auto MCACC Setup 33 02 Controls and displays Front ...surround effects . . . . . 36 Listening in a safe place for buying this Pioneer product. Thank you for future reference.
...24 Connecting your DVD player with no HDMI input. . . 26 Connecting a satellite receiver or other digital set-top box 27 Connecting an HDD/DVD recorder, VCR and other video sources 27 Using the component video jacks... Checking what's in the box 7 Loading the batteries 7 Installing the receiver 7 Ventilation 8 04 Basic Setup Automatically setting up for surround sound (MCACC 31 Other problems when using the Auto MCACC Setup 33 02 Controls and displays Front ...surround effects . . . . . 36 Listening in a safe place for buying this Pioneer product. Thank you for future reference.
Owner's Manual
Page 5
... NeDdeerulantsdcs h EspNaeñdoel rlands Español 08 Making recordings Making an audio or a video recording 54 09 Controlling the rest of your system Setting the remote to control other components 55 Selecting preset codes directly 55 Clearing all the remote control...
... NeDdeerulantsdcs h EspNaeñdoel rlands Español 08 Making recordings Making an audio or a video recording 54 09 Controlling the rest of your system Setting the remote to control other components 55 Selecting preset codes directly 55 Clearing all the remote control...
Owner's Manual
Page 6
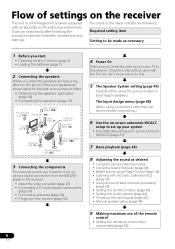
...29) • Plugging in the box (page 7) • Loading the batteries (page 7) 2 Connecting the speakers Where you 've set up your system • Automatically setting up for surround sound (MCACC) (page 31) 7 Basic playback (page 34) 8 Adjusting the sound as desired •... Retriever (page 38) • Better sound using connections other than the recommended connections.) 6 Use the on-screen automatic MCACC setup to set the video input on your speakers as necessary 1 Before you start • Checking what's in the receiver (page 30) 6 En ...
...29) • Plugging in the box (page 7) • Loading the batteries (page 7) 2 Connecting the speakers Where you 've set up your system • Automatically setting up for surround sound (MCACC) (page 31) 7 Basic playback (page 34) 8 Adjusting the sound as desired •... Retriever (page 38) • Better sound using connections other than the recommended connections.) 6 Use the on-screen automatic MCACC setup to set the video input on your speakers as necessary 1 Before you start • Checking what's in the receiver (page 30) 6 En ...
Owner's Manual
Page 9
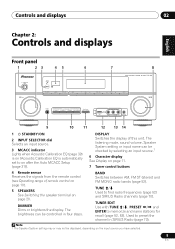
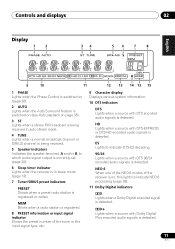
... Front panel 1 23 45 STANDBY/ON INPUT SELECTOR PHASE CONTROL SPEAKERS DIMMER DISPLAY BAND 6 7 8 AUDIO/ VIDEO MULTI- CHANNEL RECEIVER VSX-920 TUNE TUNER EDIT PRESET ENTER MASTER VOLUME PHONES AUTO/DIRECT LISTENING MODE STEREO/ALC STANDARD ADV SURROUND iPod iPhone DIRECT CONTROL VIDEO INPUT USB...this unit. The brightness can be checked by selecting an input source.1 6 Character display See Display on (Acoustic Calibration EQ is automatically set to preset the channel in four steps. TUNE / Used to memorize and name stations for recall (page 52, 53). ...
... Front panel 1 23 45 STANDBY/ON INPUT SELECTOR PHASE CONTROL SPEAKERS DIMMER DISPLAY BAND 6 7 8 AUDIO/ VIDEO MULTI- CHANNEL RECEIVER VSX-920 TUNE TUNER EDIT PRESET ENTER MASTER VOLUME PHONES AUTO/DIRECT LISTENING MODE STEREO/ALC STANDARD ADV SURROUND iPod iPhone DIRECT CONTROL VIDEO INPUT USB...this unit. The brightness can be checked by selecting an input source.1 6 Character display See Display on (Acoustic Calibration EQ is automatically set to preset the channel in four steps. TUNE / Used to memorize and name stations for recall (page 52, 53). ...
Owner's Manual
Page 11
... (page 38). 2 AUTO Lights when the Auto Surround feature is switched on (see Auto playback on , this lights to which audio signal output is currently set (page 20). 6 Sleep timer indicator Lights when the receiver is in auto stereo mode. 4 TUNE Lights when a normal broadcast channel or SIRIUS channel is being...
... (page 38). 2 AUTO Lights when the Auto Surround feature is switched on (see Auto playback on , this lights to which audio signal output is currently set (page 20). 6 Sleep timer indicator Lights when the receiver is in auto stereo mode. 4 TUNE Lights when a normal broadcast channel or SIRIUS channel is being...
Owner's Manual
Page 12
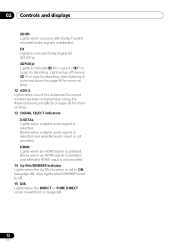
... when an HDMI signal is selected and selected HDMI input is not provided. 14 Up Mix/DIMMER indicator Lights when the Up Mix function is set to indicate 2 Pro Logic II / 2 Pro Logic IIx decoding. Lights when one of the Advanced Surround modes has been selected (see Using the Advanced surround... effects on page 36 for more on this). 13 SIGNAL SELECT indicators DIGITAL Lights when a digital audio signal is set to ON (see Listening in surround sound on page 35 for more on (page 38). 12 En Also, lights when DIMMER is selected. EX Lights...
... when an HDMI signal is selected and selected HDMI input is not provided. 14 Up Mix/DIMMER indicator Lights when the Up Mix function is set to indicate 2 Pro Logic II / 2 Pro Logic IIx decoding. Lights when one of the Advanced Surround modes has been selected (see Using the Advanced surround... effects on page 36 for more on this). 13 SIGNAL SELECT indicators DIGITAL Lights when a digital audio signal is set to ON (see Listening in surround sound on page 35 for more on (page 38). 12 En Also, lights when DIMMER is selected. EX Lights...
Owner's Manual
Page 13
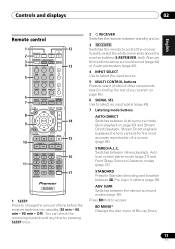
Also use this button to set up surround sound (page 44) or Audio parameters (page 40). 4 INPUT SELECT Use to select the input source. 5 MULTI CONTROL buttons Press to select control ...
Also use this button to set up surround sound (page 44) or Audio parameters (page 40). 4 INPUT SELECT Use to select the input source. 5 MULTI CONTROL buttons Press to select control ...
Owner's Manual
Page 14
...Press RECEIVER first to access: AUDIO PARAMETER Use to browse SIRIUS radio broadcasts. MENU Displays the TOOLS menu of a BD/DVD. When TUNER is set to control a component after you have selected the corresponding input source button (BD, DVD, DVR and CD). BAND Switches between the DTV and ...first to access: BASS -/+ Use to adjust Bass1 TRE -/+ Use to adjust Treble1 Press TV first to access: TUNER EDIT Memorizes stations for Pioneer flat panel TVs. 11 Number buttons and other buttons that can be accessed after you have selected the corresponding MULTI CONTROL button (BD, DVD, ...
...Press RECEIVER first to access: AUDIO PARAMETER Use to browse SIRIUS radio broadcasts. MENU Displays the TOOLS menu of a BD/DVD. When TUNER is set to control a component after you have selected the corresponding input source button (BD, DVD, DVR and CD). BAND Switches between the DTV and ...first to access: BASS -/+ Use to adjust Bass1 TRE -/+ Use to adjust Treble1 Press TV first to access: TUNER EDIT Memorizes stations for Pioneer flat panel TVs. 11 Number buttons and other buttons that can be accessed after you have selected the corresponding MULTI CONTROL button (BD, DVD, ...
Owner's Manual
Page 15
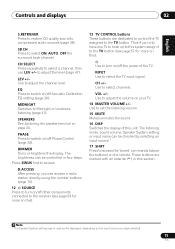
... and displays 02 S.RETRIEVER Press to restore CD quality sound to adjust the channel level. EQ Press to switch on/off Acoustic Calibration EQ setting (page 39). MIDNIGHT Switches to select the TV input signal. PHASE Press to switch on this ). 13 TV CONTROL buttons These buttons are...' commands (above the buttons) on page 20. CH +/- Use to select a channel, then use LEV +/- The listening mode, sound volume, Speaker System setting or input name can be checked by selecting an input source.1 17 SHIFT Press to turn on/off other components connected to the receiver (see...
... and displays 02 S.RETRIEVER Press to restore CD quality sound to adjust the channel level. EQ Press to switch on/off Acoustic Calibration EQ setting (page 39). MIDNIGHT Switches to select the TV input signal. PHASE Press to switch on this ). 13 TV CONTROL buttons These buttons are...' commands (above the buttons) on page 20. CH +/- Use to select a channel, then use LEV +/- The listening mode, sound volume, Speaker System setting or input name can be checked by selecting an input source.1 17 SHIFT Press to turn on/off other components connected to the receiver (see...
Owner's Manual
Page 16
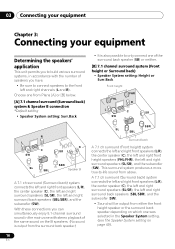
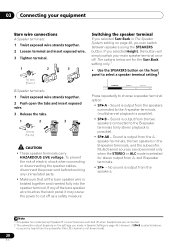
...with stereo playback of the surround back speaker (SB) or neither. [B] 7.1 channel surround system (Front height or Surround back) • Speaker System setting: Height or Surr.Back Front height FHL FHR R L C SR SW R L C SW SL SBL R SR L SBR Speaker B A 7.1...and R). Choose one from Plans [A] or [B] below. [A] 7.1 channel surround (Surround back) system & Speaker B connection *Default setting • Speaker System setting: Surr.Back • It is output from above. 03 Connecting your equipment Chapter 3: Connecting your equipment Determining the speakers' application This...
...with stereo playback of the surround back speaker (SB) or neither. [B] 7.1 channel surround system (Front height or Surround back) • Speaker System setting: Height or Surr.Back Front height FHL FHR R L C SR SW R L C SW SL SBL R SR L SBR Speaker B A 7.1...and R). Choose one from Plans [A] or [B] below. [A] 7.1 channel surround (Surround back) system & Speaker B connection *Default setting • Speaker System setting: Surr.Back • It is output from above. 03 Connecting your equipment Chapter 3: Connecting your equipment Determining the speakers' application This...
Owner's Manual
Page 17
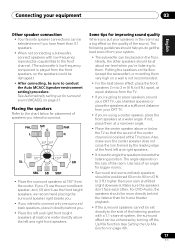
...guidelines should be at a wider angle. to 3 ft.) higher than for home theater playback. • If the surround speakers cannot be set directly to the side of the listening position with low frequency reproduction capabilities to the front channel. (The subwoofer's low frequency component is best.... • When not connecting a subwoofer, connect speakers with a 7.1-channel system, the surround effect can be placed on page 31. See Automatically setting up for placement of the room. to 9 ft.) apart, at equal distance from the TV. • If you intend to conduct the Auto...
...guidelines should be at a wider angle. to 3 ft.) higher than for home theater playback. • If the surround speakers cannot be set directly to the side of the listening position with low frequency reproduction capabilities to the front channel. (The subwoofer's low frequency component is best.... • When not connecting a subwoofer, connect speakers with a 7.1-channel system, the surround effect can be placed on page 31. See Automatically setting up for placement of the room. to 9 ft.) apart, at equal distance from the TV. • If you intend to conduct the Auto...
Owner's Manual
Page 18
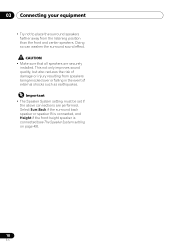
...the listening position than the front and center speakers. CAUTION • Make sure that all speakers are performed. Important • The Speaker System setting must be set if the above connections are securely installed. Select Surr.Back if the surround back speaker or speaker B is connected, and Height if the ...front height speaker is connected (see The Speaker System setting on page 49). 18 En This not only improves sound quality, but also reduces the risk of external shocks such as earthquakes.
...the listening position than the front and center speakers. CAUTION • Make sure that all speakers are performed. Important • The Speaker System setting must be set if the above connections are securely installed. Select Surr.Back if the surround back speaker or speaker B is connected, and Height if the ...front height speaker is connected (see The Speaker System setting on page 49). 18 En This not only improves sound quality, but also reduces the risk of external shocks such as earthquakes.

Owner's Manual
Page 19
... the receiver match those on page 20 for the listening options with this unit to the left Speaker B setting Speaker B - You can use speakers with a normal impedance between 6 Ω and 16 Ω. Front height setting Front height right Front height left (L) terminal. left Front right Powered subwoofer LINE LEVEL INPUT Center Front...
... the receiver match those on page 20 for the listening options with this unit to the left Speaker B setting Speaker B - You can use speakers with a normal impedance between 6 Ω and 16 Ω. Front height setting Front height right Front height left (L) terminal. left Front right Powered subwoofer LINE LEVEL INPUT Center Front...
Owner's Manual
Page 20
... terminals (multichannel playback is possible). • SPAB - Multichannel sources are connected. 2 The subwoofer output depends on the settings you made in .) CAUTION • These speaker terminals carry HAZARDOUS LIVE voltage. If you selected Height, the button will simply switch...- and B-speaker terminals. • SP - However, if SPB is selected above, no sound is selected for the Surr.Back setting only.1 • Use the SPEAKERS button on or off. Note 1 All speaker terminals (except Speaker B connections) are switched off as a safety ...
... terminals (multichannel playback is possible). • SPAB - Multichannel sources are connected. 2 The subwoofer output depends on the settings you made in .) CAUTION • These speaker terminals carry HAZARDOUS LIVE voltage. If you selected Height, the button will simply switch...- and B-speaker terminals. • SP - However, if SPB is selected above, no sound is selected for the Surr.Back setting only.1 • Use the SPEAKERS button on or off. Note 1 All speaker terminals (except Speaker B connections) are switched off as a safety ...
Owner's Manual
Page 21
... component is only possible when connected to a compatible component. 4 • HDMI format digital audio transmissions require a longer time to THRU (THROUGH) and set the input signal in the proper direction. Dolby Digital, Dolby Digital Plus, DTS, High bitrate audio (Dolby TrueHD, DTS-HD Master Audio), DVD-Audio,... CD, SACD (DSD signal), Video CD, Super VCD HDMI cable Note 1 • Set the HDMI parameter in Setting the Audio options on your TV or flat panel TV, try adjusting the resolution settings on page 40 to be heard from the speakers. If connecting the player and the TV...
... component is only possible when connected to a compatible component. 4 • HDMI format digital audio transmissions require a longer time to THRU (THROUGH) and set the input signal in the proper direction. Dolby Digital, Dolby Digital Plus, DTS, High bitrate audio (Dolby TrueHD, DTS-HD Master Audio), DVD-Audio,... CD, SACD (DSD signal), Video CD, Super VCD HDMI cable Note 1 • Set the HDMI parameter in Setting the Audio options on your TV or flat panel TV, try adjusting the resolution settings on page 40 to be heard from the speakers. If connecting the player and the TV...
Owner's Manual
Page 23
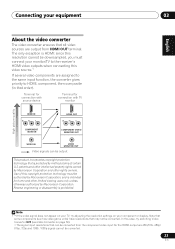
... this resolution cannot be downsampled, you must connect your monitor/TV to the receiver's HDMI video outputs when connecting this case, try adjusting the resolution settings on page 50). • The signal input resolutions that can be output This product incorporates copyright protection technology that is prohibited. The only exception is...
... this resolution cannot be downsampled, you must connect your monitor/TV to the receiver's HDMI video outputs when connecting this case, try adjusting the resolution settings on page 50). • The signal input resolutions that can be output This product incorporates copyright protection technology that is prohibited. The only exception is...
Owner's Manual
Page 26
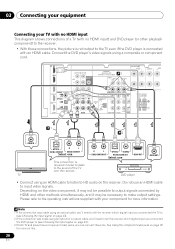
... HDMI cable to (see Choosing the input signal on page 43). 2 If the connection was made using an HDMI cable to listen to make output settings. IN BD SPEAKERS A R FRONT L CENTER DVD TV/SAT CD-R/TAPE DVR/VCR L SUBWOOFER OUT PRE OUT R CD-R/TAPE DVR/VCR CD ADAPTER PORT (OUTPUT 5 V 100...
... HDMI cable to (see Choosing the input signal on page 43). 2 If the connection was made using an HDMI cable to listen to make output settings. IN BD SPEAKERS A R FRONT L CENTER DVD TV/SAT CD-R/TAPE DVR/VCR L SUBWOOFER OUT PRE OUT R CD-R/TAPE DVR/VCR CD ADAPTER PORT (OUTPUT 5 V 100...
Owner's Manual
Page 27
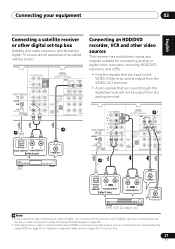
... an optical cable, you'll need to (see Choosing the input signal on page 43). 2 If the set-top box or video component also has an HDMI or a component video output, you connected the set- Note 1 If the connection was made using HDMI on page 24 or Using the component video jacks... OUT ANALOG AUDIO OUT Select one VIDEO OUT Connecting an HDD/DVD recorder, VCR and other digital set-top box Satellite and cable receivers, and terrestrial digital TV tuners are all examples of so-called 'set-top boxes'.12 CD-R/TAPE DVR/VCR L SUBWOOFER OUT PRE OUT R ADAPTER PORT (OUTPUT 5 V 100 mA...
... an optical cable, you'll need to (see Choosing the input signal on page 43). 2 If the set-top box or video component also has an HDMI or a component video output, you connected the set- Note 1 If the connection was made using HDMI on page 24 or Using the component video jacks... OUT ANALOG AUDIO OUT Select one VIDEO OUT Connecting an HDD/DVD recorder, VCR and other digital set-top box Satellite and cable receivers, and terrestrial digital TV tuners are all examples of so-called 'set-top boxes'.12 CD-R/TAPE DVR/VCR L SUBWOOFER OUT PRE OUT R ADAPTER PORT (OUTPUT 5 V 100 mA...
Owner's Manual
Page 31
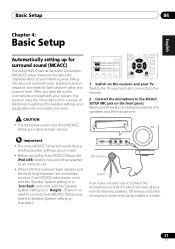
... and the microphone. CONTROL ON / OFF MASTER VOLUME Important • The Auto MCACC Setup will overwrite any existing speaker settings you have set up for surround sound (MCACC) The Auto Multi-Channel Acoustic Calibration (MCACC) setup measures the acoustic characteristics of test tones... at high volume. English Deutsch Français Italiano Nederlands Español PRESET Basic Setup 04 Chapter 4: Basic Setup Automatically setting up the microphone provided with your system, the receiver uses the information from a series of your listening area, taking into account...
... and the microphone. CONTROL ON / OFF MASTER VOLUME Important • The Auto MCACC Setup will overwrite any existing speaker settings you have set up for surround sound (MCACC) The Auto Multi-Channel Acoustic Calibration (MCACC) setup measures the acoustic characteristics of test tones... at high volume. English Deutsch Français Italiano Nederlands Español PRESET Basic Setup 04 Chapter 4: Basic Setup Automatically setting up the microphone provided with your system, the receiver uses the information from a series of your listening area, taking into account...
Owner's Manual
Page 32
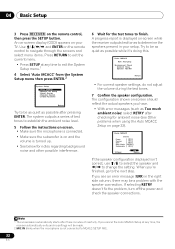
... you see Other problems when using the Auto MCACC Setup on -screen should reflect the actual speakers you 're finished, go to change the setting. The configuration shown on page 33). 1.Auto MCACC Check! When you have. • With error messages (such as possible while it's doing... this. 1.Auto MCACC Now Analyzing Environment Check Ambient Noise Speaker YES/NO Return • For correct speaker settings, do not adjust the volume during the test tones. 7 Confirm the speaker configuration. 04 Basic Setup 3 Press RECEIVER on your setup. The ...
... you see Other problems when using the Auto MCACC Setup on -screen should reflect the actual speakers you 're finished, go to change the setting. The configuration shown on page 33). 1.Auto MCACC Check! When you have. • With error messages (such as possible while it's doing... this. 1.Auto MCACC Now Analyzing Environment Check Ambient Noise Speaker YES/NO Return • For correct speaker settings, do not adjust the volume during the test tones. 7 Confirm the speaker configuration. 04 Basic Setup 3 Press RECEIVER on your setup. The ...


