Owner's Manual
Page 4
...you have finished reading the instructions, put them away in the receiver 35 04 Basic Setup Switching the speaker impedance 36 Changing the OSD display language (OSD Language 36 Automatically setting up for buying this Pioneer product. Contents 01 Before you start Checking what's in the... 29 About the WMA9 Pro decoder 29 Connecting AM/FM antennas 30 Connecting external antennas 30 MULTI-ZONE setup 31 Making MULTI-ZONE connections 31 Connecting an IR receiver 32 Operating other Pioneer components with HDMI connection . . . . 42 Selecting the multichannel analog inputs . . . 42 ...
...you have finished reading the instructions, put them away in the receiver 35 04 Basic Setup Switching the speaker impedance 36 Changing the OSD display language (OSD Language 36 Automatically setting up for buying this Pioneer product. Contents 01 Before you start Checking what's in the... 29 About the WMA9 Pro decoder 29 Connecting AM/FM antennas 30 Connecting external antennas 30 MULTI-ZONE setup 31 Making MULTI-ZONE connections 31 Connecting an IR receiver 32 Operating other Pioneer components with HDMI connection . . . . 42 Selecting the multichannel analog inputs . . . 42 ...

Owner's Manual
Page 5
... presets 74 Default preset codes 74 Controls the components 74 10 The Advanced MCACC menu Making receiver settings from the Advanced MCACC menu 77 Automatic MCACC (Expert 78 Manual MCACC setup 82 Fine Channel Level 83 Fine Speaker Distance 83 Standing Wave 85 Acoustic Calibration EQ Adjust... MCACC presets 91 Copying MCACC preset data 92 Clearing MCACC presets 92 11 The system and the other setup Making receiver settings from the System Setup menu 93 Manual speaker setup 94 Surround back speaker setting 94 Speaker Setting 95 Channel Level 96 Speaker Distance 97 X-Curve 98 The...
... presets 74 Default preset codes 74 Controls the components 74 10 The Advanced MCACC menu Making receiver settings from the Advanced MCACC menu 77 Automatic MCACC (Expert 78 Manual MCACC setup 82 Fine Channel Level 83 Fine Speaker Distance 83 Standing Wave 85 Acoustic Calibration EQ Adjust... MCACC presets 91 Copying MCACC preset data 92 Clearing MCACC presets 92 11 The system and the other setup Making receiver settings from the System Setup menu 93 Manual speaker setup 94 Surround back speaker setting 94 Speaker Setting 95 Channel Level 96 Speaker Distance 97 X-Curve 98 The...
Owner's Manual
Page 6
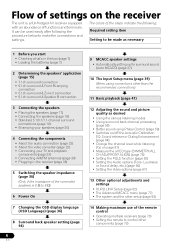
...(page 94) 6 En 9 MCACC speaker settings • Automatically setting up for surround sound (Auto MCACC) (page 37) 10 The Input Setup menu (page 39) (When using Phase Control (page 59) • Switches on/off the Acoustic Calibration EQ, Sound retriever or Dialog Enhancement (page 64) •...) 5 Switching the speaker impedance (page 36) (Only if the impedance of the connected speakers is a full-fledged AV receiver equipped with an abundance of the steps indicate the following the procedure below to be used easily after following : Required setting item Setting...
...(page 94) 6 En 9 MCACC speaker settings • Automatically setting up for surround sound (Auto MCACC) (page 37) 10 The Input Setup menu (page 39) (When using Phase Control (page 59) • Switches on/off the Acoustic Calibration EQ, Sound retriever or Dialog Enhancement (page 64) •...) 5 Switching the speaker impedance (page 36) (Only if the impedance of the connected speakers is a full-fledged AV receiver equipped with an abundance of the steps indicate the following the procedure below to be used easily after following : Required setting item Setting...

Owner's Manual
Page 7
... places that have different voltages. Before you start 01 Chapter 1: Before you start Checking what's in the box Please check that you've received the following supplied accessories: • Setup microphone (cable: 5 m (16.4 ft.)) • Remote control unit • AA size IEC R6 dry cell batteries (to confirm system operation) x2 •...
... places that have different voltages. Before you start 01 Chapter 1: Before you start Checking what's in the box Please check that you've received the following supplied accessories: • Setup microphone (cable: 5 m (16.4 ft.)) • Remote control unit • AA size IEC R6 dry cell batteries (to confirm system operation) x2 •...
Owner's Manual
Page 8
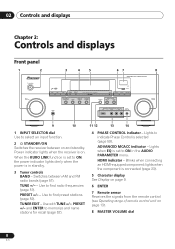
...PARAMETER menu. HDMI indicator - When the KURO LINK function is connected (page 23). 5 Character display See Display on page 9. 6 ENTER 7 Remote sensor Receives the signals from the remote control (see Operating range of remote control unit on . TUNER EDIT - Lights to indicate Phase Control is on page 13... PHONES HDMI ENTER PRESET PRESET TUNER EDIT SPEAKERS MULTI-ZONE CONTROL ON / OFF USB iPod iPhone VIDEO INPUT VIDEO L AUDIO R MCACC SETUP MIC MASTER VOLUME 9 10 11 12 13 14 1 INPUT SELECTOR dial Use to select an input function. 2 STANDBY/ON Switches the...
...PARAMETER menu. HDMI indicator - When the KURO LINK function is connected (page 23). 5 Character display See Display on page 9. 6 ENTER 7 Remote sensor Receives the signals from the remote control (see Operating range of remote control unit on . TUNER EDIT - Lights to indicate Phase Control is on page 13... PHONES HDMI ENTER PRESET PRESET TUNER EDIT SPEAKERS MULTI-ZONE CONTROL ON / OFF USB iPod iPhone VIDEO INPUT VIDEO L AUDIO R MCACC SETUP MIC MASTER VOLUME 9 10 11 12 13 14 1 INPUT SELECTOR dial Use to select an input function. 2 STANDBY/ON Switches the...

Owner's Manual
Page 9
... surround modes (page 54). STEREO - Use to indicate the currently selected input signal. AUTO lights when the receiver is no sound output from the speakers. 10 Listening mode buttons AUTO SURR/ALC/STREAM DIRECT - L/R - ... you've made MULTI-ZONE connections (see MULTI-ZONE setup on page 31) use these controls to control the sub zone from the receiver. They do not indicate the audio signals being output from... the main zone (see Using the MULTI-ZONE controls on page 34. 14 MCACC SETUP MIC jack Use to...
... surround modes (page 54). STEREO - Use to indicate the currently selected input signal. AUTO lights when the receiver is no sound output from the speakers. 10 Listening mode buttons AUTO SURR/ALC/STREAM DIRECT - L/R - ... you've made MULTI-ZONE connections (see MULTI-ZONE setup on page 31) use these controls to control the sub zone from the receiver. They do not indicate the audio signals being output from... the main zone (see Using the MULTI-ZONE controls on page 34. 14 MCACC SETUP MIC jack Use to...
Owner's Manual
Page 11
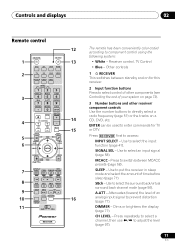
.../ MENU DIRECT STEREO STANDARD ADV SURR HDD DVD PHASE CTRL STATUS ANT MPX PQLS MEMORY AUDIO INFO CH DISP TV CTRL RECEIVER REMOTE SETUP MAIN ZONE 2 12 13 14 15 16 RECEIVER The remote has been conveniently color-coded according to access: INPUT SELECT - MCACC - Press to switch between standby and on for...
.../ MENU DIRECT STEREO STANDARD ADV SURR HDD DVD PHASE CTRL STATUS ANT MPX PQLS MEMORY AUDIO INFO CH DISP TV CTRL RECEIVER REMOTE SETUP MAIN ZONE 2 12 13 14 15 16 RECEIVER The remote has been conveniently color-coded according to access: INPUT SELECT - MCACC - Press to switch between standby and on for...
Owner's Manual
Page 13
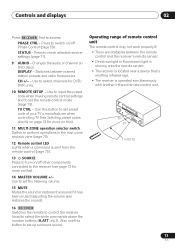
...page 73). Use to set up surround sound. STATUS - TV CTRL - Use to access: PHASE CTRL - CH +/- - Controls and displays 02 Press RECEIVER first to select channels for more on /off other components connected to perform operations in the main zone and sub zone (page 70). 12 Remote...of your TV's manufacturer when controlling TV (see page 73 for DVD/ DVR units. 10 REMOTE SETUP - Press to switch on this). 11 MULTI-ZONE operation selector switch Switch to the receiver (see Selecting preset codes directly on page 73 for more on this button to select the white ...
...page 73). Use to set up surround sound. STATUS - TV CTRL - Use to access: PHASE CTRL - CH +/- - Controls and displays 02 Press RECEIVER first to select channels for more on /off other components connected to perform operations in the main zone and sub zone (page 70). 12 Remote...of your TV's manufacturer when controlling TV (see page 73 for DVD/ DVR units. 10 REMOTE SETUP - Press to switch on this). 11 MULTI-ZONE operation selector switch Switch to the receiver (see Selecting preset codes directly on page 73 for more on this button to select the white ...

Owner's Manual
Page 21
... surround sound in the main zone with 5.1-channel surround sound. 1 Connect a Bi-amp compatible speakers to do this. 21 En Bi-Amping setup Bi-amping connection of the front speakers for high sound quality with stereo playback on another room. 1 Connect a pair of speakers to the ...surround back speaker terminals. Make this setting according to do this. Zone 2 setup With these connections you can listen to stereo playback in another component in Zone 2. 1 Connect a pair of speakers to the surround back speaker terminals...
... surround sound in the main zone with 5.1-channel surround sound. 1 Connect a Bi-amp compatible speakers to do this. 21 En Bi-Amping setup Bi-amping connection of the front speakers for high sound quality with stereo playback on another room. 1 Connect a pair of speakers to the ...surround back speaker terminals. Make this setting according to do this. Zone 2 setup With these connections you can listen to stereo playback in another component in Zone 2. 1 Connect a pair of speakers to the surround back speaker terminals...

Owner's Manual
Page 22
...the shutter protecting the optical socket. • When storing optical cable, coil loosely. Reverse engineering or disassembly is HDMI: since this receiver. The receiver selects the first available signal in the following order: Types of cables and terminals Transferable audio signals HDMI HD audio Digital (Coaxial) ... input resolution of 480i/576i can be transferred in that all video sources are assigned to the same input function (see The Input Setup menu on page 67) OFF. • The signal input resolutions that can be authorized by method claims of certain U.S. 03 Connecting...
...the shutter protecting the optical socket. • When storing optical cable, coil loosely. Reverse engineering or disassembly is HDMI: since this receiver. The receiver selects the first available signal in the following order: Types of cables and terminals Transferable audio signals HDMI HD audio Digital (Coaxial) ... input resolution of 480i/576i can be transferred in that all video sources are assigned to the same input function (see The Input Setup menu on page 67) OFF. • The signal input resolutions that can be authorized by method claims of certain U.S. 03 Connecting...

Owner's Manual
Page 27
... on page 39). Refer to The Input Setup menu on page 28. • The input functions below are all examples of so-called 'set up the receiver you'll need to tell the receiver which input you connected the settop box to (see Connecting the multichannel analog ... COAX-1a IN 1 /COAXb (BD) OPT-1 OPT-2 IN 2 (HDMI-1) (HDMI-2) (HDMI-3) COAX-2a a.VSX-1019AH model only. Connecting a satellite/cable receiver or other audio signals can connect these instead. b.VSX-919AH model only. Connecting your equipment 03 • If your DVD player has multichannel analog outputs, you can be...
... on page 39). Refer to The Input Setup menu on page 28. • The input functions below are all examples of so-called 'set up the receiver you'll need to tell the receiver which input you connected the settop box to (see Connecting the multichannel analog ... COAX-1a IN 1 /COAXb (BD) OPT-1 OPT-2 IN 2 (HDMI-1) (HDMI-2) (HDMI-3) COAX-2a a.VSX-1019AH model only. Connecting a satellite/cable receiver or other audio signals can connect these instead. b.VSX-919AH model only. Connecting your equipment 03 • If your DVD player has multichannel analog outputs, you can be...

Owner's Manual
Page 28
...must connect the analog audio cables (the digital connection is set up the receiver you'll need to tell the receiver which input you connected the recorder to (see also The Input Setup menu on page 39). VSX-1019AH HDMI ASSIGNABLE DIGITAL AUDIO 1 3 COAXIAL OPTICAL ASSIGNABLE ASSIGNABLE IN 1 IN...to record, you set to the operating instructions supplied with your equipment Connecting a HDD/DVD recorder, VCR and other video sources This receiver has two sets of audio/video inputs and outputs suitable for connecting analog or digital video devices, including HDD/DVD recorders and VCRs...
...must connect the analog audio cables (the digital connection is set up the receiver you'll need to tell the receiver which input you connected the recorder to (see also The Input Setup menu on page 39). VSX-1019AH HDMI ASSIGNABLE DIGITAL AUDIO 1 3 COAXIAL OPTICAL ASSIGNABLE ASSIGNABLE IN 1 IN...to record, you set to the operating instructions supplied with your equipment Connecting a HDD/DVD recorder, VCR and other video sources This receiver has two sets of audio/video inputs and outputs suitable for connecting analog or digital video devices, including HDD/DVD recorders and VCRs...

Owner's Manual
Page 29
...signals through a coaxial or optical digital output. However, the connected DVD player, set up the receiver you'll need to tell the receiver which input you to connect audio components for use with audio recorders. VSX-1019AH HDMI ASSIGNABLE DIGITAL AUDIO 1 3 COAXIAL ASSIGNABLE OPTICAL S ASSIGNABLE IN 3 OUT IN 1 ... it has a built-in the United States and/or other audio components This receiver has both digital and analog inputs, allowing you connected the component to (see also The Input Setup menu on page 39). One of Microsoft Corporation in phono pre-amp), connect it...
...signals through a coaxial or optical digital output. However, the connected DVD player, set up the receiver you'll need to tell the receiver which input you to connect audio components for use with audio recorders. VSX-1019AH HDMI ASSIGNABLE DIGITAL AUDIO 1 3 COAXIAL ASSIGNABLE OPTICAL S ASSIGNABLE IN 3 OUT IN 1 ... it has a built-in the United States and/or other audio components This receiver has both digital and analog inputs, allowing you connected the component to (see also The Input Setup menu on page 39). One of Microsoft Corporation in phono pre-amp), connect it...

Owner's Manual
Page 31
... speakers attached to the surround back speaker terminals as shown in the sub zone will also need to specify the volume settings in ZONE Audio Setup on your equipment 03 MULTI-ZONE setup This receiver can power up to two independent systems in separate rooms after you are not using the MULTI-ZONE... analog signal. (This does not apply for the MULTI CH IN input.) b.JPEG files cannot be output. VIDEO IN AUDIO IN R L Sub zone Main zone VSX-1019AH ASSIGNABLE Y BD IN IN 1 AUDIO YL PB PR IN 1 (DVD) Y PB PB R ZONE2 DVD PR OUT IN IN 2 (DVR) MONITOR OUT VIDEO PR COMPONENT...
... speakers attached to the surround back speaker terminals as shown in the sub zone will also need to specify the volume settings in ZONE Audio Setup on your equipment 03 MULTI-ZONE setup This receiver can power up to two independent systems in separate rooms after you are not using the MULTI-ZONE... analog signal. (This does not apply for the MULTI CH IN input.) b.JPEG files cannot be output. VIDEO IN AUDIO IN R L Sub zone Main zone VSX-1019AH ASSIGNABLE Y BD IN IN 1 AUDIO YL PB PR IN 1 (DVD) Y PB PB R ZONE2 DVD PR OUT IN IN 2 (DVR) MONITOR OUT VIDEO PR COMPONENT...

Owner's Manual
Page 34
... instructions for iPod. USB iPod iPhone VIDEO INPUT VIDEO L AUDIO R MCACC SETUP MIC USB iPod iPhone VIDEO INPUT VIDEO L AUDIO R MCACC SETUP MIC SPEAKERS MULTI-ZONE CONTROL ON / OFF MASTER VOLUME This receiver USB iPod iPhone VIDEO INPUT VIDEO L AUDIO R MCACC SETUP MIC VIDEO AUDIO OUTPUT TV game, video camera, etc. 03 Connecting your...
... instructions for iPod. USB iPod iPhone VIDEO INPUT VIDEO L AUDIO R MCACC SETUP MIC USB iPod iPhone VIDEO INPUT VIDEO L AUDIO R MCACC SETUP MIC SPEAKERS MULTI-ZONE CONTROL ON / OFF MASTER VOLUME This receiver USB iPod iPhone VIDEO INPUT VIDEO L AUDIO R MCACC SETUP MIC VIDEO AUDIO OUTPUT TV game, video camera, etc. 03 Connecting your...

Owner's Manual
Page 35
... by the plug part. Do not place the unit, a piece of this receiver. • Push down on this receiver once it damaged, ask your nearest Pioneer authorized independent service company for a replacement. • The receiver should be routed so that they are wet, as this could cause a short.... USB iPod iPhone VIDEO INPUT VIDEO L AUDIO R MCACC SETUP MIC SPEAKERS MULTI-ZONE CONTROL ON / OFF USB iPod iPhone VIDEO INPUT VIDEO L AUDIO R MCACC SETUP MIC MASTER VOLUME USB mass storage device This receiver Plugging in the receiver Only plug in a while. Check the power cord once ...
... by the plug part. Do not place the unit, a piece of this receiver. • Push down on this receiver once it damaged, ask your nearest Pioneer authorized independent service company for a replacement. • The receiver should be routed so that they are wet, as this could cause a short.... USB iPod iPhone VIDEO INPUT VIDEO L AUDIO R MCACC SETUP MIC SPEAKERS MULTI-ZONE CONTROL ON / OFF USB iPod iPhone VIDEO INPUT VIDEO L AUDIO R MCACC SETUP MIC MASTER VOLUME USB mass storage device This receiver Plugging in the receiver Only plug in a while. Check the power cord once ...

Owner's Manual
Page 36
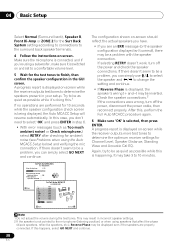
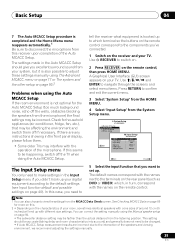
... OK Exit Return The setting is selected for when English is completed and the System Setup menu reappears automatically. 36 En Other Setup Language : 4c.OSD Language A/V RECEIVER English Exit Return OK Exit Return 4 Select the desired language. • English • French •...; Dutch • Russian 5 Select 'OK' to exit the current menu. 2 Select 'System Setup' from the HOME MENU. 3 Select 'OSD Language' from the System Setup menu. 4.SystemSetup A/V RECEIVER a.Manual SP Setup b. The display shows RESET NO . Use TUNE +/- (or / ...
... OK Exit Return The setting is selected for when English is completed and the System Setup menu reappears automatically. 36 En Other Setup Language : 4c.OSD Language A/V RECEIVER English Exit Return OK Exit Return 4 Select the desired language. • English • French •...; Dutch • Russian 5 Select 'OK' to exit the current menu. 2 Select 'System Setup' from the HOME MENU. 3 Select 'OSD Language' from the System Setup menu. 4.SystemSetup A/V RECEIVER a.Manual SP Setup b. The display shows RESET NO . Use TUNE +/- (or / ...
Owner's Manual
Page 37
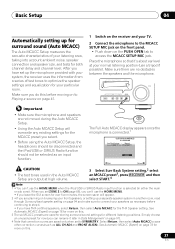
...microphone and speakers are used in the Auto MCACC Setup are planning on bi-amping your front speakers, or setting up the microphone provided with your system, the receiver uses the information from a series of your TV. 2 Connect the microphone to the MCACC SETUP MIC jack on the front panel. •... Push down on the PUSH OPEN tab to access the MCACC SETUP MIC jack. Select Return, then select Auto ...
...microphone and speakers are used in the Auto MCACC Setup are planning on bi-amping your front speakers, or setting up the microphone provided with your system, the receiver uses the information from a series of your TV. 2 Connect the microphone to the MCACC SETUP MIC jack on the front panel. •... Push down on the PUSH OPEN tab to access the MCACC SETUP MIC jack. Select Return, then select Auto ...
Owner's Manual
Page 38
...to determine the optimum receiver settings for the test tones to the microphone (listening position) or when using speakers that affect the phase (dipole speakers, reflective speakers, etc.), Reverse Phase may be as quiet as Too much ambient noise! 04 Basic Setup Select Normal (Surround back...you can simply select GO NEXT and continue. Again, try to the surround back speaker terminals. 4 Follow the instructions on -screen while the receiver outputs test tones to a comfortable volume level. 5 Wait for Channel Level, Speaker Distance, Standing Wave and Acoustic Cal EQ. A progress ...
...to determine the optimum receiver settings for the test tones to the microphone (listening position) or when using speakers that affect the phase (dipole speakers, reflective speakers, etc.), Reverse Phase may be as quiet as Too much ambient noise! 04 Basic Setup Select Normal (Surround back...you can simply select GO NEXT and continue. Again, try to the surround back speaker terminals. 4 Follow the instructions on -screen while the receiver outputs test tones to a comfortable volume level. 5 Wait for Channel Level, Speaker Distance, Standing Wave and Acoustic Cal EQ. A progress ...
Owner's Manual
Page 39
... be incorrect. OSD Language d. You can also choose to confirm and exit the current menu. 3 Select 'System Setup' from the HOME MENU. 4 Select 'Input Setup' from the System Setup menu. 4.SystemSetup A/V RECEIVER a.Manual SP Setup b. Other Setup 4b.Input Setup A/V RECEIVER INPUT Input Name Input Skip : DVD : Rename : OFF Exit Digital In : HDMI Input : Component In : CO-A-RX...
... be incorrect. OSD Language d. You can also choose to confirm and exit the current menu. 3 Select 'System Setup' from the HOME MENU. 4 Select 'Input Setup' from the System Setup menu. 4.SystemSetup A/V RECEIVER a.Manual SP Setup b. Other Setup 4b.Input Setup A/V RECEIVER INPUT Input Name Input Skip : DVD : Rename : OFF Exit Digital In : HDMI Input : Component In : CO-A-RX...

