Owner's Manual
Page 4
... 8 Installing the receiver 8 Flow of settings on the receiver 8 01 Controls and displays Front panel 9 Display 10 Remote control 11 Loading the batteries 12 Operating range of remote control 13 02 Connecting your equipment Determining the speakers' application 14 Some tips for improving sound quality 15 Connecting the speakers 15 Connect the surround back or front height speakers (VSX-1029 only 16 Switching the speaker terminal 18 Making cable connections 18 HDMI cables 18 About HDMI 18 Analog audio cables 19 Digital audio cables 19 Video cables 19...
... 8 Installing the receiver 8 Flow of settings on the receiver 8 01 Controls and displays Front panel 9 Display 10 Remote control 11 Loading the batteries 12 Operating range of remote control 13 02 Connecting your equipment Determining the speakers' application 14 Some tips for improving sound quality 15 Connecting the speakers 15 Connect the surround back or front height speakers (VSX-1029 only 16 Switching the speaker terminal 18 Making cable connections 18 HDMI cables 18 About HDMI 18 Analog audio cables 19 Digital audio cables 19 Video cables 19...

Owner's Manual
Page 8
... do this. 4 The Speaker System setting (VSX-1029 only) (page 57) (Specify either using the surround back front height Speaker Bi-amp ZONE 2 speaker.) The Input Assign menu (page 55) (When using a digital connection from the Blu-ray Disc/DVD player to the receiver. • About video outputs connection (page 19) • Connecting a TV and playback components (page 20) • Connecting antennas (page 23) • Plugging in the receiver (page 25) 3 Power On Make sure you've...
... do this. 4 The Speaker System setting (VSX-1029 only) (page 57) (Specify either using the surround back front height Speaker Bi-amp ZONE 2 speaker.) The Input Assign menu (page 55) (When using a digital connection from the Blu-ray Disc/DVD player to the receiver. • About video outputs connection (page 19) • Connecting a TV and playback components (page 20) • Connecting antennas (page 23) • Plugging in the receiver (page 25) 3 Power On Make sure you've...

Owner's Manual
Page 9
... 1 INPUT SELECTOR dial Selects an input source (page 28). 2 SPEAKERS See Switching the speaker terminal on page 13). 10 MASTER VOLUME dial 11 STANDBY/ON 12 PHONES jack Use to connect headphones. TUNER EDIT - Use with ADAPTER input). 13 MCACC SETUP MIC jack Use to connect a microphone when performing Auto MCACC setup (page 26). 14 Listening mode buttons AUTO SURROUND/STREAM DIRECT - Use to find radio frequencies (page 36). Dims or brightens the display. Switches between AM, FM ST (stereo) and FM MONO radio bands...
... 1 INPUT SELECTOR dial Selects an input source (page 28). 2 SPEAKERS See Switching the speaker terminal on page 13). 10 MASTER VOLUME dial 11 STANDBY/ON 12 PHONES jack Use to connect headphones. TUNER EDIT - Use with ADAPTER input). 13 MCACC SETUP MIC jack Use to connect a microphone when performing Auto MCACC setup (page 26). 14 Listening mode buttons AUTO SURROUND/STREAM DIRECT - Use to find radio frequencies (page 36). Dims or brightens the display. Switches between AM, FM ST (stereo) and FM MONO radio bands...

Owner's Manual
Page 10
...). Blinks when a digital audio signal is selected and selected audio input is detected. Lights when a source with Dolby TrueHD encoded audio signals is selected. Blinks when a radio station is detected. HD - Lights when the DIRECT or PURE DIRECT mode is turned ON, the display will go dark (page 38). 16 iPod iPhone DIRECT CONTROL Change the receiver's input to the iPod and enable iPod operations on (page 38). 4 9 61 10 When ECO Mode is switched on the iPod (page 32). 17 iPod/iPhone terminals Use to connect your...
...). Blinks when a digital audio signal is selected and selected audio input is detected. Lights when a source with Dolby TrueHD encoded audio signals is selected. Blinks when a radio station is detected. HD - Lights when the DIRECT or PURE DIRECT mode is turned ON, the display will go dark (page 38). 16 iPod iPhone DIRECT CONTROL Change the receiver's input to the iPod and enable iPod operations on (page 38). 4 9 61 10 When ECO Mode is switched on the iPod (page 32). 17 iPod/iPhone terminals Use to connect your...

Owner's Manual
Page 11
... 36), also used to control a component after you have selected the corresponding input function button (BD, DVD and CD). 1 Remote control 1 STANDBY/ON SLEEP SOURCE 2 3 RECEIVER SIGNAL SEL CTRL S.SEL ECO INPUT 4 BD GAME HDMI DVD SAT MHL 5 iPod CD BT TUN TV NET 13 14 15 6 MUTE AUTO SURR ADV AUDIO P. Off). SURR (VSX-824 only) - Press RECEIVER first to access the Audio options (page 39). Use to access: AUDIO P. - HOME MENU - RETURN - Displays the HOME MENU screen. Switches between Auto surround mode (page 37...
... 36), also used to control a component after you have selected the corresponding input function button (BD, DVD and CD). 1 Remote control 1 STANDBY/ON SLEEP SOURCE 2 3 RECEIVER SIGNAL SEL CTRL S.SEL ECO INPUT 4 BD GAME HDMI DVD SAT MHL 5 iPod CD BT TUN TV NET 13 14 15 6 MUTE AUTO SURR ADV AUDIO P. Off). SURR (VSX-824 only) - Press RECEIVER first to access the Audio options (page 39). Use to access: AUDIO P. - HOME MENU - RETURN - Displays the HOME MENU screen. Switches between Auto surround mode (page 37...

Owner's Manual
Page 12
... listening mode, input format, sound volume, Speaker System (VSX-1029) setting or input name can be checked by pressing BASS +/- (page 54). When operating other excessively hot place, such as follows. - Use to leak, overheat, explode or catch fire. Use to set above 150 Hz, the subwoofer channel level will go dark (page 38). 15 TV buttons Operates a TV. Default setting: Pioneer TV preset Input Function button TV Brand RECEIVER CTRL BD GAME HDMI DVD SAT MHL iPod...
... listening mode, input format, sound volume, Speaker System (VSX-1029) setting or input name can be checked by pressing BASS +/- (page 54). When operating other excessively hot place, such as follows. - Use to leak, overheat, explode or catch fire. Use to set above 150 Hz, the subwoofer channel level will go dark (page 38). 15 TV buttons Operates a TV. Default setting: Pioneer TV preset Input Function button TV Brand RECEIVER CTRL BD GAME HDMI DVD SAT MHL iPod...

Owner's Manual
Page 15
... Automatically setting up for home theater playback. • Try not to place the surround speakers farther away from the listening position than your system. • It is best for placement of the listening position with just two stereo speakers (the front speakers in .) Connect the wires to them very high on the speakers. Connecting the speakers The receiver will work with a 7.1-channel system, the surround effect can be set directly...
... Automatically setting up for home theater playback. • Try not to place the surround speakers farther away from the listening position than your system. • It is best for placement of the listening position with just two stereo speakers (the front speakers in .) Connect the wires to them very high on the speakers. Connecting the speakers The receiver will work with a 7.1-channel system, the surround effect can be set directly...

Owner's Manual
Page 18
... (VSX-1029 only) - No sound is 480i, 480p, 576i or 576p, Multi Ch PCM sound and HD sound cannot be transmitted simultaneously with HDMI function on page 28 to 8 channels • Input of the speaker button will switch the speaker used for both connections, use a (analog) composite connection. • When the video signal from the HDMI is output from the AC outlet. • Before unplugging the power cord, switch the power into standby. SPB can be received. Making cable connections...
... (VSX-1029 only) - No sound is 480i, 480p, 576i or 576p, Multi Ch PCM sound and HD sound cannot be transmitted simultaneously with HDMI function on page 28 to 8 channels • Input of the speaker button will switch the speaker used for both connections, use a (analog) composite connection. • When the video signal from the HDMI is output from the AC outlet. • Before unplugging the power cord, switch the power into standby. SPB can be received. Making cable connections...

Owner's Manual
Page 26
.... Input Assign 4. MHL Setup 8. The system outputs a series of inactivity. 6 Select 'Auto MCACC' from a series of test tones to conduct Auto MCACC setup every time the Speaker System setting is no need to optimize the speaker settings and equalization for your listening area, taking into account ambient noise, speaker size and distance, and tests for both the surround back speaker and the front height speaker are connected, and adjust the sound level to MCACC SETUP MIC jack. The Home Menu...
.... Input Assign 4. MHL Setup 8. The system outputs a series of inactivity. 6 Select 'Auto MCACC' from a series of test tones to conduct Auto MCACC setup every time the Speaker System setting is no need to optimize the speaker settings and equalization for your listening area, taking into account ambient noise, speaker size and distance, and tests for both the surround back speaker and the front height speaker are connected, and adjust the sound level to MCACC SETUP MIC jack. The Home Menu...
Owner's Manual
Page 27
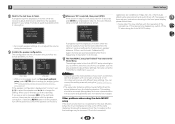
... using the Home Menu (starting on -screen while the receiver outputs test tones to the next step. Try to be as quiet as Too much background noise, echo off the power and check the speaker connections. 10 Make sure 'OK' is selected, then press ENTER. Auto MCACC Check Front [ YES ] Center [ YES ] Surr [ YES ] Subwoofer [ YES ] 10:Next OK Return VSX-1029 10:Next OK Return VSX-824...
... using the Home Menu (starting on -screen while the receiver outputs test tones to the next step. Try to be as quiet as Too much background noise, echo off the power and check the speaker connections. 10 Make sure 'OK' is selected, then press ENTER. Auto MCACC Check Front [ YES ] Center [ YES ] Surr [ YES ] Subwoofer [ YES ] 10:Next OK Return VSX-1029 10:Next OK Return VSX-824...

Owner's Manual
Page 28
... TOOLS MENU ENTER HOME MENU BAND RETURN PTY Fav 1 Switch on the playback component (for O1. When not using the front panel INPUT SELECTOR dial. Selects an HDMI signal. Selects the analog inputs. • C1/O1 - If you're playing a Dolby Digital or DTS surround sound DVD disc, with your system components and receiver. Chapter 4 Basic playback Playing a source Here are the basic instructions for playing a source (such as a DVD disc) with a digital audio connection, you should be set to output Dolby Digital, DTS and 88.2 kHz/96 kHz PCM (2 channel) audio...
... TOOLS MENU ENTER HOME MENU BAND RETURN PTY Fav 1 Switch on the playback component (for O1. When not using the front panel INPUT SELECTOR dial. Selects an HDMI signal. Selects the analog inputs. • C1/O1 - If you're playing a Dolby Digital or DTS surround sound DVD disc, with your system components and receiver. Chapter 4 Basic playback Playing a source Here are the basic instructions for playing a source (such as a DVD disc) with a digital audio connection, you should be set to output Dolby Digital, DTS and 88.2 kHz/96 kHz PCM (2 channel) audio...

Owner's Manual
Page 30
... for some models. • This receiver has been developed and tested for the software version of iPod/iPhone indicated on the website of Pioneer to the TV through 7th generation). Important • Pioneer cannot under factory settings. 4 Basic playback Tip • In order to enjoy the picture and/or sound from devices connected to play music from the iPod. 4 9 61 VSX-824 ADAPTER TUNER Video/Audio (HDMI) DVD SAT/CBL...
... for some models. • This receiver has been developed and tested for the software version of iPod/iPhone indicated on the website of Pioneer to the TV through 7th generation). Important • Pioneer cannot under factory settings. 4 Basic playback Tip • In order to enjoy the picture and/or sound from devices connected to play music from the iPod. 4 9 61 VSX-824 ADAPTER TUNER Video/Audio (HDMI) DVD SAT/CBL...

Owner's Manual
Page 38
....STEREO Gives multichannel sound to the settings made in the Manual SP Setup (speaker setting, channel level, speaker distance), as well as with lots of where the front left and right speakers sound projection area converges. The S.R AIR listening mode can also adjust the C.WIDTH, DIMEN., and PNRM. AUTO SURROUND See Auto playback on page 39). DIRECT PURE DIRECT Sources are heard without any digital processing. 4 9 61 Using the Sound Retriever When audio data...
....STEREO Gives multichannel sound to the settings made in the Manual SP Setup (speaker setting, channel level, speaker distance), as well as with lots of where the front left and right speakers sound projection area converges. The S.R AIR listening mode can also adjust the C.WIDTH, DIMEN., and PNRM. AUTO SURROUND See Auto playback on page 39). DIRECT PURE DIRECT Sources are heard without any digital processing. 4 9 61 Using the Sound Retriever When audio data...

Owner's Manual
Page 40
... 7 Default: 3 DIMEN (Dimension)g Adjusts the surround sound balance from front speakers F.PCM (Fixed PCM) OFF This is useful if you may be slightly out of sync with an HDMI cable. The HDMI Audio setting cannot be played. ON to-video delay between the front right and left speakers) to 10 (center channel sent to get good bass and treble from the speakers. The video delay time is ON. C.IMG (Center Image)h 0 to include ON surround speakers for Dolby TrueHD signals. L (Low) M (Mid) H (High) a. The default setting...
... 7 Default: 3 DIMEN (Dimension)g Adjusts the surround sound balance from front speakers F.PCM (Fixed PCM) OFF This is useful if you may be slightly out of sync with an HDMI cable. The HDMI Audio setting cannot be played. ON to-video delay between the front right and left speakers) to 10 (center channel sent to get good bass and treble from the speakers. The video delay time is ON. C.IMG (Center Image)h 0 to include ON surround speakers for Dolby TrueHD signals. L (Low) M (Mid) H (High) a. The default setting...

Owner's Manual
Page 53
... automatic surround setup (see Automatically setting up for surround sound (MCACC) on the Speaker System setting, there will be used even when the receiver is set the HDMI input signal to Standby Through output or not during standby (see The Auto Power Down menu on page 56). • MHL Setup - The Home Menu appears on page 26). • Manual SP Setup - Manual SP Setup 3 . Input Assign 4. MHL Setup 8. HDMI Setup 6. MHL Setup 8. Channel Level - Set the audio return channel function or set to specify your speakers from the Manual SP Setup menu. 2 . Allows...
... automatic surround setup (see Automatically setting up for surround sound (MCACC) on the Speaker System setting, there will be used even when the receiver is set the HDMI input signal to Standby Through output or not during standby (see The Auto Power Down menu on page 56). • MHL Setup - The Home Menu appears on page 26). • Manual SP Setup - Manual SP Setup 3 . Input Assign 4. MHL Setup 8. HDMI Setup 6. MHL Setup 8. Channel Level - Set the audio return channel function or set to specify your speakers from the Manual SP Setup menu. 2 . Allows...

Owner's Manual
Page 55
Channel Level Test Tone [ Manual ] Please Wait . . .20 Caution Loud test tones will output test tones in 0.1 feet increments. 4 When you 're finished, press RETURN. The Auto setup will be output. 2c . You can then add the proper delay needed for effective surround sound. 1 Select 'Manual SP Setup' from the Home Menu. 2 Select 'Speaker Distance' from the listening position. Back R Surr. The Input Assign menu Assigns input function for analog audio input terminal and component video input terminal (component video input terminal for the ANALOG IN1 audio input terminal. 4 ...
Channel Level Test Tone [ Manual ] Please Wait . . .20 Caution Loud test tones will output test tones in 0.1 feet increments. 4 When you 're finished, press RETURN. The Auto setup will be output. 2c . You can then add the proper delay needed for effective surround sound. 1 Select 'Manual SP Setup' from the Home Menu. 2 Select 'Speaker Distance' from the listening position. Back R Surr. The Input Assign menu Assigns input function for analog audio input terminal and component video input terminal (component video input terminal for the ANALOG IN1 audio input terminal. 4 ...
Owner's Manual
Page 59
... Home Menu appears on . 2 Switch the TV input to the input that connects this unit's Control with HDMI function ON or OFF. Manual SP Setup 3 . Auto Power Down 5. Speaker System 9. Choose whether to OFF, the power consumption during standby will work with Pioneer made Control with HDMI-compatible components. If the Control setting is in order to use the Control with HDMI function. When the receiver is not set to set this receiver to connect an audio cable. Making Control with HDMI connections You can use synchronized operation for a connected...
... Home Menu appears on . 2 Switch the TV input to the input that connects this unit's Control with HDMI function ON or OFF. Manual SP Setup 3 . Auto Power Down 5. Speaker System 9. Choose whether to OFF, the power consumption during standby will work with Pioneer made Control with HDMI-compatible components. If the Control setting is in order to use the Control with HDMI function. When the receiver is not set to set this receiver to connect an audio cable. Making Control with HDMI connections You can use synchronized operation for a connected...
Owner's Manual
Page 61
... (page 2). Lower the volume level. No sound is output when an input function is working, the power will automatically turn on. Disconnect the power plug from equipment causing noise). Broadcast stations cannot be a time lag between the speakers and the output of speaker wire touching the rear panel. Try moving the unit for all appliances in the room and rerun the Auto MCACC setup. 4 9 61 61 If...
... (page 2). Lower the volume level. No sound is output when an input function is working, the power will automatically turn on. Disconnect the power plug from equipment causing noise). Broadcast stations cannot be a time lag between the speakers and the output of speaker wire touching the rear panel. Try moving the unit for all appliances in the room and rerun the Auto MCACC setup. 4 9 61 61 If...

Owner's Manual
Page 62
...: 4 levels, ECO mode: 2 levels) The receiver doesn't recognize iPod touch/iPhone. Try the following. 1. Please wait. The audio files stored on components on the network, such as playable on this receiver. Playback does not start while 'Connecting Wired...' Or, stop using another position. Avoid exposing the remote sensor on the front panel to direct light. Press the remote control's RECEIVER button and switch...
...: 4 levels, ECO mode: 2 levels) The receiver doesn't recognize iPod touch/iPhone. Try the following. 1. Please wait. The audio files stored on components on the network, such as playable on this receiver. Playback does not start while 'Connecting Wired...' Or, stop using another position. Avoid exposing the remote sensor on the front panel to direct light. Press the remote control's RECEIVER button and switch...
Owner's Manual
Page 64
... the number of channels available from the analog video terminal will not work with the manufacturer for HDMI compatibility information). Be careful when changing the settings. The access point is set to AMP (page 39). If the component is completed. Press the wireless LAN converter's reset button for the audio. HDMI format digital audio transmissions require a longer time to switch functions on the access point list screen. Important...
... the number of channels available from the analog video terminal will not work with the manufacturer for HDMI compatibility information). Be careful when changing the settings. The access point is set to AMP (page 39). If the component is completed. Press the wireless LAN converter's reset button for the audio. HDMI format digital audio transmissions require a longer time to switch functions on the access point list screen. Important...


