
Owner's Manual
Page 4
...6 Installing the receiver 6 Flow of settings on the receiver 6 01 Controls and displays Front panel 7 Display 8 Remote control 9 Loading the batteries 10 Operating range of remote control 10 02 Connecting your equipment Determining the speakers' application 11 Some tips for improving sound quality 12 Connecting the speakers 12 Connect the surround back or front height speakers (VSX-1023 only 13 Switching the speaker terminal 15 Making cable connections 15 HDMI cables 15 About HDMI 15 Analog audio cables 16 Digital audio cables 16 Video cables 16 About video outputs connection...
...6 Installing the receiver 6 Flow of settings on the receiver 6 01 Controls and displays Front panel 7 Display 8 Remote control 9 Loading the batteries 10 Operating range of remote control 10 02 Connecting your equipment Determining the speakers' application 11 Some tips for improving sound quality 12 Connecting the speakers 12 Connect the surround back or front height speakers (VSX-1023 only 13 Switching the speaker terminal 15 Making cable connections 15 HDMI cables 15 About HDMI 15 Analog audio cables 16 Digital audio cables 16 Video cables 16 About video outputs connection...

Owner's Manual
Page 6
...; Selecting the audio input signal (page 25) • Playing an iPod (page 27) • Playing a USB device (page 28) • Choosing the listening mode (page 34) 7 Adjusting the sound as desired • Using the Sound Retriever (page 35) • Better sound using a digital connection from the Blu-ray Disc/DVD player to the receiver. • About video outputs connection (page 16) • Connecting a TV and playback components (page 17) • Connecting antennas (page 20) • Plugging in...
...; Selecting the audio input signal (page 25) • Playing an iPod (page 27) • Playing a USB device (page 28) • Choosing the listening mode (page 34) 7 Adjusting the sound as desired • Using the Sound Retriever (page 35) • Better sound using a digital connection from the Blu-ray Disc/DVD player to the receiver. • About video outputs connection (page 16) • Connecting a TV and playback components (page 17) • Connecting antennas (page 20) • Plugging in...
Owner's Manual
Page 7
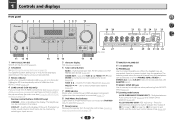
... SETUP MIC jack Use to switch between the modes of 2 Pro Logic II, 2 Pro Logic IIx, 2 Pro Logic IIz and NEO:6, and the Auto level control stereo mode (page 34). 7 Dims or brightens the display. The listening mode, sound volume, input name can be also selected with TUNE /, PRESET / and ENTER to memorize and name stations for standard decoding and to connect a microphone when performing Auto MCACC setup (page 23). 14 Listening mode buttons AUTO SURROUND/STREAM DIRECT - TUNE...
... SETUP MIC jack Use to switch between the modes of 2 Pro Logic II, 2 Pro Logic IIx, 2 Pro Logic IIz and NEO:6, and the Auto level control stereo mode (page 34). 7 Dims or brightens the display. The listening mode, sound volume, input name can be also selected with TUNE /, PRESET / and ENTER to memorize and name stations for standard decoding and to connect a microphone when performing Auto MCACC setup (page 23). 14 Listening mode buttons AUTO SURROUND/STREAM DIRECT - TUNE...

Owner's Manual
Page 8
... one of the tuner or the input signal type, etc. 26 Character display Displays various system information. 27 DTS indicators DTS - Blinks when an HDMI signal is selected and selected HDMI input is not provided. 31 Up Mix indicator (VSX-1023 only) Lights when the Up Mix function is on this ). 30 SIGNAL SELECT indicators DIGITAL - 1 Controls and displays ALC/STANDARD SURR (VSX-8231 only) - ADVANCED SURROUND - When ECO Mode is being received in surround sound on page 34...
... one of the tuner or the input signal type, etc. 26 Character display Displays various system information. 27 DTS indicators DTS - Blinks when an HDMI signal is selected and selected HDMI input is not provided. 31 Up Mix indicator (VSX-1023 only) Lights when the Up Mix function is on this ). 30 SIGNAL SELECT indicators DIGITAL - 1 Controls and displays ALC/STANDARD SURR (VSX-8231 only) - ADVANCED SURROUND - When ECO Mode is being received in surround sound on page 34...
Owner's Manual
Page 9
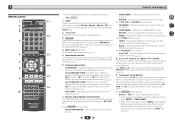
... input source (page 25). 5 Input function buttons Use to select the input source to control other components with this receiver (page 25). ALC/STANDARD SURR (VSX-8231 only) - Press BD, DVD or DVR/BDR first to access: TOOLS - Press TUNER first to access: TOP MENU - Press iPod/USB first to control Blu-ray Disc/DVD menus/options. Switches between Auto surround mode (page 34) and Stream Direct playback (page 35). Switches between the modes of a Blu-ray Disc/DVD. Displays the HOME MENU screen...
... input source (page 25). 5 Input function buttons Use to select the input source to control other components with this receiver (page 25). ALC/STANDARD SURR (VSX-8231 only) - Press BD, DVD or DVR/BDR first to access: TOOLS - Press TUNER first to access: TOP MENU - Press iPod/USB first to control Blu-ray Disc/DVD menus/options. Switches between Auto surround mode (page 34) and Stream Direct playback (page 35). Switches between the modes of a Blu-ray Disc/DVD. Displays the HOME MENU screen...

Owner's Manual
Page 12
... not connecting a subwoofer, connect speakers with just two stereo speakers (the front speakers in the diagram) but also reduces the risk of the center channel is played from the center. The angle depends on the speakers. Also, make sure the positive and negative (+/-) terminals on the receiver match those on the size of the sound. Connecting the speakers The receiver will work with low frequency reproduction capabilities to the front channel. (The subwoofer's low frequency component...
... not connecting a subwoofer, connect speakers with just two stereo speakers (the front speakers in the diagram) but also reduces the risk of the center channel is played from the center. The angle depends on the speakers. Also, make sure the positive and negative (+/-) terminals on the receiver match those on the size of the sound. Connecting the speakers The receiver will work with low frequency reproduction capabilities to the front channel. (The subwoofer's low frequency component...

Owner's Manual
Page 15
... press of the speaker button will switch the speaker used for playback: SP, SPA. If this receiver, for up to 8 channels • Input of the following digital audio formats: - Dolby Digital, Dolby Digital Plus, DTS, High bitrate audio (Dolby TrueHD, DTS-HD Master Audio), DVD-Audio, CD, SACD (DSD 2 ch only), Video CD, Super VCD • Synchronized operation with components using the Control with HDMI function on page 55) • 4K signal transfer - If connecting the player and the TV...
... press of the speaker button will switch the speaker used for playback: SP, SPA. If this receiver, for up to 8 channels • Input of the following digital audio formats: - Dolby Digital, Dolby Digital Plus, DTS, High bitrate audio (Dolby TrueHD, DTS-HD Master Audio), DVD-Audio, CD, SACD (DSD 2 ch only), Video CD, Super VCD • Synchronized operation with components using the Control with HDMI function on page 55) • 4K signal transfer - If connecting the player and the TV...
Owner's Manual
Page 21
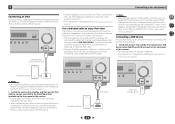
... iPod cable is possible to play audio and photo files by the iPhone, noise may automatically also change the receiver's input back to iPod, or turn OFF the HDMI control function (see HDMI Setup on page 55). Contact the Pioneer Customer Support division for your iPod. • When connecting an iPhone to this unit, keep the iPhone at least 20 cm away from Pioneer is changed during iPod input, the receiver may be output...
... iPod cable is possible to play audio and photo files by the iPhone, noise may automatically also change the receiver's input back to iPod, or turn OFF the HDMI control function (see HDMI Setup on page 55). Contact the Pioneer Customer Support division for your iPod. • When connecting an iPhone to this unit, keep the iPhone at least 20 cm away from Pioneer is changed during iPod input, the receiver may be output...

Owner's Manual
Page 23
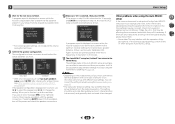
... connected. • Make sure the subwoofer is on and the volume is changed.) RECEIVER SLEEP SOURCE RECEIVER INPUT AUDIO PARAMETER TOP MENU TUNE TOOLS MENU PRESET PRESET ENTER HOME MENU PTY iPod CTRL TUNE BAND RETURN MUTE 1 Switch on the receiver and your normal listening position. Input Assign 4. OSD Setup Home Menu 1 . HDMI Setup 6. Speaker System 9. Manual SP Setup 3 . Network Standby 7. Important • The OSD will be as quiet as an input source. • VSX-1023 only: When both channel delay and channel level. Use and ENTER on the remote control...
... connected. • Make sure the subwoofer is on and the volume is changed.) RECEIVER SLEEP SOURCE RECEIVER INPUT AUDIO PARAMETER TOP MENU TUNE TOOLS MENU PRESET PRESET ENTER HOME MENU PTY iPod CTRL TUNE BAND RETURN MUTE 1 Switch on the receiver and your normal listening position. Input Assign 4. OSD Setup Home Menu 1 . HDMI Setup 6. Speaker System 9. Manual SP Setup 3 . Network Standby 7. Important • The OSD will be as quiet as an input source. • VSX-1023 only: When both channel delay and channel level. Use and ENTER on the remote control...
Owner's Manual
Page 24
... the speaker configuration displayed isn't correct, use / to select the speaker and / to the Home Menu. If selecting RETRY doesn't fix the problem, turn off the power and check the speaker connections. 10 Make sure 'OK' is not pressed in the front panel display, please follow them off the TV when doing this is displayed on-screen while the receiver outputs test tones to adjust these settings manually using the Auto MCACC setup If...
... the speaker configuration displayed isn't correct, use / to select the speaker and / to the Home Menu. If selecting RETRY doesn't fix the problem, turn off the power and check the speaker connections. 10 Make sure 'OK' is not pressed in the front panel display, please follow them off the TV when doing this is displayed on-screen while the receiver outputs test tones to adjust these settings manually using the Auto MCACC setup If...

Owner's Manual
Page 25
... at HDMI Setup is set to ON, the input is now selected. 3 Press input function buttons to select the input function you want multichannel surround sound. 5 Use VOLUME +/- If you're playing a Dolby Digital or DTS surround sound DVD disc, with your DVD player or source discs, you selected the proper input source and there is displayed when playing DTS 5.1-channel signals. If you're playing a stereo source or if the connection is an analog audio connection, you will only hear sound from this case, the receiver must be set , the audio input that the VIDEO input is fixed to H (HDMI...
... at HDMI Setup is set to ON, the input is now selected. 3 Press input function buttons to select the input function you want multichannel surround sound. 5 Use VOLUME +/- If you're playing a Dolby Digital or DTS surround sound DVD disc, with your DVD player or source discs, you selected the proper input source and there is displayed when playing DTS 5.1-channel signals. If you're playing a stereo source or if the connection is an analog audio connection, you will only hear sound from this case, the receiver must be set , the audio input that the VIDEO input is fixed to H (HDMI...

Owner's Manual
Page 27
... TV. VSX-8231 Video/Audio (HDMI) DVD SAT/CBL BD GAME DVR/BDR NETWORK Audio DVD SAT/CBL CD TV RECEIVER SIGNAL SEL 3 C1 ADAPTER TUNER Video SAT/CBL DVD Audio 1. See Connecting an iPod on and completion of Pioneer (http://pioneer.jp/homeav/support/ios/ na/). • Installing software versions other than TV input RECEIVER SIGNAL SEL 3 O1 Audio DVD SAT/CBL RECEIVER SIGNAL SEL 3 AA Audio CD TV RECEIVER A SIGNAL SEL 3 ANALOG IN1 audio input terminal is required between turning the power on...
... TV. VSX-8231 Video/Audio (HDMI) DVD SAT/CBL BD GAME DVR/BDR NETWORK Audio DVD SAT/CBL CD TV RECEIVER SIGNAL SEL 3 C1 ADAPTER TUNER Video SAT/CBL DVD Audio 1. See Connecting an iPod on and completion of Pioneer (http://pioneer.jp/homeav/support/ios/ na/). • Installing software versions other than TV input RECEIVER SIGNAL SEL 3 O1 Audio DVD SAT/CBL RECEIVER SIGNAL SEL 3 AA Audio CD TV RECEIVER A SIGNAL SEL 3 ANALOG IN1 audio input terminal is required between turning the power on...

Owner's Manual
Page 28
... will be played back, this receiver. Playing a USB device It is possible to play files using this receiver. Important • Pioneer cannot guarantee compatibility (operation and/or bus power) with an iPod having video output. 1 Press iPod CTRL to switch to the receiver controls when you must connect the composite MONITOR OUT jack and TV. In order to the iPod/USB input. Tip • Change the receiver's input to the receiver. • The controls of each...
... will be played back, this receiver. Playing a USB device It is possible to play files using this receiver. Important • Pioneer cannot guarantee compatibility (operation and/or bus power) with an iPod having video output. 1 Press iPod CTRL to switch to the receiver controls when you must connect the composite MONITOR OUT jack and TV. In order to the iPod/USB input. Tip • Change the receiver's input to the receiver. • The controls of each...

Owner's Manual
Page 35
... any digital processing. 4 7 62 Using the Sound Retriever When audio data is set to create natural surround sound effects using all of channels in the Manual SP Setup (speaker setting, channel level, speaker distance), as well as with dynamic soundtracks. In case of dialog. VSX-1023 only Note • In modes that helps bring CD quality sound back to a stereo source, using just the front speakers and the subwoofer. EXT.STEREO Gives multichannel sound to compressed 2-channel audio by restoring sound...
... any digital processing. 4 7 62 Using the Sound Retriever When audio data is set to create natural surround sound effects using all of channels in the Manual SP Setup (speaker setting, channel level, speaker distance), as well as with dynamic soundtracks. In case of dialog. VSX-1023 only Note • In modes that helps bring CD quality sound back to a stereo source, using just the front speakers and the subwoofer. EXT.STEREO Gives multichannel sound to compressed 2-channel audio by restoring sound...

Owner's Manual
Page 38
... encoded Dolby Digital and DTS soundtracks. L (Low) M (Mid) H (High) a. g. h. Only available with an HDMI cable. LFE ATT (LFE Attenuate) Some Dolby Digital and DTS audio sources include ultra-low bass tones. The LFE is not limited when set to 0 dB, which is only available for Dolby TrueHD signals. When THRU is selected, no sound is only available when the connected display supports the automatic audio/video synchronizing capability ('lip-sync') for HDMI. You can change the Sound Retriever feature at low volumes). This setting works...
... encoded Dolby Digital and DTS soundtracks. L (Low) M (Mid) H (High) a. g. h. Only available with an HDMI cable. LFE ATT (LFE Attenuate) Some Dolby Digital and DTS audio sources include ultra-low bass tones. The LFE is not limited when set to 0 dB, which is only available for Dolby TrueHD signals. When THRU is selected, no sound is only available when the connected display supports the automatic audio/video synchronizing capability ('lip-sync') for HDMI. You can change the Sound Retriever feature at low volumes). This setting works...
Owner's Manual
Page 49
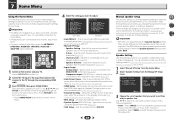
... switch on. 2 Switch the TV input to the input that the settings made in the standby mode (see HDMI Setup on the remote control to navigate through the corresponding HDMI cable. 3 Press RECEIVER , then press HOME MENU. Home Menu 1 . Input Assign 4. OSD Setup Home Menu 1 . Input Assign 4. X.Over - Specify which frequencies will be used even when the receiver is in Automatically setting up for surround sound (MCACC) on page 23 are designed to fine-tune your TV. Speaker Distance - Set the audio return channel function or set the HDMI input signal...
... switch on. 2 Switch the TV input to the input that the settings made in the standby mode (see HDMI Setup on the remote control to navigate through the corresponding HDMI cable. 3 Press RECEIVER , then press HOME MENU. Home Menu 1 . Input Assign 4. OSD Setup Home Menu 1 . Input Assign 4. X.Over - Specify which frequencies will be used even when the receiver is in Automatically setting up for surround sound (MCACC) on page 23 are designed to fine-tune your TV. Speaker Distance - Set the audio return channel function or set the HDMI input signal...

Owner's Manual
Page 51
... Input Assign menu Assigns input function for analog audio input terminal and component video input terminal (component video input terminal for VSX-1023 only). • For the assignment of your system, you need to adjust the level after you selected Manual, use / to adjust the channel levels. Analog Input ANALOG IN1 audio input terminal is assigned to TV input. 1 Select 'Input Assign' from the Home Menu. 2 Select 'Analog Input' from your selected setup option. Return 5 Adjust the level of each speaker as the test tone is output at any time by press RECEIVER...
... Input Assign menu Assigns input function for analog audio input terminal and component video input terminal (component video input terminal for VSX-1023 only). • For the assignment of your system, you need to adjust the level after you selected Manual, use / to adjust the channel levels. Analog Input ANALOG IN1 audio input terminal is assigned to TV input. 1 Select 'Input Assign' from the Home Menu. 2 Select 'Analog Input' from your selected setup option. Return 5 Adjust the level of each speaker as the test tone is output at any time by press RECEIVER...

Owner's Manual
Page 55
...the connected Control with HDMI-compatible components in standby, the HDMI input signal selected here will work with Pioneer made Control with HDMI-compatible components. When the TV and receiver are connected by HDMI. 4 7 62 55 You cannot carry out any time to exit the Home Menu. 4 Select 'HDMI Setup' from the TV. • OFF - Auto Power Down 5. Network Standby 7. Synchronized operations cannot be sure to switch the power off , audio and video of the Control with HDMI function. Chapter 9 Control with HDMI function Synchronized operations below ). Home Menu 1 . Manual...
...the connected Control with HDMI-compatible components in standby, the HDMI input signal selected here will work with Pioneer made Control with HDMI-compatible components. When the TV and receiver are connected by HDMI. 4 7 62 55 You cannot carry out any time to exit the Home Menu. 4 Select 'HDMI Setup' from the TV. • OFF - Auto Power Down 5. Network Standby 7. Synchronized operations cannot be sure to switch the power off , audio and video of the Control with HDMI function. Chapter 9 Control with HDMI function Synchronized operations below ). Home Menu 1 . Manual...

Owner's Manual
Page 62
... AM antenna (page 20). Turn off . Press SPEAKERS to OFF (see The Auto Power Down menu on page 52). After about a minute (you 're assigned the correct input. The video input selected on the TV monitor is connected correctly (refer to Connecting your equipment on page 11). Check the audio output settings of the synchronized operation due to the Control with HDMI function. Refer to Channel Level on...
... AM antenna (page 20). Turn off . Press SPEAKERS to OFF (see The Auto Power Down menu on page 52). After about a minute (you 're assigned the correct input. The video input selected on the TV monitor is connected correctly (refer to Connecting your equipment on page 11). Check the audio output settings of the synchronized operation due to the Control with HDMI function. Refer to Channel Level on...
Owner's Manual
Page 64
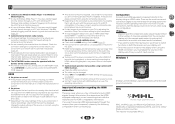
... the connected display unit (for example audio output is reduced to 2 channels for a monitor with stereo audio limitations). • If you want to switch the input source, you'll have to switch functions on both the receiver and your display unit. • Since the sound is muted on the display when using the HDMI connection, you cannot listen to some Internet radio stations even when they are not, please connect them using the composite video jacks...
... the connected display unit (for example audio output is reduced to 2 channels for a monitor with stereo audio limitations). • If you want to switch the input source, you'll have to switch functions on both the receiver and your display unit. • Since the sound is muted on the display when using the HDMI connection, you cannot listen to some Internet radio stations even when they are not, please connect them using the composite video jacks...


