

Owner's Manual
Page 4
...for surround sound (MCACC). . . 20 Other problems when using synchronization 39 About synchronized operations 39 About connections with a product of remote control 9 02 Connecting your equipment Placing the speakers 10 Hints on the Control with Your System 26 Listening to Satellite Radio 26 ...Naming preset stations 28 05 Listening to your system Choosing the listening mode 29 Auto playback 29 Listening in a safe place for buying this Pioneer product. After you start 5 Checking what's in the box 5 Installing the receiver 5 Flow of settings on the receiver 5 01 Controls...
...for surround sound (MCACC). . . 20 Other problems when using synchronization 39 About synchronized operations 39 About connections with a product of remote control 9 02 Connecting your equipment Placing the speakers 10 Hints on the Control with Your System 26 Listening to Satellite Radio 26 ...Naming preset stations 28 05 Listening to your system Choosing the listening mode 29 Auto playback 29 Listening in a safe place for buying this Pioneer product. After you start 5 Checking what's in the box 5 Installing the receiver 5 Flow of settings on the receiver 5 01 Controls...

Owner's Manual
Page 5
...241;ol Before you start Checking what's in the box Please check that you've received the following supplied accessories: • Setup microphone • Remote control • AAA size IEC R03 dry cell batteries (to confirm system operation) x2 • AM loop antenna • FM wire antenna ...) • Setting the Audio options (page 32) • Manual speaker setup (page 34) 8 Making maximum use of the remote control • Setting the remote to put it on a color TV (the screen may interfere with an abundance of the steps indicate the following: Required setting item Setting...
...241;ol Before you start Checking what's in the box Please check that you've received the following supplied accessories: • Setup microphone • Remote control • AAA size IEC R03 dry cell batteries (to confirm system operation) x2 • AM loop antenna • FM wire antenna ...) • Setting the Audio options (page 32) • Manual speaker setup (page 34) 8 Making maximum use of the remote control • Setting the remote to put it on a color TV (the screen may interfere with an abundance of the steps indicate the following: Required setting item Setting...
Owner's Manual
Page 6
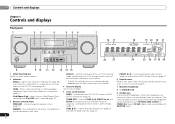
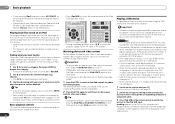
... an HDMI-equipped component; lights when the component is selected (page 19). 3 Receiver control buttons SPEAKERS - DISPLAY - Switches the display of remote control on page 9). 7 MASTER VOLUME dial 8 STANDBY/ON 9 PHONES jack Use to on after the Auto MCACC setup (page 20...you have selected. 4 Character display See Display on (Acoustic Calibration EQ is on page 7. 5 Tuner control buttons BAND - CHANNEL RECEIVER VSX-821 HDMI iPod iPhone iPad INPUT SELECTOR STANDBY /ON SPEAKERS DIMMER DISPLAY BAND TUNER EDIT TUNE PRESET AUTO SURROUND/ ALC/ STREAM DIRECT STANDARD SURR ...
... an HDMI-equipped component; lights when the component is selected (page 19). 3 Receiver control buttons SPEAKERS - DISPLAY - Switches the display of remote control on page 9). 7 MASTER VOLUME dial 8 STANDBY/ON 9 PHONES jack Use to on after the Auto MCACC setup (page 20...you have selected. 4 Character display See Display on (Acoustic Calibration EQ is on page 7. 5 Tuner control buttons BAND - CHANNEL RECEIVER VSX-821 HDMI iPod iPhone iPad INPUT SELECTOR STANDBY /ON SPEAKERS DIMMER DISPLAY BAND TUNER EDIT TUNE PRESET AUTO SURROUND/ ALC/ STREAM DIRECT STANDARD SURR ...
Owner's Manual
Page 8
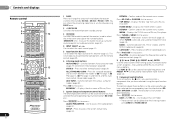
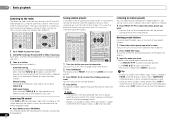
...-ray Discs. 7 System Setup and component control buttons The following button controls can be accessed after you to control other components with the remote control (page 40). 6 Listening mode buttons AUTO/DIRECT - Use to access the System Setup menu (page 34). MENU - The controls...using the input function buttons. RETURN - Press BD, DVD or DVR/BDR first to access: BASS -/+, TRE -/+ - Off). 01 Controls and displays Remote control 1 RECEIVER SLEEP TV SOURCE CONTROL 2 3 RECEIVER INPUT SELECT INPUT 4 BD DVD TV DVR/BDR CD CD-R CH 5 ADAPTER iPod USB VIDEO 1...
...-ray Discs. 7 System Setup and component control buttons The following button controls can be accessed after you to control other components with the remote control (page 40). 6 Listening mode buttons AUTO/DIRECT - Use to access the System Setup menu (page 34). MENU - The controls...using the input function buttons. RETURN - Press BD, DVD or DVR/BDR first to access: BASS -/+, TRE -/+ - Off). 01 Controls and displays Remote control 1 RECEIVER SLEEP TV SOURCE CONTROL 2 3 RECEIVER INPUT SELECT INPUT 4 BD DVD TV DVR/BDR CD CD-R CH 5 ADAPTER iPod USB VIDEO 1...

Owner's Manual
Page 9
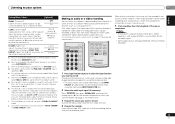
...TV input signal. Use to adjust the level (page 35). Use to directly select a radio frequency (page 28) or the tracks on the remote. Loading the batteries MIDNIGHT - DIMMER - Never use different batteries together. - Insert the plus and minus sides of this unit. S.RETRIEVER - ...Batteries with the unit are obstacles between the hard disk, DVD and VCR controls for Pioneer TVs. 10 Number buttons and other components connected to select a channel, then use of remote control The remote control may not last over a long period. Thus if you can be controlled in...
...TV input signal. Use to adjust the level (page 35). Use to directly select a radio frequency (page 28) or the tracks on the remote. Loading the batteries MIDNIGHT - DIMMER - Never use different batteries together. - Insert the plus and minus sides of this unit. S.RETRIEVER - ...Batteries with the unit are obstacles between the hard disk, DVD and VCR controls for Pioneer TVs. 10 Number buttons and other components connected to select a channel, then use of remote control The remote control may not last over a long period. Thus if you can be controlled in...
Owner's Manual
Page 18
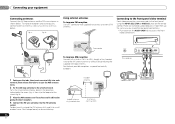
... antenna and the FM wire antenna as shown below ). There are accessed via the front panel using the INPUT SELECTOR or VIDEO2 button on the remote control. To fix the stand to 20 ft.) Video camera, etc. Hook them up . 18 En Outdoor antenna ANTENNA AM LOOP Indoor antenna (vinyl-coated...
... antenna and the FM wire antenna as shown below ). There are accessed via the front panel using the INPUT SELECTOR or VIDEO2 button on the remote control. To fix the stand to 20 ft.) Video camera, etc. Hook them up . 18 En Outdoor antenna ANTENNA AM LOOP Indoor antenna (vinyl-coated...

Owner's Manual
Page 20
...exits and no obstacles between the speakers and the microphone. 03 Basic Setup Chapter 3: Basic Setup Canceling the demo display The display on the remote control to navigate through the corresponding composite or component cable. 3 Connect the microphone to the MCACC SETUP MIC jack on the power to ... speaker, make sure that the Pre Out setting is correctly set up . • When using a table or a chair. 4 Press RECEIVER on the remote control, then press the SETUP button. Otherwise, place the microphone at high volume. Make sure there are output at ear level using surround back or...
...exits and no obstacles between the speakers and the microphone. 03 Basic Setup Chapter 3: Basic Setup Canceling the demo display The display on the remote control to navigate through the corresponding composite or component cable. 3 Connect the microphone to the MCACC SETUP MIC jack on the power to ... speaker, make sure that the Pre Out setting is correctly set up . • When using a table or a chair. 4 Press RECEIVER on the remote control, then press the SETUP button. Otherwise, place the microphone at high volume. Make sure there are output at ear level using surround back or...

Owner's Manual
Page 22
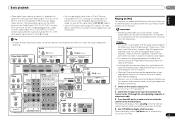
... check the connections and settings. For other components using the input function buttons. For example, if you select the input source using the remote control. It is fixed to the source component. If the display does not correspond to check on your home theater system. 04 Basic ...player or digital satellite receiver. Start by using the front panel INPUT SELECTOR dial. To operate the receiver, first press RECEIVER on the remote control, then press the appropriate button to the VIDEO jacks on your TV and subwoofer (if you selected the proper input source and ...
... check the connections and settings. For other components using the input function buttons. For example, if you select the input source using the remote control. It is fixed to the source component. If the display does not correspond to check on your home theater system. 04 Basic ...player or digital satellite receiver. Start by using the front panel INPUT SELECTOR dial. To operate the receiver, first press RECEIVER on the remote control, then press the appropriate button to the VIDEO jacks on your TV and subwoofer (if you selected the proper input source and ...
Owner's Manual
Page 23
...Use TOP MENU to the input that connects this receiver. Other than CD input RECEIVER SIGNAL SEL 0 C1 Audio 1. Important • Pioneer cannot under any circumstances accept responsibility for reproduction of audio content from any inconvenience or loss of this receiver to the TV through the corresponding.... 3 Press iPod USB on page 19. 2 Switch the TV input to display iPod Top menu. See Connecting an iPod on the remote control to switch the receiver to each terminal, select the input by doing the following. Basic playback 04 • When digital input (...
...Use TOP MENU to the input that connects this receiver. Other than CD input RECEIVER SIGNAL SEL 0 C1 Audio 1. Important • Pioneer cannot under any circumstances accept responsibility for reproduction of audio content from any inconvenience or loss of this receiver to the TV through the corresponding.... 3 Press iPod USB on page 19. 2 Switch the TV input to display iPod Top menu. See Connecting an iPod on the remote control to switch the receiver to each terminal, select the input by doing the following. Basic playback 04 • When digital input (...
Owner's Manual
Page 24
...8226; Note that connects this receiver. Finding what you must use the main controls of your iPod instead. Basic playback controls This receiver's remote control buttons can be used with all USB mass storage devices and assumes no title assigned to enable iPod operations on the iPod. Important ... players (MP3 players) of this receiver, you 're done. For example, you can also press ENTER to start playback. Important • Pioneer cannot guarantee compatibility (operation and/or bus power) with an iPod having video output. 1 Press iPod CTRL to switch to the iPod controls for...
...8226; Note that connects this receiver. Finding what you must use the main controls of your iPod instead. Basic playback controls This receiver's remote control buttons can be used with all USB mass storage devices and assumes no title assigned to enable iPod operations on the iPod. Important ... players (MP3 players) of this receiver, you 're done. For example, you can also press ENTER to start playback. Important • Pioneer cannot guarantee compatibility (operation and/or bus power) with an iPod having video output. 1 Press iPod CTRL to switch to the iPod controls for...

Owner's Manual
Page 25
... (supplied with Bluetooth wireless technology: Digital music player + Bluetooth audio transmitter (sold commercially) Music data Bluetooth® ADAPTER This receiver Remote control operation Wireless music play . For more information on error messages, see USB messages on a device not equipped with SCMS-T type... About WMA WMA is connected to this unit, a product equipped with some irregularly encoded files may not play When the Bluetooth ADAPTER (Pioneer Model No. If this receiver.) About MPEG-4 AAC Advanced Audio Coding (AAC) is incompatible. File extension: .mp3 • WMA...
... (supplied with Bluetooth wireless technology: Digital music player + Bluetooth audio transmitter (sold commercially) Music data Bluetooth® ADAPTER This receiver Remote control operation Wireless music play . For more information on error messages, see USB messages on a device not equipped with SCMS-T type... About WMA WMA is connected to this unit, a product equipped with some irregularly encoded files may not play When the Bluetooth ADAPTER (Pioneer Model No. If this receiver.) About MPEG-4 AAC Advanced Audio Coding (AAC) is incompatible. File extension: .mp3 • WMA...
Owner's Manual
Page 26
...MENU. 2 Press ENTER to enter PAIRING. 3 Select the PIN code to follow installation and setup instructions are registered trademarks owned by Pioneer Corporation is available to enable Bluetooth communications. Easy to be compatible with AVRCP profile. • Depending on the receiver. Press ADAPTER ...talk, uncensored entertainment, comedy, family programming, local traffic and weather and news from your most trusted sources. This receiver's remote control buttons can also be done with this unit allows you to begin enjoying the service. Listening to Satellite Radio To ...
...MENU. 2 Press ENTER to enter PAIRING. 3 Select the PIN code to follow installation and setup instructions are registered trademarks owned by Pioneer Corporation is available to enable Bluetooth communications. Easy to be compatible with AVRCP profile. • Depending on the receiver. Press ADAPTER ...talk, uncensored entertainment, comedy, family programming, local traffic and weather and news from your most trusted sources. This receiver's remote control buttons can also be done with this unit allows you to begin enjoying the service. Listening to Satellite Radio To ...

Owner's Manual
Page 27
... the space provided near a window (refer to activate your radio subscription, you will need to have a printed 12-digit SID number. Connect SIRIUS on the remote control to do everything if you want . You can select channels directly by directly inputting their channel number and providing the parental lock password. •...
... the space provided near a window (refer to activate your radio subscription, you will need to have a printed 12-digit SID number. Connect SIRIUS on the remote control to do everything if you want . You can select channels directly by directly inputting their channel number and providing the parental lock password. •...
Owner's Manual
Page 28
... you often listen to a particular radio station, it shows as ST when recalled. See Listening to the radio on page 28 for more on the remote control to recall the station preset. The display shows PRESET, then a blinking MEM and station preset. 3 Press PRESET / to select the station preset...
... you often listen to a particular radio station, it shows as ST when recalled. See Listening to the radio on page 28 for more on the remote control to recall the station preset. The display shows PRESET, then a blinking MEM and station preset. 3 Press PRESET / to select the station preset...

Owner's Manual
Page 30
b. You can also adjust the C.IMG effect (see Setting the Audio options on the remote control. • The audio is active. • You can choose the STEREO mode by restoring sound pressure and smoothing jagged artifacts left over after compression. e. f. &#...
b. You can also adjust the C.IMG effect (see Setting the Audio options on the remote control. • The audio is active. • You can choose the STEREO mode by restoring sound pressure and smoothing jagged artifacts left over after compression. e. f. &#...
Owner's Manual
Page 33
.... • The input source can also be selected by using INPUT SELECT buttons on the remote control, or by using S.RETRIEVER button. You can make an audio or a video recording from the built-in DOLBY PLII MUSIC mode. b. The default setting ...
.... • The input source can also be selected by using INPUT SELECT buttons on the remote control, or by using S.RETRIEVER button. You can make an audio or a video recording from the built-in DOLBY PLII MUSIC mode. b. The default setting ...

Owner's Manual
Page 34
... page 37). • FL Demo Mode - Channel Level - Sets the demo display on the front panel display (see The Auto Power Down menu on the remote control to confirm and exit the current menu. • Press SETUP at high volume. Speaker Setting Use this receiver to the TV through the screens...
... page 37). • FL Demo Mode - Channel Level - Sets the demo display on the front panel display (see The Auto Power Down menu on the remote control to confirm and exit the current menu. • Press SETUP at high volume. Speaker Setting Use this receiver to the TV through the screens...

Owner's Manual
Page 36
... Auto setup will automatically be switched off. • Make sure you 're finished, press RETURN. You may see Using the component video jacks on the remote control. Auto Power Down 7 . Note • If you are using a component video input, you 're finished, press RETURN. You return to that corresponds with an...
... Auto setup will automatically be switched off. • Make sure you 're finished, press RETURN. You may see Using the component video jacks on the remote control. Auto Power Down 7 . Note • If you are using a component video input, you 're finished, press RETURN. You return to that corresponds with an...
Owner's Manual
Page 38
... over automatically when the TV's input is turned off and disconnect the power cord from the wall socket. When using the TV's remote control. • Power synchronization with TV • Automatic switching of this unit's power is changed or a Control with HDMI connections... are not output. 07 Control with HDMI function Chapter 7: Control with HDMI function Synchronized operations below ). Important • With Pioneer devices, the Control with HDMI functions are output from the System Setup menu. For more information see Connecting using the Control with...
... over automatically when the TV's input is turned off and disconnect the power cord from the wall socket. When using the TV's remote control. • Power synchronization with TV • Automatic switching of this unit's power is changed or a Control with HDMI connections... are not output. 07 Control with HDMI function Chapter 7: Control with HDMI function Synchronized operations below ). Important • With Pioneer devices, the Control with HDMI functions are output from the System Setup menu. For more information see Connecting using the Control with...
Owner's Manual
Page 40
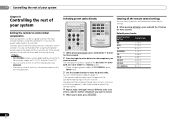
... to enter the preset code. The component can be controllable after assigning the proper preset code, or the codes for the manufacturer in the remote. You can find the preset codes on directly by pressing RECEIVER . • After one of the input function buttons using . The power... press RECEIVER . If the correct code has been input the power of the component being input will turn on or off . Clearing all the remote control settings You can clear all presets and restore the factory default settings. While pressing RECEIVER , press and hold the '1' button for...
... to enter the preset code. The component can be controllable after assigning the proper preset code, or the codes for the manufacturer in the remote. You can find the preset codes on directly by pressing RECEIVER . • After one of the input function buttons using . The power... press RECEIVER . If the correct code has been input the power of the component being input will turn on or off . Clearing all the remote control settings You can clear all presets and restore the factory default settings. While pressing RECEIVER , press and hold the '1' button for...


