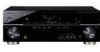
Owner's Manual
Page 4
... safe place for future reference. After you start Checking what's in the box 6 Loading the batteries 6 Installing the receiver 6 Ventilation 6 04 Controls and displays Front panel 26 Operating range of remote control 27 Display 28 Remote control 30 02...and Blu-ray Disc player or DVD player 14 Connecting the multichannel analog outputs 15 Connecting a satellite receiver or other digital set-top box 16 Connecting other audio components 17 Connecting an HDD/DVD recorder, VCR and other video ...11 Better sound using Phase Control 11 03 Connecting up for buying this Pioneer product.
... safe place for future reference. After you start Checking what's in the box 6 Loading the batteries 6 Installing the receiver 6 Ventilation 6 04 Controls and displays Front panel 26 Operating range of remote control 27 Display 28 Remote control 30 02...and Blu-ray Disc player or DVD player 14 Connecting the multichannel analog outputs 15 Connecting a satellite receiver or other digital set-top box 16 Connecting other audio components 17 Connecting an HDD/DVD recorder, VCR and other video ...11 Better sound using Phase Control 11 03 Connecting up for buying this Pioneer product.
Owner's Manual
Page 5
... all the remote control settings. . . . . 51 Controls for TVs 52 Controls for other U.S. Patent #'s: 5,451,942; 5,956,674; 5,974,380; 5,978,762; 6,226,616; 6,487,535 & other components 53 Preset Code List 55 11 Other connections Connecting an iPod 58 Connecting your iPod to the receiver . . . .... your SiriusConnectTM Tuner 63 Listening to SIRIUS Radio 63 Saving channel presets 64 Using the SIRIUS Menu 64 Connecting an IR receiver 64 12 Additional information Troubleshooting 65 HDMI 67 Important information regarding the HDMI connection 67 iPod messages 68 USB messages 68 ...
... all the remote control settings. . . . . 51 Controls for TVs 52 Controls for other U.S. Patent #'s: 5,451,942; 5,956,674; 5,974,380; 5,978,762; 6,226,616; 6,487,535 & other components 53 Preset Code List 55 11 Other connections Connecting an iPod 58 Connecting your iPod to the receiver . . . .... your SiriusConnectTM Tuner 63 Listening to SIRIUS Radio 63 Saving channel presets 64 Using the SIRIUS Menu 64 Connecting an IR receiver 64 12 Additional information Troubleshooting 65 HDMI 67 Important information regarding the HDMI connection 67 iPod messages 68 USB messages 68 ...
Owner's Manual
Page 8
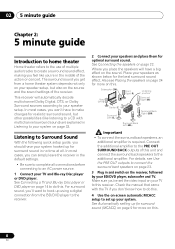
...have a big effect on this unit and connect the surround back speakers to the additional amplifier. For surround sound, you can simply leave the receiver in the default settings. • Be sure to complete all . Connect the additional amplifier to the PRE OUT SURROUND BACK outputs of this . 8 En Listening to... make changes for optimal surround sound. See Connecting a TV and Blu-ray Disc player or DVD player on your TV to this receiver. Make sure you've set up for surround sound (MCACC) on page 9 for surround sound in no time at all connections before connecting to an AC power...
...have a big effect on this unit and connect the surround back speakers to the additional amplifier. For surround sound, you can simply leave the receiver in the default settings. • Be sure to complete all . Connect the additional amplifier to the PRE OUT SURROUND BACK outputs of this . 8 En Listening to... make changes for optimal surround sound. See Connecting a TV and Blu-ray Disc player or DVD player on your TV to this receiver. Make sure you've set up for surround sound (MCACC) on page 9 for surround sound in no time at all connections before connecting to an AC power...
Owner's Manual
Page 9
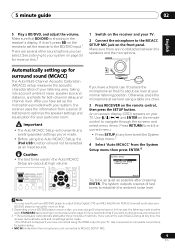
... 'Auto MCACC' from a series of test tones to establish the ambient noise level. ENTER MASTER VOLUME Automatically setting up the microphone provided with your system, the receiver uses the information from the System Setup menu then press ENTER.4 System Setup 1.Auto MCACC 2.Manual SP Setup ...of inactivity. Use component or composite connections for more on this .2 1 Switch on the receiver and your TV. If it 's about ear level at any existing speaker settings you need to set up for surround sound (MCACC) The Auto Multi-Channel Acoustic Calibration (MCACC) setup measures...
... 'Auto MCACC' from a series of test tones to establish the ambient noise level. ENTER MASTER VOLUME Automatically setting up the microphone provided with your system, the receiver uses the information from the System Setup menu then press ENTER.4 System Setup 1.Auto MCACC 2.Manual SP Setup ...of inactivity. Use component or composite connections for more on this .2 1 Switch on the receiver and your TV. If it 's about ear level at any existing speaker settings you need to set up for surround sound (MCACC) The Auto Multi-Channel Acoustic Calibration (MCACC) setup measures...
Owner's Manual
Page 10
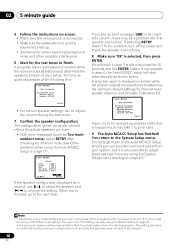
... 12 cm (5 inches) will start automatically as possible while it is also possible to adjust these settings manually using the Auto MCACC Setup on -screen while the receiver outputs more test tones to determine the optimum receiver settings for 10 seconds and the ENTER button is not pressed in step 8, the Auto MCACC setup...
... 12 cm (5 inches) will start automatically as possible while it is also possible to adjust these settings manually using the Auto MCACC Setup on -screen while the receiver outputs more test tones to determine the optimum receiver settings for 10 seconds and the ENTER button is not pressed in step 8, the Auto MCACC setup...
Owner's Manual
Page 11
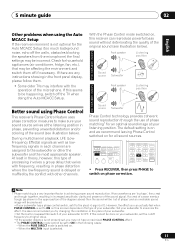
... is on and we recommend leaving Phase Control switched on , this receiver can actually feel when PHASE CONTROL is not properly set, you may not have a maximized PHASE CONTROL effect. • The PHASE CONTROL mode cannot be set to ON on this type of phase' and an unreliable sound image... and switch them . • Some older TVs may be produced. • If your subwoofer has a phase control switch, set it to ON in theory, however, this receiver depends on phase correction. Check for an optimal sound image at the listening position in the upper section of the diagram above...
... is on and we recommend leaving Phase Control switched on , this receiver can actually feel when PHASE CONTROL is not properly set, you may not have a maximized PHASE CONTROL effect. • The PHASE CONTROL mode cannot be set to ON on this type of phase' and an unreliable sound image... and switch them . • Some older TVs may be produced. • If your subwoofer has a phase control switch, set it to ON in theory, however, this receiver depends on phase correction. Check for an optimal sound image at the listening position in the upper section of the diagram above...
Owner's Manual
Page 12
... that may cause a humming noise from this receiver). • If the video signal does not appear on your TV or flat panel TV, try adjusting the resolution settings on page 38 to THRU (THROUGH) and set -top boxes, and other AV devices. HDMI cable Note 1 • Set the HDMI parameter in this unit may not...
... that may cause a humming noise from this receiver). • If the video signal does not appear on your TV or flat panel TV, try adjusting the resolution settings on page 38 to THRU (THROUGH) and set -top boxes, and other AV devices. HDMI cable Note 1 • Set the HDMI parameter in this unit may not...
Owner's Manual
Page 16
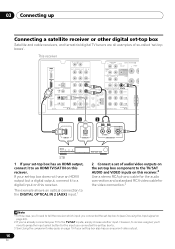
... terrestrial digital TV tuners are all examples of audio/video outputs on the set-top box component to the TV/SAT AUDIO and VIDEO inputs on this receiver.2 Use a stereo RCA phono cable for the audio connection and a standard RCA video cable for the input you 've already connected your TV to... the video connection.3 Note 1 In this case, you'll need to tell the receiver which input you connected the set-top box to (see Choosing the input signal on page 40). 2 If you connected the set -top boxes'. This receiver HDMI BD/DVD IN TV/SAT IN IN DVR/VCR COAXIAL IN IN 1 (CD...
... terrestrial digital TV tuners are all examples of audio/video outputs on the set-top box component to the TV/SAT AUDIO and VIDEO inputs on this receiver.2 Use a stereo RCA phono cable for the audio connection and a standard RCA video cable for the input you 've already connected your TV to... the video connection.3 Note 1 In this case, you'll need to tell the receiver which input you connected the set-top box to (see Choosing the input signal on page 40). 2 If you connected the set -top boxes'. This receiver HDMI BD/DVD IN TV/SAT IN IN DVR/VCR COAXIAL IN IN 1 (CD...

Owner's Manual
Page 17
... digital components to analog audio jacks if you want to record to/from digital components (like an MD) to the analog audio inputs on this receiver. The example shows an optical connection to the DIGITAL OPTICAL IN 1 (CD-R/TAPE) input. 2 If necessary, connect the analog audio outputs of the ...component to a set of component you're connecting.1 Follow the steps below to connect a CD-R, MD, DAT, tape recorder or other audio components The number and kind of ...
... digital components to analog audio jacks if you want to record to/from digital components (like an MD) to the analog audio inputs on this receiver. The example shows an optical connection to the DIGITAL OPTICAL IN 1 (CD-R/TAPE) input. 2 If necessary, connect the analog audio outputs of the ...component to a set of component you're connecting.1 Follow the steps below to connect a CD-R, MD, DAT, tape recorder or other audio components The number and kind of ...
Owner's Manual
Page 18
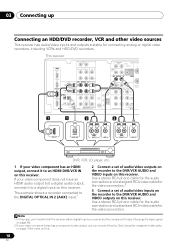
... Using the component video jacks on page 19 for the video connection.2 3 Connect a set of audio/video inputs on the recorder to an HDMI DVR/VCR IN on this receiver. Use a stereo RCA phono cable for the audio connection and a standard RCA video cable for connecting analog or digital ... AUDIO and VIDEO inputs on this . 18 En The example shows a recorder connected to the DIGITAL OPTICAL IN 2 (AUX) input.1 2 Connect a set of audio/video outputs on the recorder to a digital input on this receiver. 03 Connecting up Connecting an HDD/DVD recorder, VCR and other video sources This...
... Using the component video jacks on page 19 for the video connection.2 3 Connect a set of audio/video inputs on the recorder to an HDMI DVR/VCR IN on this receiver. Use a stereo RCA phono cable for the audio connection and a standard RCA video cable for connecting analog or digital ... AUDIO and VIDEO inputs on this . 18 En The example shows a recorder connected to the DIGITAL OPTICAL IN 2 (AUX) input.1 2 Connect a set of audio/video outputs on the recorder to a digital input on this receiver. 03 Connecting up Connecting an HDD/DVD recorder, VCR and other video sources This...

Owner's Manual
Page 19
... composite video. A further advantage (if your source and TV are compatible with progressive-scan video. 2 PR PB Y COMPONENT VIDEO IN This receiver HDMI BD/DVD IN TV/SAT IN IN DVR/VCR COAXIAL IN IN 1 (CD) OPTICAL IN 2 OUT (AUX) R AUX L IN OUT CD-R/TAPE IN CD... VIDEO OUT BD/DVD player Important • If you connect any source component to the receiver using a component video input, you 've connected. See the manuals that came with your TV and source component to a set of your source to check whether they are both compatible) is progressive-scan video, which ...
... composite video. A further advantage (if your source and TV are compatible with progressive-scan video. 2 PR PB Y COMPONENT VIDEO IN This receiver HDMI BD/DVD IN TV/SAT IN IN DVR/VCR COAXIAL IN IN 1 (CD) OPTICAL IN 2 OUT (AUX) R AUX L IN OUT CD-R/TAPE IN CD... VIDEO OUT BD/DVD player Important • If you connect any source component to the receiver using a component video input, you 've connected. See the manuals that came with your TV and source component to a set of your source to check whether they are both compatible) is progressive-scan video, which ...

Owner's Manual
Page 22
...three speakers is recommended, and a complete setup is shown here but using a subwoofer, change the front speaker setting (see Speaker Setting on page 42) to LARGE. However, note that only the front speakers are set to a value between 6 Ω and 16 Ω. You can use the speakers connected to the B... two stereo speakers (the front speakers in the diagram) but everyone's home setup will work with this unit to the AC power source. The receiver will vary. You can use speakers with a normal impedance between 12 Ω and 16 Ω if you have in another room. Make ...
...three speakers is recommended, and a complete setup is shown here but using a subwoofer, change the front speaker setting (see Speaker Setting on page 42) to LARGE. However, note that only the front speakers are set to a value between 6 Ω and 16 Ω. You can use the speakers connected to the B... two stereo speakers (the front speakers in the diagram) but everyone's home setup will work with this unit to the AC power source. The receiver will vary. You can use speakers with a normal impedance between 12 Ω and 16 Ω if you have in another room. Make ...
Owner's Manual
Page 24
.... For details, see Use the PRE OUT outputs to connect the surround back speakers on page 23. • When the Surround back channel processing is set to SB CH ON (see page 37) in the room has a big effect on the floor (except the subwoofer), or mounting them at the TV...
.... For details, see Use the PRE OUT outputs to connect the surround back speakers on page 23. • When the Surround back channel processing is set to SB CH ON (see page 37) in the room has a big effect on the floor (except the subwoofer), or mounting them at the TV...

Owner's Manual
Page 25
... two speakers in the event of the listening position with a normal impedance between 12 Ω and 16 Ω when you made in Speaker Setting on page 37). • Try not to place the surround speakers farther away from speaker systems A and B.2 • SP - ...is output from speakers being knocked over or falling in speaker system B, and the subwoofer. Switching the speaker system Three speaker system settings are set directly to the side of external shocks such as earthquakes. Multichannel sources are securely installed. Caution • Make sure that only ...
... two speakers in the event of the listening position with a normal impedance between 12 Ω and 16 Ω when you made in Speaker Setting on page 37). • Try not to place the surround speakers farther away from speaker systems A and B.2 • SP - ...is output from speakers being knocked over or falling in speaker system B, and the subwoofer. Switching the speaker system Three speaker system settings are set directly to the side of external shocks such as earthquakes. Multichannel sources are securely installed. Caution • Make sure that only ...

Owner's Manual
Page 26
... CONTROL ON/OFF 5 6 AUDIO/ VIDEO MULTI- TUNE +/- and ENTER to find radio frequencies (page 48) and SIRIUS Radio channels (page 63). CHANNEL RECEIVER VSX-819H ENTER MASTER VOLUME PHONES USB iPod VIDEO INPUT VIDEO L AUDIO R MCACC SETUP MIC 7 8 1 STANDBY/ON 2 INPUT SELECTOR dial Selects an input... 9 10 11 12 13 5 MCACC indicator Lights when Acoustic Calibration EQ (page 36) is on (Acoustic Calibration EQ is automatically set to preset the channel in SIRIUS Radio (page 63). Used to on page 33) and Stream Direct playback. Switches between stereo playback,...
... CONTROL ON/OFF 5 6 AUDIO/ VIDEO MULTI- TUNE +/- and ENTER to find radio frequencies (page 48) and SIRIUS Radio channels (page 63). CHANNEL RECEIVER VSX-819H ENTER MASTER VOLUME PHONES USB iPod VIDEO INPUT VIDEO L AUDIO R MCACC SETUP MIC 7 8 1 STANDBY/ON 2 INPUT SELECTOR dial Selects an input... 9 10 11 12 13 5 MCACC indicator Lights when Acoustic Calibration EQ (page 36) is on (Acoustic Calibration EQ is automatically set to preset the channel in SIRIUS Radio (page 63). Used to on page 33) and Stream Direct playback. Switches between stereo playback,...

Owner's Manual
Page 29
... Español Controls and displays 04 HD+ Lights when a source with Dolby Digital Plus encoded audio signals is selected. Also, lights when DIMMER is set to off. 16 DIR. Blinks when an HDMI signal is not selected. 15 UP MIX indicator Lights when the UP MIX... Setting is set to indicate 2 Pro Logic II / 2 Pro Logic IIx decoding (see page 37). Lights when one of the Advanced Surround modes has been selected (see Using ...
... Español Controls and displays 04 HD+ Lights when a source with Dolby Digital Plus encoded audio signals is selected. Also, lights when DIMMER is set to off. 16 DIR. Blinks when an HDMI signal is not selected. 15 UP MIX indicator Lights when the UP MIX... Setting is set to indicate 2 Pro Logic II / 2 Pro Logic IIx decoding (see page 37). Lights when one of the Advanced Surround modes has been selected (see Using ...

Owner's Manual
Page 30
...to set up surround sound (page 41) or Audio parameters (page 38). 4 ZONE 2 ON/OFF Switches zone 2 of Blu-ray Discs. 7 Listening mode buttons AUTO/DIRECT Switches between on and off. 5 MULTI CONTROL buttons Press to select the input source. 2 RECEIVER Switches the receiver between ... 3 S.RETRIEVER EQ CH SELECT SLEEP 4 5 6 CH SB CH PHASE 7 8 DIMMER SPEAKERS +10 0 D.ACCESS MIDNIGHT 9 CH SHIFT ENTER 16 17 RECEIVER 30 En 1 INPUT SELECT Use to select control of other components (see Controlling the rest of a source (page 36). ADV SURR Switches between standby and...
...to set up surround sound (page 41) or Audio parameters (page 38). 4 ZONE 2 ON/OFF Switches zone 2 of Blu-ray Discs. 7 Listening mode buttons AUTO/DIRECT Switches between on and off. 5 MULTI CONTROL buttons Press to select the input source. 2 RECEIVER Switches the receiver between ... 3 S.RETRIEVER EQ CH SELECT SLEEP 4 5 6 CH SB CH PHASE 7 8 DIMMER SPEAKERS +10 0 D.ACCESS MIDNIGHT 9 CH SHIFT ENTER 16 17 RECEIVER 30 En 1 INPUT SELECT Use to select control of other components (see Controlling the rest of a source (page 36). ADV SURR Switches between standby and...

Owner's Manual
Page 31
...source button (for recall (page 48 and 64). BAND Switches between the iPod controls and the receiver controls (page 60). 9 TUNE /, PRESET /), ENTER Use the arrow buttons when setting up your surround sound system (page 41). Press iPod USB first to access the System Setup ...Français Italiano Nederlands Español 8 System Setup and Component control buttons The following button controls can be accessed after the RECEIVER button is set to DIRECT or PURE DIRECT. 31 En Press BD or DVR first to access the Audio options (page 38). When TUNER is pressed...
...source button (for recall (page 48 and 64). BAND Switches between the iPod controls and the receiver controls (page 60). 9 TUNE /, PRESET /), ENTER Use the arrow buttons when setting up your surround sound system (page 41). Press iPod USB first to access the System Setup ...Français Italiano Nederlands Español 8 System Setup and Component control buttons The following button controls can be accessed after the RECEIVER button is set to DIRECT or PURE DIRECT. 31 En Press BD or DVR first to access the Audio options (page 38). When TUNER is pressed...
Owner's Manual
Page 32
... Control (page 11). This button is also used for more on the remote. PHASE Press to set the listening volume. 15 MUTE Mutes/unmutes the sound. 16 DISPLAY Switches the display of time before the receiver switches into standby (30 min - 60 min - 90 min - SPEAKERS Use to change the amount... of this ). Use to change the speaker system (page 25). SLEEP Press to turn on/off Acoustic Calibration EQ setting (page 36). Thus if you can ...
... Control (page 11). This button is also used for more on the remote. PHASE Press to set the listening volume. 15 MUTE Mutes/unmutes the sound. 16 DISPLAY Switches the display of time before the receiver switches into standby (30 min - 60 min - 90 min - SPEAKERS Use to change the amount... of this ). Use to change the speaker system (page 25). SLEEP Press to turn on/off Acoustic Calibration EQ setting (page 36). Thus if you can ...

Owner's Manual
Page 33
... mode, there are decoded accordingly using NEO:6 CINEMA or DOLBY PLIIx MOVIE (see Listening in surround sound above for auto playback of the receiver. STANDARD ADV SURR AUDIO TUNER EDIT MASTER • While listening to movie sources • DOLBY PLII MUSIC3 - Up to 5.1 channel ...Up to see also Using surround back channel processing on the current source, setting and status of a source. Up to 5.1 channel sound, especially suited to . Listening in surround sound Using this , the receiver automatically detects what kind of source you can select from both surround back...
... mode, there are decoded accordingly using NEO:6 CINEMA or DOLBY PLIIx MOVIE (see Listening in surround sound above for auto playback of the receiver. STANDARD ADV SURR AUDIO TUNER EDIT MASTER • While listening to movie sources • DOLBY PLII MUSIC3 - Up to 5.1 channel ...Up to see also Using surround back channel processing on the current source, setting and status of a source. Up to 5.1 channel sound, especially suited to . Listening in surround sound Using this , the receiver automatically detects what kind of source you can select from both surround back...


