Owner's Manual
Page 3
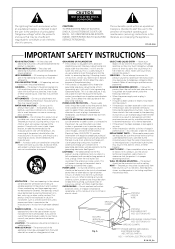
... never be followed. This is a safety feature. Power-supply cords should use instructions should be operated only from the type of electric shock to ensure reliable operation of time. Refer all servicing to lightning and power-line surges. Adjust only those controls that the product is in proper operating condition. WALL OR CEILING MOUNTING - A ANTENNA DISCHARGE UNIT (NEC SECTION 810-20) GROUNDING CONDUCTORS...
... never be followed. This is a safety feature. Power-supply cords should use instructions should be operated only from the type of electric shock to ensure reliable operation of time. Refer all servicing to lightning and power-line surges. Adjust only those controls that the product is in proper operating condition. WALL OR CEILING MOUNTING - A ANTENNA DISCHARGE UNIT (NEC SECTION 810-20) GROUNDING CONDUCTORS...
Owner's Manual
Page 4
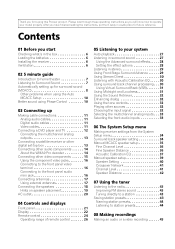
...11 Analog audio cables 11 Digital audio cables 11 Video cables 11 Connecting a DVD player and TV 12 Connecting the multichannel analog outputs 13 Connecting a satellite receiver or other digital set-top box 13 Connecting other audio components 14 About the WMA9 Pro decoder 14 Connecting other sources 32 Choosing the input signal 32 Selecting the multichannel analog inputs . . . 33 Selecting the front audio inputs 33 06 The System Setup menu Making receiver settings from the System Setup menu 34 Surround back speaker setting 34 Manual MCACC speaker setup 35 Fine Channel Level 36...
...11 Analog audio cables 11 Digital audio cables 11 Video cables 11 Connecting a DVD player and TV 12 Connecting the multichannel analog outputs 13 Connecting a satellite receiver or other digital set-top box 13 Connecting other audio components 14 About the WMA9 Pro decoder 14 Connecting other sources 32 Choosing the input signal 32 Selecting the multichannel analog inputs . . . 33 Selecting the front audio inputs 33 06 The System Setup menu Making receiver settings from the System Setup menu 34 Surround back speaker setting 34 Manual MCACC speaker setup 35 Fine Channel Level 36...

Owner's Manual
Page 5
... HD Surround 53 Saving channel presets 53 Using the XM Menu 54 Using SIRIUS Radio 54 Connecting your SIRIUS Connect Tuner . . . 54 Listening to SIRIUS Radio 55 Saving channel presets 56 Using the SIRIUS Menu 56 Second Zone speaker B setup 57 Switching the speaker system 57 Bi-amping your front speakers 57 Bi-wiring your speakers 58 11 Other Settings The Input Assign menu 59 The Other Setup menu 60 Dynamic Range Control Setup 60 Dual Mono Setup 61 LFE Attenuator Setup 61 12 Additional information Troubleshooting...
... HD Surround 53 Saving channel presets 53 Using the XM Menu 54 Using SIRIUS Radio 54 Connecting your SIRIUS Connect Tuner . . . 54 Listening to SIRIUS Radio 55 Saving channel presets 56 Using the SIRIUS Menu 56 Second Zone speaker B setup 57 Switching the speaker system 57 Bi-amping your front speakers 57 Bi-wiring your speakers 58 11 Other Settings The Input Assign menu 59 The Other Setup menu 60 Dynamic Range Control Setup 60 Dual Mono Setup 61 LFE Attenuator Setup 61 12 Additional information Troubleshooting...
Owner's Manual
Page 7
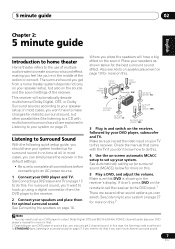
... optimal surround sound. Also see your DVD player's manual for realistic surround sound, but also on this . 5 Play a DVD, and adjust the volume. This receiver will have your system hooked up for more on your system. See Automatically setting up your DVD player or source disc, you 're in no time at all connections before connecting to an AC power source. 1 Connect your TV to this . 4 Use the on-screen automatic MCACC setup to hook up using a digital connection from a home theater system...
... optimal surround sound. Also see your DVD player's manual for realistic surround sound, but also on this . 5 Play a DVD, and adjust the volume. This receiver will have your system hooked up for more on your system. See Automatically setting up your DVD player or source disc, you 're in no time at all connections before connecting to an AC power source. 1 Connect your TV to this . 4 Use the on-screen automatic MCACC setup to hook up using a digital connection from a home theater system...
Owner's Manual
Page 8
... have a tripod, use it 's about ear level at any time to optimize the speaker settings and equalization for both channel delay and channel level. System Setup 1.Surr Back System 2.Auto MCACC 3.Manual MCACC 4.Manual SP Setup 5.Input Assign 6.Other Setup 2. The system outputs a series of inactivity. Make sure there are planning on the front panel. An on-screen display (OSD) appears on the remote control, then press the SETUP button. Important • The Auto MCACC Setup will be...
... have a tripod, use it 's about ear level at any time to optimize the speaker settings and equalization for both channel delay and channel level. System Setup 1.Surr Back System 2.Auto MCACC 3.Manual MCACC 4.Manual SP Setup 5.Input Assign 6.Other Setup 2. The system outputs a series of inactivity. Make sure there are planning on the front panel. An on-screen display (OSD) appears on the remote control, then press the SETUP button. Important • The Auto MCACC Setup will be...

Owner's Manual
Page 9
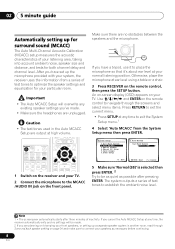
... panel will light to be as quiet as possible while it is automatically detected every time you switch on the system. 5 minute guide 02 English Deutsch Français Italiano Nederlands Español 6 Follow the instructions on-screen. • Make sure the microphone is connected. • If you're using the Speaker Setting on page 40. • The subwoofer distance setting may be changed...
... panel will light to be as quiet as possible while it is automatically detected every time you switch on the system. 5 minute guide 02 English Deutsch Français Italiano Nederlands Español 6 Follow the instructions on-screen. • Make sure the microphone is connected. • If you're using the Speaker Setting on page 40. • The subwoofer distance setting may be changed...
Owner's Manual
Page 10
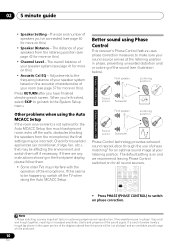
... this) • Speaker Distance - RECEIVER INPUT SELECT SOURCE MULTI CONTROL TV CTRL DVD/LD TV/SAT DVR/VCR F.AUDIO CD-R/TAPE CD XM RADIO FM SIRIUS AM RECEIVER AUTO SURR STEREO/ F.S.SURR STANDARD ADV.SURR ACOUSTIC SOUND PHASE EQ DIALOG RETRIEVER MUTE EFFECT /CH SEL LEVEL • Press PHASE (PHASE CONTROL) to the System Setup menu. Other problems when using Phase Control This receiver's Phase Control feature uses phase correction measures to the frequency balance of your...
... this) • Speaker Distance - RECEIVER INPUT SELECT SOURCE MULTI CONTROL TV CTRL DVD/LD TV/SAT DVR/VCR F.AUDIO CD-R/TAPE CD XM RADIO FM SIRIUS AM RECEIVER AUTO SURR STEREO/ F.S.SURR STANDARD ADV.SURR ACOUSTIC SOUND PHASE EQ DIALOG RETRIEVER MUTE EFFECT /CH SEL LEVEL • Press PHASE (PHASE CONTROL) to the System Setup menu. Other problems when using Phase Control This receiver's Phase Control feature uses phase correction measures to the frequency balance of your...

Owner's Manual
Page 13
... 1 (DVD/LD) OUT R AUDIO AUX FM UNBAL 75 Ω CD DVR / VCR IN TV / SAT IN DVD / LD FRONT PLAY CD-R D V D 5.1CH INPUT IN / TAPE / MD AM LOOP ANTENNA VIDEO REC L CEN- SUB TER WOOFER SIRIUS IN MONITOR OUT R SURROUND L DVD 5.1CH INPUT OUT (D Y OUT MONITOR OUT DVR / VCR IN TV / SAT IN SR P E SUB WOOFER A DVD / LD A PREOUT IN S-VIDEO K E R S FRONT MONIT LR RL FRONT OUTPUT CENTER OUTPUT RL SURROUND OUTPUT SUB WOOFER OUTPUT VIDEO OUTPUT DVD/multi-channel decoder with S-video using a coaxial digital audio cable. If...
... 1 (DVD/LD) OUT R AUDIO AUX FM UNBAL 75 Ω CD DVR / VCR IN TV / SAT IN DVD / LD FRONT PLAY CD-R D V D 5.1CH INPUT IN / TAPE / MD AM LOOP ANTENNA VIDEO REC L CEN- SUB TER WOOFER SIRIUS IN MONITOR OUT R SURROUND L DVD 5.1CH INPUT OUT (D Y OUT MONITOR OUT DVR / VCR IN TV / SAT IN SR P E SUB WOOFER A DVD / LD A PREOUT IN S-VIDEO K E R S FRONT MONIT LR RL FRONT OUTPUT CENTER OUTPUT RL SURROUND OUTPUT SUB WOOFER OUTPUT VIDEO OUTPUT DVD/multi-channel decoder with S-video using a coaxial digital audio cable. If...

Owner's Manual
Page 16
... SIRIUS AUX VIDEO L AUDIO R MCACC/ AUDIO IN Portable CD player (etc.) AUDIO OUT 16 En Use a three-way component video cable for more on this. 3 Connect the COMPONENT VIDEO MONITOR OUT jacks on this receiver to the component video inputs on this receiver's COMPONENT VIDEO MONITOR OUT jacks. 1 Connect the component video outputs of your source to a set of component video inputs on your TV connected to the following defaults: • COMP 1 - TV • COMP 3 - Press VIDEO/FRONT AUDIO and select the VIDEO input. Hook them up Using the component video jacks Component video should...
... SIRIUS AUX VIDEO L AUDIO R MCACC/ AUDIO IN Portable CD player (etc.) AUDIO OUT 16 En Use a three-way component video cable for more on this. 3 Connect the COMPONENT VIDEO MONITOR OUT jacks on this receiver to the component video inputs on this receiver's COMPONENT VIDEO MONITOR OUT jacks. 1 Connect the component video outputs of your source to a set of component video inputs on your TV connected to the following defaults: • COMP 1 - TV • COMP 3 - Press VIDEO/FRONT AUDIO and select the VIDEO input. Hook them up Using the component video jacks Component video should...

Owner's Manual
Page 18
... DVD / LD FRONT PLAY CD-R D V D 5.1CH INPUT IN / TAPE / MD AM LOOP ANTENNA VIDEO REC L CEN- Use good quality speaker wire to connect the speakers to the surround back left to LARGE. 2 If you 're not using a subwoofer, change the front speaker setting (see Switching the speaker impedance on page 65 if you have in the manner shown below.1 The receiver will work with just two stereo speakers (the front speakers in the diagram) but everyone's home setup...
... DVD / LD FRONT PLAY CD-R D V D 5.1CH INPUT IN / TAPE / MD AM LOOP ANTENNA VIDEO REC L CEN- Use good quality speaker wire to connect the speakers to the surround back left to LARGE. 2 If you 're not using a subwoofer, change the front speaker setting (see Switching the speaker impedance on page 65 if you have in the manner shown below.1 The receiver will work with just two stereo speakers (the front speakers in the diagram) but everyone's home setup...

Owner's Manual
Page 22
... 19 20 21 1 SIGNAL indicators Lights to access the System Setup menu (page 8, page 34, page 59). Use with the MULTI JOG dial (page 32). 18 SPEAKERS Use to change the speaker system (page 57) and the impedance setting (page 65). 19 SIGNAL SELECT Use to select an input signal (page 32). 20 TUNING / STATION Selects the frequency (page 43) and station presets (page 43) when using a stereo mini-jack cable (page 16). 13 MASTER VOLUME dial 14 SOUND RETRIEVER Press to...
... 19 20 21 1 SIGNAL indicators Lights to access the System Setup menu (page 8, page 34, page 59). Use with the MULTI JOG dial (page 32). 18 SPEAKERS Use to change the speaker system (page 57) and the impedance setting (page 65). 19 SIGNAL SELECT Use to select an input signal (page 32). 20 TUNING / STATION Selects the frequency (page 43) and station presets (page 43) when using a stereo mini-jack cable (page 16). 13 MASTER VOLUME dial 14 SOUND RETRIEVER Press to...

Owner's Manual
Page 25
... select channels. 7 Component control buttons The main buttons (, , etc.) are other component controls Use the number buttons to access the System Setup menu (see page 34). TUNER DISP* Switches between the three banks (classes) of DVD-Video discs. Use to adjust the Advanced Surround effect and channel levels, as well as to HDD or vice-versa. ONE TOUCH COPY* Copies the currently playing title from DVD to change Dolby Pro Logic IIx Music and Neo:6 Music parameter settings. SETUP Use to directly select a radio frequency...
... select channels. 7 Component control buttons The main buttons (, , etc.) are other component controls Use the number buttons to access the System Setup menu (see page 34). TUNER DISP* Switches between the three banks (classes) of DVD-Video discs. Use to adjust the Advanced Surround effect and channel levels, as well as to HDD or vice-versa. ONE TOUCH COPY* Copies the currently playing title from DVD to change Dolby Pro Logic IIx Music and Neo:6 Music parameter settings. SETUP Use to directly select a radio frequency...

Owner's Manual
Page 28
... status / mode of the receiver, certain options may not get sound from the surround back speakers in your setup. buttons to select a listening mode. • ACTION - GAME - Suitable for 6.1 channel sources (like .1 • X-STEREO - ON Note 1 • If you press ADVANCED SURROUND when the headphones are connected, the PHONES SURROUND mode will automatically be used with Dolby Digital sources). 28 En Creates surround back channel sound for 5.1 channel sources and provides pure decoding for video games...
... status / mode of the receiver, certain options may not get sound from the surround back speakers in your setup. buttons to select a listening mode. • ACTION - GAME - Suitable for 6.1 channel sources (like .1 • X-STEREO - ON Note 1 • If you press ADVANCED SURROUND when the headphones are connected, the PHONES SURROUND mode will automatically be used with Dolby Digital sources). 28 En Creates surround back channel sound for 5.1 channel sources and provides pure decoding for video games...

Owner's Manual
Page 32
... adjust the bass or treble using AUTO SURROUND). 3 If your source is the TV's built-in tuner, switch to the channel you want to watch, otherwise make sure that the TV's video input is set to this receiver (For example, if you connected this receiver. 4 • This receiver can only play back Dolby Digital, PCM (32 kHz to the source component. Using the tone controls Depending on what you are selected (except when STEREO is selected using the front panel tone control.2 1 Press TONE...
... adjust the bass or treble using AUTO SURROUND). 3 If your source is the TV's built-in tuner, switch to the channel you want to watch, otherwise make sure that the TV's video input is set to this receiver (For example, if you connected this receiver. 4 • This receiver can only play back Dolby Digital, PCM (32 kHz to the source component. Using the tone controls Depending on what you are selected (except when STEREO is selected using the front panel tone control.2 1 Press TONE...
Owner's Manual
Page 34
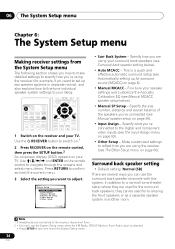
... automatic surround setup (see Surround back speaker setting below ). • Manual SP Setup - Fine tune your TV. RECEIVER INPUT SELECT SOURCE MULTI CONTROL TV CTRL DVD/LD TV/SAT DVR/VCR F.AUDIO CD-R/TAPE CD XM RADIO FM SIRIUS AM RECEIVER AUTO SURR STEREO/ F.S.SURR STANDARD ADV.SURR MASTER VOLUME RECEIVER CONTROL ONE TOUCH COPY CH+ TOP MENU TUNE ST ST ENTER MENU T.EDIT GUIDE SETUP SUBTITLE TUNE CH - Use and ENTER on page 8). • Manual MCACC - Note 1 If headphones are connected to set up...
... automatic surround setup (see Surround back speaker setting below ). • Manual SP Setup - Fine tune your TV. RECEIVER INPUT SELECT SOURCE MULTI CONTROL TV CTRL DVD/LD TV/SAT DVR/VCR F.AUDIO CD-R/TAPE CD XM RADIO FM SIRIUS AM RECEIVER AUTO SURR STEREO/ F.S.SURR STANDARD ADV.SURR MASTER VOLUME RECEIVER CONTROL ONE TOUCH COPY CH+ TOP MENU TUNE ST ST ENTER MENU T.EDIT GUIDE SETUP SUBTITLE TUNE CH - Use and ENTER on page 8). • Manual MCACC - Note 1 If headphones are connected to set up...
Owner's Manual
Page 35
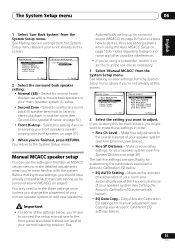
... speaker system (see Fine Channel Level below : • EQ AUTO Setting - System Setup 1.Surr Back System 2.Auto MCACC 3.Manual MCACC 4.Manual SP Setup 5.Input Assign 6.Other Setup : Exit 3.Manual MCACC a.Fine Ch Level b.Fine SP Distance c.EQ AUTO Setting d.EQ Data Copy e.EQ CUSTOM1 Adjust f .EQ CUSTOM2 Adjust g.EQ Data Check :Return 2 Select the setting you want to make these settings, you should have to connect the setup microphone to adjust. Copy Acoustic Calibration EQ settings for surround sound...
... speaker system (see Fine Channel Level below : • EQ AUTO Setting - System Setup 1.Surr Back System 2.Auto MCACC 3.Manual MCACC 4.Manual SP Setup 5.Input Assign 6.Other Setup : Exit 3.Manual MCACC a.Fine Ch Level b.Fine SP Distance c.EQ AUTO Setting d.EQ Data Copy e.EQ CUSTOM1 Adjust f .EQ CUSTOM2 Adjust g.EQ Data Check :Return 2 Select the setting you want to make these settings, you should have to connect the setup microphone to adjust. Copy Acoustic Calibration EQ settings for surround sound...

Owner's Manual
Page 45
... the source component.1 Note 1 • The receiver's volume, balance, tone (bass, treble, loudness), and surround effects have no effect on this . Keep in mind you can't make a digital recording from an analog source or vice-versa, so make an audio or a video recording from the built-in tuner, or from an audio or video source connected to the receiver (such as for more on the recorded signal. • Some digital sources are copy-protected...
... the source component.1 Note 1 • The receiver's volume, balance, tone (bass, treble, loudness), and surround effects have no effect on this . Keep in mind you can't make a digital recording from an analog source or vice-versa, so make an audio or a video recording from the built-in tuner, or from an audio or video source connected to the receiver (such as for more on the recorded signal. • Some digital sources are copy-protected...

Owner's Manual
Page 46
... certain functions may be able to control your system Setting the remote to control other components Most components can find the preset codes on directly by pressing RECEIVER. You can be assigned to control. Selecting preset codes directly RECEIVER INPUT SELECT SOURCE MULTI CONTROL TV CTRL DVD/LD TV/SAT DVR/VCR F.AUDIO CD-R/TAPE CD XM RADIO FM SIRIUS AM RECEIVER AUTO SURR STEREO/ F.S.SURR STANDARD ADV.SURR TUNER DISP CLASS MPX D.ACCESS MIDNIGHT ANALOG ATT DIMMER ENTER DISC SLEEP +10 SIGNAL SB...
... certain functions may be able to control your system Setting the remote to control other components Most components can find the preset codes on directly by pressing RECEIVER. You can be assigned to control. Selecting preset codes directly RECEIVER INPUT SELECT SOURCE MULTI CONTROL TV CTRL DVD/LD TV/SAT DVR/VCR F.AUDIO CD-R/TAPE CD XM RADIO FM SIRIUS AM RECEIVER AUTO SURR STEREO/ F.S.SURR STANDARD ADV.SURR TUNER DISP CLASS MPX D.ACCESS MIDNIGHT ANALOG ATT DIMMER ENTER DISC SLEEP +10 SIGNAL SB...

Owner's Manual
Page 59
... used component video cords to connect your TV. Input Assign a.Digital Input b.Component Input 5b.Component Input Component-1 DVD Component-2 [ TV ] Component-3 [ DVR ] :Return :Finish 59 En An on-screen display (OSD) appears on the remote control, then press the SETUP button. Use and ENTER on the remote correspond to what digital equipment is hooked up to which device it is, or else you may see Using the component video jacks on the back of the receiver. 3 Select the component that corresponds with the numbers...
... used component video cords to connect your TV. Input Assign a.Digital Input b.Component Input 5b.Component Input Component-1 DVD Component-2 [ TV ] Component-3 [ DVR ] :Return :Finish 59 En An on-screen display (OSD) appears on the remote control, then press the SETUP button. Use and ENTER on the remote correspond to what digital equipment is hooked up to which device it is, or else you may see Using the component video jacks on the back of the receiver. 3 Select the component that corresponds with the numbers...
Owner's Manual
Page 63
... the Auto MCACC Setup. (LARGE or SMALL) is dark or off. • Press DIMMER on the control repeatedly to return to the default. Sound is set to the highest frequency setting. After using MCACC (this will automatically compensate for a delay in standby, switch to direct light. Everything seems to be sure to turn the volume down STEREO/ F.S.SURR (front panel) and pressing STANDBY/ON (the current setting is a PHASE setting...
... the Auto MCACC Setup. (LARGE or SMALL) is dark or off. • Press DIMMER on the control repeatedly to return to the default. Sound is set to the highest frequency setting. After using MCACC (this will automatically compensate for a delay in standby, switch to direct light. Everything seems to be sure to turn the volume down STEREO/ F.S.SURR (front panel) and pressing STANDBY/ON (the current setting is a PHASE setting...


