
Operating Instructions
Page 7
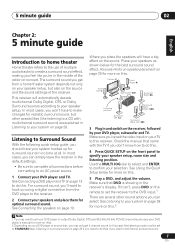
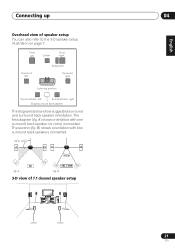
... you may need to this receiver. See Connecting a DVD player and TV on page 13 to your DVD player and TV. Place your DVD player, subwoofer and TV. In most cases, you 're in the receiver's display. In most cases, you won't have a big effect on the sound. Center... (C) Front Right (R) Front Left (L) Subwoofer (SW) Surround Right (RS) Listening position Surround Back Right (SBR) Surround Left (LS) Surround Back Left (SBL) 3 Plug in Listening to do this. If ...
... you may need to this receiver. See Connecting a DVD player and TV on page 13 to your DVD player and TV. Place your DVD player, subwoofer and TV. In most cases, you 're in the receiver's display. In most cases, you won't have a big effect on the sound. Center... (C) Front Right (R) Front Left (L) Subwoofer (SW) Surround Right (RS) Listening position Surround Back Right (SBR) Surround Left (LS) Surround Back Left (SBL) 3 Plug in Listening to do this. If ...
Operating Instructions
Page 8
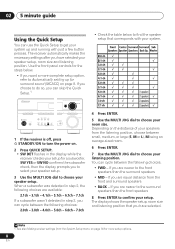
.../VIDEO MULTI-CHANNEL RECEIVER VSX-816 ENTER MULTI JOG DIGITAL PRECISION PROCESSING AUX SIGNAL SB ch ACOUSTIC SELECT PROCESSING EQ MCACC SETUP MIC MASTER VOLUME DOWN UP 1 If the receiver is off, press STANDBY/ON to choose your setup for a subwoofer. When a subwoofer was detected in step ...2, the following choices are available: 2.1ch - 3.1ch - 4.1ch - 5.1ch - 6.1ch - 7.1ch If a subwoofer wasn't detected in the display while the receiver checks your room size. If ...
.../VIDEO MULTI-CHANNEL RECEIVER VSX-816 ENTER MULTI JOG DIGITAL PRECISION PROCESSING AUX SIGNAL SB ch ACOUSTIC SELECT PROCESSING EQ MCACC SETUP MIC MASTER VOLUME DOWN UP 1 If the receiver is off, press STANDBY/ON to choose your setup for a subwoofer. When a subwoofer was detected in step ...2, the following choices are available: 2.1ch - 3.1ch - 4.1ch - 5.1ch - 6.1ch - 7.1ch If a subwoofer wasn't detected in the display while the receiver checks your room size. If ...
Operating Instructions
Page 10
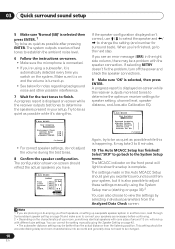
... ENTER. You can also choose to 8 minutes. 10 The Auto MCACC Setup has finished! The MCACC indicator on page 42. • The subwoofer distance setting may take 3 to view the settings by selecting individual parameters from the listening position. Make sure it 's doing this is happening. ... ambient noise level. 6 Follow the instructions on-screen. • Make sure the microphone is connected. • If you're using a subwoofer, it is automatically detected every time you excellent surround sound from your system, but it is also possible to adjust these settings manually using the...
... ENTER. You can also choose to 8 minutes. 10 The Auto MCACC Setup has finished! The MCACC indicator on page 42. • The subwoofer distance setting may take 3 to view the settings by selecting individual parameters from the listening position. Make sure it 's doing this is happening. ... ambient noise level. 6 Follow the instructions on-screen. • Make sure the microphone is connected. • If you're using a subwoofer, it is automatically detected every time you excellent surround sound from your system, but it is also possible to adjust these settings manually using the...
Operating Instructions
Page 19
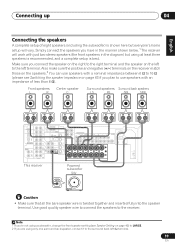
...(the front speakers in the diagram) but everyone's home setup will work with an impedance of eight speakers (including the subwoofer) is shown here but using a subwoofer, change the front speaker setting (see Speaker Setting on the left to the receiver. Use good quality speaker wire to ...MONITOR OUT LR SURROUND (TV/SAT)IN 2 R R L CENTER R SURROUND BACK L R CENTER B AC IN 110V 120 - 127V 220V 240V This receiver Powered subwoofer SW INPUT Caution • Make sure that all the bare speaker wire is best. Note 1 If you plan to the surround back left terminal. Make...
...(the front speakers in the diagram) but everyone's home setup will work with an impedance of eight speakers (including the subwoofer) is shown here but using a subwoofer, change the front speaker setting (see Speaker Setting on the left to the receiver. Use good quality speaker wire to ...MONITOR OUT LR SURROUND (TV/SAT)IN 2 R R L CENTER R SURROUND BACK L R CENTER B AC IN 110V 120 - 127V 220V 240V This receiver Powered subwoofer SW INPUT Caution • Make sure that all the bare speaker wire is best. Note 1 If you plan to the surround back left terminal. Make...
Operating Instructions
Page 21
... 3-D speaker setup illustration on page 7. B 3-D view of speaker setup You can also refer to 60 LS SB fig. Front left Center Front right Surround left Subwoofer Surround right Listening position Surround back left Surround back right Single surround back speaker . B) shows orientation with one surround back speaker (or none) connected. A RS...
... 3-D speaker setup illustration on page 7. B 3-D view of speaker setup You can also refer to 60 LS SB fig. Front left Center Front right Surround left Subwoofer Surround right Listening position Surround back left Surround back right Single surround back speaker . B) shows orientation with one surround back speaker (or none) connected. A RS...
Operating Instructions
Page 29
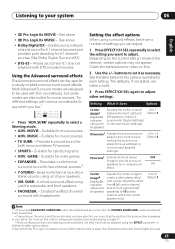
... SURR. - Gives multichannel sound to select the setting you like Dolby Digital Surround EX) • DTS-ES - Setting the effect options When using just the subwoofer and front speakers. • PHONESUR. - For more forward (positive settings). -3 to +3 Default: 0 Panoramaa Extends the front stereo OFF image to select a listening mode. • ADV...
... SURR. - Gives multichannel sound to select the setting you like Dolby Digital Surround EX) • DTS-ES - Setting the effect options When using just the subwoofer and front speakers. • PHONESUR. - For more forward (positive settings). -3 to +3 Default: 0 Panoramaa Extends the front stereo OFF image to select a listening mode. • ADV...
Operating Instructions
Page 30
... sources in stereo When you select STEREO or DIRECT, you will hear the source through just the front left and right speakers (and possibly your subwoofer depending on your surround settings and you can still use Acoustic Calibration EQ with DVD 5.1ch or WMA9 Pro, and it does Options Effect Sets...
... sources in stereo When you select STEREO or DIRECT, you will hear the source through just the front left and right speakers (and possibly your subwoofer depending on your surround settings and you can still use Acoustic Calibration EQ with DVD 5.1ch or WMA9 Pro, and it does Options Effect Sets...
Operating Instructions
Page 37
... theater use the (surround back) B speaker terminals to listen to the System Setup menu. Check the ALL CH ADJUST, FRONT ALIGN and custom settings using a subwoofer, switch it about ear level at this . Select to use with the system. Select for customizing the parameters explained in order. • Fine Ch Level...
... theater use the (surround back) B speaker terminals to listen to the System Setup menu. Check the ALL CH ADJUST, FRONT ALIGN and custom settings using a subwoofer, switch it about ear level at this . Select to use with the system. Select for customizing the parameters explained in order. • Fine Ch Level...
Operating Instructions
Page 39
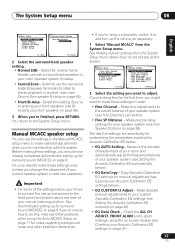
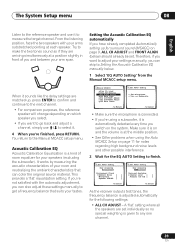
... .EQ CUSTOM2 Adjust g.EQ Data Check :Return 3c.EQ AUTO Setting Set microphone. If you're not satisfied with your speakers (excluding the subwoofer). Setting the Acoustic Calibration EQ automatically If you have already completed Automatically setting up , press ENTER to confirm and continue to the next channel.... Try to make the two tones sound as if they are arriving simultaneously at the middle position. • See Other problems when using a subwoofer, it is automatically detected every time you switch on page 9, ALL CH ADJUST and FRONT ALIGN (below . 1 Select 'EQ AUTO Setting' ...
... .EQ CUSTOM2 Adjust g.EQ Data Check :Return 3c.EQ AUTO Setting Set microphone. If you're not satisfied with your speakers (excluding the subwoofer). Setting the Acoustic Calibration EQ automatically If you have already completed Automatically setting up , press ENTER to confirm and continue to the next channel.... Try to make the two tones sound as if they are arriving simultaneously at the middle position. • See Other problems when using a subwoofer, it is automatically detected every time you switch on page 9, ALL CH ADJUST and FRONT ALIGN (below . 1 Select 'EQ AUTO Setting' ...
Operating Instructions
Page 42
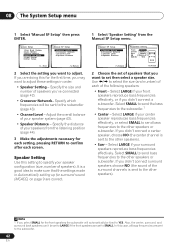
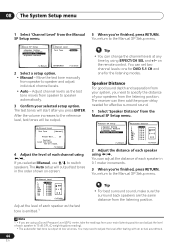
... bass frequencies to adjust. Select LARGE if your center speaker reproduces bass frequencies effectively, or select SMALL to send bass frequencies to the subwoofer (page 43). • Channel Level - Specify the size and number of your speakers from the Manual SP Setup menu. Also,... RETURN to confirm after each of the following speakers: • Front - Adjust the overall balance of speakers you may want to the subwoofer.1 • Center - Select LARGE if your surround speakers reproduce bass frequencies effectively. Speaker Setting Use this for the first time, you ...
... bass frequencies to adjust. Select LARGE if your center speaker reproduces bass frequencies effectively, or select SMALL to send bass frequencies to the subwoofer (page 43). • Channel Level - Specify the size and number of your speakers from the Manual SP Setup menu. Also,... RETURN to confirm after each of the following speakers: • Front - Adjust the overall balance of speakers you may want to the subwoofer.1 • Center - Select LARGE if your surround speakers reproduce bass frequencies effectively. Speaker Setting Use this for the first time, you ...
Operating Instructions
Page 43
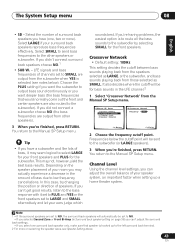
... SMALL are also routed to low frequency cancellations. Depending on selecting the speaker sizes, see notes below the cutoff point will be sent to the subwoofer (or LARGE speakers). 3 When you 're having problems, the easiest option is to route all the bass sounds to the other speakers). 3 When ...front speakers set to NO. • If you selected Second Zone or Front Bi-Amp (in the LFE channel.2 1 Select 'Crossover Network' from the subwoofer when YES is hooked up a home theater system. You return to the Manual SP Setup menu. It also decides where the cutoff will be for...
... SMALL are also routed to low frequency cancellations. Depending on selecting the speaker sizes, see notes below the cutoff point will be sent to the subwoofer (or LARGE speakers). 3 When you 're having problems, the easiest option is to route all the bass sounds to the other speakers). 3 When ...front speakers set to NO. • If you selected Second Zone or Front Bi-Amp (in the LFE channel.2 1 Select 'Crossover Network' from the subwoofer when YES is hooked up a home theater system. You return to the Manual SP Setup menu. It also decides where the cutoff will be for...
Operating Instructions
Page 44
... of each speaker as the test tone moves from speaker to switch speakers. You may need to 75 dB SPL (C-weighting/slow reading). • The subwoofer test tone is emitted.1 Tip • You can then add the proper delay needed for the listening modes. Loud test tones will output test tones...
... of each speaker as the test tone moves from speaker to switch speakers. You may need to 75 dB SPL (C-weighting/slow reading). • The subwoofer test tone is emitted.1 Tip • You can then add the proper delay needed for the listening modes. Loud test tones will output test tones...
Operating Instructions
Page 54
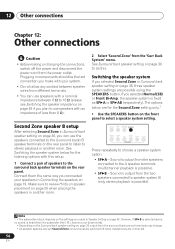
...speaker system below are possible using the SPEAKERS button. Make sure to review Hints on speaker placement on page 42. Note 1 • The subwoofer output depends on the settings you make with a nominal impedance between 6 Ω to 16 Ω (please see Switching the speaker impedance... with an impedance of speakers to the A speaker terminals (multichannel playback is possible). • SP B - Sound is output from the subwoofer (the LFE channel is output from the power outlet. Second Zone speaker B setup After selecting Second Zone in Surround back speaker setting on ...
...speaker system below are possible using the SPEAKERS button. Make sure to review Hints on speaker placement on page 42. Note 1 • The subwoofer output depends on the settings you make with a nominal impedance between 6 Ω to 16 Ω (please see Switching the speaker impedance... with an impedance of speakers to the A speaker terminals (multichannel playback is possible). • SP B - Sound is output from the subwoofer (the LFE channel is output from the power outlet. Second Zone speaker B setup After selecting Second Zone in Surround back speaker setting on ...
Operating Instructions
Page 55
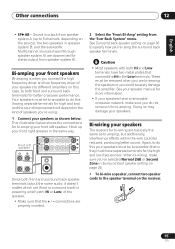
... which set (front or surround back) is when you 're using . 1 Connect your speakers. Bi-amping your front right speaker in speaker system B, and the subwoofer. These must be bi-ampable to do not remove it doesn't matter which part (Hi or Low) of speakers you could be removed when you...
... which set (front or surround back) is when you 're using . 1 Connect your speakers. Bi-amping your front right speaker in speaker system B, and the subwoofer. These must be bi-ampable to do not remove it doesn't matter which part (Hi or Low) of speakers you could be removed when you...
Operating Instructions
Page 56
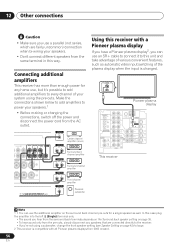
...INPUT Center channel amplifier (mono) Surround back channel amplifier Surround channel amplifier Front channel amplifier Powered subwoofer Using this receiver with all Pioneer plasma displays from 2003 onward. 56 En CONTROL OUT Pioneer plasma display DIGITAL OUT IN OPT IN OPT 2 (TV/ SAT) IN OPT 1 (CD)...different speakers from the pre-outs, simply disconnect any speakers that are fairly uncommon) connection when bi-wiring your system using a subwoofer, change the front speaker setting (see Speaker Setting on the surround back channel pre-outs for any home use the additional ...
...INPUT Center channel amplifier (mono) Surround back channel amplifier Surround channel amplifier Front channel amplifier Powered subwoofer Using this receiver with all Pioneer plasma displays from 2003 onward. 56 En CONTROL OUT Pioneer plasma display DIGITAL OUT IN OPT IN OPT 2 (TV/ SAT) IN OPT 1 (CD)...different speakers from the pre-outs, simply disconnect any speakers that are fairly uncommon) connection when bi-wiring your system using a subwoofer, change the front speaker setting (see Speaker Setting on the surround back channel pre-outs for any home use the additional ...
Operating Instructions
Page 61
...After about a minute (you 're assigned the correct input. • The video input selected on page 33). No sound from subwoofer. • Make sure the subwoofer is connected correctly (refer to Connecting up on page 12). • Select the correct component (use the input select buttons). &#...Deutsch Français Italiano Nederlands Español Chapter 14: Additional information Troubleshooting Incorrect operations are often mistaken for your nearest Pioneer authorized independent service company to carry out repair work. • If the unit does not operate normally due to external ...
...After about a minute (you 're assigned the correct input. • The video input selected on page 33). No sound from subwoofer. • Make sure the subwoofer is connected correctly (refer to Connecting up on page 12). • Select the correct component (use the input select buttons). &#...Deutsch Français Italiano Nederlands Español Chapter 14: Additional information Troubleshooting Incorrect operations are often mistaken for your nearest Pioneer authorized independent service company to carry out repair work. • If the unit does not operate normally due to external ...
Operating Instructions
Page 62
selected automatically. Noise during playback of a cassette deck. • Move the cassette deck away from your speakers. Sound is produced from other Pioneer components on . There seems to be sure to turn the volume down to a wall (or connect an outdoor FM antenna). • Connect...No sound is output or a noise is output when software with DTS is played back. • Set the digital volume level of the subwoofer. After using MCACC (this will automatically compensate for surround sound (MCACC) on page 9 to the instruction manual supplied with the DVD player. page ...
selected automatically. Noise during playback of a cassette deck. • Move the cassette deck away from your speakers. Sound is produced from other Pioneer components on . There seems to be sure to turn the volume down to a wall (or connect an outdoor FM antenna). • Connect...No sound is output or a noise is output when software with DTS is played back. • Set the digital volume level of the subwoofer. After using MCACC (this will automatically compensate for surround sound (MCACC) on page 9 to the instruction manual supplied with the DVD player. page ...
Service Manual
Page 19
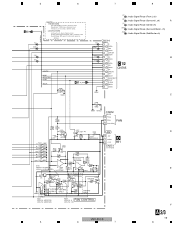
...2SC4081 (QR) Q260 R465 22K 4.7K GNDU VSX-916 VSX-816 VSX-916 ONLY ONLY R466 22K VSX-916 ONLY ONLY D253 VSX-816 : UDZS27(B) R464 VSX-816 : 0 FAN CONTROL VSX-916 : UDZS13(B) VSX-916 : 22K R442 100K C254 100/25 ...VSX-816-K 5 6 7 D E F A 2/3 19 8 Rated Voltage: 50V expect for electrolytic capacitors. JA:CEJA AMUTE DCDT XPROTECT OLDT NECK C392 1000p YB GNDU A 3/3 6_OHM (FL) : Audio Signal Route (Front L ch) (SL) : Audio Signal Route (Surround L ch) A (C) : Audio Signal Route (Center ch) (SBL) : Audio Signal Route (Surround Back L ch) (SW) : Audio Signal Route (SubWoofer...
...2SC4081 (QR) Q260 R465 22K 4.7K GNDU VSX-916 VSX-816 VSX-916 ONLY ONLY R466 22K VSX-916 ONLY ONLY D253 VSX-816 : UDZS27(B) R464 VSX-816 : 0 FAN CONTROL VSX-916 : UDZS13(B) VSX-916 : 22K R442 100K C254 100/25 ...VSX-816-K 5 6 7 D E F A 2/3 19 8 Rated Voltage: 50V expect for electrolytic capacitors. JA:CEJA AMUTE DCDT XPROTECT OLDT NECK C392 1000p YB GNDU A 3/3 6_OHM (FL) : Audio Signal Route (Front L ch) (SL) : Audio Signal Route (Surround L ch) A (C) : Audio Signal Route (Center ch) (SBL) : Audio Signal Route (Surround Back L ch) (SW) : Audio Signal Route (SubWoofer...
Service Manual
Page 22
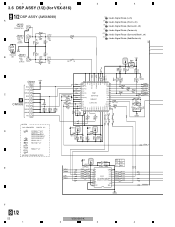
1 2 3.6 DSP ASSY (1/2) (for VSX-816) B 1/2 DSP ASSY (AWX8699) A JA502 VKB1159 1 COAX(STBY) 2 JA501 1 AKB7173 (1/2) 3 RX0 COAX1 R514 0 L501 stby C503 0.01 ... Signal Route (Surround L ch) (C) : Audio Signal Route (Center ch) (SBL) : Audio Signal Route (Surround Back L ch) (SW) : Audio Signal Route (SubWoofer ch) V3D V31 R629 stby L605 QTL1013 MC C618 47/6.3 C620 470p CH C619 0.1 YB C621 0.47 YB C614 YB 0.1 R627 10k C617 YB 1000p...2 3 4 5 6 7 8 SEL Y H XM L DIR R571 47 R570 100 R569 47 R568 100 R567 100 1 16 GNDD XMSW3 F B 1/2 22 VSX-816-K 1 2 3 4
1 2 3.6 DSP ASSY (1/2) (for VSX-816) B 1/2 DSP ASSY (AWX8699) A JA502 VKB1159 1 COAX(STBY) 2 JA501 1 AKB7173 (1/2) 3 RX0 COAX1 R514 0 L501 stby C503 0.01 ... Signal Route (Surround L ch) (C) : Audio Signal Route (Center ch) (SBL) : Audio Signal Route (Surround Back L ch) (SW) : Audio Signal Route (SubWoofer ch) V3D V31 R629 stby L605 QTL1013 MC C618 47/6.3 C620 470p CH C619 0.1 YB C621 0.47 YB C614 YB 0.1 R627 10k C617 YB 1000p...2 3 4 5 6 7 8 SEL Y H XM L DIR R571 47 R570 100 R569 47 R568 100 R567 100 1 16 GNDD XMSW3 F B 1/2 22 VSX-816-K 1 2 3 4
Service Manual
Page 33
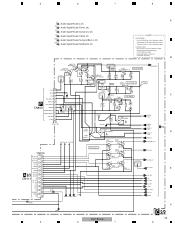
... FL AC1 -12V -VF FL_AC2 FL_AC1 GAV +12V NC (SW) +12V AC_WUP SWOUT GNDA NC -12V GNDV GNDU GNDT AC_RY GNDU (SW) 5 GNDA VSX-816-K 6 7 F C 2/2 33 8 Rated Voltage:50V except for electrolytic capacitors. Tolerance:(J) 5% unless otherwise noted. 2.CAPACITORS Umit: p-pF or µF ...L ch) (C) : Audio Signal Route (Center ch) (SBL) : Audio Signal Route (Surround Back L ch) (SW) : Audio Signal Route (SubWoofer ch) A NOTE 1.RESISTORS Unit:k-kΩ,M-MΩ or unless otherwise noted. Rated power:1/4W unless otherwise noted. B Q807(1/2) RN2903(1/2) Q808(1/2) RTN1903(1/2) Q807(2/2)...
... FL AC1 -12V -VF FL_AC2 FL_AC1 GAV +12V NC (SW) +12V AC_WUP SWOUT GNDA NC -12V GNDV GNDU GNDT AC_RY GNDU (SW) 5 GNDA VSX-816-K 6 7 F C 2/2 33 8 Rated Voltage:50V except for electrolytic capacitors. Tolerance:(J) 5% unless otherwise noted. 2.CAPACITORS Umit: p-pF or µF ...L ch) (C) : Audio Signal Route (Center ch) (SBL) : Audio Signal Route (Surround Back L ch) (SW) : Audio Signal Route (SubWoofer ch) A NOTE 1.RESISTORS Unit:k-kΩ,M-MΩ or unless otherwise noted. Rated power:1/4W unless otherwise noted. B Q807(1/2) RN2903(1/2) Q808(1/2) RTN1903(1/2) Q807(2/2)...


