
Operating Instructions
Page 4
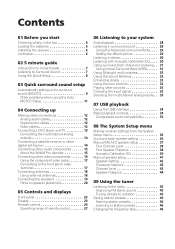
... audio components 15 About the WMA9 Pro decoder 15 Connecting other video components 16 Using the component video jacks 17 Connecting to the front panel video terminal 17 Connecting antennas 18 Using external antennas 18 Connecting the speakers 19 Hints on speaker placement 20 05 Controls and displays Front panel 22 Display 23 Remote control 25...
... audio components 15 About the WMA9 Pro decoder 15 Connecting other video components 16 Using the component video jacks 17 Connecting to the front panel video terminal 17 Connecting antennas 18 Using external antennas 18 Connecting the speakers 19 Hints on speaker placement 20 05 Controls and displays Front panel 22 Display 23 Remote control 25...
Operating Instructions
Page 5
... the remote to control other components 52 12 Other connections Second Zone speaker B setup 54 Switching the speaker system 54 Bi-amping your front speakers 55 Bi-wiring your speakers 55 Connecting additional amplifiers 56 Using this receiver with a Pioneer plasma display 56 Using the SR+ mode with a Pioneer plasma display 57 13 Other Settings The Input Assign...
... the remote to control other components 52 12 Other connections Second Zone speaker B setup 54 Switching the speaker system 54 Bi-amping your front speakers 55 Bi-wiring your speakers 55 Connecting additional amplifiers 56 Using this receiver with a Pioneer plasma display 56 Using the SR+ mode with a Pioneer plasma display 57 13 Other Settings The Input Assign...
Operating Instructions
Page 7
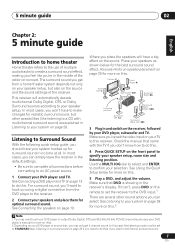
... page 13 to do this receiver. In this case, the listening mode must be set your speakers and place them for more on this. The surround sound you get from the DVD player to the receiver. 2 Connect your DVD player to output Dolby Digital, DTS and 88.2 kHz/96 kHz PCM (2 channel... on your DVD player or source disc, you may need to set to STANDARD (see your DVD player and TV. See Connecting the speakers on the front panel to specify your speaker setup, but other sound options you can simply leave the receiver in and switch on page 20 for surround sound in...
... page 13 to do this receiver. In this case, the listening mode must be set your speakers and place them for more on this. The surround sound you get from the DVD player to the receiver. 2 Connect your DVD player to output Dolby Digital, DTS and 88.2 kHz/96 kHz PCM (2 channel... on your DVD player or source disc, you may need to set to STANDARD (see your DVD player and TV. See Connecting the speakers on the front panel to specify your speaker setup, but other sound options you can simply leave the receiver in and switch on page 20 for surround sound in...
Operating Instructions
Page 9
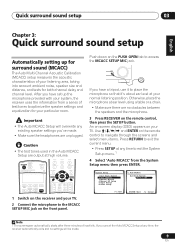
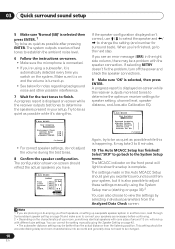
...MENU ST T.EDIT RETURN GUIDE TUNE TV CONTROL TV VOL INPUT SELECT TV CH VOL REC 1 Switch on the receiver and your TV. 2 Connect the microphone to exit the current menu. • Press SETUP at your normal listening position. Otherwise, place the microphone at ear level using a... ] : Exit ENTER: Start : Cancel Note 1 The screensaver automatically starts after three minutes of your listening area, taking into account ambient noise, speaker size and distance, and tests for both channel delay and channel level. MCACC SETUP MIC DOWN MASTER VOLUME UP If you cancel the Auto MCACC...
...MENU ST T.EDIT RETURN GUIDE TUNE TV CONTROL TV VOL INPUT SELECT TV CH VOL REC 1 Switch on the receiver and your TV. 2 Connect the microphone to exit the current menu. • Press SETUP at your normal listening position. Otherwise, place the microphone at ear level using a... ] : Exit ENTER: Start : Cancel Note 1 The screensaver automatically starts after three minutes of your listening area, taking into account ambient noise, speaker size and distance, and tests for both channel delay and channel level. MCACC SETUP MIC DOWN MASTER VOLUME UP If you cancel the Auto MCACC...
Operating Instructions
Page 10
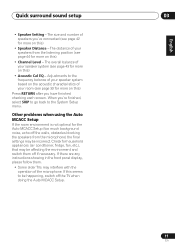
If selecting RETRY doesn't fix the problem, turn off the power and check the speaker connections. 9 Make sure 'OK' is displayed on-screen while the receiver outputs test tones to determine the speakers present in your room, sometimes identical speakers with the speaker connection. You can also choose to view the settings by selecting individual parameters from...
If selecting RETRY doesn't fix the problem, turn off the power and check the speaker connections. 9 Make sure 'OK' is displayed on-screen while the receiver outputs test tones to determine the speakers present in your room, sometimes identical speakers with the speaker connection. You can also choose to view the settings by selecting individual parameters from...
Operating Instructions
Page 11
Check for more on this) • Speaker Distance - The size and number of your speaker system based on the acoustic characteristics of speakers you've connected (see page 39 for more on this ) • Acoustic Cal EQ - When you have finished checking each screen. ...English Deutsch Français Italiano Nederlands Español Quick surround sound setup 03 • Speaker Setting - Adjustments to...
Check for more on this) • Speaker Distance - The size and number of your speaker system based on the acoustic characteristics of speakers you've connected (see page 39 for more on this ) • Acoustic Cal EQ - When you have finished checking each screen. ...English Deutsch Français Italiano Nederlands Español Quick surround sound setup 03 • Speaker Setting - Adjustments to...
Operating Instructions
Page 12
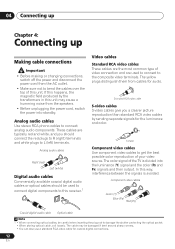
...damage the shutter protecting the optical socket. • When storing optical cable, coil loosely. The cable may cause a humming noise from the speakers. • Before unplugging the power cord, switch the power into the luminance (Y) signal and the color (PB and PR) signals and ...Use stereo RCA phono cables to get the best possible color reproduction of your video source. 04 Connecting up Chapter 4: Connecting up Making cable connections Important • Before making or changing connections, switch off the power and disconnect the power cord from the AC outlet. • Make sure...
...damage the shutter protecting the optical socket. • When storing optical cable, coil loosely. The cable may cause a humming noise from the speakers. • Before unplugging the power cord, switch the power into the luminance (Y) signal and the color (PB and PR) signals and ...Use stereo RCA phono cables to get the best possible color reproduction of your video source. 04 Connecting up Chapter 4: Connecting up Making cable connections Important • Before making or changing connections, switch off the power and disconnect the power cord from the AC outlet. • Make sure...
Operating Instructions
Page 19
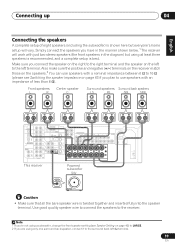
... a subwoofer, change the front speaker setting (see Switching the speaker impedance on the left (L) terminal. 19 En Note 1 If you're not using only one surround back speaker, connect it to use speakers with a nominal impedance between 6 Ω to 16 Ω (please see Speaker Setting on page 42) to ...LARGE. 2 If you connect the speaker on the right to the right terminal and the speaker on page 63 if you have ...
... a subwoofer, change the front speaker setting (see Switching the speaker impedance on the left (L) terminal. 19 En Note 1 If you're not using only one surround back speaker, connect it to use speakers with a nominal impedance between 6 Ω to 16 Ω (please see Speaker Setting on page 42) to ...LARGE. 2 If you connect the speaker on the right to the right terminal and the speaker on page 63 if you have ...
Operating Instructions
Page 20
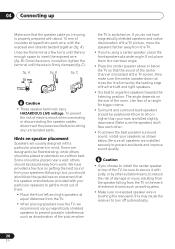
... designed to be positioned 60 cm to 90 cm higher than your ears and titled slightly downward. 04 Connecting up Make sure that the speaker cable you're using is properly prepared with about 10 mm of insulator stripped from each other suitable means, to reduce the ... C). B fig. Also, make sure the center speaker does not cross the line formed by other . • To achieve the best possible surround sound, install your speakers as shown below the TV so that the sound of electric shock when connecting or disconnecting the speaker cables, disconnect the power cord before touching any...
... designed to be positioned 60 cm to 90 cm higher than your ears and titled slightly downward. 04 Connecting up Make sure that the speaker cable you're using is properly prepared with about 10 mm of insulator stripped from each other suitable means, to reduce the ... C). B fig. Also, make sure the center speaker does not cross the line formed by other . • To achieve the best possible surround sound, install your speakers as shown below the TV so that the sound of electric shock when connecting or disconnecting the speaker cables, disconnect the power cord before touching any...
Operating Instructions
Page 21
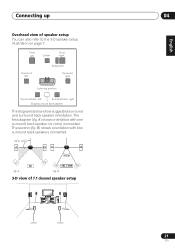
...speakers connected. 90 to 120 LS RS LS RS 0 to the 3-D speaker setup illustration on page 7. B) shows orientation with one surround back speaker (or none) connected. A RS SBL SBL SBR SBR fig. The second (fig. The first diagram (fig. English Deutsch Français Italiano Nederlands Español Connecting... up 04 Overhead view of 7.1 channel speaker setup 21 En Front left Center Front right Surround left Subwoofer Surround right Listening position Surround back left...
...speakers connected. 90 to 120 LS RS LS RS 0 to the 3-D speaker setup illustration on page 7. B) shows orientation with one surround back speaker (or none) connected. A RS SBL SBL SBR SBR fig. The second (fig. The first diagram (fig. English Deutsch Français Italiano Nederlands Español Connecting... up 04 Overhead view of 7.1 channel speaker setup 21 En Front left Center Front right Surround left Subwoofer Surround right Listening position Surround back left...
Operating Instructions
Page 23
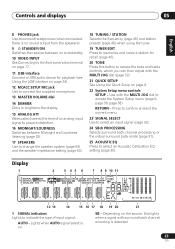
... Deutsch Français Italiano Nederlands Español 8 PHONES jack Use to connect headphones (when connected, there is no sound output from the speakers). 9 STANDBY/ON Switches the receiver between on and standby. 10 VIDEO INPUT See Connecting to the front panel video terminal on page 17. 11 USB interface... Connect a USB audio device for recall (page 46). 20 TONE Press this lights when a signal with ...
... Deutsch Français Italiano Nederlands Español 8 PHONES jack Use to connect headphones (when connected, there is no sound output from the speakers). 9 STANDBY/ON Switches the receiver between on and standby. 10 VIDEO INPUT See Connecting to the front panel video terminal on page 17. 11 USB interface... Connect a USB audio device for recall (page 46). 20 TONE Press this lights when a signal with ...
Operating Instructions
Page 28
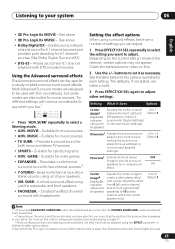
...suited to movie sources • Neo:6 MUSIC - 6.1 channel sound, especially suited to music sources With multichannel sources, if you have connected surround back speaker(s) and have selected SB ON, you 're playing and selects multichannel or stereo playback as necessary.1 STANDARD ADV.SURR STEREO AUTO SURR ... surround (matrix) formats are set to NO (page 42) (this happens automatically if the Surround back speaker setting on the source (for stereo and multichannel sources. If you connect headphones or select the multichannel analog inputs. 2 If surround back processing (page 31) is set to...
...suited to movie sources • Neo:6 MUSIC - 6.1 channel sound, especially suited to music sources With multichannel sources, if you have connected surround back speaker(s) and have selected SB ON, you 're playing and selects multichannel or stereo playback as necessary.1 STANDARD ADV.SURR STEREO AUTO SURR ... surround (matrix) formats are set to NO (page 42) (this happens automatically if the Surround back speaker setting on the source (for stereo and multichannel sources. If you connect headphones or select the multichannel analog inputs. 2 If surround back processing (page 31) is set to...
Operating Instructions
Page 29
... 'wraparound' ON effect. Most Advanced Surround modes are a number of the receiver, certain options may not get sound from 0 (all of your speakers. • VIR. Suitable for both mono and stereo TV sources. • SPORTS - A virtual surround effect using surround effects, there are designed...Dolby Digital Surround EX) • DTS-ES - Provides surround sound for movie sources. • ADV. The defaults, if not stated, are connected, the PHONES SURROUND mode will automatically be selected. • Depending on the current status / mode of settings you can be used for a ...
... 'wraparound' ON effect. Most Advanced Surround modes are a number of the receiver, certain options may not get sound from 0 (all of your speakers. • VIR. Suitable for both mono and stereo TV sources. • SPORTS - A virtual surround effect using surround effects, there are designed...Dolby Digital Surround EX) • DTS-ES - Provides surround sound for movie sources. • ADV. The defaults, if not stated, are connected, the PHONES SURROUND mode will automatically be selected. • Depending on the current status / mode of settings you can be used for a ...
Operating Instructions
Page 33
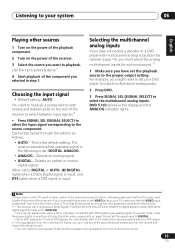
... the volume and channel levels can be set. • You can't listen to your speaker B (Second Zone) system during playback from the speakers connected to this receiver (For example, if you have connected a decoder or a DVD player with multichannel analog outputs to this receiver (page 14),... you must select the analog multichannel inputs for surround sound. 3 1 Make sure you connected this receiver to the ...
... the volume and channel levels can be set. • You can't listen to your speaker B (Second Zone) system during playback from the speakers connected to this receiver (For example, if you have connected a decoder or a DVD player with multichannel analog outputs to this receiver (page 14),... you must select the analog multichannel inputs for surround sound. 3 1 Make sure you connected this receiver to the ...
Operating Instructions
Page 36
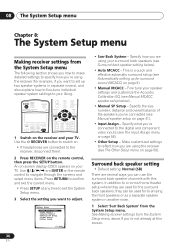
...and exit the current menu. • Press SETUP at this system. Specify the size, number, distance and overall balance of the speakers you've connected (see Manual speaker setup on page 41). • Input Assign - Use the RECEIVER button to switch on. • If headphones are using your ...liking. Specify what you've connected to adjust. Specify how you are connected to the receiver, disconnect them. 2 Press RECEIVER on the remote ...
...and exit the current menu. • Press SETUP at this system. Specify the size, number, distance and overall balance of the speakers you've connected (see Manual speaker setup on page 41). • Input Assign - Use the RECEIVER button to switch on. • If headphones are using your ...liking. Specify what you've connected to adjust. Specify how you are connected to the receiver, disconnect them. 2 Press RECEIVER on the remote ...
Operating Instructions
Page 37
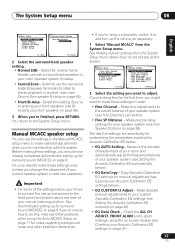
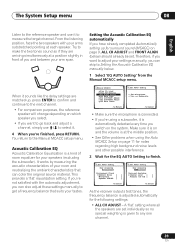
...unless you 're finished, press RETURN. The last five settings are specifically for customizing the parameters explained in another room (see Biamping your speaker system (see Setting the Acoustic Calibration EQ automatically below). • EQ Data Copy - See Making receiver settings from the System Setup ...ALL CH ADJUST, FRONT ALIGN and custom settings using a subwoofer, switch it about ear level at this setting if you should have to connect the setup microphone to stereo playback in Acoustic Calibration EQ below ). • Fine SP Distance - Select for the first time, you...
...unless you 're finished, press RETURN. The last five settings are specifically for customizing the parameters explained in another room (see Biamping your speaker system (see Setting the Acoustic Calibration EQ automatically below). • EQ Data Copy - See Making receiver settings from the System Setup ...ALL CH ADJUST, FRONT ALIGN and custom settings using a subwoofer, switch it about ear level at this setting if you should have to connect the setup microphone to stereo playback in Acoustic Calibration EQ below ). • Fine SP Distance - Select for the first time, you...
Operating Instructions
Page 39
... go back and adjust a channel, simply use it to finish. 3c.EQ AUTO Setting Now Analyzing Environment Check Ambient Noise [ ] Microphone [ ] Speaker YES/NO [ ] :Cancel 3c.EQ AUTO Setting Now Analyzing Surround Analyzing Channel Level [ ] Acoustic Cal EQ [ ] :Cancel As the receiver outputs...next channel. • For comparison purposes, the reference speaker will change depending on which speaker you select. • If you 're not satisfied with your arm span. Turn on Subwoofar. :Cancel • Make sure the microphone is connected. • If you switch on page 9, ALL...
... go back and adjust a channel, simply use it to finish. 3c.EQ AUTO Setting Now Analyzing Environment Check Ambient Noise [ ] Microphone [ ] Speaker YES/NO [ ] :Cancel 3c.EQ AUTO Setting Now Analyzing Surround Analyzing Channel Level [ ] Acoustic Cal EQ [ ] :Cancel As the receiver outputs...next channel. • For comparison purposes, the reference speaker will change depending on which speaker you select. • If you 're not satisfied with your arm span. Turn on Subwoofar. :Cancel • Make sure the microphone is connected. • If you switch on page 9, ALL...
Operating Instructions
Page 54
... SP AB (respectively). Make sure to review Hints on speaker placement on page 20 when placing the speakers in components should be the last connection you make with your speakers in another room. 2 Select 'Second Zone' from the two speakers connected to stereo playback in Connecting the speakers on page 19. Sound is output from the power outlet...
... SP AB (respectively). Make sure to review Hints on speaker placement on page 20 when placing the speakers in components should be the last connection you make with your speakers in another room. 2 Select 'Second Zone' from the two speakers connected to stereo playback in Connecting the speakers on page 19. Sound is output from the power outlet...
Operating Instructions
Page 55
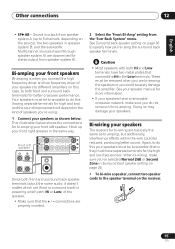
... L B Hi Lo Since both Hi and Low terminals have a removable crossover network, make sure you've selected Normal (SB) or Second Zone in Surround back speaker setting on page 36. • To bi-wire a speaker, connect two speaker cords to do not remove it doesn't matter which part (Hi or Low) of...
... L B Hi Lo Since both Hi and Low terminals have a removable crossover network, make sure you've selected Normal (SB) or Second Zone in Surround back speaker setting on page 36. • To bi-wire a speaker, connect two speaker cords to do not remove it doesn't matter which part (Hi or Low) of...
Operating Instructions
Page 61
... the power plug from surround or center speakers. • Connect the speakers properly (refer to page 19). • Refer to Speaker Setting on page 42 to check the speaker settings. • Refer to Channel Level on page 43 to check the speaker levels. 61 En If the message persists, call a Pioneer authorized blinks. The receiver suddenly switches...
... the power plug from surround or center speakers. • Connect the speakers properly (refer to page 19). • Refer to Speaker Setting on page 42 to check the speaker settings. • Refer to Channel Level on page 43 to check the speaker levels. 61 En If the message persists, call a Pioneer authorized blinks. The receiver suddenly switches...


