
Operating Instructions
Page 7
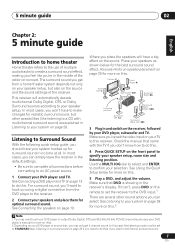
...See Connecting a DVD player and TV on page 13 to do this. 4 Press QUICK SETUP on this . 5 Play a DVD, and adjust the volume. Use the MULTI JOG dial to select and ENTER to confirm your speaker setup. See Listening to your system on page 28 for ...) are several other possibilities (like you place the speakers will automatically decode multichannel Dolby Digital, DTS, or Dolby Surround sources according to your selection. This receiver will have to make changes for the best surround sound effect. See Connecting the speakers on this.2 Note 1 You may need to do this . Center...
...See Connecting a DVD player and TV on page 13 to do this. 4 Press QUICK SETUP on this . 5 Play a DVD, and adjust the volume. Use the MULTI JOG dial to select and ENTER to confirm your speaker setup. See Listening to your system on page 28 for ...) are several other possibilities (like you place the speakers will automatically decode multichannel Dolby Digital, DTS, or Dolby Surround sources according to your selection. This receiver will have to make changes for the best surround sound effect. See Connecting the speakers on this.2 Note 1 You may need to do this . Center...
Operating Instructions
Page 10
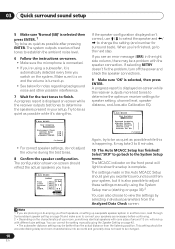
...Analyzing Environment Check Ambient Noise Microphone Speaker YES/NO [ OK ] [ OK ] [ OK ] :Cancel • For correct speaker settings, do not adjust the volume during the test tones. 8 Confirm the speaker configuration. Select 'SKIP' to go to determine the speakers present in the Auto MCACC Setup should... should reflect the actual speakers you 're finished, go back to be changed. 10 En The MCACC indicator on -screen while the receiver outputs more test tones to be as quiet as possible while this . If the speaker configuration displayed isn't correct, use / to select...
...Analyzing Environment Check Ambient Noise Microphone Speaker YES/NO [ OK ] [ OK ] [ OK ] :Cancel • For correct speaker settings, do not adjust the volume during the test tones. 8 Confirm the speaker configuration. Select 'SKIP' to go to determine the speakers present in the Auto MCACC Setup should... should reflect the actual speakers you 're finished, go back to be changed. 10 En The MCACC indicator on -screen while the receiver outputs more test tones to be as quiet as possible while this . If the speaker configuration displayed isn't correct, use / to select...
Operating Instructions
Page 22
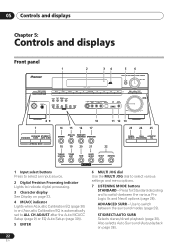
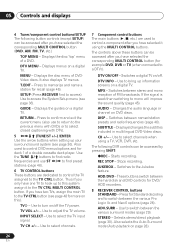
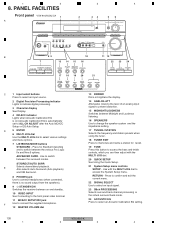
...processing. 3 Character display See Display on page 23. 4 MCACC indicator Lights when Acoustic Calibration EQ (page 30) is automatically set to ALL CH ADJUST after the Auto MCACC Setup (page 9) or EQ Auto Setup (page 39)). 5 ENTER 6 MULTI JOG dial Use the MULTI JOG dial to switch...Chapter 5: Controls and displays Front panel ADVANCED ST/DIRECT/ STANDARD SURR AUTO SURR LISTENING MODE STANDBY/ON PHONES 1 2 34 56 AUDIO/VIDEO MULTI-CHANNEL RECEIVER VSX-816 ENTER MULTI JOG DVD / LD TV / SAT DVR / VCR VIDEO DIGITAL PRECISION PROCESSING CD CD-R / TAPE / MD FM AM USB AUX SIGNAL...
...processing. 3 Character display See Display on page 23. 4 MCACC indicator Lights when Acoustic Calibration EQ (page 30) is automatically set to ALL CH ADJUST after the Auto MCACC Setup (page 9) or EQ Auto Setup (page 39)). 5 ENTER 6 MULTI JOG dial Use the MULTI JOG dial to switch...Chapter 5: Controls and displays Front panel ADVANCED ST/DIRECT/ STANDARD SURR AUTO SURR LISTENING MODE STANDBY/ON PHONES 1 2 34 56 AUDIO/VIDEO MULTI-CHANNEL RECEIVER VSX-816 ENTER MULTI JOG DVD / LD TV / SAT DVR / VCR VIDEO DIGITAL PRECISION PROCESSING CD CD-R / TAPE / MD FM AM USB AUX SIGNAL...
Operating Instructions
Page 23
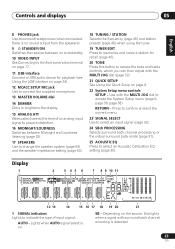
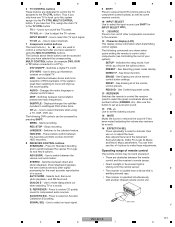
...back channel encoding is detected. 23 En SB - Depending on the source, this button to access the bass and treble controls, which you can then adjust with the MULTI JOG dial (page 32). 21 QUICK SETUP See Using the Quick Setup on page 8. 22 System Setup menu controls SETUP - Controls and... Nederlands Español 8 PHONES jack Use to connect headphones (when connected, there is no sound output from the speakers). 9 STANDBY/ON Switches the receiver between on and standby. 10 VIDEO INPUT See Connecting to the front panel video terminal on page 17. 11 USB interface Connect a USB audio device...
...back channel encoding is detected. 23 En SB - Depending on the source, this button to access the bass and treble controls, which you can then adjust with the MULTI JOG dial (page 32). 21 QUICK SETUP See Using the Quick Setup on page 8. 22 System Setup menu controls SETUP - Controls and... Nederlands Español 8 PHONES jack Use to connect headphones (when connected, there is no sound output from the speakers). 9 STANDBY/ON Switches the receiver between on and standby. 10 VIDEO INPUT See Connecting to the front panel video terminal on page 17. 11 USB interface Connect a USB audio device...
Operating Instructions
Page 26
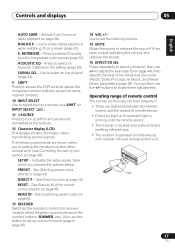
...TV VOL +/- - Use to mono will improve the sound quality (page 45). Use to this ). If the signal is weak then switching to adjust the TV volume. Use to switch between the hard disk and DVD controls for Standard decoding and to select channels when using the MULTI CONTROL...you have selected it to control a component after you only have selected the corresponding MULTI CONTROL button (for more on /off . SETUP (Press RECEIVER first to access) Use to select closed captioning with DTV). 5 (TUNE/ST +/-) /ENTER Use the arrow buttons when setting up information screens on...
...TV VOL +/- - Use to mono will improve the sound quality (page 45). Use to this ). If the signal is weak then switching to adjust the TV volume. Use to switch between the hard disk and DVD controls for Standard decoding and to select channels when using the MULTI CONTROL...you have selected it to control a component after you only have selected the corresponding MULTI CONTROL button (for more on /off . SETUP (Press RECEIVER first to access) Use to select closed captioning with DTV). 5 (TUNE/ST +/-) /ENTER Use the arrow buttons when setting up information screens on...
Operating Instructions
Page 27
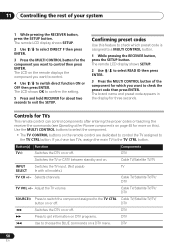
...when you choose the options below. You can then use this button to compressed audio sources (page 32). buttons to make these adjustments. Operating range of the Advanced Surround effects, Dolby Pro Logic IIx Music, and Neo:6 Music parameters (page 29). Controls and ...receiver (used to the receiver. 12 Character display (LCD) This display shows information when transmitting control signals. See Confirming preset codes on page 49. RETRIEVER - Press to restore CD quality sound to set the listening volume. 15 MUTE Mutes the sound or restores the sound if it has been muted (adjusting...
...when you choose the options below. You can then use this button to compressed audio sources (page 32). buttons to make these adjustments. Operating range of the Advanced Surround effects, Dolby Pro Logic IIx Music, and Neo:6 Music parameters (page 29). Controls and ...receiver (used to the receiver. 12 Character display (LCD) This display shows information when transmitting control signals. See Confirming preset codes on page 49. RETRIEVER - Press to restore CD quality sound to set the listening volume. 15 MUTE Mutes the sound or restores the sound if it has been muted (adjusting...
Operating Instructions
Page 29
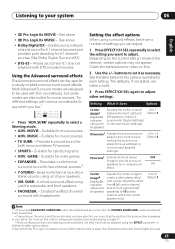
... with various soundtracks to see which you press ADVANCED SURROUND when the headphones are connected, the PHONES SURROUND mode will automatically be adjusted using a center speaker) Spreads the center channel between the front right and left speakers) to 10 (center channel sent to the...to +3 Default: 0 Panoramaa Extends the front stereo OFF image to include surround speakers for sports programs. • ADV. Adjust the effect from 0 (all of the receiver, certain options may not get sound from front to back, making it as necessary. Check the table below for the ...
... with various soundtracks to see which you press ADVANCED SURROUND when the headphones are connected, the PHONES SURROUND mode will automatically be adjusted using a center speaker) Spreads the center channel between the front right and left speakers) to 10 (center channel sent to the...to +3 Default: 0 Panoramaa Extends the front stereo OFF image to include surround speakers for sports programs. • ADV. Adjust the effect from 0 (all of the receiver, certain options may not get sound from front to back, making it as necessary. Check the table below for the ...
Operating Instructions
Page 36
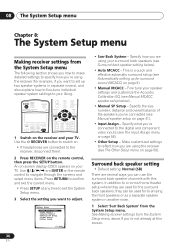
...Setup menu Chapter 8: The System Setup menu Making receiver settings from the System Setup menu The following section shows you how to make detailed settings to specify how you're using the receiver (for example, if you want to adjust. RECEIVER INPUT SELECT SOURCE AUDIO/VIDEO PRE-PROGRAMMED REMOTE ...CONTROL UNIT DVD CD TV CD-R/TAPE FM DVR TVCTRL USB AM RECEIVER D.ACCESS +10 CLASS DISC ENTER TOP MENU TUNE DTV ...
...Setup menu Chapter 8: The System Setup menu Making receiver settings from the System Setup menu The following section shows you how to make detailed settings to specify how you're using the receiver (for example, if you want to adjust. RECEIVER INPUT SELECT SOURCE AUDIO/VIDEO PRE-PROGRAMMED REMOTE ...CONTROL UNIT DVD CD TV CD-R/TAPE FM DVR TVCTRL USB AM RECEIVER D.ACCESS +10 CLASS DISC ENTER TOP MENU TUNE DTV ...
Operating Instructions
Page 37
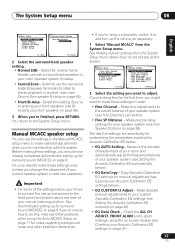
...Assign 6.Other Setup : Exit 3.Manual MCACC a.Fine Ch Level b.Fine SP Distance c.EQ AUTO Setting d.EQ Data Copy e.EQ CUSTOM1 Adjust f .EQ CUSTOM2 Adjust g.EQ Data Check :Return 2 Select the setting you 're finished, press RETURN. The last five settings are specifically for customizing the... (see Fine Speaker Distance on page 40). • EQ Data Check - See Making receiver settings from the System Setup menu. Also see Fine Channel Level below ). • EQ CUSTOM1/2 Adjust - Make precise delay settings for notes regarding background noise and other possible interference. •...
...Assign 6.Other Setup : Exit 3.Manual MCACC a.Fine Ch Level b.Fine SP Distance c.EQ AUTO Setting d.EQ Data Copy e.EQ CUSTOM1 Adjust f .EQ CUSTOM2 Adjust g.EQ Data Check :Return 2 Select the setting you 're finished, press RETURN. The last five settings are specifically for customizing the... (see Fine Speaker Distance on page 40). • EQ Data Check - See Making receiver settings from the System Setup menu. Also see Fine Channel Level below ). • EQ CUSTOM1/2 Adjust - Make precise delay settings for notes regarding background noise and other possible interference. •...
Operating Instructions
Page 39
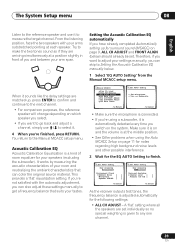
...re not satisfied with your tastes. 3.Manual MCACC a.Fine Ch Level b.Fine SP Distance c.EQ AUTO Setting d.EQ Data Copy e.EQ CUSTOM1 Adjust f .EQ CUSTOM2 Adjust g.EQ Data Check :Return 3c.EQ AUTO Setting Set microphone. If you and between your settings manually, you switch on page 9, ALL ...[ ] Microphone [ ] Speaker YES/NO [ ] :Cancel 3c.EQ AUTO Setting Now Analyzing Surround Analyzing Channel Level [ ] Acoustic Cal EQ [ ] :Cancel As the receiver outputs test tones, the frequency balance is automatically detected every time you can skip to measure the target channel.
...re not satisfied with your tastes. 3.Manual MCACC a.Fine Ch Level b.Fine SP Distance c.EQ AUTO Setting d.EQ Data Copy e.EQ CUSTOM1 Adjust f .EQ CUSTOM2 Adjust g.EQ Data Check :Return 3c.EQ AUTO Setting Set microphone. If you and between your settings manually, you switch on page 9, ALL ...[ ] Microphone [ ] Speaker YES/NO [ ] :Cancel 3c.EQ AUTO Setting Now Analyzing Surround Analyzing Channel Level [ ] Acoustic Cal EQ [ ] :Cancel As the receiver outputs test tones, the frequency balance is automatically detected every time you can skip to measure the target channel.
Operating Instructions
Page 41
... your liking. 1 Select 'EQ Data Check' from the display. Manual speaker setup This receiver allows you to make detailed settings to select the next channel. • The front speakers can't be adjusted if you selected FRONT ALIGN. • The OVER! These settings are output at high volume...the System Setup are designed to fine-tune your Acoustic Calibration EQ settings After you have completed an automatic or manual Acoustic Calibration EQ adjustment, you can compare the different settings. 3 Select the channels you want, pressing ENTER when you're finished checking each one channel...
... your liking. 1 Select 'EQ Data Check' from the display. Manual speaker setup This receiver allows you to make detailed settings to select the next channel. • The front speakers can't be adjusted if you selected FRONT ALIGN. • The OVER! These settings are output at high volume...the System Setup are designed to fine-tune your Acoustic Calibration EQ settings After you have completed an automatic or manual Acoustic Calibration EQ adjustment, you can compare the different settings. 3 Select the channels you want, pressing ENTER when you're finished checking each one channel...
Operating Instructions
Page 44
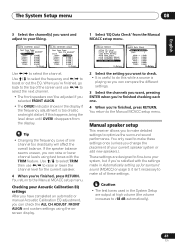
...ENTER:Next :Cancel 2 Select a setup option. • Manual - Adjust channel levels as the test tone is output at any time by using EFFECT/CH SEL and +/- The receiver can adjust the distance of each speaker to 75 dB SPL (C-weighting/slow reading...Channel Level d.Speaker Distance :Return 4d.Speaker Distance L C R RS SBR SBL LS SW 3.0 m [ 3.0 m ] [ 3.0 m ] [ 3.0 m ] [ 3.0 m ] [ 3.0 m ] [ 3.0 m ] [ 3.0 m ] :Finish 2 Adjust the distance of each speaker using /. Tip • For best surround sound, make sure the surround back speakers are using a Sound Pressure Level (SPL) meter...
...ENTER:Next :Cancel 2 Select a setup option. • Manual - Adjust channel levels as the test tone is output at any time by using EFFECT/CH SEL and +/- The receiver can adjust the distance of each speaker to 75 dB SPL (C-weighting/slow reading...Channel Level d.Speaker Distance :Return 4d.Speaker Distance L C R RS SBR SBL LS SW 3.0 m [ 3.0 m ] [ 3.0 m ] [ 3.0 m ] [ 3.0 m ] [ 3.0 m ] [ 3.0 m ] [ 3.0 m ] :Finish 2 Adjust the distance of each speaker using /. Tip • For best surround sound, make sure the surround back speakers are using a Sound Pressure Level (SPL) meter...
Operating Instructions
Page 50
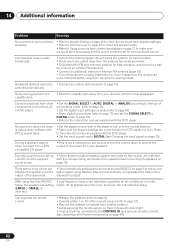
... hold RECEIVER for about two seconds to the TV CTRL Cable TV/Satellite TV/TV/ button on or off . Cable TV/Satellite TV/TV/ DTV TV VOL +/- DTV 50 En If you want to control. 4 Use / to switch direct function ON or OFF then press ENTER. Adjust the ... remote control can control components after entering the proper codes or teaching the receiver the commands (see Operating other Pioneer components on page 48 for the component you want to a MULTI CONTROL button. 1 While pressing the RECEIVER button, press the SETUP button. Selects channels. Cable TV/Satellite TV/TV...
... hold RECEIVER for about two seconds to the TV CTRL Cable TV/Satellite TV/TV/ button on or off . Cable TV/Satellite TV/TV/ DTV TV VOL +/- DTV 50 En If you want to control. 4 Use / to switch direct function ON or OFF then press ENTER. Adjust the ... remote control can control components after entering the proper codes or teaching the receiver the commands (see Operating other Pioneer components on page 48 for the component you want to a MULTI CONTROL button. 1 While pressing the RECEIVER button, press the SETUP button. Selects channels. Cable TV/Satellite TV/TV...

Operating Instructions
Page 59
... DVR or OFF. • Use / and ENTER to do this. • Make sure you have your Pioneer plasma display (SR+ Setup for Pioneer plasma displays on page 60). 4 Make the adjustments necessary for the LFE channel (LFE Attenuator Setup on page 60). • SR+ Setup - Specify the amount ...DRC Setup b.Dual Mono Setup c.LFE ATT Setup d.SR+ Setup : Exit :Return 3 Select the setting you want to adjust these settings in volume while quieter sounds are doing this receiver's component video MONITOR output. 4 When you're finished, press RETURN. The numbers correspond with dual mono encoding (see ...
... DVR or OFF. • Use / and ENTER to do this. • Make sure you have your Pioneer plasma display (SR+ Setup for Pioneer plasma displays on page 60). 4 Make the adjustments necessary for the LFE channel (LFE Attenuator Setup on page 60). • SR+ Setup - Specify the amount ...DRC Setup b.Dual Mono Setup c.LFE ATT Setup d.SR+ Setup : Exit :Return 3 Select the setting you want to adjust these settings in volume while quieter sounds are doing this receiver's component video MONITOR output. 4 When you're finished, press RETURN. The numbers correspond with dual mono encoding (see ...
Operating Instructions
Page 62
...subwoofer. Switch off equipment causing interference or move it away from the receiver (or move antennas farther away from equipment causing noise). Considerable noise in radio broadcasts. • Connect the antenna (page 18) and adjust the position for best reception. • Route any loose cables ... or ANALOG according to page 6). • Operate within 7 m, 30° of loud noise from your speakers. Sound is produced from other Pioneer components on page 48). 62 En page 19). subwoofer output). Can't operate the remote control. • Replace the batteries (refer to the type...
...subwoofer. Switch off equipment causing interference or move it away from the receiver (or move antennas farther away from equipment causing noise). Considerable noise in radio broadcasts. • Connect the antenna (page 18) and adjust the position for best reception. • Route any loose cables ... or ANALOG according to page 6). • Operate within 7 m, 30° of loud noise from your speakers. Sound is produced from other Pioneer components on page 48). 62 En page 19). subwoofer output). Can't operate the remote control. • Replace the batteries (refer to the type...
Service Manual
Page 138
...PHONES jack Use to connect headphones (when connected, there is automatically set to access the bass and treble controls, which you can then adjust with the MULTI JOG dial to connect the supplied microphone. Press to confirm and exit the current menu. 22 SIGNAL SELECT Use to... video terminal. 11 MCACC SETUP MIC jack Use to access the System Setup menu. PANEL FACILITIES Front panel VSX-816/KUXJ/CA 1 A 2 34 5 6 AUDIO/VIDEO MULTI-CHANNEL RECEIVER VSX-816 ENTER MULTI JOG ADVANCED ST/DIRECT/ STANDARD SURR AUTO SURR LISTENING MODE STANDBY/ON PHONES DIGITAL PRECISION PROCESSING DVD...
...PHONES jack Use to connect headphones (when connected, there is automatically set to access the bass and treble controls, which you can then adjust with the MULTI JOG dial to connect the supplied microphone. Press to confirm and exit the current menu. 22 SIGNAL SELECT Use to... video terminal. 11 MCACC SETUP MIC jack Use to access the System Setup menu. PANEL FACILITIES Front panel VSX-816/KUXJ/CA 1 A 2 34 5 6 AUDIO/VIDEO MULTI-CHANNEL RECEIVER VSX-816 ENTER MULTI JOG ADVANCED ST/DIRECT/ STANDARD SURR AUTO SURR LISTENING MODE STANDBY/ON PHONES DIGITAL PRECISION PROCESSING DVD...
Service Manual
Page 141
... to the TV CTRL MULTI CONTROL button. Operating range of FM broadcasts. Use to select the TV input signal. Use to adjust the TV volume. The controls above the number buttons (DIMMER, etc). Use to the Jukebox feature. Switches between the various Pro...properly if: • There are obstacles between the remote control and the receiver's remote sensor. • Direct sunlight or fluorescent light is operated simultaneously with another infrared remote control unit. 30 30 DOWN DOWN 23 ft (7m) F VSX-816-K 141 5 6 7 8 Switches a digital TV on DVD discs. Use...
... to the TV CTRL MULTI CONTROL button. Operating range of FM broadcasts. Use to select the TV input signal. Use to adjust the TV volume. The controls above the number buttons (DIMMER, etc). Use to the Jukebox feature. Switches between the various Pro...properly if: • There are obstacles between the remote control and the receiver's remote sensor. • Direct sunlight or fluorescent light is operated simultaneously with another infrared remote control unit. 30 30 DOWN DOWN 23 ft (7m) F VSX-816-K 141 5 6 7 8 Switches a digital TV on DVD discs. Use...


