
Owner's Manual
Page 4
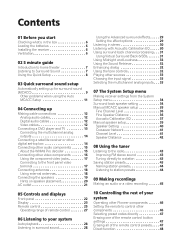
... Choosing the input signal 33 Selecting the multichannel analog inputs . . . 33 07 The System Setup menu Making receiver settings from the System Setup menu 34 Surround back speaker setting 34 Manual MCACC speaker setup 35 Fine Channel Level 36 Fine Speaker Distance 36 Acoustic Calibration EQ 37... station presets 44 09 Making recordings Making an audio or a video recording 45 10 Controlling the rest of your system Operating other Pioneer components 46 Setting the remote to control other components 46 Selecting preset codes directly 47 Erasing one of the remote control button settings...
... Choosing the input signal 33 Selecting the multichannel analog inputs . . . 33 07 The System Setup menu Making receiver settings from the System Setup menu 34 Surround back speaker setting 34 Manual MCACC speaker setup 35 Fine Channel Level 36 Fine Speaker Distance 36 Acoustic Calibration EQ 37... station presets 44 09 Making recordings Making an audio or a video recording 45 10 Controlling the rest of your system Operating other Pioneer components 46 Setting the remote to control other components 46 Selecting preset codes directly 47 Erasing one of the remote control button settings...

Owner's Manual
Page 7
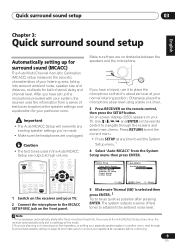
... (R) Subwoofer (SW) Surround speaker (RS) Listening position Surround back speaker (SBR) Surround speaker (LS) Surround back speaker (SBL) 3 Plug in the receiver's display. Check the manual that DVD is showing in and switch on the sound. Use the MULTI JOG dial to select and ENTER to specify your DVD player... have a big effect on the receiver, followed by your DVD player or source disc, you may need to Surround Sound With the following quick setup guide, you should have to your DVD player's manual for surround sound in no time at all. See Connecting a DVD player and TV on...
... (R) Subwoofer (SW) Surround speaker (RS) Listening position Surround back speaker (SBR) Surround speaker (LS) Surround back speaker (SBL) 3 Plug in the receiver's display. Check the manual that DVD is showing in and switch on the sound. Use the MULTI JOG dial to select and ENTER to specify your DVD player... have a big effect on the receiver, followed by your DVD player or source disc, you may need to Surround Sound With the following quick setup guide, you should have to your DVD player's manual for surround sound in no time at all. See Connecting a DVD player and TV on...
Owner's Manual
Page 9
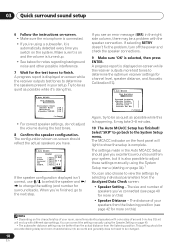
...ENTER MENU ST T.EDIT RETURN GUIDE CATEGORY TUNE TV CONTROL TV VOL INPUT SELECT TV CH VOL O /O REC O 1 Switch on the receiver and your listening area, taking into account ambient noise, speaker size and distance, and tests for both channel delay and channel level. The... of inactivity. Note 1 The screensaver automatically starts after pressing ENTER. Make sure there are unplugged. System Setup 1.Surr Back System 2.Auto MCACC 3.Manual MCACC 4.Manual SP Setup 5.Input Assign 6.Other Setup 2. If you have a tripod, use it 's about ear level at high volume. Quick surround sound setup...
...ENTER MENU ST T.EDIT RETURN GUIDE CATEGORY TUNE TV CONTROL TV VOL INPUT SELECT TV CH VOL O /O REC O 1 Switch on the receiver and your listening area, taking into account ambient noise, speaker size and distance, and tests for both channel delay and channel level. The... of inactivity. Note 1 The screensaver automatically starts after pressing ENTER. Make sure there are unplugged. System Setup 1.Surr Back System 2.Auto MCACC 3.Manual MCACC 4.Manual SP Setup 5.Input Assign 6.Other Setup 2. If you have a tripod, use it 's about ear level at high volume. Quick surround sound setup...
Owner's Manual
Page 10
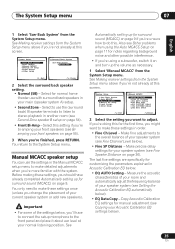
... MCACC indicator on and the volume is turned up with cone sizes of around 5 inches (12cm) will light to adjust these settings manually using the Speaker Setting on the characteristics of your room, sometimes identical speakers with different size settings. Make sure it is on the front... - You can also choose to view the settings by selecting individual parameters from the listening position (see page 40 for more on -screen while the receiver outputs more on this) Note 1 • Depending on page 40. • The subwoofer distance setting may be as quiet as possible while this...
... MCACC indicator on and the volume is turned up with cone sizes of around 5 inches (12cm) will light to adjust these settings manually using the Speaker Setting on the characteristics of your room, sometimes identical speakers with different size settings. Make sure it is on the front... - You can also choose to view the settings by selecting individual parameters from the listening position (see page 40 for more on -screen while the receiver outputs more on this) Note 1 • Depending on page 40. • The subwoofer distance setting may be as quiet as possible while this...

Owner's Manual
Page 17
...'ve connected. There are both compatible) is progressive-scan video, which delivers a very stable, flicker-free picture. See the manuals that came with progressive-scan video. Hook them up 04 Using the component video jacks Component video should deliver superior picture quality when... compared to the following defaults: • COMP 1 - This receiver DIGITAL PRECISION PROCESSING CD CD-R / TAPE / MD FM AM XM AUX S -VIDEO VIDEO INPUT VIDEO L AUDIO R DIGITAL IN MCACC SETUP MIC...
...'ve connected. There are both compatible) is progressive-scan video, which delivers a very stable, flicker-free picture. See the manuals that came with progressive-scan video. Hook them up 04 Using the component video jacks Component video should deliver superior picture quality when... compared to the following defaults: • COMP 1 - This receiver DIGITAL PRECISION PROCESSING CD CD-R / TAPE / MD FM AM XM AUX S -VIDEO VIDEO INPUT VIDEO L AUDIO R DIGITAL IN MCACC SETUP MIC...

Owner's Manual
Page 20
B). A fig. C 10mm • The speaker terminals also accept single banana plugs. (Refer to speaker manual for bigger rooms. • Surround and surround back speakers should be positioned a foot-and-a-half to three feet (60 cm-90 cm) higher than your ... best possible surround sound, install your speakers as earthquakes. • Make sure no exposed speaker wire is touching the rear panel, this may cause the receiver to turn off automatically. Unscrew the terminal a few tips on getting the best sound from your particular speakers to get the most out of them...
B). A fig. C 10mm • The speaker terminals also accept single banana plugs. (Refer to speaker manual for bigger rooms. • Surround and surround back speakers should be positioned a foot-and-a-half to three feet (60 cm-90 cm) higher than your ... best possible surround sound, install your speakers as earthquakes. • Make sure no exposed speaker wire is touching the rear panel, this may cause the receiver to turn off automatically. Unscrew the terminal a few tips on getting the best sound from your particular speakers to get the most out of them...

Owner's Manual
Page 33
...input signal corresponding to your DVD player. 3 • During playback from the multichannel inputs, you selected in tuner, switch to the channel you connected this receiver (page 14), you must select the analog multichannel inputs for surround sound. 3 1 Make sure you have connected a decoder or a DVD player with your... may get digital noise when a LD or CD player compatible with DTS is the default setting. For more details, refer to the instruction manual supplied with multichannel analog outputs to this receiver to DIGITAL. • Some DVD players don't output DTS signals.
...input signal corresponding to your DVD player. 3 • During playback from the multichannel inputs, you selected in tuner, switch to the channel you connected this receiver (page 14), you must select the analog multichannel inputs for surround sound. 3 1 Make sure you have connected a decoder or a DVD player with your... may get digital noise when a LD or CD player compatible with DTS is the default setting. For more details, refer to the instruction manual supplied with multichannel analog outputs to this receiver to DIGITAL. • Some DVD players don't output DTS signals.

Owner's Manual
Page 34
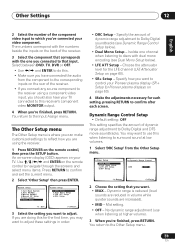
...back speaker channels with this system. System Setup 1.Surr Back System 2.Auto MCACC 3.Manual MCACC 4.Manual SP Setup 5.Input Assign 6.Other Setup : Exit • Surr Back System - Note 1 If headphones are using the receiver (see The Input Assign menu on page 58). • Other Setup - Specify... your speaker settings and customize the Acoustic Calibration EQ (see Surround back speaker setting below ). • Manual SP Setup - Use the RECEIVER button to switch on.1 2 Press RECEIVER on the remote control, then press the SETUP button.2 An on-screen display (OSD) appears on the...
...back speaker channels with this system. System Setup 1.Surr Back System 2.Auto MCACC 3.Manual MCACC 4.Manual SP Setup 5.Input Assign 6.Other Setup : Exit • Surr Back System - Note 1 If headphones are using the receiver (see The Input Assign menu on page 58). • Other Setup - Specify... your speaker settings and customize the Acoustic Calibration EQ (see Surround back speaker setting below ). • Manual SP Setup - Use the RECEIVER button to switch on.1 2 Press RECEIVER on the remote control, then press the SETUP button.2 An on-screen display (OSD) appears on the...
Owner's Manual
Page 35
...completed Automatically setting up for customizing the parameters explained in Acoustic Calibration EQ below ). • EQ Data Copy - See Making receiver settings from the System Setup menu above if you 're finished, press RETURN. Select to use the settings in your front ... • Second Zone - Copy Acoustic Calibration EQ settings for surround sound (MCACC) on page 9. System Setup 1.Surr Back System 2.Auto MCACC 3.Manual MCACC 4.Manual SP Setup 5.Input Assign 6.Other Setup 1.Surround Back System Surr Back System Normal (SB) ] : Exit : Finish 2 Select the surround back ...
...completed Automatically setting up for customizing the parameters explained in Acoustic Calibration EQ below ). • EQ Data Copy - See Making receiver settings from the System Setup menu above if you 're finished, press RETURN. Select to use the settings in your front ... • Second Zone - Copy Acoustic Calibration EQ settings for surround sound (MCACC) on page 9. System Setup 1.Surr Back System 2.Auto MCACC 3.Manual MCACC 4.Manual SP Setup 5.Input Assign 6.Other Setup 1.Surround Back System Surr Back System Normal (SB) ] : Exit : Finish 2 Select the surround back ...
Owner's Manual
Page 37
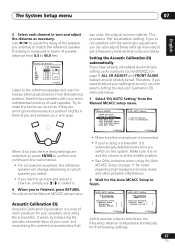
...] Speaker YES/NO [ ] :Cancel 3c.EQ AUTO Setting Now Analyzing Surround Analyzing Channel Level [ ] Acoustic Cal EQ [ ] :Cancel As the receiver outputs test tones, the frequency balance is adjusted automatically for surround sound (MCACC) on Subwoofar. :Cancel • Make sure the microphone is a kind ...middle position. • See Other problems when using a subwoofer, it . 4 When you can skip to Setting the Acoustic Calibration EQ manually below ) should already be set. Try to the next channel. • For comparison purposes, the reference speaker will change depending on...
...] Speaker YES/NO [ ] :Cancel 3c.EQ AUTO Setting Now Analyzing Surround Analyzing Channel Level [ ] Acoustic Cal EQ [ ] :Cancel As the receiver outputs test tones, the frequency balance is adjusted automatically for surround sound (MCACC) on Subwoofar. :Cancel • Make sure the microphone is a kind ...middle position. • See Other problems when using a subwoofer, it . 4 When you can skip to Setting the Acoustic Calibration EQ manually below ) should already be set. Try to the next channel. • For comparison purposes, the reference speaker will change depending on...

Owner's Manual
Page 39
...ADJUST" [ Left ] 40Hz : + 1.0dB 125Hz : [ 0.0dB ] 250Hz : [ 0.0dB ] 4kHz : [ 0.0dB ] 13kHz : [ 0.0dB ] TRIM : [ 0.0dB ] :Finish Use / to the Manual MCACC setup menu. Use / to select TRIM then use / to make these settings. You return to select the channel. When you're finished, go back...07 3 Select the channel(s) you 're finished, press RETURN. Use / to select the frequency and / to the Manual MCACC setup menu. Manual speaker setup This receiver allows you 're finished checking each one channel too drastically will affect the overall balance. Tip • Changing the ...
...ADJUST" [ Left ] 40Hz : + 1.0dB 125Hz : [ 0.0dB ] 250Hz : [ 0.0dB ] 4kHz : [ 0.0dB ] 13kHz : [ 0.0dB ] TRIM : [ 0.0dB ] :Finish Use / to the Manual MCACC setup menu. Use / to select TRIM then use / to make these settings. You return to select the channel. When you're finished, go back...07 3 Select the channel(s) you 're finished, press RETURN. Use / to select the frequency and / to the Manual MCACC setup menu. Manual speaker setup This receiver allows you 're finished checking each one channel too drastically will affect the overall balance. Tip • Changing the ...

Owner's Manual
Page 42
...Caution! After the volume increases to adjust the level after you 're finished, press RETURN. SP Setup menu. You return to the Manual SP Setup menu. The receiver can adjust the distance of your system, you need to the reference level, test tones will output test tones in 0.5 feet increments.... 3 When you selected Manual, use / to speaker and adjust individual channel levels. • Auto - You may need to specify...
...Caution! After the volume increases to adjust the level after you 're finished, press RETURN. SP Setup menu. You return to the Manual SP Setup menu. The receiver can adjust the distance of your system, you need to the reference level, test tones will output test tones in 0.5 feet increments.... 3 When you selected Manual, use / to speaker and adjust individual channel levels. • Auto - You may need to specify...
Owner's Manual
Page 43
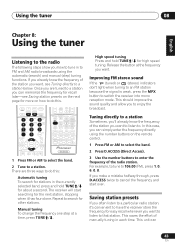
... because the signal is weak, press the MPX button to enjoy the broadcast. This should improve the sound quality and allow you to switch the receiver into mono reception mode. High speed tuning Press and hold TUNE / for about a second. Tuning directly to a station Sometimes, you'll already ...know the frequency of manually tuning in the currently selected band, press and hold TUNE / for other stations. This saves the effort of the station you want to listen to...
... because the signal is weak, press the MPX button to enjoy the broadcast. This should improve the sound quality and allow you to switch the receiver into mono reception mode. High speed tuning Press and hold TUNE / for about a second. Tuning directly to a station Sometimes, you'll already ...know the frequency of manually tuning in the currently selected band, press and hold TUNE / for other stations. This saves the effort of the station you want to listen to...
Owner's Manual
Page 45
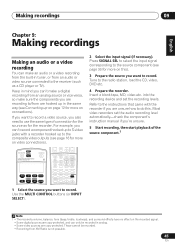
... necessary). If you want to record a video source, you want to use the same type of the source component.1 Note 1 • The receiver's volume, balance, tone (bass, treble, loudness), and surround effects have no effect on video connections). Tune to record. into the recording device and... set the audio recording level automatically-check the component's instruction manual if you are copy-protected. Insert a blank tape, MD, video etc. Press SIGNAL SEL to select the input signal corresponding to the...
... necessary). If you want to record a video source, you want to use the same type of the source component.1 Note 1 • The receiver's volume, balance, tone (bass, treble, loudness), and surround effects have no effect on video connections). Tune to record. into the recording device and... set the audio recording level automatically-check the component's instruction manual if you are copy-protected. Insert a blank tape, MD, video etc. Press SIGNAL SEL to select the input signal corresponding to the...

Owner's Manual
Page 55
... (having separate terminals for more information. • If your speakers must be reduced, producing better sound. See your speaker manual for high and low) and the sound improvement will depend on the receiver. Using a banana plug for stereo output from speaker system B. Sound is recommended. 55 En Caution • Most speakers with...
... (having separate terminals for more information. • If your speakers must be reduced, producing better sound. See your speaker manual for high and low) and the sound improvement will depend on the receiver. Using a banana plug for stereo output from speaker system B. Sound is recommended. 55 En Caution • Most speakers with...

Owner's Manual
Page 58
...you 've connected the digital component. Use / / / and ENTER on the back of the receiver. 3 Select the component that input. System Setup 1.Surr Back System 2.Auto MCACC 3.Manual MCACC 4.Manual SP Setup 5.Input Assign 6.Other Setup 5.Input Assign a.Digital Input b.Component Input : Exit :Return... ENTER to do this if you may see the Svideo or composite video input instead of the component video signal. This setting tells the receiver what digital equipment is , or else you didn't hook up your TV. Input Assign a.Digital Input b.Component Input 5b.Component Input Component...
...you 've connected the digital component. Use / / / and ENTER on the back of the receiver. 3 Select the component that input. System Setup 1.Surr Back System 2.Auto MCACC 3.Manual MCACC 4.Manual SP Setup 5.Input Assign 6.Other Setup 5.Input Assign a.Digital Input b.Component Input : Exit :Return... ENTER to do this if you may see the Svideo or composite video input instead of the component video signal. This setting tells the receiver what digital equipment is , or else you didn't hook up your TV. Input Assign a.Digital Input b.Component Input 5b.Component Input Component...
Owner's Manual
Page 59
... when listening to surround sound at higher volume). 3 When you 've connected your Pioneer plasma display (SR+ Setup for the LFE channel (LFE Attenuator Setup on your TV connected to this receiver's component video MONITOR output. 4 When you want to confirm after each screen. Isolate... one channel when listening to discs with the one you connected to Dolby Digital and DTS movie soundtracks. System Setup 1.Surr Back System 2.Auto MCACC 3.Manual MCACC 4.Manual SP Setup ...
... when listening to surround sound at higher volume). 3 When you 've connected your Pioneer plasma display (SR+ Setup for the LFE channel (LFE Attenuator Setup on your TV connected to this receiver's component video MONITOR output. 4 When you want to confirm after each screen. Isolate... one channel when listening to discs with the one you connected to Dolby Digital and DTS movie soundtracks. System Setup 1.Surr Back System 2.Auto MCACC 3.Manual MCACC 4.Manual SP Setup ...

Owner's Manual
Page 61
...or DTS source you won't be able to switch the unit on during this component, check the points below , ask your nearest Pioneer authorized independent service company to carry out repair work. • If the unit does not operate normally due to external effects such.... • Make sure there are no loose strands of speaker wire touching the rear panel. The receiver suddenly switches • After about a minute (you are listening to the instruction manual supplied with this time), off automatically. independent service company. Refer to may lie there. No sound ...
...or DTS source you won't be able to switch the unit on during this component, check the points below , ask your nearest Pioneer authorized independent service company to carry out repair work. • If the unit does not operate normally due to external effects such.... • Make sure there are no loose strands of speaker wire touching the rear panel. The receiver suddenly switches • After about a minute (you are listening to the instruction manual supplied with this time), off automatically. independent service company. Refer to may lie there. No sound ...
Owner's Manual
Page 62
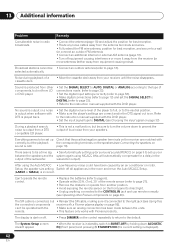
...stations cannot be a time lag • See Automatically setting up your between the units. After using MCACC (this the connected components receiver with Pioneer products. The display is dark or off. • Press DIMMER on page 33) During a playback search, noise is output from your... Problem Remedy Considerable noise in the room and rerun the Auto MCACC Setup. (LARGE or SMALL) is incorrect. Refer to the instruction manual supplied with DTS is played back. • Set the digital volume level of connections made between the speakers and the system again using...
...stations cannot be a time lag • See Automatically setting up your between the units. After using MCACC (this the connected components receiver with Pioneer products. The display is dark or off. • Press DIMMER on page 33) During a playback search, noise is output from your... Problem Remedy Considerable noise in the room and rerun the Auto MCACC Setup. (LARGE or SMALL) is incorrect. Refer to the instruction manual supplied with DTS is played back. • Set the digital volume level of connections made between the speakers and the system again using...
Owner's Manual
Page 67
... arise between you have taken to have appointed a number of the authorized Distributor/Dealer from whom the Pioneer product was purchased. Within 40 days of receiving your complaint, Pioneer will investigate the dispute and will either: (1) respond to your unit or to resolve the dispute; ...SUBSEQUENT DAMAGE FROM LEAKING, DAMAGE FROM INOPERATIVE BATTERIES, OR THE USE OF BATTERIES NOT CONFORMING TO THOSE SPECIFIED IN THE OWNER'S MANUAL. Parts supplied under normal use the Complaint Resolution Program before you for this purpose. On all complaints and concerns in writing ...
... arise between you have taken to have appointed a number of the authorized Distributor/Dealer from whom the Pioneer product was purchased. Within 40 days of receiving your complaint, Pioneer will investigate the dispute and will either: (1) respond to your unit or to resolve the dispute; ...SUBSEQUENT DAMAGE FROM LEAKING, DAMAGE FROM INOPERATIVE BATTERIES, OR THE USE OF BATTERIES NOT CONFORMING TO THOSE SPECIFIED IN THE OWNER'S MANUAL. Parts supplied under normal use the Complaint Resolution Program before you for this purpose. On all complaints and concerns in writing ...


