
Owner's Manual
Page 3
...a traffic hazard and is illegal in Your Hands Get the most importantly, without affecting your hearing. The Safety of your hearing adapts. Sound can 't hear what sounds "normal" can hear it there. D8-10-3a_A1_En This product is in many areas. BE SURE TO OBSERVE THE FOLLOWING GUIDELINES: ...• Do not turn up the volume so high that lets the sound come through clearly without distortion. • Once you can be charged for even during the warranty period. Guard against this product continuously. ...
...a traffic hazard and is illegal in Your Hands Get the most importantly, without affecting your hearing. The Safety of your hearing adapts. Sound can 't hear what sounds "normal" can hear it there. D8-10-3a_A1_En This product is in many areas. BE SURE TO OBSERVE THE FOLLOWING GUIDELINES: ...• Do not turn up the volume so high that lets the sound come through clearly without distortion. • Once you can be charged for even during the warranty period. Guard against this product continuously. ...
Owner's Manual
Page 4
... system Enjoying various types of playback using the listening modes 46 Selecting MCACC presets...47 Choosing the input signal...47 Better sound using Phase Control...48 07 Playback with NETWORK features Introduction...50 Playback with Network functions...51 About network playback...52 About ...playback Playing a source...39 Playing an iPod...40 Playing a USB device...41 Listening to the radio...42 Bluetooth ADAPTER for buying this Pioneer product. Contents 01 Before you start Checking what's in the box...8 Installing the receiver...8 Loading the batteries...8 Operating range of remote ...
... system Enjoying various types of playback using the listening modes 46 Selecting MCACC presets...47 Choosing the input signal...47 Better sound using Phase Control...48 07 Playback with NETWORK features Introduction...50 Playback with Network functions...51 About network playback...52 About ...playback Playing a source...39 Playing an iPod...40 Playing a USB device...41 Listening to the radio...42 Bluetooth ADAPTER for buying this Pioneer product. Contents 01 Before you start Checking what's in the box...8 Installing the receiver...8 Loading the batteries...8 Operating range of remote ...
Owner's Manual
Page 5
...setup...81 Network Setup menu...83 Checking the Network Information...84 The Other Setup menu...84 13 FAQ Troubleshooting...88 Power...88 No sound...88 Other audio problems...89 ADAPTER PORT terminal...90 Video...90 Settings...90 Professional Calibration EQ graphical output...91 Display...91 Remote ...control...91 HDMI...91 AVNavigator...92 USB interface...93 iPod...93 Network...93 Wireless LAN...94 14 Additional information Surround sound formats...97 About iPod...97 About SiriusXM...97 About FLAC...97 Auto Surround, ALC and Stream Direct with different input signal formats ...
...setup...81 Network Setup menu...83 Checking the Network Information...84 The Other Setup menu...84 13 FAQ Troubleshooting...88 Power...88 No sound...88 Other audio problems...89 ADAPTER PORT terminal...90 Video...90 Settings...90 Professional Calibration EQ graphical output...91 Display...91 Remote ...control...91 HDMI...91 AVNavigator...92 USB interface...93 iPod...93 Network...93 Wireless LAN...94 14 Additional information Surround sound formats...97 About iPod...97 About SiriusXM...97 About FLAC...97 Auto Surround, ALC and Stream Direct with different input signal formats ...
Owner's Manual
Page 6
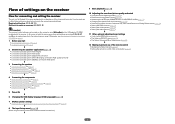
... used easily after following the procedure below to control other than the recommended connections) j 9 Basic playback (page 38) j 10 Adjusting the sound and picture quality as necessary: 6, 8, 10, 11, 12 Important The receiver's initial settings can be made interactively. About the audio connection...all EQ type (SYMMETRY/ALL CH ADJ/FRONT ALIGN) (page 73) ! Bi-amping your TV and playback components on page 23 ! Better sound using AVNavigator (included CD-ROM) on page 9. 1 Before you start ! Control with an abundance of functions and terminals. Connecting the speakers...
... used easily after following the procedure below to control other than the recommended connections) j 9 Basic playback (page 38) j 10 Adjusting the sound and picture quality as necessary: 6, 8, 10, 11, 12 Important The receiver's initial settings can be made interactively. About the audio connection...all EQ type (SYMMETRY/ALL CH ADJ/FRONT ALIGN) (page 73) ! Bi-amping your TV and playback components on page 23 ! Better sound using AVNavigator (included CD-ROM) on page 9. 1 Before you start ! Control with an abundance of functions and terminals. Connecting the speakers...
Owner's Manual
Page 8
... gives off a magnetic field). near a heater. Do not touch this unit, make sure to check initial operations; Loading the batteries The batteries included with the sound. - they may not work properly if: ! When installing this receiver's bottom panel while the power is turned off) and could cause burns. This may have...
... gives off a magnetic field). near a heater. Do not touch this unit, make sure to check initial operations; Loading the batteries The batteries included with the sound. - they may not work properly if: ! When installing this receiver's bottom panel while the power is turned off) and could cause burns. This may have...

Owner's Manual
Page 11
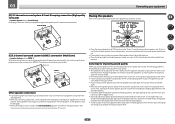
... the remote control mode (page 67). 4 Input function buttons Press to access: ! Press to compressed audio sources (page 59). ! Press to restore CD quality sound to select the PQLS setting (page 57). ! SPEAKERS - Use to switch various modes (2 Pro Logic, Neo:6, etc.) (page 46). ! Press for Standard... 56, 73 and 81). ! Press to confirm and exit the current menu screen. 8 i/j/k/l/ENTER Use the arrow buttons when setting up your surround sound system (see page 73) and the Audio or Video options (page 59 or 61). 9 ZONE 2 Switch to perform operations in sleep mode and ...
... the remote control mode (page 67). 4 Input function buttons Press to access: ! Press to compressed audio sources (page 59). ! Press to restore CD quality sound to select the PQLS setting (page 57). ! SPEAKERS - Use to switch various modes (2 Pro Logic, Neo:6, etc.) (page 46). ! Press for Standard... 56, 73 and 81). ! Press to confirm and exit the current menu screen. 8 i/j/k/l/ENTER Use the arrow buttons when setting up your surround sound system (see page 73) and the Audio or Video options (page 59 or 61). 9 ZONE 2 Switch to perform operations in sleep mode and ...

Owner's Manual
Page 12
Use to select the white commands). Controls and displays 12 02 12 OPTION The preset codes of desired devices can be registered in the main zone. Also use this button to perform operations in the remote control and button operations can be registered using the learning mode. 13 Switches the remote to control the receiver (used to set up surround sound. 14 VOLUME +/- Switch to set the listening volume. 15 MUTE Mutes the sound or restores the sound if it has been muted (adjusting the volume also restores the sound).
Use to select the white commands). Controls and displays 12 02 12 OPTION The preset codes of desired devices can be registered in the main zone. Also use this button to perform operations in the remote control and button operations can be registered using the learning mode. 13 Switches the remote to control the receiver (used to set up surround sound. 14 VOLUME +/- Switch to set the listening volume. 15 MUTE Mutes the sound or restores the sound if it has been muted (adjusting the volume also restores the sound).

Owner's Manual
Page 13
...) or TONE (tone controls) features is selected (page 59). 6 PQLS Lights when the PQLS feature is active (page 57). 7 S.RTRV Lights when the Auto Sound Retriever function is selected (page 47). ! 02 Controls and displays Display 1 2 3 4 5 6 7 8 9 10 11 12 13 14 15 AUTO L ...signal automatically (page 47). 2 Program format indicators Light to indicate the channels to indicate the current speaker system using MPX. 12 Lights when the sound is being input) ! PCM - Lights during DSD (Direct Stream Digital) to indicate the currently selected input signal. AUTO SURROUND - ALC - ...
...) or TONE (tone controls) features is selected (page 59). 6 PQLS Lights when the PQLS feature is active (page 57). 7 S.RTRV Lights when the Auto Sound Retriever function is selected (page 47). ! 02 Controls and displays Display 1 2 3 4 5 6 7 8 9 10 11 12 13 14 15 AUTO L ...signal automatically (page 47). 2 Program format indicators Light to indicate the channels to indicate the current speaker system using MPX. 12 Lights when the sound is being input) ! PCM - Lights during DSD (Direct Stream Digital) to indicate the currently selected input signal. AUTO SURROUND - ALC - ...

Owner's Manual
Page 14
... you've made MULTI-ZONE connections (page 29) use these controls to indicate iPod/iPhone/iPad is connected (page 23). ! Lights when EQ is no sound output from the remote control (page 8). 8 MASTER VOLUME dial 9 SPEAKERS Use to change the speaker terminal (page 63). 10 PHONES jack Use to switch various...
... you've made MULTI-ZONE connections (page 29) use these controls to indicate iPod/iPhone/iPad is connected (page 23). ! Lights when EQ is no sound output from the remote control (page 8). 8 MASTER VOLUME dial 9 SPEAKERS Use to change the speaker terminal (page 63). 10 PHONES jack Use to switch various...

Owner's Manual
Page 17
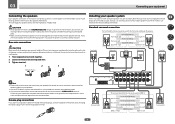
... shown below . Important ! The Speaker System setting must be made if you have two subwoofers, the second subwoofer can simultaneously enjoy 5.2-channel surround sound in the main zone with the left and right front height speakers shown in the main zone when not using the B speakers. 17 It is... height speakers (FHL/FHR), the left and right surround speakers (SL/SR), the left and right channels (L and R). ! In this case, the same sound is also possible to the front left and right surround back speakers (SBL/SBR), and the subwoofers (SW 1/SW 2). Choose one of the surround back...
... shown below . Important ! The Speaker System setting must be made if you have two subwoofers, the second subwoofer can simultaneously enjoy 5.2-channel surround sound in the main zone with the left and right front height speakers shown in the main zone when not using the B speakers. 17 It is... height speakers (FHL/FHR), the left and right surround speakers (SL/SR), the left and right channels (L and R). ! In this case, the same sound is also possible to the front left and right surround back speakers (SBL/SBR), and the subwoofers (SW 1/SW 2). Choose one of the surround back...
Owner's Manual
Page 18
... sound effect. 18 See Automatically conducting optimum sound tuning (Full Auto MCACC) on the size of the speakers you put your equipment [D] 5.2 channel surround system & Front Bi-amping connection (High quality surround) ! FHL SW 2 SW 1 FHR C L R FWL 30 30 FWR 60 60 120 120 SL 60 ...equal distance from your CRT TV. ! Speaker System setting: Front Bi-Amp Bi-amping connection of the front speakers for improving sound quality Where you intend to conduct the Full Auto MCACC (speaker environment setting) procedure. Placing the speakers Refer to place the...
... sound effect. 18 See Automatically conducting optimum sound tuning (Full Auto MCACC) on the size of the speakers you put your equipment [D] 5.2 channel surround system & Front Bi-amping connection (High quality surround) ! FHL SW 2 SW 1 FHR C L R FWL 30 30 FWR 60 60 120 120 SL 60 ...equal distance from your CRT TV. ! Speaker System setting: Front Bi-Amp Bi-amping connection of the front speakers for improving sound quality Where you intend to conduct the Full Auto MCACC (speaker environment setting) procedure. Placing the speakers Refer to place the...
Owner's Manual
Page 19
... CENTER SURROUND R L SURROUND BACK / ZONE 2 R L (Single) FRONT HEIGHT / WIDE / R L B Note ! Connecting two subwoofers increases the bass sound to cut off as a safety measure. 03 Connecting your equipment Connecting the speakers Each speaker connection on how to connect the other end of external...be used for details on the receiver comprises a positive (+) and negative (-) terminal. CAUTION ! In this case, the same sound is twisted together and inserted fully into the end of electric shock when con- left Subwoofer 1 Center Subwoofer 2 Front left...
... CENTER SURROUND R L SURROUND BACK / ZONE 2 R L (Single) FRONT HEIGHT / WIDE / R L B Note ! Connecting two subwoofers increases the bass sound to cut off as a safety measure. 03 Connecting your equipment Connecting the speakers Each speaker connection on how to connect the other end of external...be used for details on the receiver comprises a positive (+) and negative (-) terminal. CAUTION ! In this case, the same sound is twisted together and inserted fully into the end of electric shock when con- left Subwoofer 1 Center Subwoofer 2 Front left...
Owner's Manual
Page 20
... makes no difference. If your speakers have two metal plates that connect the High to do not remove it for high and low) and the sound improvement will depend on the receiver. Your speakers must be bi-ampable to the Low terminals. Don't connect different speakers from the same terminal in...
... makes no difference. If your speakers have two metal plates that connect the High to do not remove it for high and low) and the sound improvement will depend on the receiver. Your speakers must be bi-ampable to the Low terminals. Don't connect different speakers from the same terminal in...

Owner's Manual
Page 21
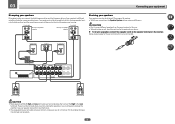
... B setup You can listen to stereo playback in another component in ZONE 2. 1 Connect a pair of the front speakers for high sound quality with stereo playback on page 81 to do this . See Speaker system setting on another room. 1 Connect a pair of speakers... Select 'ZONE 2' from the Speaker System menu. Front wide setup 1 Connect a pair of cables and terminals HDMI Transferable audio signals HD audio Sound signal priority Digital (Coaxial) Digital (Optical) Conventional digital audio RCA (Analog) (White/Red) Conventional analog audio ! See Standard surround connection on page...
... B setup You can listen to stereo playback in another component in ZONE 2. 1 Connect a pair of the front speakers for high sound quality with stereo playback on page 81 to do this . See Speaker system setting on another room. 1 Connect a pair of speakers... Select 'ZONE 2' from the Speaker System menu. Front wide setup 1 Connect a pair of cables and terminals HDMI Transferable audio signals HD audio Sound signal priority Digital (Coaxial) Digital (Optical) Conventional digital audio RCA (Analog) (White/Red) Conventional analog audio ! See Standard surround connection on page...
Owner's Manual
Page 23
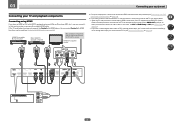
...input components, connections other than HDMI connections are connected by HDMI connections, if the TV supports the HDMI ARC (Audio Return Channel) function, the sound of the TV can be used (see Connecting your TV and playback components Connecting using a commercially available HDMI cable. When the TV and receiver ...your equipment Connecting your DVD player with no need to tell the receiver which digital or analog audio input you want to listen to the sound of the TV over the receiver. If you connected the TV to connect an audio cable. If you use a coaxial digital audio cable...
...input components, connections other than HDMI connections are connected by HDMI connections, if the TV supports the HDMI ARC (Audio Return Channel) function, the sound of the TV can be used (see Connecting your TV and playback components Connecting using a commercially available HDMI cable. When the TV and receiver ...your equipment Connecting your DVD player with no need to tell the receiver which digital or analog audio input you want to listen to the sound of the TV over the receiver. If you connected the TV to connect an audio cable. If you use a coaxial digital audio cable...
Owner's Manual
Page 24
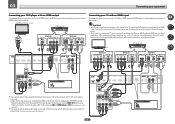
Important ! When the TV and receiver are connected by HDMI connections, if the TV supports the HDMI ARC (Audio Return Channel) function, the sound of the TV can be used to ON (see The Input Setup menu on page 56). ! If you use an optical digital audio cable, you'... output to the TV even if the DVD player is no need to tell the receiver which digital input you want to listen to the sound of the TV over the receiver, connect the receiver and TV with audio cables (page 23). - Also, when the receiver and TV are connected by...
Important ! When the TV and receiver are connected by HDMI connections, if the TV supports the HDMI ARC (Audio Return Channel) function, the sound of the TV can be used to ON (see The Input Setup menu on page 56). ! If you use an optical digital audio cable, you'... output to the TV even if the DVD player is no need to tell the receiver which digital input you want to listen to the sound of the TV over the receiver, connect the receiver and TV with audio cables (page 23). - Also, when the receiver and TV are connected by...
Owner's Manual
Page 25
... necessary to HD audio with audio cables (page 23). ! In order to listening to make video output settings. If you connected the player to the sound of the TV over the receiver, connect the receiver and TV with this receiver, connect an HDMI cable, and use an optical digital audio cable...
... necessary to HD audio with audio cables (page 23). ! In order to listening to make video output settings. If you connected the player to the sound of the TV over the receiver, connect the receiver and TV with this receiver, connect an HDMI cable, and use an optical digital audio cable...
Owner's Manual
Page 27
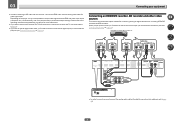
... by HDMI (see also The Input Setup menu on page 23). If your turntable has line-level outputs (i.e., it has a built-in some cases the sound is output from the HDMI output terminal. When you set up the receiver you'll need to tell the receiver which input you to the...
... by HDMI (see also The Input Setup menu on page 23). If your turntable has line-level outputs (i.e., it has a built-in some cases the sound is output from the HDMI output terminal. When you set up the receiver you'll need to tell the receiver which input you to the...

Owner's Manual
Page 28
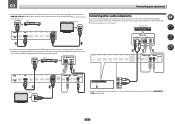
... terminal, then release the tabs to secure the AM antenna wires. 3 Fix the AM loop antenna to a wall or door frame. To improve reception and sound quality, connect external antennas (see Connecting external antennas on a flat surface and in the direction indicated by the arrow (fig. 03 Connecting your equipment Connecting...
... terminal, then release the tabs to secure the AM antenna wires. 3 Fix the AM loop antenna to a wall or door frame. To improve reception and sound quality, connect external antennas (see Connecting external antennas on a flat surface and in the direction indicated by the arrow (fig. 03 Connecting your equipment Connecting...
Owner's Manual
Page 33
Basic Setup Changing the OSD display language (OSD Language 34 Automatically conducting optimum sound tuning (Full Auto MCACC 34 The Input Setup menu...36 Operation Mode Setup...37 About the Home Menu...37 33
Basic Setup Changing the OSD display language (OSD Language 34 Automatically conducting optimum sound tuning (Full Auto MCACC 34 The Input Setup menu...36 Operation Mode Setup...37 About the Home Menu...37 33


