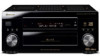

Owner's Manual
Page 3
... used for service. Do not place this product near a swimming pool; HEAT - NATIONAL ELECTRICAL CODE D1-4-2-2_En This product is operated. FOLLOW INSTRUCTIONS - WATER AND MOISTURE - If you are covered by following conditions: • When the power-supply cord or plug is left un-used replacement parts specified by the manufacturer, or sold with care. Article 810 of time. When installing an outside antenna...
... used for service. Do not place this product near a swimming pool; HEAT - NATIONAL ELECTRICAL CODE D1-4-2-2_En This product is operated. FOLLOW INSTRUCTIONS - WATER AND MOISTURE - If you are covered by following conditions: • When the power-supply cord or plug is left un-used replacement parts specified by the manufacturer, or sold with care. Article 810 of time. When installing an outside antenna...

Owner's Manual
Page 4
... 7 Installing the receiver 7 Opening the front panel 7 Using the remote control 7 Loading the batteries 7 Operating range of the remote control 8 02 5 minute guide Introduction to home theater 9 Setting up for Surround Sound 9 Automatically setting up for surround sound 12 Other problems when using the Auto Surround Setup 14 Checking the settings on your DVD (or other) player 14 Playing a source 14 03 Connecting your equipment Rear panel 15 About the video converter 16 About cable types 17 Analog audio cables 17 Digital audio cables 17 Video cables 17 When making cable...
... 7 Installing the receiver 7 Opening the front panel 7 Using the remote control 7 Loading the batteries 7 Operating range of the remote control 8 02 5 minute guide Introduction to home theater 9 Setting up for Surround Sound 9 Automatically setting up for surround sound 12 Other problems when using the Auto Surround Setup 14 Checking the settings on your DVD (or other) player 14 Playing a source 14 03 Connecting your equipment Rear panel 15 About the video converter 16 About cable types 17 Analog audio cables 17 Digital audio cables 17 Video cables 17 When making cable...
Owner's Manual
Page 5
... CINEMA Setup 77 The Input Assign menu 77 Function Rename 79 SACD Setup 80 PHONO/LINE Setup 80 Multi-Room and IR receiver setup 81 12 Volt Trigger 81 The Expert setup menu 82 Crossover Network 83 Fine Channel Level 83 Fine Channel Delay 84 Acoustic Calibration EQ 84 Professional Acoustic Calibration 87 Using Professional Acoustic Calibration 88 Bass Peak Level 89 Dynamic Range Control 90 12 Additional information Troubleshooting 91 Power 91 No sound 92 Other audio problems...
... CINEMA Setup 77 The Input Assign menu 77 Function Rename 79 SACD Setup 80 PHONO/LINE Setup 80 Multi-Room and IR receiver setup 81 12 Volt Trigger 81 The Expert setup menu 82 Crossover Network 83 Fine Channel Level 83 Fine Channel Delay 84 Acoustic Calibration EQ 84 Professional Acoustic Calibration 87 Using Professional Acoustic Calibration 88 Bass Peak Level 89 Dynamic Range Control 90 12 Additional information Troubleshooting 91 Power 91 No sound 92 Other audio problems...

Owner's Manual
Page 11
... mm) of the bare speaker wire touches the back panel it isn't, press DVD/LD on the remote control to set the receiver to the DVD input. 5 Use the on-screen Auto Surround setup to your liking. A fig. 5 minute guide 02 Each speaker connection on the sound. B). Caution • Make sure that the DVD input is firmly clamped (fig. To connect a terminal, unscrew the terminal a few turns until the wire is selected. In addition to...
... mm) of the bare speaker wire touches the back panel it isn't, press DVD/LD on the remote control to set the receiver to the DVD input. 5 Use the on-screen Auto Surround setup to your liking. A fig. 5 minute guide 02 Each speaker connection on the sound. B). Caution • Make sure that the DVD input is firmly clamped (fig. To connect a terminal, unscrew the terminal a few turns until the wire is selected. In addition to...

Owner's Manual
Page 12
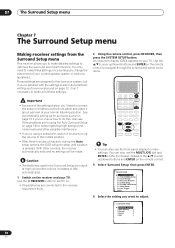
.... 1.Surround Setup [ SurrBack System ] [ Auto Setting ] [ Normal ] [ Expert ] [ Exit ] 12 En Use the RECEIVER button to optimize the speaker settings and equalization for your TV. PHONO/LINE Setup ] [ 7. After you have set up /down) buttons and ENTER on the receiver and your normal listening position. Input Assign ] [ 4. Multi Room ] [ 8. 12V Trigger ] [ Exit ] 5 'SurrBack System' should be highlighted. Make sure there are output at ear level using a table or a chair. 3 Press RECEIVER on -screen menu...
.... 1.Surround Setup [ SurrBack System ] [ Auto Setting ] [ Normal ] [ Expert ] [ Exit ] 12 En Use the RECEIVER button to optimize the speaker settings and equalization for your TV. PHONO/LINE Setup ] [ 7. After you have set up /down) buttons and ENTER on the receiver and your normal listening position. Input Assign ] [ 4. Multi Room ] [ 8. 12V Trigger ] [ Exit ] 5 'SurrBack System' should be highlighted. Make sure there are output at ear level using a table or a chair. 3 Press RECEIVER on -screen menu...

Owner's Manual
Page 14
... speakers connected to this receiver, make sure that VIDEO 1 input is set to output Dolby Digital, DTS and 88.2/96kHz PCM (2 channel) audio. Playing a source Here are playing a stereo source, you will be affecting the environment and switch them off if necessary. Note • For more information on different ways of listening to sources. 5 Use the MASTER VOLUME control (front panel or remote) to adjust the volume level. • Turn down the volume of your TV so that all the settings by selecting...
... speakers connected to this receiver, make sure that VIDEO 1 input is set to output Dolby Digital, DTS and 88.2/96kHz PCM (2 channel) audio. Playing a source Here are playing a stereo source, you will be affecting the environment and switch them off if necessary. Note • For more information on different ways of listening to sources. 5 Use the MASTER VOLUME control (front panel or remote) to adjust the volume level. • Turn down the volume of your TV so that all the settings by selecting...

Owner's Manual
Page 15
..., DVD and speaker connections. See Operating other Pioneer components with this receiver. See Connecting antennas on page 61 for connection details. 6 Stereo analog audio source inputs/outputs Four sets of analog audio jacks for connection details. 15 En Rear panel 1 S S400 2 13 CENTER 19 AC IN 20 SWITCHED 100W(0.8A)MAX 3 SELECTABLE Caution • Before making or changing the connections, switch off the power and disconnect the power cord from a single remote sensor. See Using the i.LINK interface on page 74 for connection details. 4 IR input/output...
..., DVD and speaker connections. See Operating other Pioneer components with this receiver. See Connecting antennas on page 61 for connection details. 6 Stereo analog audio source inputs/outputs Four sets of analog audio jacks for connection details. 15 En Rear panel 1 S S400 2 13 CENTER 19 AC IN 20 SWITCHED 100W(0.8A)MAX 3 SELECTABLE Caution • Before making or changing the connections, switch off the power and disconnect the power cord from a single remote sensor. See Using the i.LINK interface on page 74 for connection details. 4 IR input/output...

Owner's Manual
Page 33
... the station memory and frequency select mode when using the - /+ buttons. - /+ Selects station memories or frequencies when using the tuner. Connect a game console, portable DVD player, video camera (etc.), that has an optical digital connection. • S-VIDEO - CONTROL Use together with the MULTI JOG dial to select the function or use with the MULTI JOG dial. 19 MULTI ROOM & SOURCE controls If you've made multi-room connections (see Using the multi-room controls on page 70). Controls and displays 04 10 STEREO/DIRECT (page 40) Switches the receiver into STEREO mode...
... the station memory and frequency select mode when using the - /+ buttons. - /+ Selects station memories or frequencies when using the tuner. Connect a game console, portable DVD player, video camera (etc.), that has an optical digital connection. • S-VIDEO - CONTROL Use together with the MULTI JOG dial to select the function or use with the MULTI JOG dial. 19 MULTI ROOM & SOURCE controls If you've made multi-room connections (see Using the multi-room controls on page 70). Controls and displays 04 10 STEREO/DIRECT (page 40) Switches the receiver into STEREO mode...

Owner's Manual
Page 35
... TUNING DTV ON/OFF BAND DISP MODE SUB TITLE TUNING + STATION DTV MENUCLASS STATION + CHANNEL CHANNEL+ + TV INPUT TV CONTROL + TV VOL TV CH INPUT MIDNIGHT MULTI DH INPUT + VOLUME MOVIE MUSIC MODE ACOUSTIC EQ SURROUND STEREO/ DIRECT ENTER SB CH MODE MUTE REMOTE SETUP 12 13 14 15 16 17 18 19 20 21 22 23 24 1 Remote Control Display Screen 2 SOURCE Use this button to turn on/ off . DNR Press to select the video source. VIDEO SEL (page 63) Press repeatedly to switch digital...
... TUNING DTV ON/OFF BAND DISP MODE SUB TITLE TUNING + STATION DTV MENUCLASS STATION + CHANNEL CHANNEL+ + TV INPUT TV CONTROL + TV VOL TV CH INPUT MIDNIGHT MULTI DH INPUT + VOLUME MOVIE MUSIC MODE ACOUSTIC EQ SURROUND STEREO/ DIRECT ENTER SB CH MODE MUTE REMOTE SETUP 12 13 14 15 16 17 18 19 20 21 22 23 24 1 Remote Control Display Screen 2 SOURCE Use this button to turn on/ off . DNR Press to select the video source. VIDEO SEL (page 63) Press repeatedly to switch digital...

Owner's Manual
Page 36
... buttons to select the options available. TV CH +/Use these to change the channel of the TV. STEREO/DIRECT (page 40) Switches the receiver into standby. 14 MULTI OPERATION (page 59) Use this button to perform multi operations. 15 RECEIVER Press this button will take you 've programmed your selection. The are setting up the receiver. 16 TOP MENU/GUIDE Use to access receiver functions or when setting up the receiver, this button to display the disc 'top menu' when a DVD player is selected as the input source...
... buttons to select the options available. TV CH +/Use these to change the channel of the TV. STEREO/DIRECT (page 40) Switches the receiver into standby. 14 MULTI OPERATION (page 59) Use this button to perform multi operations. 15 RECEIVER Press this button will take you 've programmed your selection. The are setting up the receiver. 16 TOP MENU/GUIDE Use to access receiver functions or when setting up the receiver, this button to display the disc 'top menu' when a DVD player is selected as the input source...

Owner's Manual
Page 41
... 1 Make sure you have set your DVD player to output multichannel analog audio. 2 Press MULTI CH INPUT (MULTI CH IN on Acoustic Calibration Equalization. Note • You can 't use Acoustic Calibration EQ when MULTI CH IN or SACD DIRECT is active. Note • You can listen to sources using the Acoustic Calibration Equalization set in the display to indicate the audio is selected, the receiver automatically switches to STEREO. 41 En Listening with...
... 1 Make sure you have set your DVD player to output multichannel analog audio. 2 Press MULTI CH INPUT (MULTI CH IN on Acoustic Calibration Equalization. Note • You can 't use Acoustic Calibration EQ when MULTI CH IN or SACD DIRECT is active. Note • You can listen to sources using the Acoustic Calibration Equalization set in the display to indicate the audio is selected, the receiver automatically switches to STEREO. 41 En Listening with...
Owner's Manual
Page 50
... unsure how to do this. System Setup [ 1. Input Assign ] [ 4. PHONO/LINE Setup ] [ 7. Caution • The test tones used in Automatically setting up for surround sound on your current speaker system or add new speakers.). RECEIVER SYSTEM SETUP ENTER Tip • You can also use the front panel display to make these settings. 2 Using the remote control, press RECEIVER, then press the SYSTEM SETUP button. Multi Room ] [ 8. 12V Trigger ] [ Exit ] 4 Select the setting you to make all of your...
... unsure how to do this. System Setup [ 1. Input Assign ] [ 4. PHONO/LINE Setup ] [ 7. Caution • The test tones used in Automatically setting up for surround sound on your current speaker system or add new speakers.). RECEIVER SYSTEM SETUP ENTER Tip • You can also use the front panel display to make these settings. 2 Using the remote control, press RECEIVER, then press the SYSTEM SETUP button. Multi Room ] [ 8. 12V Trigger ] [ Exit ] 4 Select the setting you to make all of your...

Owner's Manual
Page 69
... and speakers for example, changing the input source or starting playback). • Connect a TV monitor to the MULTI-ROOM & SOURCE MONITOR OUT jacks, both rooms at the same time or, depending on your digital component into the receiver's (analog) input terminals to hear the component in the sub room. • You can't use sound controls (such as shown in separate rooms after you can connect the analog outputs of speakers attached to the surround back speaker terminals...
... and speakers for example, changing the input source or starting playback). • Connect a TV monitor to the MULTI-ROOM & SOURCE MONITOR OUT jacks, both rooms at the same time or, depending on your digital component into the receiver's (analog) input terminals to hear the component in the sub room. • You can't use sound controls (such as shown in separate rooms after you can connect the analog outputs of speakers attached to the surround back speaker terminals...

Owner's Manual
Page 70
... operations for awhile, turn off the power in the display. 10 Other connections Using the multi-room controls You can use the front panel controls to adjust the sub room volume and select sources. • You won't be able to switch the main room off completely unless you've switched off the multi-room control first. • The tuner cannot be used when you're setting up the system (from the on-screen System Setup menu...
... operations for awhile, turn off the power in the display. 10 Other connections Using the multi-room controls You can use the front panel controls to adjust the sub room volume and select sources. • You won't be able to switch the main room off completely unless you've switched off the multi-room control first. • The tuner cannot be used when you're setting up the system (from the on-screen System Setup menu...

Owner's Manual
Page 71
... additional amplifier on page 51. Closet or shelving unit IR IN CONTROL IN OUT Non-Pioneer component Pioneer component S400 S400 CENTER IR receiver 2 Connect the IR IN jack of another component to power your IR receiver type in a closed cabinet or shelving unit, you have configured the Surround back speaker setting on the surround back channel pre-outs for any home use an optional IR receiver (such as well. Note • Remote operation...
... additional amplifier on page 51. Closet or shelving unit IR IN CONTROL IN OUT Non-Pioneer component Pioneer component S400 S400 CENTER IR receiver 2 Connect the IR IN jack of another component to power your IR receiver type in a closed cabinet or shelving unit, you have configured the Surround back speaker setting on the surround back channel pre-outs for any home use an optional IR receiver (such as well. Note • Remote operation...

Owner's Manual
Page 77
... 37 for the digital inputs (see Surround sound formats on the back of the digital input to what digital equipment is highlighted on screen: System Setup [ 1. Input Assign [Digital-In Select ] [Component-In Select ] [i.LINK Input ] [Exit ] Assigning the digital inputs • Default settings: Digital-1 (optical) - This setting tells the receiver what you have connected equipment using component video or i.LINK cables. • Select 'Input Assign' from the System Setup menu. For more on decoding formats see above). DVD/LD Digital-4 (coaxial) - PHONO/LINE Setup...
... 37 for the digital inputs (see Surround sound formats on the back of the digital input to what digital equipment is highlighted on screen: System Setup [ 1. Input Assign [Digital-In Select ] [Component-In Select ] [i.LINK Input ] [Exit ] Assigning the digital inputs • Default settings: Digital-1 (optical) - This setting tells the receiver what you have connected equipment using component video or i.LINK cables. • Select 'Input Assign' from the System Setup menu. For more on decoding formats see above). DVD/LD Digital-4 (coaxial) - PHONO/LINE Setup...

Owner's Manual
Page 81
... Setup [ 1. Input Assign ] [ 4. Multi Room ] [ 8. 12V Trigger ] [ Exit ] DVD/LD TV/SAT VCR1/DVR VCR2 VIDEO PHONO/LINE CD CD-R/TAPE1 MD/TAPE2 USB TUNER [ Exit ] [ OFF ] [ OFF ] [ OFF ] [ OFF ] [ OFF ] [ OFF ] [ OFF ] [ OFF ] [ OFF ] [ OFF ] [ OFF ] 2 Select an input function and choose the setting that receiver's volume controls. 7. THX CINEMA Setup ] [ 3. Function Rename ] [ 5. This should be using this setting if you've connected a fully integrated amplifier (such as another Pioneer VSX receiver) in the Surround...
... Setup [ 1. Input Assign ] [ 4. Multi Room ] [ 8. 12V Trigger ] [ Exit ] DVD/LD TV/SAT VCR1/DVR VCR2 VIDEO PHONO/LINE CD CD-R/TAPE1 MD/TAPE2 USB TUNER [ Exit ] [ OFF ] [ OFF ] [ OFF ] [ OFF ] [ OFF ] [ OFF ] [ OFF ] [ OFF ] [ OFF ] [ OFF ] [ OFF ] 2 Select an input function and choose the setting that receiver's volume controls. 7. THX CINEMA Setup ] [ 3. Function Rename ] [ 5. This should be using this setting if you've connected a fully integrated amplifier (such as another Pioneer VSX receiver) in the Surround...

Owner's Manual
Page 82
... setting up /down ) buttons and ENTER on the remote control. 3 Select 'Surround Setup' then press ENTER. 4 Select 'Expert' then press ENTER. 1.Surround Setup [ SurrBack System ] [ Auto Setting ] [ Normal ] [ Expert ] [ Exit ] 5 Select the setting you can also use the front panel display to make detailed adjustments to Dolby Digital and DTS movie soundtracks (see Crossover Network below ). • Fine Channel Delay- PHONO/LINE Setup ] [ 7. System Setup [ 1. Input Assign ] [ 4. You can use to confirm after each setting, pressing ENTER to make these settings...
... setting up /down ) buttons and ENTER on the remote control. 3 Select 'Surround Setup' then press ENTER. 4 Select 'Expert' then press ENTER. 1.Surround Setup [ SurrBack System ] [ Auto Setting ] [ Normal ] [ Expert ] [ Exit ] 5 Select the setting you can also use the front panel display to make detailed adjustments to Dolby Digital and DTS movie soundtracks (see Crossover Network below ). • Fine Channel Delay- PHONO/LINE Setup ] [ 7. System Setup [ 1. Input Assign ] [ 4. You can use to confirm after each setting, pressing ENTER to make these settings...
Owner's Manual
Page 93
...; The source has no sound output for that channel. • By choosing an advanced effect listening mode (see Listening in Channel Level on page 52. • The speaker isn't connected properly. • Check Installing your DVD player is compatible with digital output level adjustment capability. • The multichannel analog inputs are selected. • Press MULTI CH INPUT again (see page 30). • Interference caused by other component neutral position. DTS signal out is turned down...
...; The source has no sound output for that channel. • By choosing an advanced effect listening mode (see Listening in Channel Level on page 52. • The speaker isn't connected properly. • Check Installing your DVD player is compatible with digital output level adjustment capability. • The multichannel analog inputs are selected. • Press MULTI CH INPUT again (see page 30). • Interference caused by other component neutral position. DTS signal out is turned down...

Owner's Manual
Page 94
... the receiver is in standby, switch to COLOR BURST OFF by holding down the MULTI JOG CONTROL RETURN button and pressing STANDBY/ON. (the current setting appears in the subwoofer output). a video source. • If your video connections use RCA standard video cable for example RCA standard video to a component video connection), you 're assigned the correct input. There seems to be a time lag between the speakers and the output of the subwoofer. • The subwoofer channel can be delayed...
... the receiver is in standby, switch to COLOR BURST OFF by holding down the MULTI JOG CONTROL RETURN button and pressing STANDBY/ON. (the current setting appears in the subwoofer output). a video source. • If your video connections use RCA standard video cable for example RCA standard video to a component video connection), you 're assigned the correct input. There seems to be a time lag between the speakers and the output of the subwoofer. • The subwoofer channel can be delayed...


