
Owner's Manual
Page 4
...remote control unit 8 Installing the Receiver 8 Opening the Front Panel 8 Easy Setup Guide Part 1 9 Home Theater: The Basics 9 1) Your Home System 9 2) The Source Material 9 3) The Listening Modes 9 Conclusion 9 1 Hooking Up Your DVD Player and TV 10 Digital Connections 10 2 Speaker Connections 11 3 Setting up the Main Unit 12 4 Assigning the Digital Inputs 12 Easy Setup Guide Part 2 13 1 Auto Surround Sound Setup 13 2 Playing a DVD with Surround Sound 15 Connecting Your Equipment 16 Connecting your TV 16 Component Video Input Default Settings 16 Connecting Video Components...
...remote control unit 8 Installing the Receiver 8 Opening the Front Panel 8 Easy Setup Guide Part 1 9 Home Theater: The Basics 9 1) Your Home System 9 2) The Source Material 9 3) The Listening Modes 9 Conclusion 9 1 Hooking Up Your DVD Player and TV 10 Digital Connections 10 2 Speaker Connections 11 3 Setting up the Main Unit 12 4 Assigning the Digital Inputs 12 Easy Setup Guide Part 2 13 1 Auto Surround Sound Setup 13 2 Playing a DVD with Surround Sound 15 Connecting Your Equipment 16 Connecting your TV 16 Component Video Input Default Settings 16 Connecting Video Components...
Owner's Manual
Page 5
... Remote Controls (LEARNING Mode 65 Using Remote Control with Other Components 67 CD/MD/CD-R/VCR/DVD/LD/DVD Recorder/ Cassette Deck operations 67 Cable TV/Satellite TV/Digital TV/TV operations .......... 68 Setting up the Direct Function 69 Using Other Functions 70 Recording from Audio/Video Components 70 SECOND ZONE (Speaker System B) Setup 71 Stereo playback in another room 71 SPEAKERS Button 71 Setting up and Using the USB Audio Connection ........ 72 Connecting Additional Amplifiers 73 MULTI ROOM function 74 MULTI ROOM connections 74 MULTI ROOM setup 75 Controlling the MULTI...
... Remote Controls (LEARNING Mode 65 Using Remote Control with Other Components 67 CD/MD/CD-R/VCR/DVD/LD/DVD Recorder/ Cassette Deck operations 67 Cable TV/Satellite TV/Digital TV/TV operations .......... 68 Setting up the Direct Function 69 Using Other Functions 70 Recording from Audio/Video Components 70 SECOND ZONE (Speaker System B) Setup 71 Stereo playback in another room 71 SPEAKERS Button 71 Setting up and Using the USB Audio Connection ........ 72 Connecting Additional Amplifiers 73 MULTI ROOM function 74 MULTI ROOM connections 74 MULTI ROOM setup 75 Controlling the MULTI...
Owner's Manual
Page 6
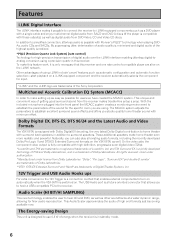
... specific room you studio quality home theater sound with minimum effort. With the included microphone plugged into the front panel the MCACC system creates a monitoring environment to establish the parameters of energy when the receiver is in addition to surround speakers. Dolby Digital EX, DTS-ES, DTS 96/24 and the Latest Audio and Video Formats The VSX-55TXi is equipped with Dolby Digital EX decoding, the very latest Dolby Digital contribution to home theater...
... specific room you studio quality home theater sound with minimum effort. With the included microphone plugged into the front panel the MCACC system creates a monitoring environment to establish the parameters of energy when the receiver is in addition to surround speakers. Dolby Digital EX, DTS-ES, DTS 96/24 and the Latest Audio and Video Formats The VSX-55TXi is equipped with Dolby Digital EX decoding, the very latest Dolby Digital contribution to home theater...

Owner's Manual
Page 11
... subwoofer use a mono (single plug) RCA cord and for the other speakers use surround back speakers. If this happens it up the speakers you connect the speaker on the right to the R terminal and the speaker on new, eight channel home theater DVDs. The diagram below in order to hook up the single speaker as FRONT. Front speaker (Left) Powered subwoofer TV/monitor Front speaker (Right) Center speaker Surround speaker (AUDIO) (Left) S400 S400 Surround speaker (Right) (Single) Surround back speaker (Left) Surround back speaker...
... subwoofer use a mono (single plug) RCA cord and for the other speakers use surround back speakers. If this happens it up the speakers you connect the speaker on the right to the R terminal and the speaker on new, eight channel home theater DVDs. The diagram below in order to hook up the single speaker as FRONT. Front speaker (Left) Powered subwoofer TV/monitor Front speaker (Right) Center speaker Surround speaker (AUDIO) (Left) S400 S400 Surround speaker (Right) (Single) Surround back speaker (Left) Surround back speaker...

Owner's Manual
Page 13
... remote control. 6 Press the SYSTEM SETUP button and use the on-screen displays (OSDs) on the receiver and your TV. EASY SETUP GUIDE Easy Setup Guide Part 2 Easy Setup Guide Part 2 1 Auto Surround Sound Setup If setting up your surround sound speakers seems like it's going to be pointing at SURROUND SETUP, press ENTER. 7 13 stand Use a table, chair or something else to put the microphone into the SETUP MIC jack on the Front Panel. Front Speaker (R) If you have a subwoofer turn the volume down, then plug...
... remote control. 6 Press the SYSTEM SETUP button and use the on-screen displays (OSDs) on the receiver and your TV. EASY SETUP GUIDE Easy Setup Guide Part 2 Easy Setup Guide Part 2 1 Auto Surround Sound Setup If setting up your surround sound speakers seems like it's going to be pointing at SURROUND SETUP, press ENTER. 7 13 stand Use a table, chair or something else to put the microphone into the SETUP MIC jack on the Front Panel. Front Speaker (R) If you have a subwoofer turn the volume down, then plug...
Owner's Manual
Page 22
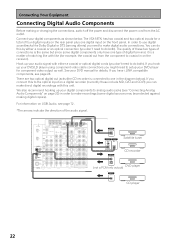
... but since some digital sources may be protected against making or changing the connections, switch off the power and disconnect the power cord from the component to make recordings (some digital components only have i.LINK compatible components, see "Connecting Analog Audio Components" on a digital recorder (currently these two types of connections is a matter of four digital inputs on the rear panel plus one in on the receiver). Hook up your digital components to setup your DVD manual for component video output as shown...
... but since some digital sources may be protected against making or changing the connections, switch off the power and disconnect the power cord from the component to make recordings (some digital components only have i.LINK compatible components, see "Connecting Analog Audio Components" on a digital recorder (currently these two types of connections is a matter of four digital inputs on the rear panel plus one in on the receiver). Hook up your digital components to setup your DVD manual for component video output as shown...

Owner's Manual
Page 30
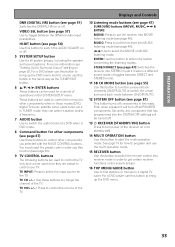
... this display will light.) 9 i.LINK indicator Lights when an i.LINK -Audio-equipped component is selected. 30 When you press the SET UP button (13), you can use it was in a different sound mode or toggles between DIRECT and STEREO mode. 4 ENTER button Use this button to enter information concerning the SYSTEM SETUP, listening mode or the tuner. 5 STANDBY indicator Lights when the receiver is in STANDBY mode. (Please note that this dial for many purposes. select a function...
... this display will light.) 9 i.LINK indicator Lights when an i.LINK -Audio-equipped component is selected. 30 When you press the SET UP button (13), you can use it was in a different sound mode or toggles between DIRECT and STEREO mode. 4 ENTER button Use this button to enter information concerning the SYSTEM SETUP, listening mode or the tuner. 5 STANDBY indicator Lights when the receiver is in STANDBY mode. (Please note that this dial for many purposes. select a function...

Owner's Manual
Page 32
... sound delay settings (see page 46) Press repeatedly to make Dolby Pro Logic II MUSIC parameter settings. DIGITAL - You must input the preset code in receiver mode the buttons operate as make these adjustments. buttons to select one of the receiver and the remote control, which bypasses the tone circuitry. TV button This is a dedicated TV button. SIGNAL SEL button (see page 53). TV CONT: Press so that switch the mode of the following: 1 Remote Control Display Screen AUTO - EFFECT/CH SEL button Switches...
... sound delay settings (see page 46) Press repeatedly to make Dolby Pro Logic II MUSIC parameter settings. DIGITAL - You must input the preset code in receiver mode the buttons operate as make these adjustments. buttons to select one of the receiver and the remote control, which bypasses the tone circuitry. TV button This is a dedicated TV button. SIGNAL SEL button (see page 53). TV CONT: Press so that switch the mode of the following: 1 Remote Control Display Screen AUTO - EFFECT/CH SEL button Switches...
Owner's Manual
Page 33
... CONTROL buttons The following buttons are preset to bring up the DVD menu and for the TV. VIDEO SEL button (see page 57) Use to toggle between DIRECT and STEREO mode. 11 SB CH MODE button (see page 55) Use this function (see page 47): Switches the receiver into MUSIC listening mode (see "Setting Up for how to program and use the multi operation mode. 15 RECEIVER button Use this button to turn off components in those modes (DVD, digital TV tuner, satellite tuner, cable tuner, etc.). For a DVD player use this button...
... CONTROL buttons The following buttons are preset to bring up the DVD menu and for the TV. VIDEO SEL button (see page 57) Use to toggle between DIRECT and STEREO mode. 11 SB CH MODE button (see page 55) Use this function (see page 47): Switches the receiver into MUSIC listening mode (see "Setting Up for how to program and use the multi operation mode. 15 RECEIVER button Use this button to turn off components in those modes (DVD, digital TV tuner, satellite tuner, cable tuner, etc.). For a DVD player use this button...
Owner's Manual
Page 38
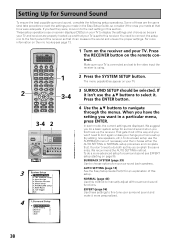
... Setup Guide, so consider if the ones you made at that your TV is set to manually adjust all the surround sound functions. To do it out of the receiver so that . SSeetDttiinstpgilnaUypgs &foUCroSpnutrrrofolosunrdSSouurnrdound Sound To ensure the best possible surround sound, complete the following setup operations. If you won't need to connect the setup mic to navigate through the menus. Press the RECEIVER button on to do a basic setup use on-screen displays...
... Setup Guide, so consider if the ones you made at that your TV is set to manually adjust all the surround sound functions. To do it out of the receiver so that . SSeetDttiinstpgilnaUypgs &foUCroSpnutrrrofolosunrdSSouurnrdound Sound To ensure the best possible surround sound, complete the following setup operations. If you won't need to connect the setup mic to navigate through the menus. Press the RECEIVER button on to do a basic setup use on-screen displays...

Owner's Manual
Page 66
S0URCE DVD/LD VCR1/ DVR CD DIMMER 1 SETUP TV SYSTEM RECEIVER OFF TV MULTI CONTROL VCR2 VIDEO CD-R/ TAPE1 SAT TUNER INPUT ATT LOUDNESS SPEAKER A/B 2 VIDEO SEL SIGNAL SEL TAPE 2 EFFECT/CH SELL 5 TONE BASS/TREBLE 9 SYSTEM SETUP MENU TUNER EDIT STATUS GUIDE MPX ¶ TUNING - 1 STATION - 4 CHANNEL - Buttons that there isn't enough capacity to learn new commands 7 If you want to select EXIT and press ENTER. 66 Remote Control of your components. If NG (no good) will...
S0URCE DVD/LD VCR1/ DVR CD DIMMER 1 SETUP TV SYSTEM RECEIVER OFF TV MULTI CONTROL VCR2 VIDEO CD-R/ TAPE1 SAT TUNER INPUT ATT LOUDNESS SPEAKER A/B 2 VIDEO SEL SIGNAL SEL TAPE 2 EFFECT/CH SELL 5 TONE BASS/TREBLE 9 SYSTEM SETUP MENU TUNER EDIT STATUS GUIDE MPX ¶ TUNING - 1 STATION - 4 CHANNEL - Buttons that there isn't enough capacity to learn new commands 7 If you want to select EXIT and press ENTER. 66 Remote Control of your components. If NG (no good) will...
Owner's Manual
Page 72
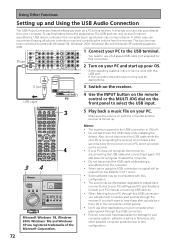
BA type 3 Switch on the computer (such as volume) may or may not work . Also, do not disconnect the USB cable while the your PC is recognizing the receiver, which takes a few seconds every time you turn them off in the computer's control panels. • Don't use this USB port. Using Other Functions Setting up and Using the USB Audio Connection The USB Audio Connection feature allows you hook up...
BA type 3 Switch on the computer (such as volume) may or may not work . Also, do not disconnect the USB cable while the your PC is recognizing the receiver, which takes a few seconds every time you turn them off in the computer's control panels. • Don't use this USB port. Using Other Functions Setting up and Using the USB Audio Connection The USB Audio Connection feature allows you hook up...

Owner's Manual
Page 96
... only need to make these settings or not. These setup operations use the buttons to the receiver. 2 Press the SYSTEM SETUP button. FINE CHANNEL LEVEL (page 98) This feature balances the sound output level of your current speaker system, add new speakers or components to prevent 5 the ultra-low bass tones from distorting the sound from the speakers. Thus, before doing these settings once (unless you to adjust the amount of room...
... only need to make these settings or not. These setup operations use the buttons to the receiver. 2 Press the SYSTEM SETUP button. FINE CHANNEL LEVEL (page 98) This feature balances the sound output level of your current speaker system, add new speakers or components to prevent 5 the ultra-low bass tones from distorting the sound from the speakers. Thus, before doing these settings once (unless you to adjust the amount of room...
Owner's Manual
Page 102
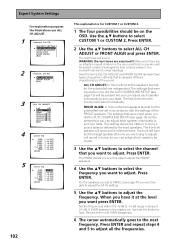
... to adjust the 63 Hz setting. 5 Use the buttons to suit your taste. This setting allows the listener to enjoy a sound balance defined by loud noise is for each speaker individually to select the frequency you did the AUTO SURROUND SETUP (see page 13) will be present but you have it at the level you can adjust each speaker individually to adjust the frequency. The settings that...
... to adjust the 63 Hz setting. 5 Use the buttons to suit your taste. This setting allows the listener to enjoy a sound balance defined by loud noise is for each speaker individually to select the frequency you did the AUTO SURROUND SETUP (see page 13) will be present but you have it at the level you can adjust each speaker individually to adjust the frequency. The settings that...
Owner's Manual
Page 110
... the speaker wires, making sure there are inserted fully (see page 100) and lower the 63 Hz and 125 Hz equalizer levels using manual setting. • Turning DIGITAL SAFETY on may allow it 's convenient go to ACOUSTIC CAL EQ (see page 25). Call a Pioneer-accredited repair center to turn on . FAN STOP blinks in the display and the unit turns off .) Every time AUTO SURROUND SETUP is attempted, there is output...
... the speaker wires, making sure there are inserted fully (see page 100) and lower the 63 Hz and 125 Hz equalizer levels using manual setting. • Turning DIGITAL SAFETY on may allow it 's convenient go to ACOUSTIC CAL EQ (see page 25). Call a Pioneer-accredited repair center to turn on . FAN STOP blinks in the display and the unit turns off .) Every time AUTO SURROUND SETUP is attempted, there is output...

Owner's Manual
Page 111
...; Choose a surround listening mode (see page 54). NAL SELECT button (see page 46). • Turn MULTI CH IN mode off . • DIGITAL/ANALOG setting is incorrect. • MULTI CH IN mode is very little low frequency informa- • Change your speakers' characteristics (see page 97) • There is STEREO. • See SPEAKER SETTING on the speaker terminals (see page 25). No sound output from the front speakers. • The front speakers aren't connected properly. •...
...; Choose a surround listening mode (see page 54). NAL SELECT button (see page 46). • Turn MULTI CH IN mode off . • DIGITAL/ANALOG setting is incorrect. • MULTI CH IN mode is very little low frequency informa- • Change your speakers' characteristics (see page 97) • There is STEREO. • See SPEAKER SETTING on the speaker terminals (see page 25). No sound output from the front speakers. • The front speakers aren't connected properly. •...
Owner's Manual
Page 112
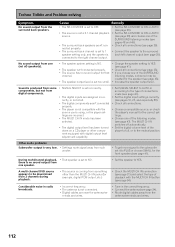
... the antenna ter- listening modes, a channel may be downmixed from 2 channels during playback. • The source is coming from subwoofer. • To get more signal to the subwoofer set to 1 speaker setting only, and the speaker is not connected. • Digital cables are incorrect. • The MULTI CH IN mode has been selected. • The digital output level has been turned down on a CD player or other than the MULTI CH IN jacks (for example, digital PCM output...
... the antenna ter- listening modes, a channel may be downmixed from 2 channels during playback. • The source is coming from subwoofer. • To get more signal to the subwoofer set to 1 speaker setting only, and the speaker is not connected. • Digital cables are incorrect. • The MULTI CH IN mode has been selected. • The digital output level has been turned down on a CD player or other than the MULTI CH IN jacks (for example, digital PCM output...
Owner's Manual
Page 113
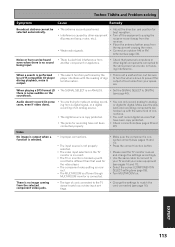
... a digital signal, or a digital or digital to digital. Noise or hum can only record analog to analog, ing from the selected component video jacks. • The type of cord connected to the TV doesn't match your video input settings. • Change the settings to match the cord connected (see page 89). • Turn MULTI-ROOM on the TV monitor is incorrect. • The TV or monitor is hooked up with the same kind of an analog source.
... a digital signal, or a digital or digital to digital. Noise or hum can only record analog to analog, ing from the selected component video jacks. • The type of cord connected to the TV doesn't match your video input settings. • Change the settings to match the cord connected (see page 89). • Turn MULTI-ROOM on the TV monitor is incorrect. • The TV or monitor is hooked up with the same kind of an analog source.
Owner's Manual
Page 115
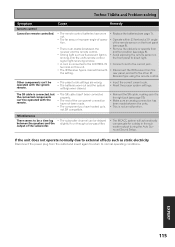
... a time lag • The subwoofer channel can 't be operated with the system remote. • The preset code settings are wrong. • The batteries wore out and the system settings were cleared. • Input the correct preset code. • Reset the proper system settings. If the unit does not operate normally due to external effects such as fluorescent light is shining onto the unit's remote control signal light-receiving window. • A cord is connected...
... a time lag • The subwoofer channel can 't be operated with the system remote. • The preset code settings are wrong. • The batteries wore out and the system settings were cleared. • Input the correct preset code. • Reset the proper system settings. If the unit does not operate normally due to external effects such as fluorescent light is shining onto the unit's remote control signal light-receiving window. • A cord is connected...
Owner's Manual
Page 118
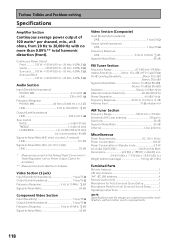
... Regulation rule on Power Output Claims for Auto Surround Sound Setup ...........1 Operating Instructions 1 NOTE: Specifications and the design are subject to possible modifications without package 19.0 kg (41.9 lbs) Furnished Parts FM wire Antenna 1 AM loop Antenna 1 "AA" IEC LR6 batteries 4 Remote Control Unit 1 Microphone for Auto Surround Sound Setup 1 Microphone Stand for Amplifiers. ** Measured by Audio Spectrum Analyzer. Video Section (S jack) Input (Sensitivity/Impedance 1 Vp-p/75 Ω Output (Level/Impedance 1 Vp-p/75 Ω Frequency Response 5 Hz to...
... Regulation rule on Power Output Claims for Auto Surround Sound Setup ...........1 Operating Instructions 1 NOTE: Specifications and the design are subject to possible modifications without package 19.0 kg (41.9 lbs) Furnished Parts FM wire Antenna 1 AM loop Antenna 1 "AA" IEC LR6 batteries 4 Remote Control Unit 1 Microphone for Auto Surround Sound Setup 1 Microphone Stand for Amplifiers. ** Measured by Audio Spectrum Analyzer. Video Section (S jack) Input (Sensitivity/Impedance 1 Vp-p/75 Ω Output (Level/Impedance 1 Vp-p/75 Ω Frequency Response 5 Hz to...


