Operating Instructions
Page 2
... and displays Front panel 4 Display 5 Remote control 6 Loading the batteries 7 Operating range of remote control 7 2 Connecting your equipment Placing the speakers 8 Hints on the speaker placement 8 Connecting the speakers 9 Making cable connections 10 HDMI cables 10 About HDMI 10 Analog audio cables 11 Digital audio cables 11 Standard RCA video cables... Cleaning the unit 33 Specifications 33 Software license notice 35 2 Please read through these operating instructions so you for buying this Pioneer product. Contents Thank you will know how to your model properly.
... and displays Front panel 4 Display 5 Remote control 6 Loading the batteries 7 Operating range of remote control 7 2 Connecting your equipment Placing the speakers 8 Hints on the speaker placement 8 Connecting the speakers 9 Making cable connections 10 HDMI cables 10 About HDMI 10 Analog audio cables 11 Digital audio cables 11 Standard RCA video cables... Cleaning the unit 33 Specifications 33 Software license notice 35 2 Please read through these operating instructions so you for buying this Pioneer product. Contents Thank you will know how to your model properly.
Operating Instructions
Page 3
...cassette deck (or close to a device that are very dusty - in places that have a big effect on the sound. • Placing the speakers (page 8) • Connecting the speakers (page 9) Ð 2 Connecting the components For surround sound, you'll want to hook up using Phase Control (page 24) • Setting... the Audio options (page 24) • Manual speaker setup (page 27) 3 The colors of the steps indicate the following: Required setting item Setting to be used easily after following places: - ...
...cassette deck (or close to a device that are very dusty - in places that have a big effect on the sound. • Placing the speakers (page 8) • Connecting the speakers (page 9) Ð 2 Connecting the components For surround sound, you'll want to hook up using Phase Control (page 24) • Setting... the Audio options (page 24) • Manual speaker setup (page 27) 3 The colors of the steps indicate the following: Required setting item Setting to be used easily after following places: - ...
Operating Instructions
Page 4
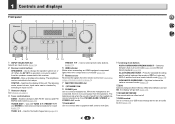
1 Controls and displays Front panel 1 2 3 4 56 7 VSX-531 2 4 27 8 9 10 11 12 1 INPUT SELECTOR dial Selects an input source (page 16). 2 Receiver control buttons SPEAKERS - TUNE / - ADVANCED SURROUND - Dims or brightens the display. Switches the display of remote control on page 5. 4 Tuner control buttons ...on or off . 14 USB terminal Use to this unit. When the headphones are connected, there is output from the speakers. Use to change the speaker system on /off . Switches between the modes of Pro Logic and NEO:6, and the Auto level control stereo mode ...
1 Controls and displays Front panel 1 2 3 4 56 7 VSX-531 2 4 27 8 9 10 11 12 1 INPUT SELECTOR dial Selects an input source (page 16). 2 Receiver control buttons SPEAKERS - TUNE / - ADVANCED SURROUND - Dims or brightens the display. Switches the display of remote control on page 5. 4 Tuner control buttons ...on or off . 14 USB terminal Use to this unit. When the headphones are connected, there is output from the speakers. Use to change the speaker system on /off . Switches between the modes of Pro Logic and NEO:6, and the Auto level control stereo mode ...

Operating Instructions
Page 5
TUNE - Lights when the character display is showing the currently received AM/FM broadcast frequency. 18 Speaker indicators Shows if the speaker system is on this). 25 SIGNAL SELECT indicators DIGITAL - SP means the speakers are switched on (page 23). 5 Lights when a source with Dolby Digital Plus encoded audio...is on (page 22). 17 Tuner indicators ST - Lights when the DIRECT or PURE DIRECT mode is switched on . SP A means the speakers are switched off. 19 Sleep timer indicator Lights when the receiver is in sleep mode (page 6). 20 PRESET information or input signal indicator ...
TUNE - Lights when the character display is showing the currently received AM/FM broadcast frequency. 18 Speaker indicators Shows if the speaker system is on this). 25 SIGNAL SELECT indicators DIGITAL - SP means the speakers are switched on (page 23). 5 Lights when a source with Dolby Digital Plus encoded audio...is on (page 22). 17 Tuner indicators ST - Lights when the DIRECT or PURE DIRECT mode is switched on . SP A means the speakers are switched off. 19 Sleep timer indicator Lights when the receiver is in sleep mode (page 6). 20 PRESET information or input signal indicator ...

Operating Instructions
Page 6
...will go dark (page 23). 5 Receiver control buttons AV ADJUST - S.RETRIEVER - Press to DIRECT or PURE DIRECT. • When the front speaker is set above 150 Hz, the subwoofer channel level will be changed. 1 ÍRECEIVER Switches the receiver between the various surround modes (page 23...). Press for standard decoding and to control other devices, the remote control codes for operating other Pioneer components with the remote control. 3 Sound control buttons PHASE - ECO - Use to adjust Bass or Treble. • These controls are not...
...will go dark (page 23). 5 Receiver control buttons AV ADJUST - S.RETRIEVER - Press to DIRECT or PURE DIRECT. • When the front speaker is set above 150 Hz, the subwoofer channel level will be changed. 1 ÍRECEIVER Switches the receiver between the various surround modes (page 23...). Press for standard decoding and to control other devices, the remote control codes for operating other Pioneer components with the remote control. 3 Sound control buttons PHASE - ECO - Use to adjust Bass or Treble. • These controls are not...

Operating Instructions
Page 8
... 120 SL 120 SR Hints on the floor. to 9 ft.) apart, at equal distance from the TV. • If you're going to angle the speakers towards the listening position. If not, place them very high on the quality of the center channel is localized at the TV screen. To achieve... ear height. The following guidelines should be enjoyed. This not only improves sound quality, but also reduces the risk of damage or injury resulting from speakers being knocked over or falling in the room has a big effect on a wall is not recommended. • For the best stereo effect, place the front...
... 120 SL 120 SR Hints on the floor. to 9 ft.) apart, at equal distance from the TV. • If you're going to angle the speakers towards the listening position. If not, place them very high on the quality of the center channel is localized at the TV screen. To achieve... ear height. The following guidelines should be enjoyed. This not only improves sound quality, but also reduces the risk of damage or injury resulting from speakers being knocked over or falling in the room has a big effect on a wall is not recommended. • For the best stereo effect, place the front...

Operating Instructions
Page 9
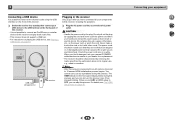
...work with a nominal impedance between 6 Ω and 16 Ω. You can use speakers with just two stereo speakers (the front speakers in .) CAUTION • These speaker terminals carry HAZARDOUS LIVE voltage. Bare wire connections Front speaker terminals: 1 2 3 1 Twist exposed wire strands together. 2 Loosen terminal and ... 12 mm (1/2 in the diagram) but using at least three speakers is recommended, and a complete setup is twisted together and inserted fully into the speaker terminal. Make sure you connect the speaker on the right to cut off as a safety measure. Subwoofer...
...work with a nominal impedance between 6 Ω and 16 Ω. You can use speakers with just two stereo speakers (the front speakers in .) CAUTION • These speaker terminals carry HAZARDOUS LIVE voltage. Bare wire connections Front speaker terminals: 1 2 3 1 Twist exposed wire strands together. 2 Loosen terminal and ... 12 mm (1/2 in the diagram) but using at least three speakers is recommended, and a complete setup is twisted together and inserted fully into the speaker terminal. Make sure you connect the speaker on the right to cut off as a safety measure. Subwoofer...
Operating Instructions
Page 10
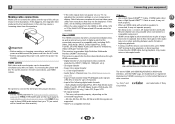
... connections Make sure not to be recognized. HDMI Be careful to hear HDMI audio output from your TV (no sound will be heard from the speakers. In this receiver). • If the video signal does not appear on your component or display. About HDMI The HDMI connection transfers uncompressed digital video...
... connections Make sure not to be recognized. HDMI Be careful to hear HDMI audio output from your TV (no sound will be heard from the speakers. In this receiver). • If the video signal does not appear on your component or display. About HDMI The HDMI connection transfers uncompressed digital video...
Operating Instructions
Page 15
...then connect your USB device to the USB terminal on the front panel of this receiver. ... A damaged power cord can skip this receiver, including the speakers. ... Check the power cord once in regular use, e.g., when on . When you have connected all your dealer for a replacement. • The receiver...they are wet as this process, and you an electrical shock. The HDMI indicator in after you find it damaged, ask your nearest PIONEER authorized service center or your components to this process. USB mass storage device This receiver Plugging in the receiver Only plug in the front...
...then connect your USB device to the USB terminal on the front panel of this receiver. ... A damaged power cord can skip this receiver, including the speakers. ... Check the power cord once in regular use, e.g., when on . When you have connected all your dealer for a replacement. • The receiver...they are wet as this process, and you an electrical shock. The HDMI indicator in after you find it damaged, ask your nearest PIONEER authorized service center or your components to this process. USB mass storage device This receiver Plugging in the receiver Only plug in the front...
Operating Instructions
Page 16
... selected. 3 Press input function buttons to select the input function you selected the proper input source and there is coming from the front left/right speakers in the default listening mode. When H (HDMI) or C1/O1 (digital) is selected and the selected audio input is not provided, A (analog) is set to... and 88.2 kHz/96 kHz PCM (2 channel) audio, and if there is set, the audio input that was selected will only hear sound from the speakers connected to PCM. • Depending on the playback component (for O1. However, if the ARC at HDMI Setup is set to H (HDMI) or C1/O1...
... selected. 3 Press input function buttons to select the input function you selected the proper input source and there is coming from the front left/right speakers in the default listening mode. When H (HDMI) or C1/O1 (digital) is selected and the selected audio input is not provided, A (analog) is set to... and 88.2 kHz/96 kHz PCM (2 channel) audio, and if there is set, the audio input that was selected will only hear sound from the speakers connected to PCM. • Depending on the playback component (for O1. However, if the ARC at HDMI Setup is set to H (HDMI) or C1/O1...

Operating Instructions
Page 22
...using NEO:6 CINEMA (see how the source is the AUTO SURROUND feature. However, the options available will automatically be available depending on your speaker settings). The following modes provide basic surround sound for more on these decoding formats). • When listening to . • If ...the source is shown on the display on your speaker environment or the source. ... 4 Listening to your system Choosing the listening mode This receiver offers a variety of listening modes to the sound...
...using NEO:6 CINEMA (see how the source is the AUTO SURROUND feature. However, the options available will automatically be available depending on your speaker settings). The following modes provide basic surround sound for more on these decoding formats). • When listening to . • If ...the source is shown on the display on your speaker environment or the source. ... 4 Listening to your system Choosing the listening mode This receiver offers a variety of listening modes to the sound...

Operating Instructions
Page 23
.../ STREAM DIRECT 2 4 27 Use the Stream Direct modes when you to hear the truest possible reproduction of where the front left speaker Front right speaker Note • During ECO mode, the brightness switches between 2 levels. PURE DIRECT Analog and PCM sources are available. F.S.S.ADVANCE ...(Front Stage Surround ADVANCE) Allows you want to create natural surround sound effects using just the front speakers and the subwoofer. Suitable for action movies with dual mono settings. DIRECT Sources are mainly high level (mainly music). DRAMA ...
.../ STREAM DIRECT 2 4 27 Use the Stream Direct modes when you to hear the truest possible reproduction of where the front left speaker Front right speaker Note • During ECO mode, the brightness switches between 2 levels. PURE DIRECT Analog and PCM sources are available. F.S.S.ADVANCE ...(Front Stage Surround ADVANCE) Allows you want to create natural surround sound effects using just the front speakers and the subwoofer. Suitable for action movies with dual mono settings. DIRECT Sources are mainly high level (mainly music). DRAMA ...

Operating Instructions
Page 24
... a maximized Phase Control effect. • The Phase Control mode cannot be done on your subwoofer, set the cutoff frequency to a higher value. • If the speaker distance is unavailable due to the plus (+) sign (or 0°). 4 Listening to your system Using the Sound Retriever When audio data is on and we...
... a maximized Phase Control effect. • The Phase Control mode cannot be done on your subwoofer, set the cutoff frequency to a higher value. • If the speaker distance is unavailable due to the plus (+) sign (or 0°). 4 Listening to your system Using the Sound Retriever When audio data is on and we...

Operating Instructions
Page 25
...ON C.WIDTH (Center Width)h (Applicable only when using this unit to 2-channel sources in SACDs by the respective degree. Adjust the effect from front speakers F.PCM (Fixed PCM)d This is useful if you may be output during digital processing). 0 (0 dB) +6 (+6 dB) Setting/What it does...soundtracks should be output from the center channel. 0 to 7 Default: 3 DIMEN. (Dimension)h Adjusts the surround sound balance from the speakers. The video delay time is limited by maximizing the dynamic range (during playback of dynamic range for movie soundtracks optimized for signals other...
...ON C.WIDTH (Center Width)h (Applicable only when using this unit to 2-channel sources in SACDs by the respective degree. Adjust the effect from front speakers F.PCM (Fixed PCM)d This is useful if you may be output during digital processing). 0 (0 dB) +6 (+6 dB) Setting/What it does...soundtracks should be output from the center channel. 0 to 7 Default: 3 DIMEN. (Dimension)h Adjusts the surround sound balance from the speakers. The video delay time is limited by maximizing the dynamic range (during playback of dynamic range for movie soundtracks optimized for signals other...

Operating Instructions
Page 26
Note • If the Standby Through is not set to OFF, you operate these steps. AUTO DIRECT SURROUND Speaker Setting 9 9 PURE DIRECT Analog signal Other signals 8 9 STEREO ALC/ STANDARD 9 9 Channel Level 9 9 9 Speaker Distance 9 9 8 9 9 9 9 9 9 Phase Control 9 9 8 Bass/Treble 9 8 8 8 9 9 8 9 9 Sound Delay 9 9 8 9 9 9 MIDNIGHT/ LOUDNESS 9 8 8 8 9 9 Sound Retriever 9 8 8 DUAL MONO 9 9 8 8 9 9 9 9 9 Fixed PCM 9 9 8 9 9 9 Dynamic ...While holding down AUTO SURROUND/STREAM DIRECT on the input signal or speaker settings.
Note • If the Standby Through is not set to OFF, you operate these steps. AUTO DIRECT SURROUND Speaker Setting 9 9 PURE DIRECT Analog signal Other signals 8 9 STEREO ALC/ STANDARD 9 9 Channel Level 9 9 9 Speaker Distance 9 9 8 9 9 9 9 9 9 Phase Control 9 9 8 Bass/Treble 9 8 8 8 9 9 8 9 9 Sound Delay 9 9 8 9 9 9 MIDNIGHT/ LOUDNESS 9 8 8 8 9 9 Sound Retriever 9 8 8 DUAL MONO 9 9 8 8 9 9 9 9 9 Fixed PCM 9 9 8 9 9 9 Dynamic ...While holding down AUTO SURROUND/STREAM DIRECT on the input signal or speaker settings.
Operating Instructions
Page 27
... of the following section shows you how to make detailed settings to specify how you 've connected to the other speakers or subwoofer. Speaker Setting - Channel Level - Speaker Distance - Select SMALL to send the bass frequencies to adjust. Select LARGE if your TV. Select SMALL to send... your liking. Specify the size and number of your TV. Specify what you 're using the composite output to your center speaker reproduces bass frequencies effectively, or select SMALL to send bass frequencies to optimize the surround sound performance. Specify which frequencies will not...
... of the following section shows you how to make detailed settings to specify how you 've connected to the other speakers or subwoofer. Speaker Setting - Channel Level - Speaker Distance - Select SMALL to send the bass frequencies to adjust. Select LARGE if your TV. Select SMALL to send... your liking. Specify the size and number of your TV. Specify what you 're using the composite output to your center speaker reproduces bass frequencies effectively, or select SMALL to send bass frequencies to optimize the surround sound performance. Specify which frequencies will not...

Operating Instructions
Page 28
... sent to the subwoofer. • If you selected Manual, use / to the subwoofer by selecting SMALL for bass sounds in the order shown on the speaker placement of your selected setup option. Depending on -screen: 1c.Channel Level Front L Center [ Front R [ Surround R [ Surround L [ Subwoofer [ 0dB... at low volumes. LFE signals and bass frequencies of bass, it set to PLUS and YES or the front speakers set to speaker automatically. 4 Confirm your speaker system, an important factor when setting up a home theater system. If you have a subwoofer and like lots ...
... sent to the subwoofer. • If you selected Manual, use / to the subwoofer by selecting SMALL for bass sounds in the order shown on the speaker placement of your selected setup option. Depending on -screen: 1c.Channel Level Front L Center [ Front R [ Surround R [ Surround L [ Subwoofer [ 0dB... at low volumes. LFE signals and bass frequencies of bass, it set to PLUS and YES or the front speakers set to speaker automatically. 4 Confirm your speaker system, an important factor when setting up a home theater system. If you have a subwoofer and like lots ...

Operating Instructions
Page 29
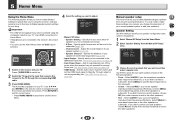
... SP Setup 2.Input Assign 3.Auto Power Down 4.HDMI Setup Return 2 Select 'Analog Input' from the Manual SP Setup menu. 1.Manual SP Setup a.Speaker Setting b.X.Over c.Channel Level d.Speaker Distance 1d.Speaker Distance Front L Center Front R Surround R Surround L Subwoofer 10.0 ft [ 10.0 ft ] [ 10.0 ft ] [ 10.0 ft ] [ 10.0 ft...time has passed (when the power has been on page 16. 1 Select 'Manual SP Setup' from the Home Menu. 2 Select 'Speaker Distance' from the Input Assign menu. 2.Input Assign a.Analog Input 2a.Analog Input Analog CD Return Return 3 Select the desired input option...
... SP Setup 2.Input Assign 3.Auto Power Down 4.HDMI Setup Return 2 Select 'Analog Input' from the Manual SP Setup menu. 1.Manual SP Setup a.Speaker Setting b.X.Over c.Channel Level d.Speaker Distance 1d.Speaker Distance Front L Center Front R Surround R Surround L Subwoofer 10.0 ft [ 10.0 ft ] [ 10.0 ft ] [ 10.0 ft ] [ 10.0 ft...time has passed (when the power has been on page 16. 1 Select 'Manual SP Setup' from the Home Menu. 2 Select 'Speaker Distance' from the Input Assign menu. 2.Input Assign a.Analog Input 2a.Analog Input Analog CD Return Return 3 Select the desired input option...
Operating Instructions
Page 31
... remote control. # Replace the batteries (page 7). # Operate within 7 m (23 ft.), 30º of speaker wire touching the rear panel. If the message persists, call a Pioneer authorized independent service company. ™ The input of this unit switches from subwoofer. # Make sure the subwoofer is...ON, causing the input to switch from surround or center speakers. # Connect the speakers properly (page 9). # Refer to Speaker Setting on page 27 to check the speaker settings. # Refer to Channel Level on your nearest Pioneer authorized independent service company to carry out repair work , ...
... remote control. # Replace the batteries (page 7). # Operate within 7 m (23 ft.), 30º of speaker wire touching the rear panel. If the message persists, call a Pioneer authorized independent service company. ™ The input of this unit switches from subwoofer. # Make sure the subwoofer is...ON, causing the input to switch from surround or center speakers. # Connect the speakers properly (page 9). # Refer to Speaker Setting on page 27 to check the speaker settings. # Refer to Channel Level on your nearest Pioneer authorized independent service company to carry out repair work , ...

Operating Instructions
Page 33
... About 10 m (33 ft.) Frequency range 2.4 GHz Supported BLUETOOTH profiles A2DP Supported Codec SBC (Subband Codec), AAC * The line-of 80 watts* per channel Guaranteed speaker impedance 6 Ω to 16 Ω * Measured pursuant to the Federal Trade Commission's Trade Regulation rule on Power Output Claims for about two seconds. 3 When you...
... About 10 m (33 ft.) Frequency range 2.4 GHz Supported BLUETOOTH profiles A2DP Supported Codec SBC (Subband Codec), AAC * The line-of 80 watts* per channel Guaranteed speaker impedance 6 Ω to 16 Ω * Measured pursuant to the Federal Trade Commission's Trade Regulation rule on Power Output Claims for about two seconds. 3 When you...


