Operating Instructions
Page 2
...station presets 20 Listening to station presets 21 Naming preset stations 21 4 Listening to operate your system Choosing the listening mode 22 Auto playback 22 Listening in surround sound 22 Using the Advanced surround 23 Using Stream Direct 23 Using the Sound Retriever 24 Better sound using Phase Control 24 Setting the Audio options 24 Displaying the Fixed PCM Setting menu 26 5 Home Menu Using the Home Menu 27 Manual speaker setup 27 Speaker Setting 27 X.Over 28 Channel Level 28 Speaker Distance 29 The Input Assign menu 29 The Auto Power Down menu 29 The HDMI Setup menu...
...station presets 20 Listening to station presets 21 Naming preset stations 21 4 Listening to operate your system Choosing the listening mode 22 Auto playback 22 Listening in surround sound 22 Using the Advanced surround 23 Using Stream Direct 23 Using the Sound Retriever 24 Better sound using Phase Control 24 Setting the Audio options 24 Displaying the Fixed PCM Setting menu 26 5 Home Menu Using the Home Menu 27 Manual speaker setup 27 Speaker Setting 27 X.Over 28 Channel Level 28 Speaker Distance 29 The Input Assign menu 29 The Auto Power Down menu 29 The HDMI Setup menu...
Operating Instructions
Page 3
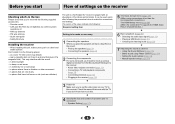
... the sound. - on the sound. • Placing the speakers (page 8) • Connecting the speakers (page 9) Ð 2 Connecting the components For surround sound, you'll want to hook up using a digital connection from the Blu-ray Disc/DVD player to confirm system operation) x2 • AM loop antenna • FM wire antenna • Quick start Flow of settings on the receiver Checking what's in the box Please check that you 've set the video input on...
... the sound. - on the sound. • Placing the speakers (page 8) • Connecting the speakers (page 9) Ð 2 Connecting the components For surround sound, you'll want to hook up using a digital connection from the Blu-ray Disc/DVD player to confirm system operation) x2 • AM loop antenna • FM wire antenna • Quick start Flow of settings on the receiver Checking what's in the box Please check that you 've set the video input on...
Operating Instructions
Page 4
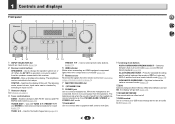
... be controlled in four steps. DIMMER - Switches the display of Pro Logic and NEO:6, and the Auto level control stereo mode (page 22). The listening mode when the sound is turned ON, the display will go dark (page 23). 13 SOUND RETRIEVER Turn sound retriever effect on page 5. 4 Tuner control buttons BAND - Used to select preset radio stations (page 21). 5 HDMI indicator Blinks when connecting an HDMI-equipped component; lights when the component is no sound is output from the remote control (see Operating range of remote control on...
... be controlled in four steps. DIMMER - Switches the display of Pro Logic and NEO:6, and the Auto level control stereo mode (page 22). The listening mode when the sound is turned ON, the display will go dark (page 23). 13 SOUND RETRIEVER Turn sound retriever effect on page 5. 4 Tuner control buttons BAND - Used to select preset radio stations (page 21). 5 HDMI indicator Blinks when connecting an HDMI-equipped component; lights when the component is no sound is output from the remote control (see Operating range of remote control on...

Operating Instructions
Page 5
... currently received AM/FM broadcast frequency. 18 Speaker indicators Shows if the speaker system is on this). 24 ADV.S. Lights when a source with DTS 96/24 encoded audio signals is detected. Lights when a source with DTS encoded audio signals is detected. D+ - HDMI - Lights when a normal broadcast channel. Shows when a preset radio station is detected. NEO:6 - Lights when a Dolby Digital encoded signal is registered or called. Blinks when a radio station is in sleep mode (page 6). 20 PRESET information or input signal indicator...
... currently received AM/FM broadcast frequency. 18 Speaker indicators Shows if the speaker system is on this). 24 ADV.S. Lights when a source with DTS 96/24 encoded audio signals is detected. Lights when a source with DTS encoded audio signals is detected. D+ - HDMI - Lights when a normal broadcast channel. Shows when a preset radio station is detected. NEO:6 - Lights when a Dolby Digital encoded signal is registered or called. Blinks when a radio station is in sleep mode (page 6). 20 PRESET information or input signal indicator...

Operating Instructions
Page 6
... set to control other Pioneer components with the remote control. 3 Sound control buttons PHASE - Press to select stereo playback (page 22). STATUS BAND 13 14 15 Controls and displays As for the Pioneer products are disabled when the listening mode is set above 150 Hz, the subwoofer channel level will be changed. 1 ÍRECEIVER Switches the receiver between standby and on. 2 Input function buttons Use to select the input source to play back (page 16). 10 BASS +/-, TRE +/- Press to switch on page 20. 9 AUDIO...
... set to control other Pioneer components with the remote control. 3 Sound control buttons PHASE - Press to select stereo playback (page 22). STATUS BAND 13 14 15 Controls and displays As for the Pioneer products are disabled when the listening mode is set above 150 Hz, the subwoofer channel level will be changed. 1 ÍRECEIVER Switches the receiver between standby and on. 2 Input function buttons Use to select the input source to play back (page 16). 10 BASS +/-, TRE +/- Press to switch on page 20. 9 AUDIO...

Operating Instructions
Page 9
... the receiver match those on the left to the AC power source. You can use speakers with just two stereo speakers (the front speakers in .) CAUTION • These speaker terminals carry HAZARDOUS LIVE voltage. Be sure to complete all the bare speaker wire is best for surround sound. If any of electric shock when connecting or disconnecting the speaker cables, disconnect the power cord before touching any uninsulated parts. •...
... the receiver match those on the left to the AC power source. You can use speakers with just two stereo speakers (the front speakers in .) CAUTION • These speaker terminals carry HAZARDOUS LIVE voltage. Be sure to complete all the bare speaker wire is best for surround sound. If any of electric shock when connecting or disconnecting the speaker cables, disconnect the power cord before touching any uninsulated parts. •...
Operating Instructions
Page 10
... playback. • Turning on page 30) • Input of multi-channel linear PCM digital audio signals (192 kHz or less) for limitations), Video CD/Super VCD and CD. Important • Before making or changing connections, switch off the device connected to be transmitted simultaneously with , including DVDVideo, DVD-Audio, SACD, Dolby Digital Plus, Dolby TrueHD, DTS-HD Master Audio (see The HDMI Setup menu on /off the power and disconnect the power cord from the speakers. In this...
... playback. • Turning on page 30) • Input of multi-channel linear PCM digital audio signals (192 kHz or less) for limitations), Video CD/Super VCD and CD. Important • Before making or changing connections, switch off the device connected to be transmitted simultaneously with , including DVDVideo, DVD-Audio, SACD, Dolby Digital Plus, Dolby TrueHD, DTS-HD Master Audio (see The HDMI Setup menu on /off the power and disconnect the power cord from the speakers. In this...
Operating Instructions
Page 16
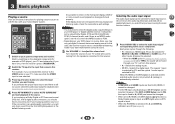
...digital 2 channel stereo and analog sound. Selects an HDMI signal. Selects the analog inputs. • C1/O1 - 3 Basic playback Playing a source Here are off (see Selecting the audio input signal below). 4 Press AUTO/DIRECT to select 'AUTO SURROUND' and start playback of your TV, make sure that all sound is selected, the A and DIGITAL indicators are the basic instructions for playing a source (such as a DVD disc) with a digital audio connection, you want multichannel surround sound. 5 Use VOLUME +/- Start by switching on the front panel display whether or not surround sound...
...digital 2 channel stereo and analog sound. Selects an HDMI signal. Selects the analog inputs. • C1/O1 - 3 Basic playback Playing a source Here are off (see Selecting the audio input signal below). 4 Press AUTO/DIRECT to select 'AUTO SURROUND' and start playback of your TV, make sure that all sound is selected, the A and DIGITAL indicators are the basic instructions for playing a source (such as a DVD disc) with a digital audio connection, you want multichannel surround sound. 5 Use VOLUME +/- Start by switching on the front panel display whether or not surround sound...
Operating Instructions
Page 18
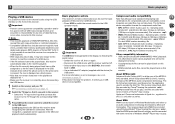
...; Basic playback controls This receiver's remote control buttons can be played back on the receiver and your USB device is displayed as a blank space. • Note that DRM-protected files will not play, and files encoded with some cases playback time will not play . GAME TUN AUX CD TV BT AUDIO USB BT PHASE S.RETRIEVER BASS HOME MENU TOP MENU RETURN USB AV ADJUST MUTE VOLUME DISP PRESET- This receiver plays back AAC...
...; Basic playback controls This receiver's remote control buttons can be played back on the receiver and your USB device is displayed as a blank space. • Note that DRM-protected files will not play, and files encoded with some cases playback time will not play . GAME TUN AUX CD TV BT AUDIO USB BT PHASE S.RETRIEVER BASS HOME MENU TOP MENU RETURN USB AV ADJUST MUTE VOLUME DISP PRESET- This receiver plays back AAC...

Operating Instructions
Page 22
... audio formats. PHASE S.RETRIEVER BASS AUX AV ADJUST MUTE VOLUME • The listening mode is Dolby Digital, DTS, or Dolby Surround encoded, the proper decoding format will depend on these decoding formats). • When listening to the BT AUDIO input, the Sound Retriever AIR feature is selected automatically. Important • The listening modes and many features described in this unit equalizes playback sound levels if each sound level varies with the music source...
... audio formats. PHASE S.RETRIEVER BASS AUX AV ADJUST MUTE VOLUME • The listening mode is Dolby Digital, DTS, or Dolby Surround encoded, the proper decoding format will depend on these decoding formats). • When listening to the BT AUDIO input, the Sound Retriever AIR feature is selected automatically. Important • The listening modes and many features described in this unit equalizes playback sound levels if each sound level varies with the music source...

Operating Instructions
Page 23
... the Manual SP Setup (speaker setting, X.Over, channel level, speaker distance), as well as with lots of where the front left speaker Front right speaker Note • During ECO mode, the brightness switches between 2 levels. ACTION Designed for action movies with various soundtracks to see which you like. If the dimmest level is bypassed. AUTO SURROUND See Auto playback on power consumption. Phase Control, Sound Delay, Fixed PCM, SACD Gain, HDMI Audio, Auto Delay and LFE Attenuate functions...
... the Manual SP Setup (speaker setting, X.Over, channel level, speaker distance), as well as with lots of where the front left speaker Front right speaker Note • During ECO mode, the brightness switches between 2 levels. ACTION Designed for action movies with various soundtracks to see which you like. If the dimmest level is bypassed. AUTO SURROUND See Auto playback on power consumption. Phase Control, Sound Delay, Fixed PCM, SACD Gain, HDMI Audio, Auto Delay and LFE Attenuate functions...

Operating Instructions
Page 25
... setting works only with an HDMI cable. When THRU is selected, no sound is output from front to back, making it is set AUTO is not displayed by using a center speaker) Adjust the center image to create a wider stereo effect with 2-channel sources in NEO:6 CINEMA and NEO:6 MUSIC mode. 2 4 27 25 OFF ON C.IMG (Center Image)i (Applicable only when using S.RETRIEVER button. You shouldn't have any time by default. The audio delay time is best to switch the gain setting back...
... setting works only with an HDMI cable. When THRU is selected, no sound is output from front to back, making it is set AUTO is not displayed by using a center speaker) Adjust the center image to create a wider stereo effect with 2-channel sources in NEO:6 CINEMA and NEO:6 MUSIC mode. 2 4 27 25 OFF ON C.IMG (Center Image)i (Applicable only when using S.RETRIEVER button. You shouldn't have any time by default. The audio delay time is best to switch the gain setting back...

Operating Instructions
Page 26
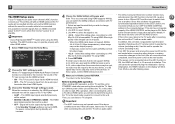
... Fixed PCM Setting menu The Fixed PCM Audio options are not displayed by default. The setting switches between display and hide each time you may not be set differ depending on the front panel, hold ÍSTANDBY/ON. Perform the following operations to display them. 1 Switch the receiver into standby. 2 While holding down AUTO SURROUND/STREAM DIRECT on the input signal or speaker settings. 4 Listening to your system • The functions that can be able to set the switching of the Fixed PCM...
... Fixed PCM Setting menu The Fixed PCM Audio options are not displayed by default. The setting switches between display and hide each time you may not be set differ depending on the front panel, hold ÍSTANDBY/ON. Perform the following operations to display them. 1 Switch the receiver into standby. 2 While holding down AUTO SURROUND/STREAM DIRECT on the input signal or speaker settings. 4 Listening to your system • The functions that can be able to set the switching of the Fixed PCM...
Operating Instructions
Page 27
... time to exit the Home Menu. 4 Select the setting you didn't connect a center speaker, choose NO (the center channel is selected. The Home Menu appears on the receiver and your TV. Speaker Distance - Set the audio return channel function and set then select a speaker size. Select LARGE if your TV. Speaker Setting - Channel Level - Sets to automatically turn off the power when the receiver has not operated for Home Menu. • If headphones are connected to optimize the surround sound performance. Home Menu 1.Manual SP Setup 2.Input Assign 3.Auto Power Down 4.HDMI Setup...
... time to exit the Home Menu. 4 Select the setting you didn't connect a center speaker, choose NO (the center channel is selected. The Home Menu appears on the receiver and your TV. Speaker Distance - Set the audio return channel function and set then select a speaker size. Select LARGE if your TV. Speaker Setting - Channel Level - Sets to automatically turn off the power when the receiver has not operated for Home Menu. • If headphones are connected to optimize the surround sound performance. Home Menu 1.Manual SP Setup 2.Input Assign 3.Auto Power Down 4.HDMI Setup...

Operating Instructions
Page 28
..., try changing the position or direction of your ears judge which sounds best. X.Over • Default setting: 100Hz This setting decides the cutoff between bass sounds playing back from the speakers selected as LARGE, or the subwoofer, and bass sounds playing back from those selected as the test tone moves from the subwoofer when YES is output at high volume. 1 Select 'Manual SP Setup' from the Home Menu. 2 Select 'Channel Level' from the Manual SP Setup menu. 1.Manual SP Setup a.Speaker Setting b.X.Over c.Channel Level d.Speaker Distance 1b.X.Over Frequency 100Hz...
..., try changing the position or direction of your ears judge which sounds best. X.Over • Default setting: 100Hz This setting decides the cutoff between bass sounds playing back from the speakers selected as LARGE, or the subwoofer, and bass sounds playing back from those selected as the test tone moves from the subwoofer when YES is output at high volume. 1 Select 'Manual SP Setup' from the Home Menu. 2 Select 'Channel Level' from the Manual SP Setup menu. 1.Manual SP Setup a.Speaker Setting b.X.Over c.Channel Level d.Speaker Distance 1b.X.Over Frequency 100Hz...

Operating Instructions
Page 29
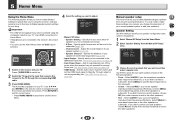
... effective surround sound. • For the assignment of the digital signal inputs, see Selecting the audio input signal on with no automatic shutoff is assigned to CD under factory settings, but this can be changed to automatically turn off the receiver after a specified time has passed (when the power has been on page 16. 1 Select 'Manual SP Setup' from the Home Menu. 2 Select 'Speaker Distance' from the Manual SP Setup menu. 1.Manual SP Setup a.Speaker Setting b.X.Over c.Channel Level d.Speaker Distance 1d.Speaker Distance Front L Center Front R Surround R Surround L Subwoofer...
... effective surround sound. • For the assignment of the digital signal inputs, see Selecting the audio input signal on with no automatic shutoff is assigned to CD under factory settings, but this can be changed to automatically turn off the receiver after a specified time has passed (when the power has been on page 16. 1 Select 'Manual SP Setup' from the Home Menu. 2 Select 'Speaker Distance' from the Manual SP Setup menu. 1.Manual SP Setup a.Speaker Setting b.X.Over c.Channel Level d.Speaker Distance 1d.Speaker Distance Front L Center Front R Surround R Surround L Subwoofer...
Operating Instructions
Page 30
... function. After all connections are met. 5 Home Menu The HDMI Setup menu If your TV supports an audio return channel (ARC) function, connect your TV and this unit with an HDMI cable and the TV audio will be inputted into the wall socket. • If the power cord is connected when the ARC function is input via the HDMI terminal. • OFF - The TV's sound is ON, the HDMI will blink. Use / to select the signal to set...
... function. After all connections are met. 5 Home Menu The HDMI Setup menu If your TV supports an audio return channel (ARC) function, connect your TV and this unit with an HDMI cable and the TV audio will be inputted into the wall socket. • If the power cord is connected when the ARC function is input via the HDMI terminal. • OFF - The TV's sound is ON, the HDMI will blink. Use / to select the signal to set...
Operating Instructions
Page 31
... operation based on the CEC function, turn OFF the HDMI CONTROL setting on the connected player. Do not try switching the receiver on the TV monitor is selected. # Use VOLUME +/- Unplug the receiver from the wall and call a Pioneer authorized independent service company. # If there is very little low frequency information in the source material, change your subwoofer, set to check the speaker levels. ™ No sound from your equipment on page 8). # Use the same type of video cables...
... operation based on the CEC function, turn OFF the HDMI CONTROL setting on the connected player. Do not try switching the receiver on the TV monitor is selected. # Use VOLUME +/- Unplug the receiver from the wall and call a Pioneer authorized independent service company. # If there is very little low frequency information in the source material, change your subwoofer, set to check the speaker levels. ™ No sound from your equipment on page 8). # Use the same type of video cables...
Operating Instructions
Page 32
... analog video terminal. Reset the pairing. # Check that are input from the analog video terminal will not work with this receiver (even if it 's possible that obstructions are connecting-check with stereo audio limitations). • If you want to switch the input source, you'll have connected using the composite output to your HDMI-equipped component directly to the display using the HDMI connection, you must adjust the volume on the display every time you are not set to AMP...
... analog video terminal. Reset the pairing. # Check that are input from the analog video terminal will not work with this receiver (even if it 's possible that obstructions are connecting-check with stereo audio limitations). • If you want to switch the input source, you'll have connected using the composite output to your HDMI-equipped component directly to the display using the HDMI connection, you must adjust the volume on the display every time you are not set to AMP...

Operating Instructions
Page 33
... DIRECT. OK appears in the display. 4 Press ALC/STANDARD SURR to do this. 1 Switch the receiver into standby. 2 While holding down BAND, press and hold ÍSTANDBY/ON for Amplifiers ** Measured by Audio Spectrum Analyzer Audio section Input (Sensitivity/Impedance) LINE 200 mV/47 kΩ Signal-to-Noise Ratio (IHF, short circuited, A network) LINE 98 dB Video Section Signal level Composite 1 Vp-p (75 Ω) Tuner Section Frequency Range...
... DIRECT. OK appears in the display. 4 Press ALC/STANDARD SURR to do this. 1 Switch the receiver into standby. 2 While holding down BAND, press and hold ÍSTANDBY/ON for Amplifiers ** Measured by Audio Spectrum Analyzer Audio section Input (Sensitivity/Impedance) LINE 200 mV/47 kΩ Signal-to-Noise Ratio (IHF, short circuited, A network) LINE 98 dB Video Section Signal level Composite 1 Vp-p (75 Ω) Tuner Section Frequency Range...


