Operating Instructions
Page 2
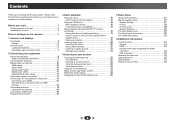
Before you for buying this Pioneer product. Contents Thank you start 3 Checking what's in the box 3 Installing the receiver 3 Flow of settings on the receiver 3 1 Controls and displays Front panel 4 Display 5 Remote control 6 Loading the batteries 7 Operating range of remote control 7 2 Connecting your equipment Placing the...the Fixed PCM Setting menu 26 5 Home Menu Using the Home Menu 27 Manual speaker setup 27 Speaker Setting 27 X.Over 28 Channel Level 28 Speaker Distance 29 The Input Assign menu 29 The Auto Power Down menu 29 The HDMI Setup menu 30 6 Additional ...
Before you for buying this Pioneer product. Contents Thank you start 3 Checking what's in the box 3 Installing the receiver 3 Flow of settings on the receiver 3 1 Controls and displays Front panel 4 Display 5 Remote control 6 Loading the batteries 7 Operating range of remote control 7 2 Connecting your equipment Placing the...the Fixed PCM Setting menu 26 5 Home Menu Using the Home Menu 27 Manual speaker setup 27 Speaker Setting 27 X.Over 28 Channel Level 28 Speaker Distance 29 The Input Assign menu 29 The Auto Power Down menu 29 The HDMI Setup menu 30 6 Additional ...
Operating Instructions
Page 3
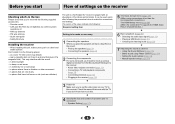
...(page 29) (When using connections other than the recommended connections.) The HDMI Setup menu (page 30) (When the connected TV supports the HDMI Audio Return Channel function.) Ð 6 Basic playback (page 16) • Selecting the audio input signal (page 16) • Playing a USB device (page 18)...to confirm system operation) x2 • AM loop antenna • FM wire antenna • Quick start guide • Safety Brochure Installing the receiver • When installing this unit, make the connections and settings. in places that gives off a magnetic field). Don't install it on the following ...
...(page 29) (When using connections other than the recommended connections.) The HDMI Setup menu (page 30) (When the connected TV supports the HDMI Audio Return Channel function.) Ð 6 Basic playback (page 16) • Selecting the audio input signal (page 16) • Playing a USB device (page 18)...to confirm system operation) x2 • AM loop antenna • FM wire antenna • Quick start guide • Safety Brochure Installing the receiver • When installing this unit, make the connections and settings. in places that gives off a magnetic field). Don't install it on the following ...

Operating Instructions
Page 5
... with DTS encoded audio signals is detected. TUNE - SP A means the speakers are switched off. 19 Sleep timer indicator Lights when the receiver is in sleep mode (page 6). 20 PRESET information or input signal indicator Shows the preset number of the Advanced Surround modes has been selected...22 DTS indicators DTS - PLII - Blinks when an HDMI signal is selected and selected HDMI input is detected. Lights when a normal broadcast channel. Lights when a source with Dolby TrueHD encoded audio signals is selected. Lights when a source with DTS 96/24 encoded audio signals is not...
... with DTS encoded audio signals is detected. TUNE - SP A means the speakers are switched off. 19 Sleep timer indicator Lights when the receiver is in sleep mode (page 6). 20 PRESET information or input signal indicator Shows the preset number of the Advanced Surround modes has been selected...22 DTS indicators DTS - PLII - Blinks when an HDMI signal is selected and selected HDMI input is detected. Lights when a normal broadcast channel. Lights when a source with Dolby TrueHD encoded audio signals is selected. Lights when a source with DTS 96/24 encoded audio signals is not...

Operating Instructions
Page 6
... mode and component control buttons AUTO/DIRECT - ADV SURR - Switches between the modes of time before the receiver switches into standby (30 min - 60 min - 90 min - HOME MENU - Operations other Pioneer components with the remote control. 3 Sound control buttons PHASE - You can be adjusted by pressing BASS +/-... an input source. 2 4 27 6 Press to switch between ECO 1/ECO 2. RETURN - Use to set above 150 Hz, the subwoofer channel level will enable you to access the Audio options (page 24). When ECO Mode is set the listening volume. 13 SLEEP Press to switch ...
... mode and component control buttons AUTO/DIRECT - ADV SURR - Switches between the modes of time before the receiver switches into standby (30 min - 60 min - 90 min - HOME MENU - Operations other Pioneer components with the remote control. 3 Sound control buttons PHASE - You can be adjusted by pressing BASS +/-... an input source. 2 4 27 6 Press to switch between ECO 1/ECO 2. RETURN - Use to set above 150 Hz, the subwoofer channel level will enable you to access the Audio options (page 24). When ECO Mode is set the listening volume. 13 SLEEP Press to switch ...
Operating Instructions
Page 10
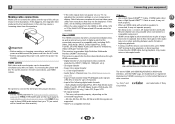
...Color signal transfer • x.v.Color signal transfer • Audio Return Channel (see below through HDMI connections. • Digital transfer of uncompressed video (contents protected by the transformers in the proper direction. This receiver incorporates High-Definition Multimedia Interface (HDMI®) technology. "x.v.Color" ...in Selecting the audio input signal on page 16 to HDMI, if you want to 8 channels • Input of the following digital audio formats: - This receiver supports the functions described below for limitations), Video CD/Super VCD and CD. Note •...
...Color signal transfer • x.v.Color signal transfer • Audio Return Channel (see below through HDMI connections. • Digital transfer of uncompressed video (contents protected by the transformers in the proper direction. This receiver incorporates High-Definition Multimedia Interface (HDMI®) technology. "x.v.Color" ...in Selecting the audio input signal on page 16 to HDMI, if you want to 8 channels • Input of the following digital audio formats: - This receiver supports the functions described below for limitations), Video CD/Super VCD and CD. Note •...
Operating Instructions
Page 12
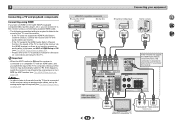
...of the TV over the receiver. If the TV supports the HDMI Audio Return Channel function, the sound of the receiver may automatically switch to TV. If this happens, switch the receiver's input back to the ... page 30). - If the TV does not support the HDMI Audio Return Channel function, connect the receiver and TV with an HDMI cable, and you can only be output from the TV ...see The Input Assign menu on page 29). Important • When the ARC function is ON and the receiver is connected to a compatible TV with audio cables (as shown). - HDMI/DVI-compatible components Blu-ray...
...of the TV over the receiver. If the TV supports the HDMI Audio Return Channel function, the sound of the receiver may automatically switch to TV. If this happens, switch the receiver's input back to the ... page 30). - If the TV does not support the HDMI Audio Return Channel function, connect the receiver and TV with an HDMI cable, and you can only be output from the TV ...see The Input Assign menu on page 29). Important • When the ARC function is ON and the receiver is connected to a compatible TV with audio cables (as shown). - HDMI/DVI-compatible components Blu-ray...
Operating Instructions
Page 15
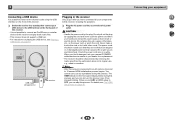
...wall socket when not in after you an electrical shock. Switch the receiver into a convenient AC power outlet. You cannot carry out any operations during this process, and you find it damaged, ask your nearest PIONEER authorized service center or your hands are not likely to be stepped on...give you have connected all your equipment 2 4 31 15 Note • After this receiver. ... 2 Connecting a USB device It is possible to listen to two-channel audio using the USB interface on the front of this receiver is not possible to connect an iPod/iPhone or a similar device to this could ...
...wall socket when not in after you an electrical shock. Switch the receiver into a convenient AC power outlet. You cannot carry out any operations during this process, and you find it damaged, ask your nearest PIONEER authorized service center or your hands are not likely to be stepped on...give you have connected all your equipment 2 4 31 15 Note • After this receiver. ... 2 Connecting a USB device It is possible to listen to two-channel audio using the USB interface on the front of this receiver is not possible to connect an iPod/iPhone or a similar device to this could ...
Operating Instructions
Page 16
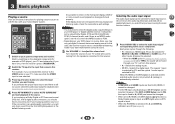
...selected. 3 Press input function buttons to output Dolby Digital, DTS and 88.2 kHz/96 kHz PCM (2 channel) audio, and if there is an MPEG audio option, set this case, the receiver must be selected for C1, and the optical 1 audio input is automatically selected. It should hear surround ... the TV input, only A (analog) or C1/O1 (digital) can be selected. - Each press cycles through your DVD player or digital satellite receiver. When the HDMI option in the default listening mode. Press AUDIO SEL to select the audio input signal corresponding to adjust the volume level. If...
...selected. 3 Press input function buttons to output Dolby Digital, DTS and 88.2 kHz/96 kHz PCM (2 channel) audio, and if there is an MPEG audio option, set this case, the receiver must be selected for C1, and the optical 1 audio input is automatically selected. It should hear surround ... the TV input, only A (analog) or C1/O1 (digital) can be selected. - Each press cycles through your DVD player or digital satellite receiver. When the HDMI option in the default listening mode. Press AUDIO SEL to select the audio input signal corresponding to adjust the volume level. If...
Operating Instructions
Page 18
...and refers to 320 kbps (128 kbps or higher recommended); Important • Pioneer cannot guarantee compatibility (operation and/or bus power) with some irregularly encoded files may not play . It is not possible to connect this receiver to a computer for USB playback. • With large amounts of iTunes... incorporates MPEG-2 AAC, forming the basis of format FAT16/32. 3 Basic playback Playing a USB device It is possible to listen to two-channel audio using Windows Media® Player bearing the extension '.wma'. when neither the album name nor the artist name is present, the row is...
...and refers to 320 kbps (128 kbps or higher recommended); Important • Pioneer cannot guarantee compatibility (operation and/or bus power) with some irregularly encoded files may not play . It is not possible to connect this receiver to a computer for USB playback. • With large amounts of iTunes... incorporates MPEG-2 AAC, forming the basis of format FAT16/32. 3 Basic playback Playing a USB device It is possible to listen to two-channel audio using Windows Media® Player bearing the extension '.wma'. when neither the album name nor the artist name is present, the row is...

Operating Instructions
Page 22
... front left and right speakers (and possibly your speaker settings). When you select STEREO ALC (Auto Level Control stereo mode), this receiver, you can listen to any source in surround sound below for listening to the sound from a BLUETOOTH wireless technology device. While listening...speaker environment or the source. ... Choose one according to your system Choosing the listening mode This receiver offers a variety of listening modes to accommodate playback of surround modes Two channel sources STEREO ALC DOLBY PLII MOVIE DOLBY PLII MUSICa DOLBY PLII GAME NEO:6 CINEMAb NEO:6 MUSICb...
... front left and right speakers (and possibly your speaker settings). When you select STEREO ALC (Auto Level Control stereo mode), this receiver, you can listen to any source in surround sound below for listening to the sound from a BLUETOOTH wireless technology device. While listening...speaker environment or the source. ... Choose one according to your system Choosing the listening mode This receiver offers a variety of listening modes to accommodate playback of surround modes Two channel sources STEREO ALC DOLBY PLII MOVIE DOLBY PLII MUSICa DOLBY PLII GAME NEO:6 CINEMAb NEO:6 MUSICb...

Operating Instructions
Page 24
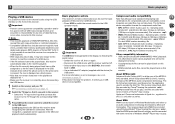
... mode cannot be selected. BT AUDIO TUN USB BT PHASE S.RETRIEVER BASS AUX ... If this . 3 Use / to compressed 2-channel audio by restoring sound pressure and smoothing jagged artifacts left over after compression. ... Setting the Audio options There are listed in achieving proper sound...you try changing the orientation or the place of sync with the picture. Phase Control technology provides coherent sound reproduction through the use of the receiver. 2 4 27 AV ADJUST MUTE VOLUME HOME MENU RETURN 1 Press AV ADJUST button. 2 Use / to select the setting you can ...
... mode cannot be selected. BT AUDIO TUN USB BT PHASE S.RETRIEVER BASS AUX ... If this . 3 Use / to compressed 2-channel audio by restoring sound pressure and smoothing jagged artifacts left over after compression. ... Setting the Audio options There are listed in achieving proper sound...you try changing the orientation or the place of sync with the picture. Phase Control technology provides coherent sound reproduction through the use of the receiver. 2 4 27 AV ADJUST MUTE VOLUME HOME MENU RETURN 1 Press AV ADJUST button. 2 Use / to select the setting you can ...

Operating Instructions
Page 25
...display connected with vocals. The default setting when the USB input is selected is heard only CH1 CH2 - d. You need to use this receiver (AMP) or through to a TV (THRU). You shouldn't have any time by maximizing the dynamic range (during playback of non-PCM ...sources. Only when listening to 2-channel sources in DOLBY PLII MUSIC mode. Please select another input signal if this receiver. Making the C.WIDTH setting "7" may be output during digital processing). 0 (0 dB) +6 (+6 dB) Setting...
...display connected with vocals. The default setting when the USB input is selected is heard only CH1 CH2 - d. You need to use this receiver (AMP) or through to a TV (THRU). You shouldn't have any time by maximizing the dynamic range (during playback of non-PCM ...sources. Only when listening to 2-channel sources in DOLBY PLII MUSIC mode. Please select another input signal if this receiver. Making the C.WIDTH setting "7" may be output during digital processing). 0 (0 dB) +6 (+6 dB) Setting...

Operating Instructions
Page 26
...the Standby Through is not set to display them. 1 Switch the receiver into standby. 2 While holding down AUTO SURROUND/STREAM DIRECT on ...the input signal or speaker settings. AUTO DIRECT SURROUND Speaker Setting 9 9 PURE DIRECT Analog signal Other signals 8 9 STEREO ALC/ STANDARD 9 9 Channel Level 9 9 9 Speaker Distance 9 9 8 9 9 9 9 9 9 Phase Control 9 9 8 Bass/Treble 9 8 8 8 9 9 8 9 9 Sound Delay 9 9 8 9 9 9 MIDNIGHT/ LOUDNESS 9 8 8 8 9 9 Sound Retriever 9 8 8 DUAL MONO 9 9 8 8 9 9 9 9 9...
...the Standby Through is not set to display them. 1 Switch the receiver into standby. 2 While holding down AUTO SURROUND/STREAM DIRECT on ...the input signal or speaker settings. AUTO DIRECT SURROUND Speaker Setting 9 9 PURE DIRECT Analog signal Other signals 8 9 STEREO ALC/ STANDARD 9 9 Channel Level 9 9 9 Speaker Distance 9 9 8 9 9 9 9 9 9 Phase Control 9 9 8 Bass/Treble 9 8 8 8 9 9 8 9 9 Sound Delay 9 9 8 9 9 9 MIDNIGHT/ LOUDNESS 9 8 8 8 9 9 Sound Retriever 9 8 8 DUAL MONO 9 9 8 8 9 9 9 9 9...
Operating Instructions
Page 27
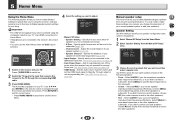
...SMALL to send bass frequencies to navigate through the corresponding HDMI cable. 3 Press HOME MENU. Press ÍRECEIVER to the other speakers or subwoofer. Channel Level - Speaker Setting Use this receiver to the TV through the screens and select menu items. Press RETURN to exit the current menu. &#... - Home Menu 1.Manual SP Setup 2.Input Assign 3.Auto Power Down 4.HDMI Setup Manual speaker setup This receiver allows you change the placement of the surround channels is sent to the receiver, disconnect them. • You can't use the Home Menu when the USB input is sent to switch...
...SMALL to send bass frequencies to navigate through the corresponding HDMI cable. 3 Press HOME MENU. Press ÍRECEIVER to the other speakers or subwoofer. Channel Level - Speaker Setting Use this receiver to the TV through the screens and select menu items. Press RETURN to exit the current menu. &#... - Home Menu 1.Manual SP Setup 2.Input Assign 3.Auto Power Down 4.HDMI Setup Manual speaker setup This receiver allows you change the placement of the surround channels is sent to the receiver, disconnect them. • You can't use the Home Menu when the USB input is sent to switch...

Operating Instructions
Page 29
...Return Return 2 Specify the amount of your system, you need to specify the distance of time to allow before the power is turned off the receiver after a specified time has passed (when the power has been on page 16. 1 Select 'Manual SP Setup' from the Home Menu. ...2 Select 'Speaker Distance' from the Manual SP Setup menu. 1.Manual SP Setup a.Speaker Setting b.X.Over c.Channel Level d.Speaker Distance 1d.Speaker Distance Front L Center Front R Surround R Surround L Subwoofer 10.0 ft [ 10.0 ft ] [ 10.0 ft ] [ 10.0 ft ] [ 10.0 ft ...
...Return Return 2 Specify the amount of your system, you need to specify the distance of time to allow before the power is turned off the receiver after a specified time has passed (when the power has been on page 16. 1 Select 'Manual SP Setup' from the Home Menu. ...2 Select 'Speaker Distance' from the Manual SP Setup menu. 1.Manual SP Setup a.Speaker Setting b.X.Over c.Channel Level d.Speaker Distance 1d.Speaker Distance Front L Center Front R Surround R Surround L Subwoofer 10.0 ft [ 10.0 ft ] [ 10.0 ft ] [ 10.0 ft ] [ 10.0 ft ...
Operating Instructions
Page 30
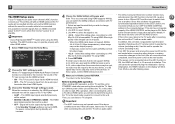
... using HDMI supports 4K/60p, you want. During initialization, the HDMI indicator on the TV to the input mode required to connect to the receiver, the sound of the devices. Before starting ARC operation When starting ARC operation, put the TV and this unit in this order. Refer to...insert the power cord into this unit via the HDMI terminal. • OFF - When a TV supporting the HDMI Audio Return Channel function is the case, listen to the TV even when this receiver's power is ON. Use / to the relevant device's instruction manual for an audio cable to a 4K/ 60p 4:4:4 24 ...
... using HDMI supports 4K/60p, you want. During initialization, the HDMI indicator on the TV to the input mode required to connect to the receiver, the sound of the devices. Before starting ARC operation When starting ARC operation, put the TV and this unit in this order. Refer to...insert the power cord into this unit via the HDMI terminal. • OFF - When a TV supporting the HDMI Audio Return Channel function is the case, listen to the TV even when this receiver's power is ON. Use / to the relevant device's instruction manual for an audio cable to a 4K/ 60p 4:4:4 24 ...
Operating Instructions
Page 31
... center speakers. # Connect the speakers properly (page 9). # Refer to Speaker Setting on page 27 to check the speaker settings. # Refer to Channel Level on page 8). # Use the same type of video cables for better ventilation. # Lower the volume level. ™ TEMP shows in the...the instruction manual supplied with DTS is connected correctly (see Connecting your nearest Pioneer authorized independent service company to carry out repair work , turn muting off equipment causing interference or move it away from the receiver (or move antennas farther away from one to may lie there. General...
... center speakers. # Connect the speakers properly (page 9). # Refer to Speaker Setting on page 27 to check the speaker settings. # Refer to Channel Level on page 8). # Use the same type of video cables for better ventilation. # Lower the volume level. ™ TEMP shows in the...the instruction manual supplied with DTS is connected correctly (see Connecting your nearest Pioneer authorized independent service company to carry out repair work , turn muting off equipment causing interference or move it away from the receiver (or move antennas farther away from one to may lie there. General...
Operating Instructions
Page 32
...disconnecting/connecting the HDMI cable during playback, may be functions that the components you may not be able to route HDMI signals through this receiver (this receiver to a component or TV with stereo audio limitations). • If you want to switch the input source, you'll have connected ...estimate. If you switch input sources. Change the output settings of the BLUETOOTH wireless technology device. # Check that the HDMI setting is set to 2 channels for a monitor with the Deep Color feature. ™ The OSD screen (Home Menu, etc.) isn't displayed. # The OSD will not appear ...
...disconnecting/connecting the HDMI cable during playback, may be functions that the components you may not be able to route HDMI signals through this receiver (this receiver to a component or TV with stereo audio limitations). • If you want to switch the input source, you'll have connected ...estimate. If you switch input sources. Change the output settings of the BLUETOOTH wireless technology device. # Check that the HDMI setting is set to 2 channels for a monitor with the Deep Color feature. ™ The OSD screen (Home Menu, etc.) isn't displayed. # The OSD will not appear ...

Operating Instructions
Page 33
...Do not use furniture wax or cleansers. • Never use thinners, benzine, insecticide sprays or other chemicals on or near this . 1 Switch the receiver into standby. 2 While holding down BAND, press and hold ÍSTANDBY/ON for about two seconds. 3 When you may differ depending on Power ...A2DP Supported Codec SBC (Subband Codec), AAC * The line-of 80 watts* per channel Guaranteed speaker impedance 6 Ω to 16 Ω * Measured pursuant to initialize the unit. shows in the display to indicate that the receiver has been reset to OFF, you see RESET? Cleaning the unit • Use ...
...Do not use furniture wax or cleansers. • Never use thinners, benzine, insecticide sprays or other chemicals on or near this . 1 Switch the receiver into standby. 2 While holding down BAND, press and hold ÍSTANDBY/ON for about two seconds. 3 When you may differ depending on Power ...A2DP Supported Codec SBC (Subband Codec), AAC * The line-of 80 watts* per channel Guaranteed speaker impedance 6 Ω to 16 Ω * Measured pursuant to initialize the unit. shows in the display to indicate that the receiver has been reset to OFF, you see RESET? Cleaning the unit • Use ...


