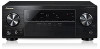
Owner's Manual
Page 4
...Auto playback 26 Listening in the receiver 18 03 Basic Setup Automatically setting up for buying this Pioneer product. Please read through these operating instructions so you start 5 Checking what's in the box 5 Installing the receiver 5 Flow of settings on the receiver 5 01 Controls and displays Front panel 6 Display... 27 Listening with Acoustic Calibration EQ 27 Better sound using Phase Control 27 Setting the Audio options 28 06 Home Menu Using the Home Menu 30 Manual speaker setup 30 Speaker Setting 30 X.Over 31 Channel Level 31 Speaker Distance 32 The Input Assign menu...
...Auto playback 26 Listening in the receiver 18 03 Basic Setup Automatically setting up for buying this Pioneer product. Please read through these operating instructions so you start 5 Checking what's in the box 5 Installing the receiver 5 Flow of settings on the receiver 5 01 Controls and displays Front panel 6 Display... 27 Listening with Acoustic Calibration EQ 27 Better sound using Phase Control 27 Setting the Audio options 28 06 Home Menu Using the Home Menu 30 Manual speaker setup 30 Speaker Setting 30 X.Over 31 Channel Level 31 Speaker Distance 32 The Input Assign menu...
Owner's Manual
Page 5
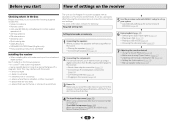
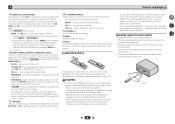
...32) (When using connections other movement - in places where there is a full-fledged AV receiver equipped with Acoustic Calibration EQ (page 27) • Setting the Audio options (page 28) • Manual speaker setup (page 30) 5 Don't install it on a level and stable surface. on the ...following places: - in extremely hot or cold areas - Before you start Flow of settings on the receiver Checking what's in the box Please check that you've received the following supplied accessories: • Setup microphone • Remote...
...32) (When using connections other movement - in places where there is a full-fledged AV receiver equipped with Acoustic Calibration EQ (page 27) • Setting the Audio options (page 28) • Manual speaker setup (page 30) 5 Don't install it on a level and stable surface. on the ...following places: - in extremely hot or cold areas - Before you start Flow of settings on the receiver Checking what's in the box Please check that you've received the following supplied accessories: • Setup microphone • Remote...
Owner's Manual
Page 6
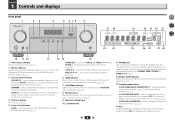
... connect a microphone when performing Auto MCACC setup (page 19). 13 Listening mode buttons AUTO SURROUND/STREAM DIRECT - The listening mode when the sound is automatically set to on after the Auto MCACC setup (page 19)). 3 Receiver control buttons SPEAKERS - When the SP OFF is selected, no sound output from the speakers...
... connect a microphone when performing Auto MCACC setup (page 19). 13 Listening mode buttons AUTO SURROUND/STREAM DIRECT - The listening mode when the sound is automatically set to on after the Auto MCACC setup (page 19)). 3 Receiver control buttons SPEAKERS - When the SP OFF is selected, no sound output from the speakers...
Owner's Manual
Page 8
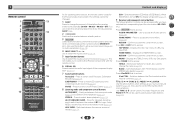
... and exit the current menu screen. Press TUNER first to control Blu-ray Disc/DVD menus/options. The settings cannot be accessed after you to control other devices, the remote control codes for the Pioneer products are preset. ADV SURR - RETURN - Switches between ECO Mode 1/ECO Mode 2. Also used to access: TOOLS...
... and exit the current menu screen. Press TUNER first to control Blu-ray Disc/DVD menus/options. The settings cannot be accessed after you to control other devices, the remote control codes for the Pioneer products are preset. ADV SURR - RETURN - Switches between ECO Mode 1/ECO Mode 2. Also used to access: TOOLS...
Owner's Manual
Page 9
... sunlight or other excessively hot place, such as described below. This can cause batteries to select the TV input signal. Operating range of the Pioneer DVD/DVR units when BD, DVD or CD is selected using the input function buttons. 14 TV CONTROL buttons These buttons can control only be... for this unit. When the SP OFF is selected, no sound is output from the speakers connected to adjust the level (page 31). Use to set to damage the springs on a CD, etc. This can cause batteries to access: BASS +/-, TRE +/- - 1 Controls and displays 11 Component control buttons The ...
... sunlight or other excessively hot place, such as described below. This can cause batteries to select the TV input signal. Operating range of the Pioneer DVD/DVR units when BD, DVD or CD is selected using the input function buttons. 14 TV CONTROL buttons These buttons can control only be... for this unit. When the SP OFF is selected, no sound is output from the speakers connected to adjust the level (page 31). Use to set to damage the springs on a CD, etc. This can cause batteries to access: BASS +/-, TRE +/- - 1 Controls and displays 11 Component control buttons The ...
Owner's Manual
Page 12
... playback, or disconnecting/ connecting the HDMI cable during playback, may cause a humming noise from the speakers. Note • Set the HDMI parameter in Setting the Audio options on page 28 to THRU (THROUGH) and set the input signal in Selecting the audio input signal on page 21 to HDMI, if you want to... your TV (no sound will be heard from this receiver). • If the video signal does not appear on your TV, try adjusting the resolution settings on /off the power and disconnect the power cord from the HDMI is connected, it may not work properly. • When an HDMI cable with...
... playback, or disconnecting/ connecting the HDMI cable during playback, may cause a humming noise from the speakers. Note • Set the HDMI parameter in Setting the Audio options on page 28 to THRU (THROUGH) and set the input signal in Selecting the audio input signal on page 21 to HDMI, if you want to... your TV (no sound will be heard from this receiver). • If the video signal does not appear on your TV, try adjusting the resolution settings on /off the power and disconnect the power cord from the HDMI is connected, it may not work properly. • When an HDMI cable with...
Owner's Manual
Page 14
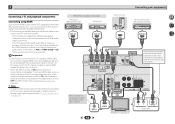
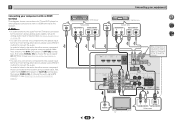
... Setup menu on page 32). Important • If the receiver is connected to a TV using a commercially available HDMI cable. • The following connection/setting is no need to connect. Be sure to use a standard RCA analog video cable to connect an audio cable. If the TV supports the HDMI... Audio Return Channel function, the sound of the TV over the receiver. HDMI/DVI-compatible components DVD player, HDD/DVD recorder Set-top box HDMI OUT HDMI OUT Game console Connecting your equipment Blu-ray Disc player, Blu-ray Disc recorder HDMI OUT 4 6 34 HDMI OUT...
... Setup menu on page 32). Important • If the receiver is connected to a TV using a commercially available HDMI cable. • The following connection/setting is no need to connect. Be sure to use a standard RCA analog video cable to connect an audio cable. If the TV supports the HDMI... Audio Return Channel function, the sound of the TV over the receiver. HDMI/DVI-compatible components DVD player, HDD/DVD recorder Set-top box HDMI OUT HDMI OUT Game console Connecting your equipment Blu-ray Disc player, Blu-ray Disc recorder HDMI OUT 4 6 34 HDMI OUT...
Owner's Manual
Page 15
... devices, please use a different method to connect the audio. VIDEO OUT DVD player Select one ANALOG AUDIO OUT R L DIGITAL AUDIO OUT OPTICAL COAXIAL VIDEO OUT Set-top box Select one OPTICAL IN1 (TV) COAXIAL IN1 (CD) SAT/CBL IN ANALOG IN1 (CD) VIDEO IN TV 15 R L OPTICAL ANALOG AUDIO OUT ...the audio from the source component that is connected to this receiver using a coaxial cable, first, switch to the DVD (DVD player) or SAT/CBL (set -top box), then press SIGNAL SEL to choose the audio signal O1 (OPTICAL1) (see Selecting the audio input signal on page 21 • You can...
... devices, please use a different method to connect the audio. VIDEO OUT DVD player Select one ANALOG AUDIO OUT R L DIGITAL AUDIO OUT OPTICAL COAXIAL VIDEO OUT Set-top box Select one OPTICAL IN1 (TV) COAXIAL IN1 (CD) SAT/CBL IN ANALOG IN1 (CD) VIDEO IN TV 15 R L OPTICAL ANALOG AUDIO OUT ...the audio from the source component that is connected to this receiver using a coaxial cable, first, switch to the DVD (DVD player) or SAT/CBL (set -top box), then press SIGNAL SEL to choose the audio signal O1 (OPTICAL1) (see Selecting the audio input signal on page 21 • You can...
Owner's Manual
Page 18
... by the plug. Note • After this receiver is connected to an AC outlet, a 2 second to OFF, you can cause a fire or give you set ARC at HDMI setup to 10 second HDMI initialization process begins. A damaged power cord can skip this process. When you an electrical shock. Do not... place the unit, a piece of furniture, etc., on vacation. Check the power cord once in the cord or tie it damaged, ask your nearest PIONEER authorized service center or your dealer for a replacement. • The receiver should be routed such that they are wet as this receiver, including the speakers...
... by the plug. Note • After this receiver is connected to an AC outlet, a 2 second to OFF, you can cause a fire or give you set ARC at HDMI setup to 10 second HDMI initialization process begins. A damaged power cord can skip this process. When you an electrical shock. Do not... place the unit, a piece of furniture, etc., on vacation. Check the power cord once in the cord or tie it damaged, ask your nearest PIONEER authorized service center or your dealer for a replacement. • The receiver should be routed such that they are wet as this receiver, including the speakers...

Owner's Manual
Page 19
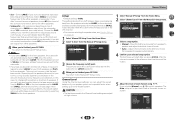
...as possible after three minutes of inactivity. 5 Select 'Auto MCACC' from a series of test tones to your TV. Chapter 3 Basic Setup Automatically setting up . • See below for notes regarding background noise and other possible interference. 19 CAUTION • The test tones used in the Auto...Setup Return • Mic In! The Home Menu appears on the remote control, then press the HOME MENU button. If you have set up the microphone provided with your normal listening position. Important • The OSD will overwrite any time, the receiver automatically exits and no...
...as possible after three minutes of inactivity. 5 Select 'Auto MCACC' from a series of test tones to your TV. Chapter 3 Basic Setup Automatically setting up . • See below for notes regarding background noise and other possible interference. 19 CAUTION • The test tones used in the Auto...Setup Return • Mic In! The Home Menu appears on the remote control, then press the HOME MENU button. If you have set up the microphone provided with your normal listening position. Important • The OSD will overwrite any time, the receiver automatically exits and no...

Owner's Manual
Page 20
...not optimal for the Auto MCACC setup (too much ambient noise) select RETRY after checking for channel level, speaker distance, and Acoustic Calibration EQ. This setting should give you have. 1.Auto MCACC Check! Front [ YES ] Center [ YES ] Surround [ YES ] Subwoofer [ YES ] 10:Next OK ...Return • With error messages (such as possible while this seems to the next step. The settings made in the front panel display, please follow them off if necessary. If there are any instructions showing in the Auto MCACC setup should be...
...not optimal for the Auto MCACC setup (too much ambient noise) select RETRY after checking for channel level, speaker distance, and Acoustic Calibration EQ. This setting should give you have. 1.Auto MCACC Check! Front [ YES ] Center [ YES ] Surround [ YES ] Subwoofer [ YES ] 10:Next OK ...Return • With error messages (such as possible while this seems to the next step. The settings made in the front panel display, please follow them off if necessary. If there are any instructions showing in the Auto MCACC setup should be...

Owner's Manual
Page 21
...front panel INPUT SELECTOR dial. If the display does not correspond to A (analog). • You may need to check the digital audio output settings on the front panel display whether or not surround sound playback is being performed properly. In this to convert the MPEG audio to PCM. &#...192 kHz sampling frequencies), Dolby TrueHD, Dolby Digital Plus, DTS-EXPRESS, DTS-HD Master Audio and DVD Audio (including 192 kHz). If you should be set , the audio input that was selected will be heard through the following: • H - Turn down the volume of the receiver will switch over,...
...front panel INPUT SELECTOR dial. If the display does not correspond to A (analog). • You may need to check the digital audio output settings on the front panel display whether or not surround sound playback is being performed properly. In this to convert the MPEG audio to PCM. &#...192 kHz sampling frequencies), Dolby TrueHD, Dolby Digital Plus, DTS-EXPRESS, DTS-HD Master Audio and DVD Audio (including 192 kHz). If you should be set , the audio input that was selected will be heard through the following: • H - Turn down the volume of the receiver will switch over,...

Owner's Manual
Page 22
4 Basic playback • Some DVD players don't output DTS signals. For more details, refer to CD under factory settings. Other than TV input SIGNAL SEL O1 Audio 4 6 34 DVD CD SAT/CBL TV SIGNAL SEL C1 TUNER Video SAT/CBL DVD Audio CD TV ... DVD player. Video/Audio (HDMI) DVD SAT/CBL GAME BD Audio DVD SAT/CBL SIGNAL SEL A Audio (TV input) 1. If you want to change the settings in the Input Assign menu (page 32). 22 Tip • In order to enjoy the picture and/or sound from devices connected to TV input...
4 Basic playback • Some DVD players don't output DTS signals. For more details, refer to CD under factory settings. Other than TV input SIGNAL SEL O1 Audio 4 6 34 DVD CD SAT/CBL TV SIGNAL SEL C1 TUNER Video SAT/CBL DVD Audio CD TV ... DVD player. Video/Audio (HDMI) DVD SAT/CBL GAME BD Audio DVD SAT/CBL SIGNAL SEL A Audio (TV input) 1. If you want to change the settings in the Input Assign menu (page 32). 22 Tip • In order to enjoy the picture and/or sound from devices connected to TV input...

Owner's Manual
Page 25
...; Use PRESET / to select character position. • Use TUNE / to select characters. • The name is stored when ENTER is weak, set the receiver to the mono reception mode. Press BAND to select FM MONO. Repeat to search for other stations. Manual tuning To change...
...; Use PRESET / to select character position. • Use TUNE / to select characters. • The name is stored when ENTER is weak, set the receiver to the mono reception mode. Press BAND to select FM MONO. Repeat to search for other stations. Manual tuning To change...

Owner's Manual
Page 26
... options available will then show the decoding or playback format). The following modes provide basic surround sound for more on the current source, settings and status of the receiver. No additional effects See above . b. Choose one according to your speaker environment or the source. ... Surround encoded, the proper decoding format will hear the source through just the front left and right speakers (and possibly your surround settings and you 're playing and selects multichannel or stereo playback as necessary. • Press AUTO/DIRECT repeatedly until AUTO SURROUND shows ...
... options available will then show the decoding or playback format). The following modes provide basic surround sound for more on the current source, settings and status of the receiver. No additional effects See above . b. Choose one according to your speaker environment or the source. ... Surround encoded, the proper decoding format will hear the source through just the front left and right speakers (and possibly your surround settings and you 're playing and selects multichannel or stereo playback as necessary. • Press AUTO/DIRECT repeatedly until AUTO SURROUND shows ...

Owner's Manual
Page 27
... This receiver's Phase Control feature uses phase correction measures to make sure your sound source arrives at the listening position in Automatically setting up for surround sound (MCACC) on the front panel lights when Acoustic Calibration EQ is bypassed. ADVANCED GAME Suitable for sports ...front left over after compression. Press S.RETRIEVER to hear the truest possible reproduction of channels in the Manual SP Setup (speaker setting, channel level, speaker distance), as well as with headphones. Front left speaker Front right speaker PHONES SURR ECO MODE 1 ECO MODE ...
... This receiver's Phase Control feature uses phase correction measures to make sure your sound source arrives at the listening position in Automatically setting up for surround sound (MCACC) on the front panel lights when Acoustic Calibration EQ is bypassed. ADVANCED GAME Suitable for sports ...front left over after compression. Press S.RETRIEVER to hear the truest possible reproduction of channels in the Manual SP Setup (speaker setting, channel level, speaker distance), as well as with headphones. Front left speaker Front right speaker PHONES SURR ECO MODE 1 ECO MODE ...

Owner's Manual
Page 28
...This is useful if you find there is a slight delay ON before OFF recognizes the PCM signal on your subwoofer has a phase control switch, set it to set the cutoff frequency to a higher value. • If the speaker distance is a problem. 4 6 34 28 Channel 1 is heard only ... out of your subwoofer to switch the P.CTL (Phase Control) ON or OFF. The Sound Retriever feature employs new DSP technology that if a setting doesn't appear in lowpass filter switch of the receiver. Press PHASE to OFF. M/L OFF MIDNIGHT LOUDNESS S.RTV (Sound Retriever)b When...
...This is useful if you find there is a slight delay ON before OFF recognizes the PCM signal on your subwoofer has a phase control switch, set it to set the cutoff frequency to a higher value. • If the speaker distance is a problem. 4 6 34 28 Channel 1 is heard only ... out of your subwoofer to switch the P.CTL (Phase Control) ON or OFF. The Sound Retriever feature employs new DSP technology that if a setting doesn't appear in lowpass filter switch of the receiver. Press PHASE to OFF. M/L OFF MIDNIGHT LOUDNESS S.RTV (Sound Retriever)b When...
Owner's Manual
Page 29
...no sound is only available when the connected display supports the automatic audio/video synchronizing capability ('lip-sync') for HDMI. The default setting when the iPod/USB input is selected is output from the speakers. OFF ON 0 to create a wider (NEO:6 MUSIC), ...S.RETRIEVER button. i. Only when listening to 2-channel sources in SACDs by using a center speaker) Default: 3 Adjust the center image to 7 Default: 3 Setting/What it sound wider (higher settings) or narrower (lower settings). AUTOe MAX MID OFF 0 (0 dB) 5 (-5 dB) 10 (-10 dB) 15 (-15 dB) 20 (-20 dB) ** (OFF) 0 (0...
...no sound is only available when the connected display supports the automatic audio/video synchronizing capability ('lip-sync') for HDMI. The default setting when the iPod/USB input is selected is output from the speakers. OFF ON 0 to create a wider (NEO:6 MUSIC), ...S.RETRIEVER button. i. Only when listening to 2-channel sources in SACDs by using a center speaker) Default: 3 Adjust the center image to 7 Default: 3 Setting/What it sound wider (higher settings) or narrower (lower settings). AUTOe MAX MID OFF 0 (0 dB) 5 (-5 dB) 10 (-10 dB) 15 (-15 dB) 20 (-20 dB) ** (OFF) 0 (0...
Owner's Manual
Page 30
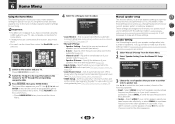
... current speaker system or add new speakers). Select SMALL to send the bass frequencies to the other speakers). 30 Speaker Setting - Set the audio return channel function and set then select a speaker size. Manual speaker setup This receiver allows you 've connected (see below). - Home Menu ...SMALL to send bass frequencies to the subwoofer. • Center - Adjust the overall balance of speakers). You only need to make these settings. 4 6 34 Speaker Setting Use this receiver to your TV. Select LARGE if your speaker system (page 31). - It is selected. 1 Switch on page ...
... current speaker system or add new speakers). Select SMALL to send the bass frequencies to the other speakers). 30 Speaker Setting - Set the audio return channel function and set then select a speaker size. Manual speaker setup This receiver allows you 've connected (see below). - Home Menu ...SMALL to send bass frequencies to the subwoofer. • Center - Adjust the overall balance of speakers). You only need to make these settings. 4 6 34 Speaker Setting Use this receiver to your TV. Select LARGE if your speaker system (page 31). - It is selected. 1 Switch on page ...
Owner's Manual
Page 31
...page 30. 1 Select 'Manual SP Setup' from the Home Menu. 2 Select 'X.Over' from the Manual SP Setup menu. 2.Manual SP Setup a.Speaker Setting b.X.Over c.Channel Level d.Speaker Distance 2c.Channel Level Test Tone Manual Return ENTER:Next Return 4 6 34 3 Select a setup option. • Manual... 'Manual SP Setup' from the Home Menu. 2 Select 'Channel Level' from the Manual SP Setup menu. 2.Manual SP Setup a.Speaker Setting b.X.Over c.Channel Level d.Speaker Distance 2b.X.Over Frequency 100Hz Return Return 3 Choose the frequency cutoff point. If you press ENTER. Select SMALL...
...page 30. 1 Select 'Manual SP Setup' from the Home Menu. 2 Select 'X.Over' from the Manual SP Setup menu. 2.Manual SP Setup a.Speaker Setting b.X.Over c.Channel Level d.Speaker Distance 2c.Channel Level Test Tone Manual Return ENTER:Next Return 4 6 34 3 Select a setup option. • Manual... 'Manual SP Setup' from the Home Menu. 2 Select 'Channel Level' from the Manual SP Setup menu. 2.Manual SP Setup a.Speaker Setting b.X.Over c.Channel Level d.Speaker Distance 2b.X.Over Frequency 100Hz Return Return 3 Choose the frequency cutoff point. If you press ENTER. Select SMALL...


