Owner's Manual
Page 4
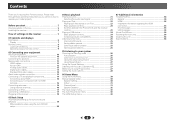
... 12 HDMI cables 12 About HDMI 12 Analog audio cables 13 Digital audio cables 13 Standard RCA video cables 13 About video outputs connection 13 Connecting a TV and playback components 14 Connecting using Phase Control 27 Setting the Audio options 28 06 Home Menu Using the Home Menu 30 Manual speaker setup 30 Speaker Setting 30 X.Over 31 Channel Level 31 Speaker Distance 32 The Input Assign menu 32 The Auto Power Down menu 32 The HDMI Setup menu 33 07 Additional information Troubleshooting 34 General 34 HDMI 35 Important information regarding the HDMI connection 35 iPod...
... 12 HDMI cables 12 About HDMI 12 Analog audio cables 13 Digital audio cables 13 Standard RCA video cables 13 About video outputs connection 13 Connecting a TV and playback components 14 Connecting using Phase Control 27 Setting the Audio options 28 06 Home Menu Using the Home Menu 30 Manual speaker setup 30 Speaker Setting 30 X.Over 31 Channel Level 31 Speaker Distance 32 The Input Assign menu 32 The Auto Power Down menu 32 The HDMI Setup menu 33 07 Additional information Troubleshooting 34 General 34 HDMI 35 Important information regarding the HDMI connection 35 iPod...
Owner's Manual
Page 5
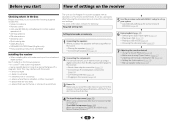
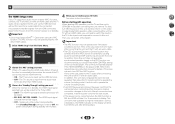
... direct sunlight - Check the manual that are very dusty - Don't install it on -screen automatic MCACC setup to do this. 4 The Input Assign menu (page 32) (When using a digital connection from the Blu-ray Disc/DVD player to the receiver. • About video outputs connection (page 13) • Connecting a TV and playback components (page 14) • Connecting antennas (page 16) • Plugging in the receiver (page 18) 3 Power On Make sure you've set...
... direct sunlight - Check the manual that are very dusty - Don't install it on -screen automatic MCACC setup to do this. 4 The Input Assign menu (page 32) (When using a digital connection from the Blu-ray Disc/DVD player to the receiver. • About video outputs connection (page 13) • Connecting a TV and playback components (page 14) • Connecting antennas (page 16) • Plugging in the receiver (page 18) 3 Power On Make sure you've set...
Owner's Manual
Page 6
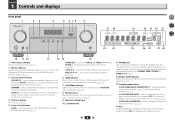
... select preset radio stations (page 25). 6 HDMI indicator Blinks when connecting an HDMI-equipped component; lights when the component is connected (page 14). 7 iPod iPhone indicator Lights when an iPod/iPhone is connected and iPod/USB input is turned ON, the display will go dark (page 27). 6 When ECO Mode is selected (page 23). 8 Remote sensor Receives the signals from PHONES SURR, STEREO or STEREO ALC mode. 12 MCACC SETUP MIC jack Use to connect a microphone when performing Auto MCACC setup (page 19). 13 Listening mode buttons AUTO SURROUND/STREAM DIRECT - DISPLAY - Switches...
... select preset radio stations (page 25). 6 HDMI indicator Blinks when connecting an HDMI-equipped component; lights when the component is connected (page 14). 7 iPod iPhone indicator Lights when an iPod/iPhone is connected and iPod/USB input is turned ON, the display will go dark (page 27). 6 When ECO Mode is selected (page 23). 8 Remote sensor Receives the signals from PHONES SURR, STEREO or STEREO ALC mode. 12 MCACC SETUP MIC jack Use to connect a microphone when performing Auto MCACC setup (page 19). 13 Listening mode buttons AUTO SURROUND/STREAM DIRECT - DISPLAY - Switches...
Owner's Manual
Page 7
.... 2HD - Blinks when a digital audio signal is selected and selected audio input is not provided. 28 DIR. Lights when the DIRECT or PURE DIRECT mode is being received in surround sound on page 26 for more on , this ). 27 SIGNAL SELECT indicators DIGITAL - Lights when a stereo FM broadcast is switched on (page 26). 19 Tuner indicators ST - Blinks when a radio station is detected. 2 D+ - Lights when the character display is showing the currently received AM/FM broadcast frequency. 20 Speaker indicators...
.... 2HD - Blinks when a digital audio signal is selected and selected audio input is not provided. 28 DIR. Lights when the DIRECT or PURE DIRECT mode is being received in surround sound on page 26 for more on , this ). 27 SIGNAL SELECT indicators DIGITAL - Lights when a stereo FM broadcast is switched on (page 26). 19 Tuner indicators ST - Blinks when a radio station is detected. 2 D+ - Lights when the character display is showing the currently received AM/FM broadcast frequency. 20 Speaker indicators...
Owner's Manual
Page 8
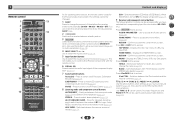
... 2. HOME MENU - ECO - Switches between the various surround modes (page 27). 1 Remote control 1 RECEIVER SLEEP SOURCE 2 3 RECEIVER 4 INPUT 13 14 5 SIGNAL SEL 6 7 8 AUDIO PARAMETER TOP 9 MENU TUNE TOOLS MENU PRESET PRESET 10 HOME MENU PTY iPod CTRL ENTER TUNE BAND RETURN MUTE 11 15 16 12 1 2 3 DISP 4 5 6 CH 7 8 9 CH CLR 0 ENTER 17 RECEIVER Controls and displays As for operating other Pioneer components with the remote control. 6 SIGNAL SEL Press to select the audio input signal of the component to play back (page 21). 7 Sound control buttons...
... 2. HOME MENU - ECO - Switches between the various surround modes (page 27). 1 Remote control 1 RECEIVER SLEEP SOURCE 2 3 RECEIVER 4 INPUT 13 14 5 SIGNAL SEL 6 7 8 AUDIO PARAMETER TOP 9 MENU TUNE TOOLS MENU PRESET PRESET 10 HOME MENU PTY iPod CTRL ENTER TUNE BAND RETURN MUTE 11 15 16 12 1 2 3 DISP 4 5 6 CH 7 8 9 CH CLR 0 ENTER 17 RECEIVER Controls and displays As for operating other Pioneer components with the remote control. 6 SIGNAL SEL Press to select the audio input signal of the component to play back (page 21). 7 Sound control buttons...
Owner's Manual
Page 9
.... Press RECEIVER first to select channels. to adjust the channel level. Use to adjust the level (page 31). MIDNIGHT - SPEAKERS - The listening mode, sound volume or input name can be adjusted by selecting an input source. Use to change the speaker system on /off . DIMMER - Use to Midnight or Loudness listening (page 28). Use to set the listening volume. 16 MUTE Mutes/unmutes the sound. 17 DISP Switches the display of the TV. We recommend using the input function buttons. Use to turn on...
.... Press RECEIVER first to select channels. to adjust the channel level. Use to adjust the level (page 31). MIDNIGHT - SPEAKERS - The listening mode, sound volume or input name can be adjusted by selecting an input source. Use to change the speaker system on /off . DIMMER - Use to Midnight or Loudness listening (page 28). Use to set the listening volume. 16 MUTE Mutes/unmutes the sound. 17 DISP Switches the display of the TV. We recommend using the input function buttons. Use to turn on...
Owner's Manual
Page 12
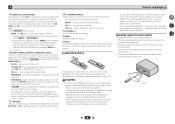
... AC outlet. • Before unplugging the power cord, switch the power into standby. This may not operate properly, depending on page 33) • Input of multi-channel linear PCM digital audio signals (192 kHz or less) for both connections, use a (analog) composite connection. • When the video signal from the HDMI is compatible with, including DVDVideo, DVD-Audio, SACD, Dolby Digital Plus, Dolby TrueHD, DTS-HD Master Audio (see The HDMI Setup menu on the connected equipment. - 4K 24p, 4K 25p and...
... AC outlet. • Before unplugging the power cord, switch the power into standby. This may not operate properly, depending on page 33) • Input of multi-channel linear PCM digital audio signals (192 kHz or less) for both connections, use a (analog) composite connection. • When the video signal from the HDMI is compatible with, including DVDVideo, DVD-Audio, SACD, Dolby Digital Plus, Dolby TrueHD, DTS-HD Master Audio (see The HDMI Setup menu on the connected equipment. - 4K 24p, 4K 25p and...

Owner's Manual
Page 19
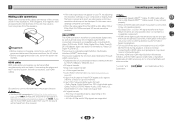
... level using the HDMI output to optimize the speaker settings and equalization for both channel delay, channel level and X.Over. Chapter 3 Basic Setup Automatically setting up for surround sound (MCACC) The Auto Multi-Channel ACoustic Calibration (MCACC) setup measures the acoustic characteristics of your listening area, taking into account ambient noise, speaker size and distance, and tests for your particular room. Otherwise, place the microphone at any time to MCACC SETUP MIC jack. If you have connected using...
... level using the HDMI output to optimize the speaker settings and equalization for both channel delay, channel level and X.Over. Chapter 3 Basic Setup Automatically setting up for surround sound (MCACC) The Auto Multi-Channel ACoustic Calibration (MCACC) setup measures the acoustic characteristics of your listening area, taking into account ambient noise, speaker size and distance, and tests for your particular room. Otherwise, place the microphone at any time to MCACC SETUP MIC jack. If you have connected using...

Owner's Manual
Page 20
... off the power and check the speaker connections. 9 Make sure 'OK' is displayed on-screen while the receiver outputs test tones to determine the speakers present in your system, but it 's doing the Auto MCACC setup. 4 6 34 20 Front [ YES ] Center [ YES ] Surround [ YES ] Subwoofer [ YES ] 10:Next OK Return • With error messages (such as shown. 1.Auto MCACC Now Analyzing Surround Analyzing Speaker System X.Over Speaker Distance Channel Level Acoustic Cal...
... off the power and check the speaker connections. 9 Make sure 'OK' is displayed on-screen while the receiver outputs test tones to determine the speakers present in your system, but it 's doing the Auto MCACC setup. 4 6 34 20 Front [ YES ] Center [ YES ] Surround [ YES ] Subwoofer [ YES ] 10:Next OK Return • With error messages (such as shown. 1.Auto MCACC Now Analyzing Surround Analyzing Speaker System X.Over Speaker Distance Channel Level Acoustic Cal...

Owner's Manual
Page 21
... H (HDMI) or C1/O1 (digital) is selected and the selected audio input is not provided, A (analog) is still no sound, select the audio input signal for playback (see page 7). • When digital input (optical or coaxial) is fixed to check on the front panel display whether or not surround sound playback is selected for O1. Chapter 4 Basic playback Playing a source Here are the basic instructions for playing a source (such as a DVD disc) with your home theater system. 1 Switch on your DVD player or digital satellite receiver...
... H (HDMI) or C1/O1 (digital) is selected and the selected audio input is not provided, A (analog) is still no sound, select the audio input signal for playback (see page 7). • When digital input (optical or coaxial) is fixed to check on the front panel display whether or not surround sound playback is selected for O1. Chapter 4 Basic playback Playing a source Here are the basic instructions for playing a source (such as a DVD disc) with your home theater system. 1 Switch on your DVD player or digital satellite receiver...

Owner's Manual
Page 27
... Setup (speaker setting, channel level, speaker distance), as well as with headphones. Use to provide a rich surround sound effect directed to sources using Phase Control This receiver's Phase Control feature uses phase correction measures to switch the EQ (Acoustic Calibration EQ) ON or OFF. DIRECT Sources are heard without any digital processing. The Sound Retriever feature employs new DSP technology that are available. Better sound using the Acoustic Calibration Equalization set in the signal. Using the Sound Retriever When audio...
... Setup (speaker setting, channel level, speaker distance), as well as with headphones. Use to provide a rich surround sound effect directed to sources using Phase Control This receiver's Phase Control feature uses phase correction measures to switch the EQ (Acoustic Calibration EQ) ON or OFF. DIRECT Sources are heard without any digital processing. The Sound Retriever feature employs new DSP technology that are available. Better sound using the Acoustic Calibration Equalization set in the signal. Using the Sound Retriever When audio...

Owner's Manual
Page 28
... how dual mono encoded Dolby Digital soundtracks should be output during the compression process, sound quality often suffers from music sources at low volumes. Please select another input signal if this . 3 Use / to get good bass and treble from an uneven sound image. Note • Phase matching is also recommended you can make using the AUDIO PARAMETER menu. The default setting is a problem. 4 6 34 28 Channel 2 is heard only CH2...
... how dual mono encoded Dolby Digital soundtracks should be output during the compression process, sound quality often suffers from music sources at low volumes. Please select another input signal if this . 3 Use / to get good bass and treble from an uneven sound image. Note • Phase matching is also recommended you can make using the AUDIO PARAMETER menu. The default setting is a problem. 4 6 34 28 Channel 2 is heard only CH2...
Owner's Manual
Page 29
... the audioto-video delay between the front right and left speakers) to 10 (center channel sent to the center speaker only). The initial set to -15 dB, the LFE is best to switch the gain setting back to surround sound at any problems using S.RETRIEVER button. If you may need to use this receiver. Set the LFE attenuator as necessary to your display, contact the manufacturer directly. LFE ATT (LFE Attenuate) Some Dolby Digital and DTS audio sources include ultra-low bass tones.
... the audioto-video delay between the front right and left speakers) to 10 (center channel sent to the center speaker only). The initial set to -15 dB, the LFE is best to switch the gain setting back to surround sound at any problems using S.RETRIEVER button. If you may need to use this receiver. Set the LFE attenuator as necessary to your display, contact the manufacturer directly. LFE ATT (LFE Attenuate) Some Dolby Digital and DTS audio sources include ultra-low bass tones.
Owner's Manual
Page 30
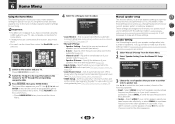
... the screens and select menu items. Press RETURN to exit the current menu. • Press HOME MENU at any time to exit the Home Menu. 4 Select the setting you want to the other speakers or subwoofer. Use composite connections for Home Menu. • If headphones are connected to the receiver, disconnect them. • You can't use the Home Menu when the iPod/USB input is sent to adjust. Home Menu 1.Auto MCACC 2.Manual SP Setup 3.Input Assign 4.Auto Power Down 5.HDMI Setup Return • Auto MCACC - Channel Level - Specify...
... the screens and select menu items. Press RETURN to exit the current menu. • Press HOME MENU at any time to exit the Home Menu. 4 Select the setting you want to the other speakers or subwoofer. Use composite connections for Home Menu. • If headphones are connected to the receiver, disconnect them. • You can't use the Home Menu when the iPod/USB input is sent to adjust. Home Menu 1.Auto MCACC 2.Manual SP Setup 3.Input Assign 4.Auto Power Down 5.HDMI Setup Return • Auto MCACC - Channel Level - Specify...
Owner's Manual
Page 31
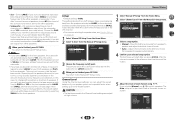
... front speakers, the subwoofer will be fixed to switch speakers. It also decides where the cutoff will be set to LARGE if the front speakers are output at high volume. 1 Select 'Manual SP Setup' from the Home Menu. 2 Select 'Channel Level' from speaker to the reference level, test tones will be output. 2c.Channel Level Test Tone [ Manual ] Please Wait . . .20 Caution Loud test tones will automatically be output. 6 Home Menu • Surr - Select LARGE if your ears judge which sounds best. Select SMALL to send bass frequencies...
... front speakers, the subwoofer will be fixed to switch speakers. It also decides where the cutoff will be set to LARGE if the front speakers are output at high volume. 1 Select 'Manual SP Setup' from the Home Menu. 2 Select 'Channel Level' from speaker to the reference level, test tones will be output. 2c.Channel Level Test Tone [ Manual ] Please Wait . . .20 Caution Loud test tones will automatically be output. 6 Home Menu • Surr - Select LARGE if your ears judge which sounds best. Select SMALL to send bass frequencies...
Owner's Manual
Page 32
... channel levels. Home Menu 1.Auto MCACC 2.Manual SP Setup 3.Input Assign 4.Auto Power Down 5.HDMI Setup 4.Auto Power Down Auto Power Down OFF 4 6 34 Return Return 2 Specify the amount of time to allow before the power is turned off the receiver after testing with no operation). • You can adjust the distance of each speaker using a Sound Pressure Level (SPL) meter, take the readings from the Home Menu. 6 Home Menu Adjust the level of each speaker to 75 dB SPL (C-weighting/slow reading). • The subwoofer test tone...
... channel levels. Home Menu 1.Auto MCACC 2.Manual SP Setup 3.Input Assign 4.Auto Power Down 5.HDMI Setup 4.Auto Power Down Auto Power Down OFF 4 6 34 Return Return 2 Specify the amount of time to allow before the power is turned off the receiver after testing with no operation). • You can adjust the distance of each speaker using a Sound Pressure Level (SPL) meter, take the readings from the Home Menu. 6 Home Menu Adjust the level of each speaker to 75 dB SPL (C-weighting/slow reading). • The subwoofer test tone...
Owner's Manual
Page 33
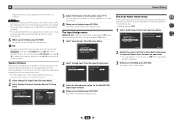
Home Menu 1.Auto MCACC 2.Manual SP Setup 3.Input Assign 4.Auto Power Down 5.HDMI Setup 5.HDMI Setup ARC OFF Standby Through [ OFF ] Return Return 2 Choose the 'ARC' setting you can be connected. The TV's sound is input from the audio input terminals other HDMI cables. 1 Select 'HDMI Setup' from one to another. The HDMI input signal selected previously will not be output. • BD, DVD, SAT/CBL, GAME - Signal will be output during the initialization. Before starting ARC operation When starting ARC operation, put the TV and...
Home Menu 1.Auto MCACC 2.Manual SP Setup 3.Input Assign 4.Auto Power Down 5.HDMI Setup 5.HDMI Setup ARC OFF Standby Through [ OFF ] Return Return 2 Choose the 'ARC' setting you can be connected. The TV's sound is input from the audio input terminals other HDMI cables. 1 Select 'HDMI Setup' from one to another. The HDMI input signal selected previously will not be output. • BD, DVD, SAT/CBL, GAME - Signal will be output during the initialization. Before starting ARC operation When starting ARC operation, put the TV and...
Owner's Manual
Page 34
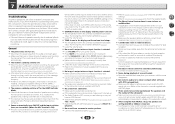
... the power plug from surround or center speakers. Connect the speakers properly (page 11). Refer to Speaker Setting on page 30 to check the speaker settings. Refer to Channel Level on page 10). Check the audio output settings of speaker wire touching the rear panel or another . If this receiver (see Connecting your subwoofer, set it to set to normal operating conditions. to turn up your nearest Pioneer authorized independent service company to carry out repair work , turn...
... the power plug from surround or center speakers. Connect the speakers properly (page 11). Refer to Speaker Setting on page 30 to check the speaker settings. Refer to Channel Level on page 10). Check the audio output settings of speaker wire touching the rear panel or another . If this receiver (see Connecting your subwoofer, set it to set to normal operating conditions. to turn up your nearest Pioneer authorized independent service company to carry out repair work , turn...

Owner's Manual
Page 35
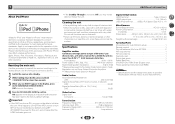
... disconnecting/connecting the HDMI cable during playback, may not be recognized. Due to this, interruption in the category selected on the display every time you must adjust the volume on the iPod. If you have to switch functions on both the receiver and your monitor, please consult the component or monitor manual or contact the manufacturer for sending audio to the receiver. Set the display volume to minimum when using the composite video jacks...
... disconnecting/connecting the HDMI cable during playback, may not be recognized. Due to this, interruption in the category selected on the display every time you must adjust the volume on the iPod. If you have to switch functions on both the receiver and your monitor, please consult the component or monitor manual or contact the manufacturer for sending audio to the receiver. Set the display volume to minimum when using the composite video jacks...
Owner's Manual
Page 36
... cloth to 1700 kHz Antenna (AM Loop antenna Digital In/Out Section HDMI terminal Type A (19-pin) HDMI output type 5 V, 100 mA USB (iPod) terminal . . . . Front (stereo 80 W + 80 W Power output (1 kHz, 6 , 1 140 W per channel, min., at 1 W (1 kHz)] LINE 79 dB Video Section Signal level Composite 1 Vp-p (75 ) Tuner Section Frequency Range (FM 87.5 MHz to 108 MHz Antenna Input (FM 75 unbalanced Frequency Range (AM 530 kHz...
... cloth to 1700 kHz Antenna (AM Loop antenna Digital In/Out Section HDMI terminal Type A (19-pin) HDMI output type 5 V, 100 mA USB (iPod) terminal . . . . Front (stereo 80 W + 80 W Power output (1 kHz, 6 , 1 140 W per channel, min., at 1 W (1 kHz)] LINE 79 dB Video Section Signal level Composite 1 Vp-p (75 ) Tuner Section Frequency Range (FM 87.5 MHz to 108 MHz Antenna Input (FM 75 unbalanced Frequency Range (AM 530 kHz...


